Page is loading ...

Date Issued: 09/27/17 IS-44031-CB
We’re here to help 866-558-5706
Hrs: M-F 9am to 5pm EST
CAUTION – RISK OF SHOCK –
Disconnect Power at the main circuit breaker panel or main
fusebox before starting and during the installation.
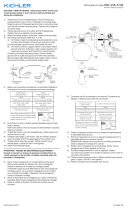
1) Pass the xture wire through the long threaded pipe[1] (with
hexnut attached).
2) Thread the long threaded pipe into the hex coupling[2] until the
hexnut[3] meets the hex coupling.
3) Pass the xture wire through the metal tube[4].
4) Rest the bottom of the metal tube onto the wiring body[5].
5) Pass the xture wire through the spacer[6] (with the smaller
diameter as the bottom). Rest onto the metal tube.
6) Pass the xture wire through the stem[7] with the loop [8] as
the top.
7) Screw the stem onto the threaded pipe that is protruded from
the metal tube. (You can make adjustments to the hexnut to
achieve the desired length of exposed threads).
8) Take threaded pipe[9] from parts bag and screw in screw col-
lar.Loop [10] a minimum of 6 mm (1/4”). Lock into place with
hexnut[3].
9) Run another hexnut down threaded pipe almost touching
rst hexnut. Now screw threaded pipe into mounting strap[11].
Mounting strap must be positioned with extruded thread faced
into outlet box[12]. Threaded pipe must protrude out the back
of mounting strap. Screw third hexnut onto end of threaded
pipe protruding from back of mounting strap.
10) Connect mounting strap to outlet box.
11) Unscrew the threaded ring[13] from screw collar loop. Take
canopy[14] and pass over screw collar loop. Approximately
one half of the screw collar loop exterior threads should be
exposed. Adjust screw collar loop by turning assembly up or
down in mounting strap. Remove canopy.
12) After desired position is found, tighten both top and bottom
hexnuts up against the bottom and top of the mounting strap.
13) Slip canopy over screw collar loop and thread on threaded ring.
Attach chain[15] (with xture connected) to bottom of screw
collar loop. Unscrew threaded ring, let canopy and threaded
ring slip down.
14) Weave electrical wire and ground wire through chain links no
more than 3 inches apart. Pass wire through threaded ring,
canopy, screw collar loop, threaded pipe and into outlet box.
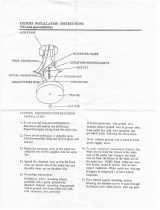
15) Grounding instructions: (See Illus. A or B).
A) On xtures where mounting strap is provided with a hole
and two raised dimples. Wrap ground wire from outlet box
around green ground screw, and thread into hole.
B) On xtures where a cupped washer is provided. Attach
ground wire from outlet box under cupped washer and
green ground screw, and thread into mounting strap.
If xture is provided with ground wire. Connect xture ground
wire to outlet box ground wire with wire connector (not provided.)
after following the above steps. Never connect ground wire to
black or white power supply wires.
16) Make wire connections (connectors not provided). Reference
chart below for correct connections and wire accordingly.
17) Raise canopy to ceiling.
18) Secure canopy in place by tightening threaded ring onto screw
collar loop.
19) Thread the threaded pipe (with hex nut attached) into the hex
coupling until the hex nut meets the coupling.
20) Raise the xture up to the hex coupling/threaded pipe.
21) Make wire connections, reference the chart on step 16.
Be sure the wires are inside the housing, and raise the wire
housing into the top cap, passing the pipe through the hole in
the bottom.
22) Raise the bottom cap to the wire housing, and pass the hole
over the pipe.
23) Thread a hex nut onto the threaded pipe. Tighten to secure.
24) Thread the nial onto the threaded pipe, and tighten to cover
the hexnut.
25) Carefully raise glass[16] to the xture. Slip the smaller opening
over the socket[17] and rest the glass onto the socket cover.
26) Thread socket ring[18] onto socket. Tighten socket ring to
secure glass in place. (DO NOT over tighten.)
27) Insert recommended bulb. (Not supplied)
28) Repeat steps 25-27 for remaining sockets.
GREEN GROUND
SCREW
CUPPED
WASHER
OUTLET BOX
GROUND
FIXTURE
GROUND
DIMPLES
WIRE CONNECTOR
OUTLET BOX
GROUND
GREEN GROUND
SCREW
FIXTURE
GROUND
A
B
Connect Black or
Red Supply Wire to:
Connect
White Supply Wire to:
Black White
*Parallel cord (round & smooth) *Parallel cord (square & ridged)
Clear, Brown, Gold or Black
without tracer
Clear, Brown, Gold or Black
with tracer
Insulated wire (other than green)
with copper conductor
Insulated wire (other than green)
with silver conductor
*Note: When parallel wires (SPT I & SPT II)
are used. The neutral wire is square shaped
or ridged and the other wire will be round in
shape or smooth (see illus.)
Neutral Wire
12
11
3
9
14
13
10
15
8
6
1
4
18
16
17
2
5
7
3

Date Issued: 09/27/17 IS-44031-CB
INSTRUCTIONS
For Assembling and Installing Fixtures in Canada
Pour L’assemblage et L’installation Au Canada
Nous sommes là pour vous aider 866-558-5706
Heures : du lundi au vendredi, de 9h à 17h (heure de l’Est)
ATTENTION – RISQUE DE DÉCHARGES ÉLECTRIQUES -
Couper le courant au niveau du panneau du disjoncteur du
circuit principal ou de la boîte à fusibles principale avant de
procéder à l’installation.
1) Passthexturewirethroughthelongthreadedpipe[1](with
hexnutattached).
2) Threadthelongthreadedpipeintothehexcoupling[2]untilthe
hexnut[3]meetsthehexcoupling.
3) Passthexturewirethroughthemetaltube[4].
4) Restthebottomofthemetaltubeontothewiringbody[5].
5) Passthexturewirethroughthespacer[6](withthesmaller
diameterasthebottom).Restontothemetaltube.
6) Passthexturewirethroughthestem[7]withtheloop[8] as
thetop.
7) Screwthestemontothethreadedpipethatisprotrudedfrom
themetaltube.(Youcanmakeadjustmentstothehexnutto
achievethedesiredlengthofexposedthreads).
8) Visserletubeleté(quisetrouveaveclespiècesdétachées)
danslecollier-écrou,surunelongueurminimumde6mm(1/4
po)[9][10].Fixeravecunécrouhexagonal[3].
9) Visserunsecondécrouhexagonaldemanièreàcequ’il
touchepresquelepremier.Visserensuiteletubeletésurla
pattedexation[11],enlefaisantdépasseretendirigeantla
partieletéedesvisverslaboîtedejonction[12].Visserun
troisièmeécrouhexagonalsurl’extrémitédutubeletésortant
del’arrièredelasangledemontage.Visseruntroisièmeécrou
hexagonalsurl’extrémitédutubeletésortantdel’arrièredela
sangledemontage.
10) Connecterlapattedexationàlaboîtedejonction.
11)Dévisserlabagueletéeducollier-écrou[13].Passerlecache
surlecollier-écrou[14].Environlamoitiédeletageextérieur
de celui-cidoitêtreapparent.Fixerlecollier-écrouenfaisant
pivoterl’assemblageverslehautouverslebas.Enleverle
cache.
12) Unefoisbienpositionné,serrerlesdeuxécroushexagonaux,
supérieuretinférieur,contreledessousetledessusdela
sangledemontage.
13)Glisserlecachesurlecollier-écrouetenlersurlabague
letée.Attacherlachaine[15](avecl’assemblageconnecté)
au basducollier-écrou.Dévisserlabagueletéeetlaisser
glisserlecacheetlabagueletée.
14)Entrelacerlelélectrqueetleldemiseálaterreetfaire
passerletoutdanslesanneauxdelachaîneenespaçantau
maximumde3po.Passerleldanslabagueletée,le
cache,lecollier-écrou,letubeletéetlaboîtedejonction.
15)Avecl’attache-l(quin’estpasfourni),connecterlelde
miseálaterreauld’alimentationnoirouáceluiquiest
blanc.
16)Connecterlesls(connecteursnonfournis).Sereporterau
tableauci-dessouspourfairelesconnexions.
17)Placerlecacheauplafond.
18)Fixerlecacheenserrantlabagueletéesurlecollier-écrou.
19)Enlerletuyauleté(avecl’écrouhexagonalattaché)dans
l’accouplementhexagonaljusqu’àcequel’écrouhexagonal
rencontrel’accouplement.
20) Raisethextureuptothehexcoupling/threadedpipe.
21)Relevezlecapuchoninférieursurleboîtierdeletpassezle
trousurletuyau.
22)Enlerunécrouhexagonalsurletuyauleté.Serrezpour
sécuriser.
23)Enlerleboutsurletubeletéetserrerpourrecouvrir
l’hexade.
24)Soulevezsoigneusementleverre[16]àl’appareil.Glissez
l’ouverturepluspetitesurladouille[17]etreposezleverresur
lecouvercledeladouille.
25)Branchezladouille[18]surlaprise.Serrezladouillepour
sécuriserleverreenplace.(NEPASserrertrop.)
26)Insérezl’ampoulerecommandée.(Nonfourni)
27)Répétezlesétapes24à26pourlesprisesrestantes.
Connecter le fil noir ou
rouge de la boite
Connecter le fil blanc de la boîte
A Noir A Blanc
*Au cordon parallèle (rond et lisse)
*Au cordon parallele (à angles droits el strié)
Au bransparent, doré, marron, ou
noir sans fil distinctif
Au transparent, doré, marron, ou
noir avec un til distinctif
Fil isolé (sauf fil vert) avec
conducteur en cuivre
Fil isolé (sauf fil vert) avec
conducteur en argent
*Remarque: Avec emploi d’un fil paralléle
(SPT I et SPT II). Le fil neutre est á angles
droits ou strié et l’autre fil doit étre rond ou
lisse (Voir le schéma).
Fil Neutre
12
11
3
9
14
13
10
15
8
6
1
4
18
16
17
2
5
7
3
/