Page is loading ...

Identity
™
Model Numbers
Tub/Shower/Hand Shower System
Operation & Maintenance Manual
6706
Modifications
Specification
6706
Identity Tub/Shower/Hand Shower System
Warranty
Limited Lifetime - to the original end purchaser in
consumer/residential installations.
5 Years - for industrial/commercial installations.
Refer to www.symmons.com/warranty for complete
warranty information.
Compliance
-ASME A112.18.1/CSA B125.1
-WaterSense 1.5 gpm (5.7 L/min)
Certied by
CSA Group
Tub/shower/hand shower system powered by the
Temptrol
®
pressure-balancing valve. Features adjustable
stop screw to limit handle turn, separate three function
diverter, non-diverter tub spout, wall ell, in-line vacuum
breaker, 60" exible metal hose, hand shower cradle,
1 mode hand shower, 1 mode showerhead with easy to
clean rubber nozzles and standard 2.5 gpm (9.5 L/min) ow
restrictors. Components made from metal and nonmetallic
materials, plated in standard polished chrome nish.
Note: Append appropriate -sufx to model number.
For California Residents
WARNING: This product contains chemicals known to the
State of California to cause cancer, birth defects, or other
reproductive harm.
-1.5 1.5 gpm (5.7 L/min) flow restrictor
-2.0 2.0 gpm (7.6 L/min) flow restrictor
-72
6' metal hose in place of 5' standard
metal hose
-143 3 mode showerhead
-145 5 mode showerhead
-231 2 mode showerhead
-B30
30" slide bar in place of wall cradle
-B48
48" slide bar in place of wall cradle
-CHKS Integral check stops - for use in
installations where a positive shut-off
device is used downstream of mixing valve
-IPS
1/2" female IPS connections
-L/HD
Less showerhead
-L/HS
Less hand shower
-LP Loop handle
-LR Lever handle
-OP 13" oval plate
-QD
Quick disconnect on hand shower units
-R
White vinyl hose in place of metal hose
-REB-TRM
Rebuild trim kit
-REV Reverse coring, hot on right, cold on
left, for back to back installations
-SS Slip spout on any tub/shower/hand
shower unit
-STN Satin Nickel finish
-T724 24" slide / grab bar with ADA hand
shower in place of standard hand show-
er unit
-T736 36" slide / grab bar with ADA hand
shower in place of standard hand show-
er unit
-TRM Trim only, valve not included
-X Integral service stops - allows water
shutoff at valve for service

2
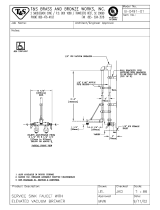
Dimensions
Notes:
1) All dimensions measured from nominal rough-in (see I as reference).
2) Dimensions subject to change without notice.
FLOORFLOOR
MM
CC
OOGG
KK
HH
FF
AA PP
QQ
SS
LL
NN
II
BB
EE
DD
JJ
RR
TT
UU
VV
Measurements
A 5-7/8", 149 mm
B 4-5/8", 117 mm
C
Male 1/2" NPT tting must
be recessed 1/4" (6 mm)
from nished wall
D
Diverter Valve Hole Size
Min. Ø 3", 76 mm
Max. Ø 3-1/4", 83 mm
E 3-5/8", 92 mm
F 2-7/8", 73 mm
G Ref. 10", 254 mm
H
Shower Valve Hole Size
Min. Ø 3", 76 mm
Max. Ø 4", 102 mm
I
Rough-in
2-3/8" ± 1/2", 60 mm ± 13 mm
J 3-1/2", 89 mm
K 12", 305 mm
L
Male 1/2" NPT tting must
protrude 4" (102 mm)
from nished wall
M Ref. 32", 813 mm
N 5-1/2", 140 mm
O Ref. 77", 1956 mm
P Ø 2-1/2", 64 mm
Q Ø 3-1/8", 79 mm
R 6", 152 mm
S 2-1/8", 54 mm
T Ø 5", 127 mm
U Ø 6-3/8", 162 mm
V Ø 2-1/2", 64 mm

3
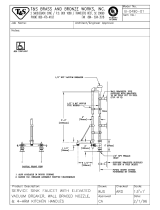
Parts Breakdown
HOT
Water Supply
COLD
Water Supply
I
J
K
Q
R
R
S
L
N
O
O
P
M
K
J
I
A
B
C
E
F
G
H
D
T
*Note: Append -STN to part number for
Satin Nickel nish.
Replacement Parts
Item Description Part Number
A Hand Shower EF-100*
B
D
Wall Ell
Set Screw
EF-105*
C
E
F
Mounting Plate
Wall Cradle
Screws
EF-106*
G
H
Vacuum Breaker
60" Hose
EF-104*
I Showerhead 672SH*
J
K
Shower Arm
Flange
300S*
L
M
Handle
Set Screw
RTS-281*
N Dome Cover T-19*
O
P
Diverter
Escutcheon Kit
67-DIV*
Q
R
S
Shower
Escutcheon Kit
6700-ESC*
T Tub Spout 060*
Tools Required for Installation
Adjustable
Wrench
Allen Wrench
3/32"
Phillips Head
Screwdriver
Plumber Tape
Silicone
Notes:
1) Apply a bead of silicone around the perimeter of all shower trim in-
stalled ush to the nished wall (less mounting plates and brackets).
Leave opening on bottom of escutcheons for weep hole.
2) Apply plumber tape to all threaded connections.

4
Note:
For valve body installation, please
see valve body manual.
1
R
S
R
2
1) Install shower mounting plate (S)
to shower valve. Secure with two
screws (R).
2) Attach shower escutcheon (Q) to
shower mounting plate (S).
Q S
Note: Tabs should snap into place.
N
1
1
2
4) Install dome covers (N) to valves.
Turn clockwise to secure.
Installation
1
1
2
3
K
J
6) Attach shower arm (J) and ange
(K) to vertical shower pipe. Turn
clockwise to tighten.
5) Install handles (L) to valves.Secure
handles with set screws (M).
L
1
1
2
M
7) Install showerhead (I) to shower
arm (J). Turn clockwise to tighten.
1
J
1
I
2
3) Install diverter escutcheon (P) to
diverter valve. Secure with two
screws (O).
1
P
O
2
8) Install wall ell
(B)
to pipe tting.
Secure wall ell with set screw (D).
B
1
1
D
2

5
Installation
Operation (Temperature Control)
1) Turn shower handle counter-
clockwise approximately 1/4 turn
to put valve in cold position.
2) Turn shower handle counter-
clockwise approximately 1/2 turn
to put valve in warm position.
3) Turn shower handle counter-
clockwise approximately 3/4 turn
to put valve in hot position.
1
3
C
4
U2
U3
U1
U2
2
Note: For dry wall 1/2" thick or less,
insert anchor tool (U3) into drywall
anchor (U2) to secure behind wall
prior to installing wall cradle.
9) Place mounting plate
(C)
in po-
sition, mark and drill 3/16" holes
for tile anchors (U1), 5/16" holes
for drywall anchors (U2). Install
anchors.
10) Remove cover of hand show-
er cradle
(E)
. Install cradle and
mounting plate
(C)
. Secure with
three screws
(F)
. Replace cover
on hand shower cradle.
1
2
4
E
F
C
3
11) Attach vacuum breaker (G) to wall
ell (B). Attach hose (H) to vacuum
breaker. Attach hand shower (A)
to hose (H). Turn clockwise to
tighten.
5
3
1
2
4
A
H
H
G
B
T
1
2
12) Install tub spout (T) to pipe tting
Turn clockwise to tighten.

Symmons Industries, Inc. ■ 31 Brooks Drive ■ Braintree, MA 02184 ■ Phone: (800) 796-6667 ■ Fax: (800) 961-9621
Copyright © 2016 Symmons Industries, Inc. ■ symmons.com ■ [email protected] ■ ZV-3199 REV 0 ■ 052416
Problem Cause Solution
Finish is spotting.
Elements in water supply may cause
water staining on nish.
Clean nished trim area with a soft
cloth using mild soap and water or a
non-abrasive cleaner and then quickly
rinse with water.
Troubleshooting Chart
Operation (Diverter Control)
POSITION 1
POSITION 2
POSITION 3
1) Cartridge is factory set to divert to
function 1.
2) Turn handle to position 2 to divert
to function 2.
3) Turn handle to position 3 to divert
to function 3.
POSITION 4
POSITION 5
POSITION 6
4) Turn handle to position 4 to share
functions 2 and 3.
5) Turn handle to position 5 to share
functions 1 and 3.
6) Turn handle to position 6 to share
functions 1 and 2.
/