Page is loading ...

THANK YOU
THANK YOUTHANK YOU
THANK YOU
We appreciate the trust and confidence you have placed in Commercial Electric through the purchase of this
LED puck light kit. We strive to continually create quality products designed to enhance your home. Visit us online to
see our full line of products available for your home improvement needs. Thank you for choosing
Commercial Electric!
Item
#844
-
606
848-665
Model #847658001054
847658001061
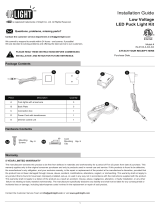
USE AND CARE GUIDE
LED PUCK LIGHT KIT
Questions, problems, missing parts? Before returning to the store,
call Commercial Electric Customer Service
8 a.m. - 6 p.m., EST, Monday - Friday
1
11
1-
--
-877
877877
877-
--
-527
527527
527-
--
-0313
03130313
0313
HOMEDEPOT
HOMEDEPOTHOMEDEPOT
HOMEDEPOT.COM
.COM.COM
.COM

2
Table of Contents
Table of Contents ................................. 2
Safety Information ................................ 2
Warranty ............................................... 3
Pre-Installation ..................................... 3
Planning Installation ................................... 3
Tools Required ........................................... 3
Hardware Required .................................... 3
Package Contents ...................................... 4
Installation – Surface Mounting .......... 5
Installation – Recessed Mounting ...... 6
Safety Information
1. Read all instructions carefully before you begin
this installation.
2. This equipment has been tested and found to
comply with the limits for a Class B digital
device pursuant to Part 15 of the FCC Rules.
These limits are designed to provide reasonable
installation protection. This equipment
generates and can radiate radio frequency
energy and, if not installed and used in
accordance with the instructions, may cause
harmful interference.
3. There is no guarantee that interference will not
occur in a particular installation. If this
equipment does cause harmful interference to
radio or television reception, which can be
determined by turning the equipment off and
on, the user is encouraged to try to correct the
interference by one or more of the following
measures: a) Reorient or relocate the receiving
antenna, b) Increase the separation between
the equipment and the receiver, c) Connect the
equipment into a different outlet and circuit
from the receiver outlet and circuit, d) Consult
the dealer or an experienced radio/TV
technician for help.
4. Changes or modification to this unit not
expressly approved by the party responsible for
compliance could void the user's authority to
operate the equipment.
5. 110-120V ~ 50/60Hz, 110mA, 8.8W rating for
this LED cabinet light kit (LED light source is
integrated).
6. This LED light kit is provided with a class 2
power supply and can be surface or recess
mounted.
7. This product is not dimmable and cannot be
used with a dimmer switch.

3 HOMEDEPOT.COM
Please contact 1-877-527-0313 for further assistance.
Warranty
LIMITED WARRANTY
LIMITED WARRANTYLIMITED WARRANTY
LIMITED WARRANTY
The manufacturer warrants this product to be free from defects in materials and workmanship for a period of three
(3) years from date of purchase. This warranty applies only to the original consumer purchaser and only to products
used in normal use and service. If this product is found to be defective, the manufacturer's only obligation, and your
exclusive remedy, is the repair or replacement of the product at the manufacturer's discretion, provided that the
product has not been damaged through misuse, abuse, accident, modifications, alterations, neglect, or mishandling.
This warranty shall not apply to any product that is found to have been improperly installed, set-up, or used in any
way not in accordance with the instructions supplied with the product. This warranty shall not apply to a failure of
the product as a result of an accident, misuse, abuse, negligence, alteration, or faulty installation, or any other
failure not relating to faulty material workmanship. The manufacturer specifically disclaims any liability and shall not
be liable for any consequential or incidental loss or damage, including labor/expense costs involved in the
replacement or repair of said product.
Contact the Customer Service Team at 1-877-527-0313 or visit www.homedepot.com.
Pre-Installation
P
PP
PLANNING INSTALLATION
LANNING INSTALLATIONLANNING INSTALLATION
LANNING INSTALLATION
Read all instructions completely before you begin installation.
TOOLS REQUIRED
TOOLS REQUIREDTOOLS REQUIRED
TOOLS REQUIRED
Phillips
screwdriver
HARDWARE REQUIRED
HARDWARE REQUIREDHARDWARE REQUIRED
HARDWARE REQUIRED
NOTE: Hardware not shown to actual size.
AA
BB
Part
PartPart
Part
Description
DescriptionDescription
Description
Quantity
QuantityQuantity
Quantity
AA
Mounting screw
10
BB
Fastener
12

4
Pre-Installation (continued)
PACKAGE
PACKAGE PACKAGE
PACKAGE CONTENTS
CONTENTSCONTENTS
CONTENTS
Part
PartPart
Part
Description
DescriptionDescription
Description
Quantity
Quantity Quantity
Quantity
A
LED puck assembly
3
B
Trim ring (preassembled to LED lights)
3
C
Power cord
switch
1
D
Connection box
1
E
Driver
1
A
C
D
E
B

5 HOMEDEPOT.COM
Please contact 1-877-527-0313 for further assistance.
Installation – Surface Mounting
1
Preparing the lights for the
Preparing the lights for the Preparing the lights for the
Preparing the lights for the
first time
first timefirst time
first time
2
Installing the trim rings
Installing the trim ringsInstalling the trim rings
Installing the trim rings
□
Separate the trim ring (B) that is attached to the
single-cord LED assembly (A) by pushing on the
back of the LED module through the trim ring (B).
Repeat this step for the remaining LED
assemblies.
□
Install the trim rings (B) to the underside of the
cabinet by inserting two mounting screws (AA)
into the mounting holes on the bottom of each
trim ring (B).
IMPORTANT
:
: :
: Do not fully tighten the screws into
the trim ring as the cords from the LED modules will
need to be pulled through the notches on the trim
ring before securing.
3
Installing the first LED
Installing the first LED Installing the first LED
Installing the first LED
assembly
assemblyassembly
assembly
4
Installing the remaining two
Installing the remaining two Installing the remaining two
Installing the remaining two
LED assemblies
LED assembliesLED assemblies
LED assemblies
□
Take the cord from the LED puck assembly (A)
and feed the cord through the trim ring (B) at the
notches. Do not pull the cord tight as you will now
need to finish screwing in the trim ring (B).
□
Tighten the screws (AA) and push the LED
assembly (A) into the trim ring (B) while pulling
the cords tight.
□
Repeat steps 1 through 3 to install the remaining
two LED puck assemblies (A).
IMPORTANT
:
: :
: Ensure that you measure the distance of
every LED puck assembly (A) before installation. The
minimum distance between every LED (A) must be at
least 12 in.
A
B
B
AA
B
A
AA
A

6
Installation
–
Surface Mounting (continued)
5
Installing the connection box
Installing the connection boxInstalling the connection box
Installing the connection box
6
Securing the cords
Securing the cordsSecuring the cords
Securing the cords
□
Attach the connection box (D) to the side of the
cabinet using two mounting screws (AA).
□
Connect the wire from the LED puck assembly (A)
and power cord with switch (C) to the hole in
connection box (D) as shown.
□
Connect the driver (E) to the cord.
□
Use nail-on fasteners (BB) to attach the wire on
the cabinet.
Installation
–
Recessed
Mounting
1
Preparing the lights for the
Preparing the lights for the Preparing the lights for the
Preparing the lights for the
first time
first timefirst time
first time
2
Inserting the LED lights
Inserting the LED lightsInserting the LED lights
Inserting the LED lights
□
Separate the trim ring (B) that is attached to the
single-cord LED assembly (A) by pushing on the
back of the LED module through the trim ring (B).
Repeat this step for the remaining LED
assemblies you wish to install and set the trim
rings aside.
IMPORTANT
:
: :
: Ensure that you measure the distance
of every LED puck assembly (A) before drilling the
installation holes. The minimum distance between every
LED (A) must be at least 12 in.
□ Drill a 2.64 in. round hole into the installation
area.
□
Thread the wire from the LED puck assembly (A)
through the hole and insert the fixture into the
hole.
□
Repeat steps 1 and 2 for the remaining two LED
puck lights (A).
□
Install the connection box (D) and secure the
cords as described in Steps 5 and 6 in the
Installation – Surface Mounting section.
D
AA
A
BB
E
C
D
A
B
A

Questions, problems, missing parts? Before returning to the store,
call Commercial Electric Customer Service
8 a.m.- 6 p.m., EST, Monday-Friday
1
11
1-
--
-877
877877
877-
--
-527
527527
527-
--
-0313
03130313
0313
HOMEDEPOT
HOMEDEPOTHOMEDEPOT
HOMEDEPOT.COM
.COM.COM
.COM
Retain this manual for future use.
/