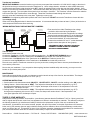
Suncourt ZC106 is a zone control damper that allows you to control the temperature of individual rooms in your home, saving energy and increasing comfort. It is designed to be used with a standard low voltage Heat-Cool wall thermostat and can be installed in metal or flexible duct. The damper is non-directional, so it can be installed facing either direction of airflow. It has a 24 Volt AC, 60 Hz motor and requires a 110/120 Volt AC connection for the power supply Transformer. The ZC106 is easy to install and maintain, and comes with a three (3) year warranty.
Suncourt ZC106 is a zone control damper that allows you to control the temperature of individual rooms in your home, saving energy and increasing comfort. It is designed to be used with a standard low voltage Heat-Cool wall thermostat and can be installed in metal or flexible duct. The damper is non-directional, so it can be installed facing either direction of airflow. It has a 24 Volt AC, 60 Hz motor and requires a 110/120 Volt AC connection for the power supply Transformer. The ZC106 is easy to install and maintain, and comes with a three (3) year warranty.


-
 1
1
-
 2
2


Suncourt ZC106 is a zone control damper that allows you to control the temperature of individual rooms in your home, saving energy and increasing comfort. It is designed to be used with a standard low voltage Heat-Cool wall thermostat and can be installed in metal or flexible duct. The damper is non-directional, so it can be installed facing either direction of airflow. It has a 24 Volt AC, 60 Hz motor and requires a 110/120 Volt AC connection for the power supply Transformer. The ZC106 is easy to install and maintain, and comes with a three (3) year warranty.
Ask a question and I''ll find the answer in the document
Finding information in a document is now easier with AI
Related papers
-
 Suncourt ZC106 Operating instructions
-
 Suncourt ZC206 Operating instructions
-
 Suncourt ZC208 Installation guide
-
 Suncourt ZC110 Installation guide
-
 Suncourt DM106 Installation guide
-
 Suncourt VS108 Installation guide
-
 Suncourt VS108 Installation guide
-
 Suncourt DB205 DB206 DB208 Installation guide
-
 Suncourt TW208P User guide
-
Suncourt RDK04-3 User manual


Other documents
-
 ZoneMaster ZC106 Installation guide
-
 ThruWall TW408 User guide
-
George Kovacs GKTF01-084 User manual
-
Parasound ZoneMaster 2 Owner's manual
-
Parasound ZoneMaster 4 Owner's manual
-
-
-
Parasound ZoneMaster 12 Owner's manual
-
 Polyaire Zonemaster ZoneTouch V2 Installation guide
-
Parasound ZM2-350 Owner's manual


