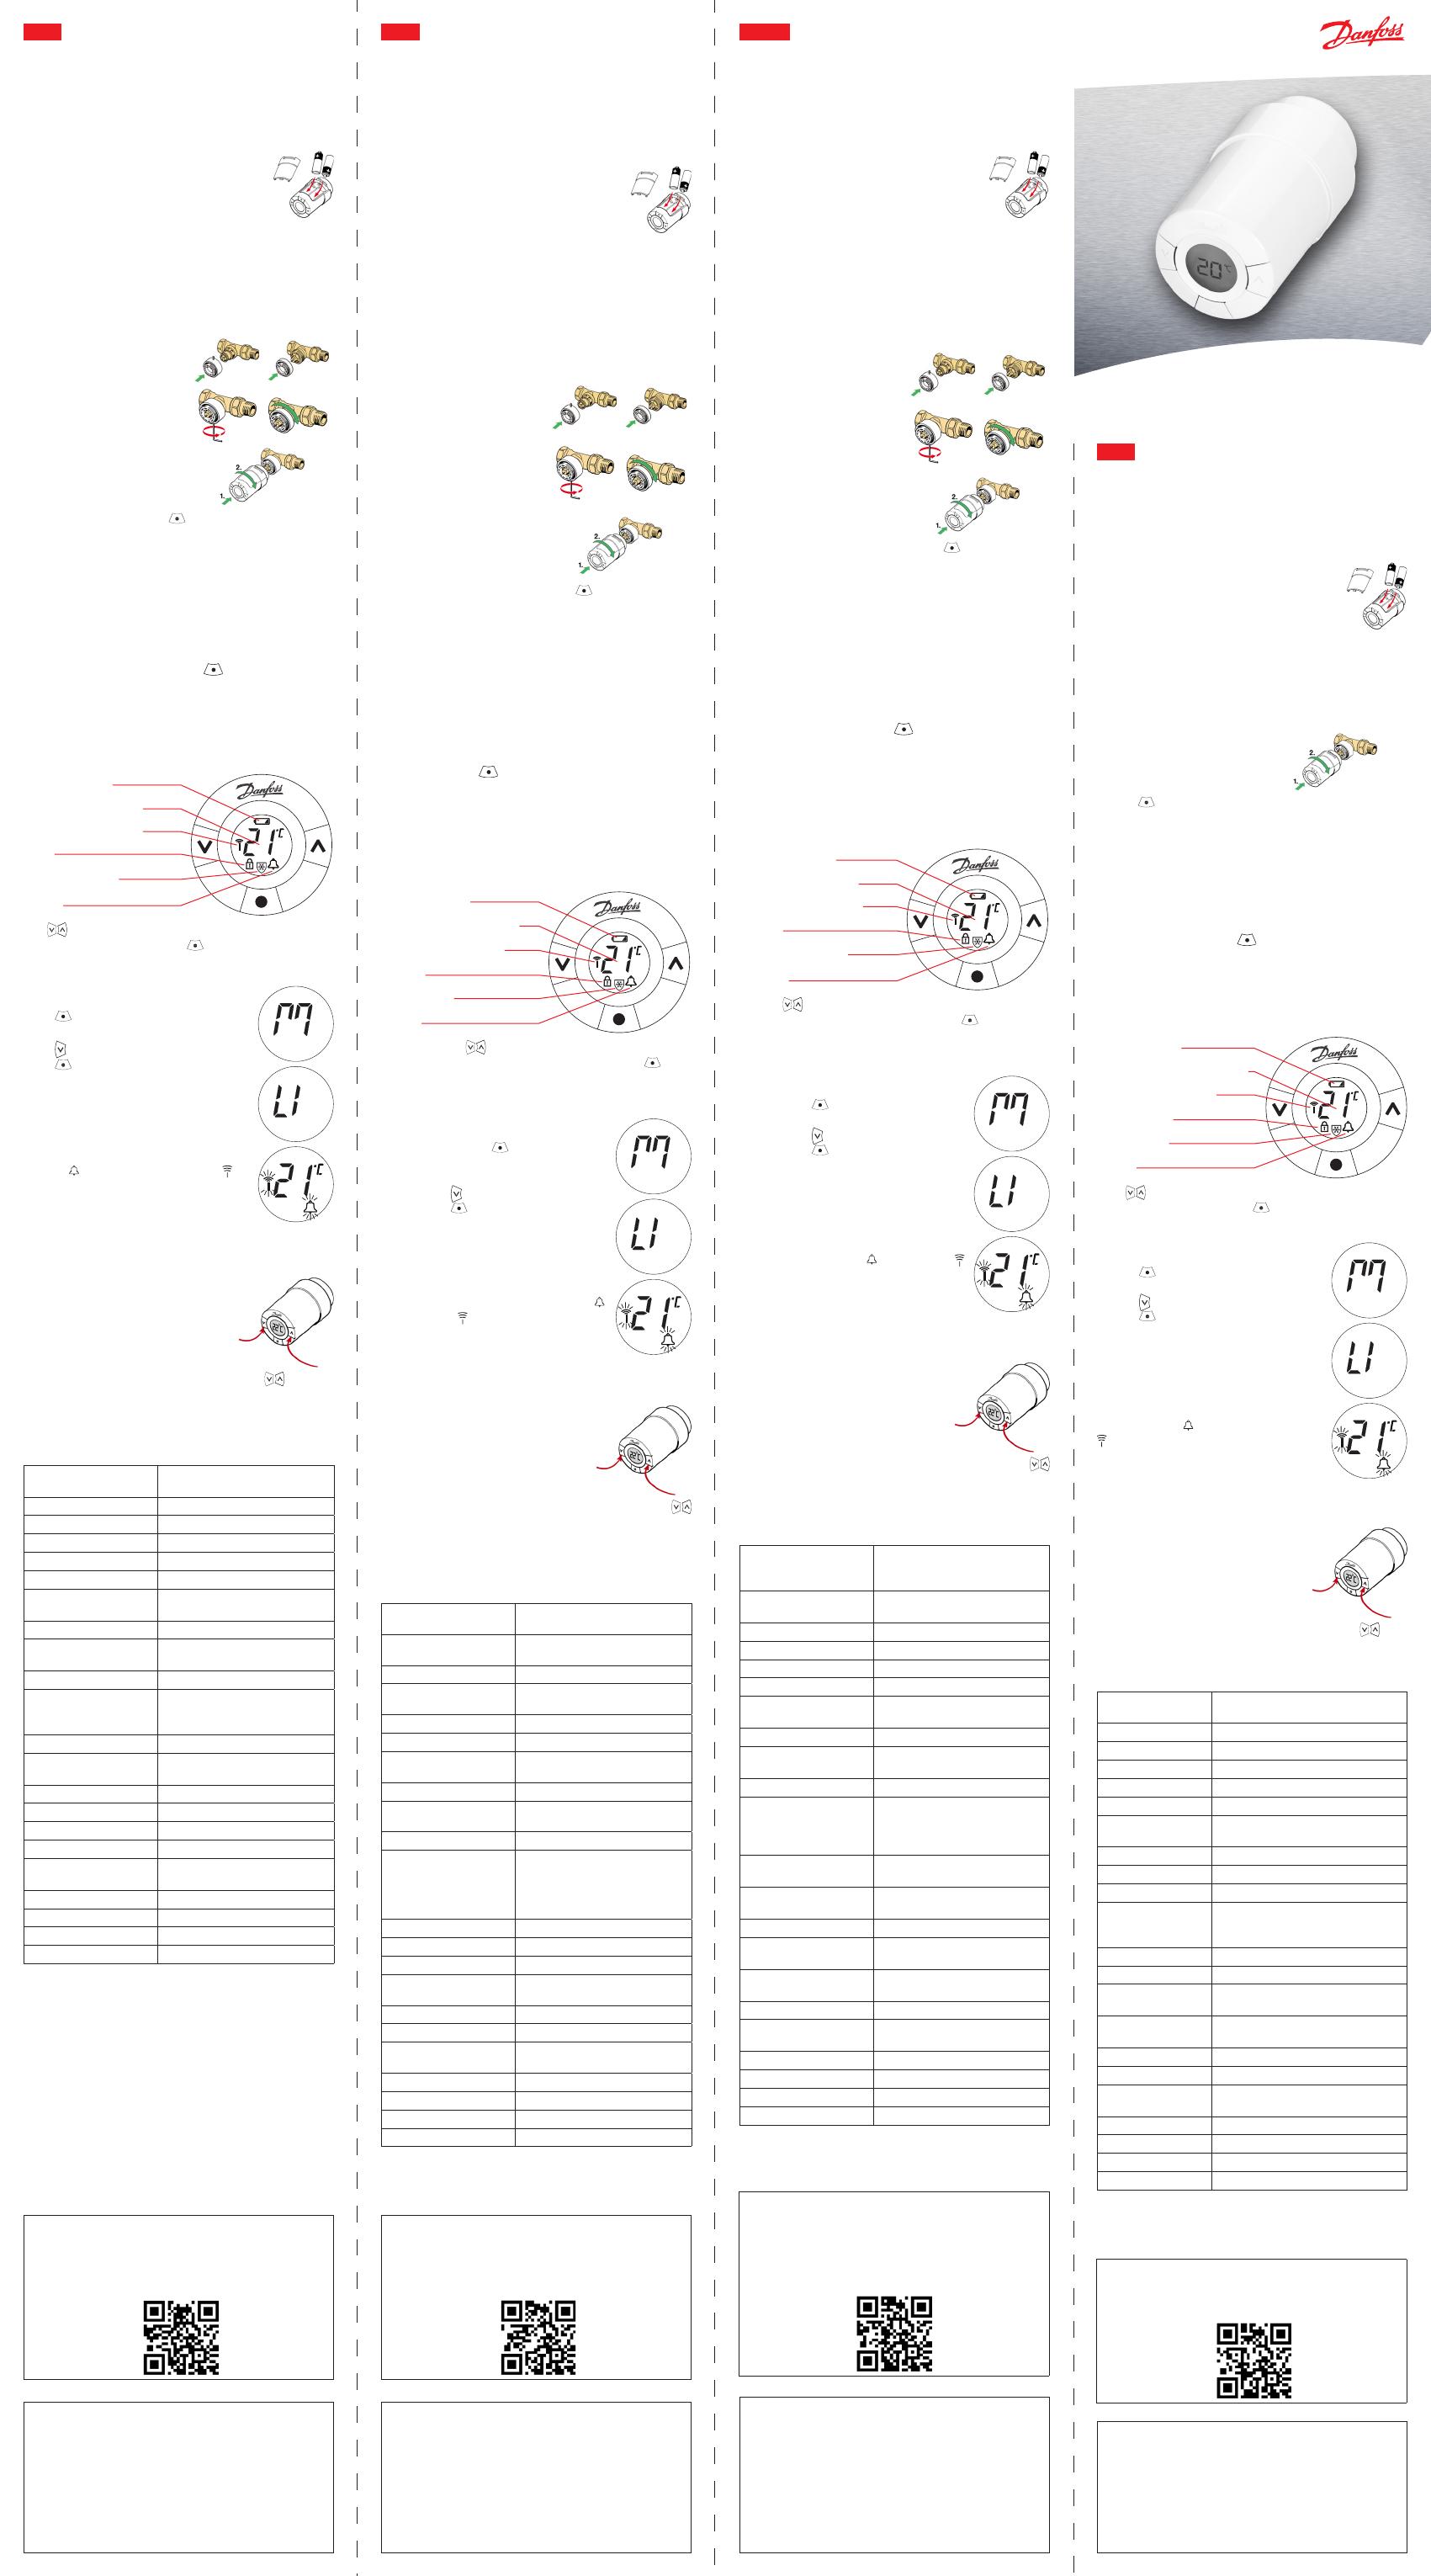
living connect®
Quick Start Guide
MAKING MODERN LIVING POSSIBLE
Danfoss Heating Solutions
UK
living connect® is an electronic radiator thermostat for
residential use with a Danfoss Link™ system (for further
information on the system, please refer to Installation
Guide for Danfoss Link™ CC central controller).
Inserting the batteries
Remove the battery cover and insert two
AA batteries. Make sure the batteries are
correctly oriented.
Rechargeable batteries must not be used.
When replacing batteries the programme settings will
be preserved, but after two minutes the settings for
time and date are reset.
Installing living connect®
M must be ashing on the display prior to installing.
1. Start by mounting the
appropriate adapter.
2. Tighten RA adapter using
the 2 mm Allen key, hand-
tighten K adapter (max. 5
Nm).
3. Screw the thermostat onto
the adapter and tighten by
hand (max. 5 Nm).
4. A large M ashes, press to x living connect®.
5. For removing and re-installation, please refer to
www.living.danfoss.com
Adding living connect® to a system
The process of adding the living connect® to a system is
performed on the Danfoss Link™ CC.
Note that the living connect® must be added to a room.
When adding, press and release and observe that
back light and antenna symbol are ashing.
For further information, please refer to the Danfoss
Link™ CC installation guide.
Display and buttons
Battery symbol
The set temperature
Network connection
Lock
Frost protection
Alarm
Use to navigate the display and the menus and to
set the temperature, and use to select and conrm.
Testing the connection
Press for at least 3 seconds until M is
displayed.
Press until LI is displayed.
Press to test the connection.
LI disappears when the connection is
made and a message is displayed on the
Danfoss Link™ CC.
If no connection can be made, the alarm
symbol and the antenna symbol
ash.
Temperature control and adjustment
The temperature is usually con-
trolled via Danfoss Link™ CC, but
may be changed at any time using
the thermostat’s buttons.
If this is done, the thermostat
sends a message to Danfoss Link™
CC, instructing it to synchronise
the other thermostats in the same
room.
18
19
20
21
26
25
24
23
Press to change
the temperature.
Technical specications
Thermostat type
Programmable electronic
radiator valve controller
Recommended use Residential (pollution degree 2)
Actuator Electromechanical
Display Grey digital with backlight
Software classication A
Control PID
Transmission frequency
/ range
868.42 MHz / up to 30 m
Power supply 2 x 1.5 V alkaline AA batteries
Power consumption
3 μW in standby
1.2 W when active
Battery life 2 years
Low batteri signal
Battery icon will ash in display.
If battery level is critical, the
whole display will ash.
Ambient temp. range 0 to 40°C
Transportation temp.
range
-20 to 65°C
Max. water temp. 90°C
Temp. setting range 4 to 28°C
Measurement interval Measures temp. every minute
Clock accuracy +/- 10 min/year
Spindle movement
Linear, up to 4.5 mm, max. 2 mm
on valve (1 mm/s)
Noise level <30 dBA
Safety classication Type 1
Weight (incl. batteries) 177 g (with RA adapter)
IP class 20
Tested for safety and EMC requirements as specied in EN 0730-1,
EN 60730-2-9 and EN 60730-2-14.
Safety precautions
The thermostat is not intended for children and must
not be used as a toy.
Do not leave packaging materials where children may
be tempted to play with them, as this is extremely
dangerous.
Do not attempt to dismantle the thermostat as it
contains no user-serviceable parts. If error code E1, E2
etc. is shown in the display or other defects appear,
please return the thermostat to the distributor.
To see the full installation and user guide, go to
www.living.danfoss.com
or see videos about installation and
programming on www. YouTube.com
- search for Danfoss living connect.
DE
living connect® ist ein elektronischer Heizkörperthermo-
stat für Wohnräume in Verbindung mit einem Danfoss
Link™-System (weitere Informationen zum System sind
in der Installationsanleitung zum Danfoss Link™ CC-
Zentralregler enthalten).
Batterien einlegen
Die Batterieabdeckung abnehmen und die
beiden AA-Batterien einlegen. Darauf ach-
ten, dass sie richtig eingelegt werden.
Wiederauadbare Batterien dürfen nicht
verwendet werden.
Bei einem Batteriewechsel bleiben die Programmein-
stellungen zunächst gespeichert, nach zwei Minuten
werden Uhrzeit- und Datumseinstellungen zurückge-
setzt.
Montage living connect®
Vor der Montage muss ein M auf dem Display aufblinken.
1. Mit der Montage des
entsprechenden Adapters
beginnen.
2. Den RA-Adapter mithilfe
des 2-mm-Inbusschlüssels
festziehen. Den K-Adapter
von Hand (max. 5 Nm)
festziehen.
3. Den Thermostat auf den
Adapter schrauben und
handfest (max. 5 Nm)
anziehen.
4. Ein großes M blinkt, drücken Sie zum Fixieren von
living connect®.
5. Informationen zum Ausbau und zur Re-Installation
nden Sie unter www.living.danfoss.com
Hinzufügen von living connect® in ein System
Das Anmelden von living connect® in einem System
erfolgt über den Danfoss Link™ CC.
Beachten Sie, dass living connect® einem Raum zuge-
ordnet werden muss.
Zum Hinzufügen kurz drücken und wieder loslas-
sen. Die Hintergrundbeleuchtung und das Antennen-
symbol müssen blinken.
Weitere Informationen sind in der Installationsanlei-
tung des Danfoss Link™ CC enthalten.
Display und Tasten
Batteriesymbol
Temperatureinstellwert
Netzwerkverbindung
Sperre
Frostschutz
Alarm
Mit den Tasten navigieren Sie im Display sowie in
den Menüs und stellen die Temperatur ein, mit be-
stätigen Sie die Auswahl.
Verbindungstest
Halten Sie die Taste für mindestens
3 Sekunden gedrückt bis M angezeigt
wird.
Drücken Sie bis LI angezeigt wird.
Drücken Sie , um die Verbindung zu
testen.
LI verschwindet, wenn eine Verbindung
besteht. Auf dem Danfoss Link™ CC
erscheint eine Meldung.
Wenn keine Verbindung hergestellt wer-
den kann, blinken die Symbole Alarm
und Antenne .
Temperaturregelung und -einstellung
Die Temperatur wird normaler-
weise über den Danfoss Link™
CC gesteuert, kann aber jederzeit
mithilfe der Tasten am Thermostat
geändert werden.
Wenn dies geschehen ist, sendet
der Thermostat eine Meldung an
Danfoss Link™ CC, der dann wei-
tere Thermostate in diesem Raum
synchronisiert (falls vorhanden).
18
19
20
21
26
25
24
23
Drücken Sie
zum Ändern
der Temperatur.
Technische Daten
Thermostattyp
Programmierbarer elektroni-
scher Heizkörperthermostat
Empfohlener
Einsatzzweck
in Wohnräumen
(Verschmutzungsgrad 2)
Stellantrieb Elektromechanisch
Display
Digitalanzeige in grau mit
Hintergrundbeleuchtung
Softwareklasse A
Regelung PID
Übertragungsfrequenz/-
bereich
868,42 MHz/bis zu 30 m
Spannungsversorgung 2 x 1,5 V AA-Alkalibatterien
Leistungsaufnahme
3 μW im Standby-Modus
1,2 W im Betriebsmodus
Batterielebensdauer 2 Jahre
Signal „Batterie fast leer“
Das Batteriesymbol blinkt im
Display auf.
Liegt der Batteriezustand im
kritischen Bereich, blinkt das
gesamte Display.
Umgebungstemperatur 0 bis 40°C
Transporttemperatur -20 bis 65°C
Max. Wassertemp. 90°C
Temperatureinstellbe-
reich
4 bis 28°C
Messfrequenz Temperaturmessg. jede Minute
Uhrstand +/- 10 Min/Jahr
Spindelbewegung
linear, bis zu 4,5 mm, max. 2 mm
am Ventil (1 mm/s)
Geräuschpegel <30 dBA
Sicherheitsklasse Typ 1
Gewicht (inkl. Batterie) 177 g (beim RA-Adapter)
IP-Schutzart 20
Auf Sicherheit und EMC nach EN 0730-1, EN 60730-2-9 und EN
60730-2-14 geprüft.
Sicherheitshinweise
Der Thermostat ist nicht für Kinder geeignet und darf
nicht als Spielzeug verwendet werden.
Verpackungsmaterialien kindersicher lagern oder
entsorgen.
Den Thermostat nicht zerlegen, denn er enthält keine
vom Benutzer zu wartenden Teile. Wenn der Feh-
lercode E1, E2 usw. auf dem Display angezeigt wird
oder andere Defekte auftreten, den Thermostat dem
Händler zurückgeben.
Die vollständige Installations- und Bedienungsanlei-
tung nden Sie unter www.living.danfoss.com, zur
Installation und Programmierung stehen Videos auf
www. YouTube.com zur Verfügung - geben Sie
in das Suchfeld „Danfoss living connect“ ein.
FR
living connect® est une tête électronique à usage rési-
dentiel associée au système Danfoss Link™ (pour plus
d’informations sur ce système, veuillez consulter le guide
d’installation du régulateur central Danfoss Link™ CC).
Insertion des piles
Retirez le couvercle du compartiment à
piles et insérez les deux piles AA. Vériez
que les piles sont correctement orientées.
Il n’est pas possible d’utiliser des piles
rechargeables.
Lors du remplacement des piles, les réglages de pro-
gramme sont conservés, mais les réglages de date et
d’heure sont réinitialisés au bout de deux minutes.
Installation de living connect®
M doit clignoter à l’écran avant l’installation.
1. Commencez par monter
l’adaptateur approprié.
2. Fixez l’adaptateur RA à
l’aide de la clé Allen de
2mm. Serrez l’adaptateur
leté manuellement (5 Nm
max.).
3. Vissez le thermostat sur
l’adaptateur puis serrez à la
main (5 Nm max.).
4. Un grand M clignote, appuyez sur pour xer living
connect®.
5. Pour le démontage et la réinstallation, veuillez
consulter www.living.danfoss.com
Ajout de living connect® à un système
L’ajout du living connect® à un système s’eectue depuis
le Danfoss Link™ CC.
Notez que le living connect® doit être aecté à une
pièce.
Lors de l’ajout, appuyez sur puis relâchez. Vériez
ensuite que le rétroéclairage et le symbole de l’antenne
clignotent.
Pour plus d’informations, consultez le guide d’installa-
tion du Danfoss Link™ CC.
Achage et boutons
Symbole de pile
Température dénie
Connexion au réseau
Verrou
Protection antigel
Alarme
Utilisez pour parcourir l’achage et les menus et
pour régler la température, puis utilisez pour sélec-
tionner et conrmer.
Test de la connexion
Appuyez sur pendant au moins 3s
jusqu’à ce que M s’ache.
Appuyez sur jusqu’à ce que LI s’ache.
Appuyez sur pour tester la
connexion.
LI disparaît une fois la connexion établie
et un message s’ache sur le Danfoss
Link™ CC.
Si la connexion ne peut pas être établie,
les symboles d’alarme et d’antenne
clignotent.
Régulation et réglage de la température
Normalement, la température est
régulée par le Danfoss Link™ CC,
mais il est possible de la modier
n’importe quand à l’aide des bou-
tons du thermostat.
Le thermostat envoie alors un
message au Danfoss Link™ CC, lui
demandant de synchroniser les
autres thermostats dans la pièce.
18
19
20
21
26
25
24
23
Appuyez sur
pour modier
la température.
Spécications techniques
Type de thermostat
Régulateur de robinet de
radiateur électronique
programmable
Utilisation recomman-
dée
Résidentielle (degré de pollution
2)
Actionneur Électromécanique
Écran Numérique, rétroéclairé, gris
Classe du logiciel A
Régulation PID
Fréquence/portée de
transmission
868,42 MHz/jusqu’à 30m
Alimentation 2 piles alcalines AA 1,5 V
Puissance consommée
3 μW en veille
1,2 W en activité
Durée de vie des piles 2 ans
Signal de piles faibles
L’icône de pile clignote à l’écran.
Si le niveau critique des piles est
atteint, tout l’écran se met à
clignoter.
Plage de temp.
ambiante
0 à +40°C
Plage de temp. de
transport
-20 à +65°C
Temp. max. de l’eau 90°C
Plage de réglage de la
temp.
+4 à +28°C
Intervalle de mesure
Mesure de la temp. toutes les
minutes
Précision de l’horloge +/-10 min/an
Déplacement de la tige
Linéaire, jusqu’à 4,5 mm, 2 mm
max. sur la vanne (1 mm/s)
Niveau sonore < 30 dBA
Classe de sécurité Type 1
Poids (piles incluses) 177 g (avec adaptateur RA)
Classe IP 20
Testé et conforme aux exigences de sécurité et de CEM spéciées
dans les normes EN 0730-1, EN 60730-2-9 et EN 60730-2-14.
Consignes de sécurité
Le thermostat n’est pas destiné aux enfants et ne doit
pas être utilisé comme un jouet.
Ne laissez pas les matériaux d’emballage à la portée
des enfants. Ils pourraient être tentés de jouer avec,
ce qui est très dangereux.
N’essayez pas de démonter le thermostat car l’entre-
tien de ses pièces n’est pas du ressort de l’utilisateur.
Si le code d’erreur E1, E2, etc. s’ache à l’écran ou si
d’autres défauts se manifestent, renvoyez le ther-
mostat au distributeur.
Pour consulter le manuel complet d’installation
et d’utilisation, rendez-vous sur
www.living.danfoss.com.
Vous pouvez également voir des vidéos à propos
de l’installation et de la programmation sur
www. youtube.com en cherchant les termes
Danfoss living connect.
DK
living connect® er en elektronisk radiatortermostat til
boliger med et Danfoss Link™-system (se installationsvej-
ledningen til Danfoss Link™ CC central styreenhed for at
få yderligere oplysninger om systemet).
Isætning af batterier
Fjern batteridækslet, og sæt de to AA-
batterier i. Sørg for, at batterierne vender
rigtigt. Der må ikke anvendes genoplade-
lige batterier.
Ved udskiftning af batterierne bevares programindstil-
lingerne, men efter to minutter nulstilles indstillingerne
for tid og dato.
Montering af living connect®
M skal blinke på displayet, før montering kan foretages.
1. Termostaten sættes på
evntilen og spændes fast
med unbrakonøglen.
2. Hold inde i ca. 3 sek. for at ksere living connect®.
3. Se www.living.danfoss.com for oplysninger om
afmontering og genmontering.
Tilmelding af living connect® til et system
Processen med at tilmelde living connect® til et system
udføres ved hjælp af Danfoss Link™ CC.
Bemærk, at living connect® skal tilmeldes til et rum.
Under tilmelding: Tryk på , og hold den inde. Hold øje
med, at baggrundslyset og antennesymbolet blinker.
Se installationsvejledningen til Danfoss Link™ CC for
yderligere oplysninger.
Display og knapper
Batterisymbol
Den indstillede temperatur
Netværksforbindelse
Børnesikring
Frostsikring
Alarm
Brug til at navigere på displayet og i menuerne og
indstille temperaturen. Brug til at vælge og bekræfte.
Test af forbindelse
Tryk på i mindst 3 sekunder, indtil M
vises.
Tryk på , indtil LI vises.
Tryk på for at teste forbindelsen.
LI forsvinder, når forbindelsen er oprettet,
og der vises en meddelelse på Danfoss
Link™ CC.
Hvis forbindelsen ikke oprettes, blinker
alarmsymbolet og antennesymbolet
.
Temperaturstyring og -justering
Temperaturen styres sædvanligvis
via Danfoss Link™ CC, men den kan
når som helst ændres ved hjælp af
termostatens knapper.
I så fald sender termostaten
besked til Danfoss Link™ CC om at
synkronisere de øvrige termostater
i samme rum.
18
19
20
21
26
25
24
23
Tryk på for at
ændre temperaturen.
Tekniske specikationer
Termostattype
Programmerbar elektronisk
radiatortermostat
Anbefalet brug Boliger (forureningsgrad 2)
Aktuator Elektromekanisk
Display Gråt, digitalt, med baggrundsbelysning
Softwareklasse A
Styring PID
Sendefrekvens/
rækkevidde
868,42 MHz/op til 30 m
Strømforsyning 2 x 1,5 V alkaline AA-batterier
Strømforbrug 3 μW ved standby - 1,2 W hvis aktiv
Batterilevetid 2 år
Signal for lavt
batteriniveau
Batteriikon blinker i displayet.
Hvis batteriniveauet er kritisk, blinker
hele displayet.
Omgivelsestemperatur 0 til 40°C
Transporttemperatur -20 til 65°C
Max. vandtempera-
tur
90°C
Indstilling af
temperaturområde
4 til 28°C
Målingsinterval Måler temperaturen hvert minut
Urets nøjagtighed +/- 10 min/år
Spindelvandring
Lineær, op til 4,5 mm, maks. 2 mm på
ventil (1 mm/s)
Støjniveau <30 dBA
Sikkerhedsklasse Type 1
Vægt (inkl. batterier) 177 g (med RA-adapter)
IP-klasse 20
Testet for sikkerhed og EMC-krav i henhold til EN 0730-1, EN
60730-2-9 og EN 60730-2-14.
Sikkerhedsregler
Termostaten er ikke beregnet til børn og må ikke bruges
som legetøj.
Efterlad ikke emballagen, hvor børn kan blive fristet til at
lege med den, da det er særdeles farligt.
Forsøg ikke at skille termostaten ad. Den indeholder ikke
dele, som en bruger kan reparere. Hvis fejlkode E1, E2
osv. vises på displayet, eller hvis der opstår andre defek-
ter, bedes du returnere termostaten til forhandleren.
Hele installations- og brugervejledningen ndes på
www.living.danfoss.com.
Der ndes videoer om installation og programmering på
www. YouTube.com - søg efter Danfoss living connect.
