Page is loading ...

INSTALLATION INSTRUCTIONS
FOR
SOLAR ROOF-MOUNTED POWER VENTS
Models:
VX1000SOLAR Series, CXSOLRF Series
Read all warnings and instructions before starting installation of this fan
FAILURE TO FOLLOW THESE INSTRUCTIONS COULD RESULT IN INJURY OR EVEN DEATH
1. Use this unit only in the manner intended by the manufacturer. If you have any
questions, contact the manufacturer.
2. Installation work and electrical wiring must be performed by a qualified person in
accordance with all applicable codes and standards, including fire-rated construction.
3. When cutting or drilling into wall or ceiling, do not damage electrical wiring and other
hidden utilities.
4. The combustion airflow needed for safe operation of fuel-burning equipment may be
affected by this unit’s operation. Follow the heating equipment manufacture’s guideline
and safety standards such as those published by the National Fire and Protection
Association (NFPA), and the American Society for Heating, Refrigeration and Air-
conditioning Engineers (ASHRAE), and the local code authorities.
CAUTION
1.
This fan is controlled by a solar panel and may start unexpectedly if the
panel is exposed to sunlight. Keep the panel securely covered until the fan
is mounted, or when servicing the fan.
2.
This unit has an unguarded propeller. Do not use in locations readily
accessible to people or animals.
3.
Mount with the lowest moving parts at least 8 feet above floor level.
4.
For general ventilating use only. Do not use to exhaust hazardous or
explosive materials and vapors.
5.
Carbon monoxide is an odorless, colorless gas that can kill. It may be drawn
into the house by operating this fan if your fuel-burning equipment is not
properly maintained, or if you lack adequate attic intake vents.
VENTAMATIC, LTD.
100 WASHINGTON STREET, MINERAL WELLS, TX 76068-0728
PHONE: (800) 433-1626 - FAX: (940) 325-9311 - www.bvc.com

THIS
R
INTAK
E
NEVE
R
SAFE
A
WATT
S
SUIT
A
Ste
p
Pla
c
cent
posi
t
the
h
Ste
p
Wh
e
cent
insi
d
hole
follo
w
Ste
p
Dra
w
the
r
the
h
in S
t
the
c
R
OOF-MOUNT
E
S ARE LOC
A
R
FROM ROO
F
A
ND EFFICIE
N
S
.
A
BLE FOR IN
p
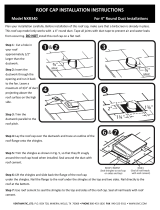
1
c
e unit on t
o
er of the ro
o
t
ioned so th
e
h
ouse.
p
2
e
n this positi
o
erline direct
d
e the roof,
d
will be use
d
w
ing operat
i
p
3
w
a referenc
r
oof using
h
ole drilled
t
ep 2 as
c
enter.
ED UNIT IS D
E
A
TED AROUN
D
F
OR RIDGE
V
N
T OPERATIO
S
TALLATION
o
p of shingle
s
o
f and close
e
unit is onl
y
o
n is establi
ly between
t
d
rill a hole t
h
d
as a refer
e
i
ons.
e square 2
5
INS
T
E
SIGNED FO
R
D
THE EAVES
.
V
ENTS. AT LE
N. THE MOT
O
ON ROOFS
U
s
, approxim
a
to the ridge
l
y
visible on
o
shed, locat
e
t
wo rafters
a
h
rough the r
o
e
nce point f
o
5
3/8-in x 25
T
ALLATI
O
R
ATTICS OF
A
.
ALTERNATI
V
AST 400 SQ-I
N
O
R OPERATE
S
U
P TO 8/12 PI
T
a
tely in the
l
ine, but
o
ne side of
e
a
a
nd, from
o
of. This
o
r the
3/8-in on
O
N INST
R
A
VERAGE SI
Z
V
ELY, AIR IN
T
N
NET FREE
A
S
ON 18 V.D.
C
T
CH*
Ste
p
Wit
h
rem
o
dra
w
Ste
p
Ne
x
circl
in S
t
dec
k
Ste
p
Slid
e
(so
m
Pos
Ste
p
R
UCTIO
N
Z
E AND OPER
A
T
AKE MAY BE
A
IR INTAKE V
C
. CURRENT
A
p
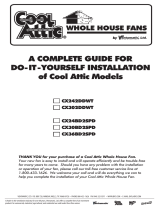
4
h
in the squa
ove shingle
s
w
n.
p
5
x
t draw a 14
e on the de
c
tep 2 as a c
k
ing, using
t
p
6
e
the flange
m
e roofing n
ition the uni
t
p
3) to align
N
S
A
TES MOST
E
FROM OPPO
ENT AREA IS
A
ND THE SO
L
re, draw a 1
s
, nails, and
1/2 -in dia
m
c
king. Be s
u
enter of this
t
he 14 ½-in
c
of the unit
u
ails may ne
e
t
on the ref
e
the exhaus
t
E
FFICIENTLY
W
SING GABLE
V
REQUIRED,
P
L
AR PANEL IS
7-in diamet
e
felt from th
e
m
ete
r
circle i
n
u
re to use t
h
circle. Cut
c
ircle as the
u
p under th
e
e
d to be re
m
e
rence squa
r
t
opening.
W
HEN AIR
V
ENTS, BUT
P
ER UNIT, FO
R
RATED AT 1
2
e
r circle an
d
e
circle just
n
side the 17
h
e hole drill
e
through the
cut line.
e
shingles
m
oved).
r
e (drawn in
R
2
.6
-in
e
d

Step 7
When the unit is properly located, apply a generous
amount of roofing compound between the flange
and the shingles approximately 1-in inside the
perimeter of
the flange
and begin to
secure with
nails.
Suggested nailing pattern:
Step 8
Check the installation for leakage with water from a
garden hose. Do not spay water directly into the
vent opening.
SOLAR PANEL INSTALLATION
Step 1
Mount the 4 brackets to the solar panel
with the 8 screws provided.
Step 2
When placing the solar panels
on your roof, choose a southern
or western exposure, away from
trees and afternoon shadows.
Mount the solar panel onto the
roof with the 4 screws and lock
washers provided.
Step 3
It is acceptable for the wires connecting the power
attic ventilator and the solar panel to run
across the roof. If
you prefer to route
the wires through the
attic, do the following:
A) Drill a hole in the
roof deck near the
top of the solar
panel location.
B) Insert connector
wires through the
hole into attic.
C) Add caulking around
the hole.
Step 4
Protect the solar panel from the
sun, using a non-translucent
material such as the original
package, so that it will not produce
power and activate the fan
unexpectedly.
Connect the wires of the solar
panel to those of the attic vent.
Be sure to connect the positive
wire from the solar panel to the positive wire from
the fan, and the negative wire from the solar panel
to the negative wire from the fan.
Recommendation:
Hose the panel down periodically to ensure that the
cells do not become obstructed by excessive dust
or other debris, as this could affect the output.
TIP:
To increase the power of the fan,
additional solar panels may be added,
using the easy-connect clips
.
*For information on roof pitch, please refer to the additional instructions at www.bvc.com.

VENTAMATIC, LTD.
LIMITED WARRANTY
Ventamatic, Ltd. extends this warranty to the original occupying owner of the home where this product is
installed that this product will be free from defects of material or workmanship for the time period listed by
model number below:
VX1000SOLAR Series or CXSOLRF Series DC Motor Limited 5-Year
Solar Panel Limited 10-Year
No subsequent purchaser of this product or of the home in which the product is installed is entitled to the
benefits of the warranty.
Ventamatic, Ltd. will replace the defective part or component only and return the new part to you freight
prepaid. Customer must bear all other expenses incurred, including labor required for field repair or
replacement and cost of return shipping of the defective part or component to Ventamatic. Customer must
also bear the cost of replacement of any part or component and the shipping charges incurred for the
replacement and return of any part or component not covered by this warranty, including parts or components
damaged by customer.
Ventamatic, Ltd. reserves the right to demand and receive written evidence of the date of purchase before
undertaking to perform its obligations under this warranty.
YOU SHOULD, THEREFORE, RETAIN YOUR SALES
SLIP AND ATTACH IT TO YOUR WARRANTY CLAIM.
In order to obtain the replacement of a part or component, you must select one of the following methods:
A. Return to factory.
Return postage prepaid the fan or part you believe to be defective to the address below:
Ventamatic, Ltd.
100 Washington Street
Mineral Wells, TX 76067
Include your name & address and a copy of your proof of purchase or installation.
B. Return to place of purchase.
There is no informal dispute settling mechanism available in the event of a controversy involving this warranty.
Any and all implied warranties shall be limited to the duration of the express warranty set forth above. In some
states, limitations of the duration of implied warranty do not apply.
Ventamatic, Ltd. shall not be liable for incidental or consequential damages, whether direct or indirect based
upon breach of warranty, breach of contract, negligence or tort. If any suit or other action is brought against
Ventamatic by customer, Ventamatic and customer irrevocably waive the right to trial by jury.
Purchase and installation of this product constitutes acceptance of the terms of this warranty by customer.
Rev. 06/12 2012 VENTAMATIC, LTD.
/