Page is loading ...

Bullhorn RM1250 User Guide
RM1250
User Guide
Proven compliance solutions.
Proven compliance solutions.
Relentless service.

©2016-2018 American Innovations, Ltd. All rights reserved.
American Innovations | www.aiworldwide.com | 12211 Technology Blvd | Austin, TX 78727
Information in this document is subject to change without notice.
Reproduction in any manner whatsoever without the written permission of American Innovations is strictly
forbidden.
The American Innovations logo and icon, including Bullhorn, are marks of American Innovations, Ltd. Other
trademarks and trade names may be used in this document to refer to either the entities claiming the marks and
names or their products. American Innovations, Ltd. disclaims any proprietary interest in trademarks and trade
names other than its own.
June 2018 122213-000, Rev.0

iii
Contents
C
HAPTER
1
Getting Started . . . . . . . . . . . . . . . . . . . . . . . . . . . . . . . . . . . . . . . . . . . . . . . . .1
Safety and Equipment Symbols . . . . . . . . . . . . . . . . . . . . . . . . . . . . . . . . . . . . . . . . . . . . . . . . . . . . . . . . . . . . . . . 1
ESD Precautions . . . . . . . . . . .
. . . . . . . . . . . . . . . . . . . . . . . . . . . . . . . . . . . . . . . . . . . . . . . . . . . . . . . . . . . . . . . . . 2
Bullhorn System Overview. . . . . . .
. . . . . . . . . . . . . . . . . . . . . . . . . . . . . . . . . . . . . . . . . . . . . . . . . . . . . . . . . . . . . 3
RM1250 Overview. . . . . . . . . .
. . . . . . . . . . . . . . . . . . . . . . . . . . . . . . . . . . . . . . . . . . . . . . . . . . . . . . . . . . . . . . . . . 3
Installation Requirements . . . . . . . . . . . . . . . . .
. . . . . . . . . . . . . . . . . . . . . . . . . . . . . . . . . . . . . . . . . . . . . . . . . . . 4
Required Tools and Equipment . . . .
. . . . . . . . . . . . . . . . . . . . . . . . . . . . . . . . . . . . . . . . . . . . . . . . . . . . . . . . 5
Required Hardware and Software. . . . . . .
. . . . . . . . . . . . . . . . . . . . . . . . . . . . . . . . . . . . . . . . . . . . . . . . . . . 5
Configuration and Support Software
. . . . . . . . . . . . . . . . . . . . . . . . . . . . . . . . . . . . . . . . . . . . . . . . . . . . . . . . . . 6
Bullhorn Tools. . . . . . . . . .
. . . . . . . . . . . . . . . . . . . . . . . . . . . . . . . . . . . . . . . . . . . . . . . . . . . . . . . . . . . . . . . . . 6
Microsoft .NET Framework. . . . . . . .
. . . . . . . . . . . . . . . . . . . . . . . . . . . . . . . . . . . . . . . . . . . . . . . . . . . . . . . . 7
Bullhorn Information Line . . . . . . .
. . . . . . . . . . . . . . . . . . . . . . . . . . . . . . . . . . . . . . . . . . . . . . . . . . . . . . . . . . . . . 7
Technical Services . . . . . . . . . .
. . . . . . . . . . . . . . . . . . . . . . . . . . . . . . . . . . . . . . . . . . . . . . . . . . . . . . . . . . . . . . . . . 8
C
HAPTER
2
Installation. . . . . . . . . . . . . . . . . . . . . . . . . . . . . . . . . . . . . . . . . . . . . . . . . . . . .9
Overview. . . . . . . . . . . . . . . . . . . . . . . . . . . . . . . . . . . . . . . . . . . . . . . . . . . . . . . . . . . . . . . . . . . . . . . . . . . . . . . . . . . 9
Preparing for Installation. . . .
. . . . . . . . . . . . . . . . . . . . . . . . . . . . . . . . . . . . . . . . . . . . . . . . . . . . . . . . . . . . . . . . 11
Electrostatic Discharge. . . . .
. . . . . . . . . . . . . . . . . . . . . . . . . . . . . . . . . . . . . . . . . . . . . . . . . . . . . . . . . . . . . . . . . 11
Installing Conduit . . . . .
. . . . . . . . . . . . . . . . . . . . . . . . . . . . . . . . . . . . . . . . . . . . . . . . . . . . . . . . . . . . . . . . . . . . . 11
Equipment Notes . . . . . . . . . .
. . . . . . . . . . . . . . . . . . . . . . . . . . . . . . . . . . . . . . . . . . . . . . . . . . . . . . . . . . . . . . . . 12
Installation Requirements . . . . . . . . . . . . . . . . .
. . . . . . . . . . . . . . . . . . . . . . . . . . . . . . . . . . . . . . . . . . . . . . . . . . 12
Installation Overview . .
. . . . . . . . . . . . . . . . . . . . . . . . . . . . . . . . . . . . . . . . . . . . . . . . . . . . . . . . . . . . . . . . . . . . . 12
Installing the RM1250 . . . . . . . . . . . . . . . . . . . .
. . . . . . . . . . . . . . . . . . . . . . . . . . . . . . . . . . . . . . . . . . . . . . . . . . 13
Maintenance . . . . . . . . . . . . . .
. . . . . . . . . . . . . . . . . . . . . . . . . . . . . . . . . . . . . . . . . . . . . . . . . . . . . . . . . . . . . . . . 16
C
HAPTER
3
Configuration . . . . . . . . . . . . . . . . . . . . . . . . . . . . . . . . . . . . . . . . . . . . . . . . .17
Configuration Overview. . . . . . . . . . . . . . . . . . . . . . . . . . . . . . . . . . . . . . . . . . . . . . . . . . . . . . . . . . . . . . . . . . . . . 17
Disable Synchronization Software . . . . . . . . . .
. . . . . . . . . . . . . . . . . . . . . . . . . . . . . . . . . . . . . . . . . . . . . . . . . . 17
Activate Bluetooth . . . . . . . . .
. . . . . . . . . . . . . . . . . . . . . . . . . . . . . . . . . . . . . . . . . . . . . . . . . . . . . . . . . . . . . . . . 18
Configure with Bullhorn Tools Softwa
re . . . . . . . . . . . . . . . . . . . . . . . . . . . . . . . . . . . . . . . . . . . . . . . . . . . . . . . 18
View Unit Information. . . . . . .
. . . . . . . . . . . . . . . . . . . . . . . . . . . . . . . . . . . . . . . . . . . . . . . . . . . . . . . . . . . . 21
Load or Import a Template . . . . . . . . . . . .
. . . . . . . . . . . . . . . . . . . . . . . . . . . . . . . . . . . . . . . . . . . . . . . . . . 21
Set Reporting Schedule and Battery Information
. . . . . . . . . . . . . . . . . . . . . . . . . . . . . . . . . . . . . . . . . . . 22
Send Test Message . . . . . . . . . . . . . . . . . . .
. . . . . . . . . . . . . . . . . . . . . . . . . . . . . . . . . . . . . . . . . . . . . . . . . . 23
Enable or Disable Readings . . . . . . . . . . . .
. . . . . . . . . . . . . . . . . . . . . . . . . . . . . . . . . . . . . . . . . . . . . . . . . . 24
Configure Readings. . . . . . . . .
. . . . . . . . . . . . . . . . . . . . . . . . . . . . . . . . . . . . . . . . . . . . . . . . . . . . . . . . . . . . 25
Work with Templates. . . . . . . .
. . . . . . . . . . . . . . . . . . . . . . . . . . . . . . . . . . . . . . . . . . . . . . . . . . . . . . . . . . . . 26
Upgrade Firmware. . . . . . . . . . . . . . . . . . . .
. . . . . . . . . . . . . . . . . . . . . . . . . . . . . . . . . . . . . . . . . . . . . . . . . . 27
De-activate Bluetooth . . . . . .
. . . . . . . . . . . . . . . . . . . . . . . . . . . . . . . . . . . . . . . . . . . . . . . . . . . . . . . . . . . . . . . . 28

RM1250 User Guide
iv
Appendix A
Technical Specifications. . . . . . . . . . . . . . . . . . . . . . . . . . . . . . . . . . . . . . . . . .29
Appendix B
Other Installation Options . . . . . . . . . . . . . . . . . . . . . . . . . . . . . . . . . . . . . . . .31
RM1250 with Index. . . . . . . . . . . . . . . . . . . . . . . . . . . . . . . . . . . . . . . . . . . . . . . . . . . . . . . . . . . . . . . . . . . . . . . . . 32
RM1250 with Existing Index . . . . . . . . . . . . . . .
. . . . . . . . . . . . . . . . . . . . . . . . . . . . . . . . . . . . . . . . . . . . . . . . . . 34
Appendix C
Regulatory Notices . . . . . . . . . . . . . . . . . . . . . . . . . . . . . . . . . . . . . . . . . . . . .38
Export Control Classification Number . . . . . . . . . . . . . . . . . . . . . . . . . . . . . . . . . . . . . . . . . . . . . . . . . . . . . . . . . 38
Appendix D
Glossary . . . . . . . . . . . . . . . . . . . . . . . . . . . . . . . . . . . . . . . . . . . . . . . . . . . . . .39

1
Getting Started
1
This guide explains how to install Bullhorn RM1250 units, as well as how to configure the units for service using
Bullhorn Tools configuration software or mobile application (Bullhorn Tools Mobile).
The RM1250 remote monitoring unit accurately, regularly, and reliably calculates gas or liquid volume by
measuring the digital pulse output from a positive displacement (PD), gas, or lease automatic custody transfer
meter (LACT). Meter readings are automatically uploaded via cellular communications to Bullhorn Web (https://
www.bullhornsys.com), where they can be used to calculate the volume of gas delivered to customers, optimize
the system, and/or populate a gas measurement database. The RM1250 is a fully-integrated unit that is easily
installed. All components, including the antenna, are internal. This design makes it easier to transport, install, and
maintain. The RM1250 can be installed either as a stand alone device, installed with an attached index, or
installed on an existing index using an adapter.
This guide includes the following topics:
• Getting Started
• Installation
• Configuration
NOTE: The RM1250 User Guide and other related documentation can be downloaded in Adobe
®
PDF format
from Bullhorn Web, under the Help menu (Help > Documents). Use Adobe
®
Reader
®
version 5 or higher to view
the PDF. If needed, visit the Adobe website at http://www.adobe.com to download a free copy of the software.
Configuration and support software can also be downloaded from Help > Downloads.
Safety and Equipment Symbols
WARNING: If the RM1250 is used in a manner not specified by AI, the protection provided for the equipment
may be impaired.
Table 1-1 provides a description of various safety and equipment symbols. Safety symbols alert you to safety
hazards or conditions that have the potential to cause personal injury, death, or equipment damage. Equipment
symbols may indicate a functional state (such as on and off) and connections (such as a Earth ground terminal).

RM1250 User Guide
2
ESD Precautions
WARNING: To prevent electrostatic discharge (ESD) damage when handling electronic equipment, always wear
an anti-static wrist strap attached to an unpainted, grounded metal object. Ensure the wrist strap has maximum
contact with bare skin.
If an anti-static wrist strap is unavailable, discharge static electricity from yourself and your clothing by touching
a grounded metal object before handling electronic equipment.
Table 1-1. Safety and Equipment Symbols
Symbol Description
Caution:
Failure to observe this warning may result in personal injury, death, or equipment
damage. A potential risk exists if the installation instructions are not followed.
Warning: Risk of electrical shock. Failure to observe this warning may result in personal injury,
death, or equipment damage. A potential risk exists if the installation instructions are not
followed.
Earth (ground) terminal: This symbol indicates a protective earth ground connection is
required.
On (Supply): Indicates power is on when the toggle switch is in the “ON” position.
Off (Supply): Indicates power is off when the toggle switch is in the “OFF” position.
DC power: Indicates that the input requires DC power.
AC/DC: Both direct and alternating current.
Positive:
Indicates a positive input.
Negative: Indicates a negative input.

RM1250 User Guide
3
Bullhorn System Overview
Bullhorn is a wireless telemetry system that provides scheduled and by-exception inbound reporting for field
equipment typically located in remote areas. Data and alarm packets transmit from remote field locations to
your account on the secure Bullhorn Web (https://www.bullhornsys.com) using digital cellular or satellite
communication networks. You can quickly determine the status of field equipment anytime using information
that posts to your website account.
The Bullhorn system provides remote monitoring with full coverage using GSM cellular network, GEOS satellite
(SkyWave-Inmarsat), or LEOS satellite (ORBCOMM) communication networks.
RM1250 Overview
RM1250 units automatically read meters to accumulate and report pulse counts. The units utilize cellular
communication with Bullhorn Web, the web-based asset manager where readings can be monitored. Reports
and extracts are also available through the Bullhorn Web account to view the data from the units.
The RM1250 inputs can be measured and configured locally using either the Bullhorn Tools software on a laptop
or the mobile application on a smartphone or tablet (running iOS 8.1 or later). Bullhorn Tools software is
available for download from the Bullhorn Web Help (Downloads) page, and the mobile app is available through
the Apple
®
App Store.
The RM1250 is a fully-integrated unit that can be mounted alone or on top of a meter. All components, including
the antenna, are internal to make it easier to transport, install, and maintain.
The RM1250 supports the following inputs:
• Accumulator 1
• Digital Input 1
• Accumulator 2
• Digital Input 2
Refer to Technical Specifications for more details on the different inputs.
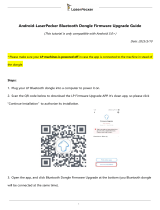
The input connections and battery placement for the RM1250 are shown in Figure 1-1.

RM1250 User Guide
4
Figure 1-1. RM1250 Inputs and Batteries
Installation Requirements
Before you install an RM1250 unit, use the following information as a checklist to ensure a successful installation:
Power Disconnect and Branch Circuit Protection: A customer-supplied, power disconnect device is
required for the unit installation. The power disconnect device (such as a switch, main circuit breaker, or
other type of power disconnect) should provide an easy and accessible means for removing the main
input supply power source from the unit. Multiple-pole circuit breakers shall interrupt all neutral and
ungrounded connectors of mains supply simultaneously. The power disconnect device must be clearly
marked to identify it as the disconnect device for the unit. The power disconnect or separate
overcurrent protection device should also provide overcurrent protection in the form of a 20 amp fuse
or circuit breaker suitable for branch circuit protection per local codes and requirements.
Backup Battery: Please contact Sales for information about purchasing a replacement battery
(American Innovations part number 517206-000).

RM1250 User Guide
5
Wiring Requirements: For optimum protection from transient voltages, all analog inputs must be in
their own multi-conductor jacket cable (such as cable AI part number 211061-000 - Belden 5308UE, or
its equivalent). All cables must have intact outer jackets, except for end cuts. Do not remove cable
jackets as they protect the unit input cable from transient voltages. Cable insulation should be suited
for voltage range of inputs. Cables should be rated at a minimum of 600 V and 105
˚C.
Input Channel Voltage Levels: All input channels are marked with acceptable input voltage ranges.
Ensure that devices connected to the RM1250 units fall within the voltages ranges listed next to the
channel input connections.
Mounting the Enclosure: Choose an area that provides enough room to easily access the unit or to
perform routine maintenance after completing the installation.
WARNING: Only accessories that meet American Innovations specifications may be used with the RM1250.
Refer to Technical Specifications for a list of accessories and requirements.
Required Tools and Equipment
The following tools and equipment are required for installing and configuring the unit for service:
• Magnet
• Anti-static wrist strap
• Small slotted screwdriver
• Wire stripper / Wire cutter
• Installation drawing (provided)
• Index or index adapter, if needed
Required Hardware and Software
To configure a unit in the field, you will need either of the following:
• A computer running Microsoft
®
Windows
®
with the following hardware and software specifications
(refer to Configuration and Support Software):
– Pentium
®
processor or equivalent
– 2 GB RAM (minimum)
– 400 MB free hard drive space (minimum)
– Spare USB port

RM1250 User Guide
6
– Microsoft
®
Windows Vista
®
Home Premium, Business, or Ultimate with Service Pack 1 or higher; or
Windows 7
®
Home Premium, Professional, or Ultimate
– Bullhorn Tools configuration software (available for download through Bullhorn Web) and the AI
USB Bluetooth dongle
– Windows
®
.NET Framework version 4 (x86 and x64)
– Windows
®
Internet Explorer
®
version 8.0 or higher
– Adobe
®
Reader
®
version 6.0 or higher
• A smartphone or tablet with the following:
– iOS iOS8 or Android 7
– Bluetooth
– Bullhorn Tools Mobile application, available through the Apple
®
App Store or Google Play
TM
Configuration and Support Software
Refer to Configuration for instructions on using either the desktop or mobile application version of Bullhorn
Tools.
To configure the RM1250 units for service using a laptop, you will need the following software installed:
• Bullhorn Tools
• Microsoft
®
.NET Framework
Bullhorn Tools and support software can be downloaded from Bullhorn Web.
Bullhorn Tools
Bullhorn Tools is a software program you use to set and read the adjustable parameters of the unit after the unit
has been installed.
Bullhorn Tools also allows you to set alarms and transmission schedules or transmit a test packet to confirm
communications with Bullhorn Web.
Installing Bullhorn Tools
NOTE: Bullhorn Tools requires a minimum of 194MB of hard disk space.

RM1250 User Guide
7
Complete the following steps to install or launch Bullhorn Tools:
1 Click the link to Bullhorn Tools from the Bullhorn Web Help (Downloads) page.
2 Click Install. The application will launch after installation.
3 To start Bullhorn Tools after installation, click the Bullhorn Tools desktop icon or click Windows
Start menu and select Bullhorn Tools.
Microsoft .NET Framework
Your computer must be installed with Microsoft
®
.NET Framework version 4.0 or higher in order to use Bullhorn
Tools. Microsoft .NET Framework is a set of software components that enable your computer to run any software
program that has been developed using Microsoft .NET technology. For more information about Microsoft .NET
Framework, visit the Microsoft website (http://www.microsoft.com).
Bullhorn Information Line
The Bullhorn Information Line is an automated attendant telephone system. It is typically used when installing
units in the field. The system identifies when the last data transmission (or test packet) was received on your
website account for a unit.
Complete the following steps to use the Bullhorn Information Line:
1 Call the Bullhorn Information Line at 866-287-6739.
2 Press 1 to access the packet log when prompted.
3 Use your telephone keypad to enter the unit serial number when prompted. The unit serial number is
included on the bar code label on the unit. It is also included on the label of the shipping carton. If
required, repeat this step to check another unit.

RM1250 User Guide
8
Technical Services
If you need assistance with the installation or configuration, contact American Innovations Technical Services in
any of the following ways.
Telephone: Local: 512-249-3400
Toll-free: 800-229-3404
Email: bhtechservices@aiworldwide.com
Address: American Innovations, Ltd.
ATTN. Technical Services
12211 Technology Blvd.
Austin, TX 78727

9
Installation
2
The RM1250 is typically installed on a flat base and connected to an index or other pulse device. Alternate
mounting options and accessories are available for purchase. Contact the American Innovations Sales team at
sales@aiworldwide.com (also refer to Appendix B, Other Installation Options).
For technical details on the input ratings, accessories, and part numbers, refer to Appendix A, Technical
Specifications.
WARNING: If the RM1250 is used in a manner not specified by American Innovations, the protection provided
by the equipment may be impaired.
Overview
The RM1250 is housed in a weatherproof enclosure that can be easily installed and configured. The unit can be
installed separately from an index or meter, attached to an existing index, or shipped with an index attached. The
RM1250 is designed primarily for metering applications and supports two-way communication with Bullhorn
Web through a GSM cellular network.
Figure 2-1. RM4210 Installed on Test Station

RM1250 User Guide
10
The input connections and battery placement for the RM1250:
Figure 2-2. RM1250 Inputs
The RM1250 includes the following inputs:
• Accumulator 1
• Digital Input 1
• Accumulator 2
• Digital Input 2
NOTE: The battery is the only field-serviceable item in the RM1250.

RM1250 User Guide
11
After installation, the RM1250 can be configured with the Bullhorn Tools configuration software on a laptop or
with the mobile application on a smartphone or tablet. Bullhorn Tools can display reading, set up transmission
schedules, set alarms, send a test message, or send an email to Technical Services. Refer to Configuration for
more information on using Bullhorn Tools.
NOTE: Because of the variations in customer's installation and grounding methods, AI cannot warranty any
damage to equipment caused by lightning strikes.
Preparing for Installation
WARNING: Only accessories that meet American Innovations specifications may be used with the RM1250.
Refer to Technical Specifications for a list of approved accessories.
Use the following items as a checklist prior to installing the RM1250:
1 For information regarding safety symbols found on the unit, refer to Safety and Equipment Symbols.
2 Ensure that the latest version of Bullhorn Tools and other support software are installed on the computer
or device that you plan to use to configure the unit. Bullhorn Tools can be downloaded from the Bullhorn
Web Help (Downloads) page, andBullhorn Tools Mobile can be downloaded from the Apple App Store.
For more information, refer to Installation.
Electrostatic Discharge
Electrostatic Discharge (ESD) can damage electronic components. Provide ESD protection by wearing an anti-
static wrist strap attached to any unpainted metal surface before making contact with any internal components.
If an anti-static wrist strap is unavailable, discharge static electricity from yourself and your clothing by touching
a nearby metal surface before opening the enclosure door of the unit or handling electronic components.
Installing Conduit
IMPORTANT: If wires are to be buried or covered, use conduit to protect wires.
Install and dress conduit to protect wiring from physical damage, electrical interference, or weather. Conduit is
provided by the customer.

RM1250 User Guide
12
Equipment Notes
This equipment is suitable for use in Class I, Division 2, Groups A, B, C, D Hazardous Locations or Non-Hazardous
Locations only.
The RM1250 are intended for transmissions at a frequency of no greater than once per hour.
Installation Requirements
The RM1250 is designed for easy installation and configuration. The unit is housed in a dome enclosure and fits
onto a customized base. The dimensions of the unit dome enclosure are shown in Figure 2-3.
Figure 2-3. RM1250 Enclosure Dimensions
Before installing the unit, ensure that the area around the installation site provides enough working space to
easily access the unit to wire inputs, configure the unit for service, or perform routine maintenance.
Installation Overview
WARNING: If wires are to be buried or covered, conduit must be used to protect wires.
The following steps provide an overview of a typical installation, as well as the recommended installation
sequence.
1 Determine where to place or mount the RM1250.
2 Make connections.
3 Secure the RM1250 unit.
4 Configure RM1250 for service using Bullhorn Tools (refer to Configuration).

RM1250 User Guide
13
Installing the RM1250
IMPORTANT: Electrostatic Discharge (ESD) can damage electronic components. Provide ESD protection by
wearing an anti-static wrist strap attached to any unpainted metal surface before accessing the unit or handling
electronic parts. If an anti-static wrist strap is unavailable, discharge static electricity from yourself and your
clothing by touching a nearby metal surface before accessing the unit or handling electronic components.
The following section explains how to install the RM1250 with the flat base. For alternative installation options,
please contact Technical Services (bhtechservice[email protected]om).
NOTE: To ensure a clean stable reading, keep field wiring as short as possible and use shielded twisted pair wire
such as Alpha 2463C. American Innovations recommends using AI part number 211061-000 (Belden 5308UE), or
equivalent, for wiring inputs.
Complete the following steps to install the RM1250:
1 Attach the flat base to a mounting bracket (either an existing bracket or the optional adjustable bracket).
Figure 2-4. RM1250 Flat Base and Adjustable Mounting Bracket (optional)
2 If necessary, mount assembly to a structure, such as a pole, which is near the external device.
3 Bring the wires connecting the external device up through the bottom of the flat base.
4 Connect the external device to the 4-pin terminal.
5 Connect the 4-pin terminal to the corresponding connection on the RM1250.

RM1250 User Guide
14
Figure 2-5. RM1250 4-pin Connector
6 Install the batteries into the bracket inside the RM1250. Secure with strap.
Figure 2-6. Battery Bracket and Battery Placement
7 Connect the two battery connectors to the battery connections on the RM1250 board.

RM1250 User Guide
15
Figure 2-7. Battery Connections
a Connect the larger, round battery to the P4 connection.
b Connect the bundled pair of batteries to the P3 connection.
NOTE: Once the batteries are connected to the unit, a Startup packet is sent to your Bullhorn Web
account.
8 Place the RM1250 unit onto the base. Align the cut-out below the Bullhorn label on the dome to the
screw (next to blue dot) on the base.
NOTE: If you plan to configure the unit using a USB 5-pin mini-b cable instead of Bluetooth, do not
place the unit on the flat base. Configure the unit first and then secure the unit on the base. Refer to
Chapter 1, Configuration for configuration instructions.

RM1250 User Guide
16
Figure 2-8. RM1250 Aligned to Base
9 Secure the unit by tightening the screws. Torque the dome screws and fitting to the following
measurements:
– dome screws - 10-12 in-lbs.
– cord grip body - 60 in-lbs.
– cord grip gland nut - 30 in-lbs.
IMPORTANT: Do not twist the dome on the base if the cut-outs do not line up with the screws. Lift the
dome off of the adapter and replace it in the correct position.
10 Continue with Chapter 1, Configuration to configure the RM1250 for service.
Maintenance
If performing maintenance on the RM1250, first disconnect the equipment from hazardous voltages before
gaining access to the enclosure.
/