La Crosse WS-7211U User manual

Category
Weather stations
Type
User manual

This manual is also suitable for

WS-7211U
Wireless 433 MHz
Weather Station
Instruction Manual
2
TABLE OF CONTENTS
Topic Page
Quick Setup 3-5
Inventory of Contents 6-7
Detailed Setup Guide
Battery Installation 7
Setting the Time 8
Features
Minimum and Maximum
Temperatures
9
Resetting Minimum and
Maximum Temperatures
10
Adding additional remote
temperature sensors
(optional)
10-11
Weather Forecast 12
Weather Icons 13-14
Tendency Arrow 14
Mounting 15-16
Troubleshooting 16-18
Maintenance and Care 18-19
Specifications 19-20
Warranty Information 21-26
3
QUICK SETUP
Hint: Use good quality Alkaline
Batteries and avoid rechargeable
batteries.
1. Have the indoor temperature
station and remote temperature
sensor 3 to 5 feet apart.
2. Batteries should be out of both
units for 10 minutes.
3. Place the batteries into the
remote temperature sensor first
then into the indoor temperature
station.
(All remote temperature sensors must
be started before the indoor
temperature station)
4. DO NOT PRESS ANY
BUTTONS FOR 15 MINUTES.
4
In this time the indoor temperature
station and remote temperature sensor
will start to talk to each other and the
display will show both the indoor
temperature and an outdoor
temperature. If the indoor
temperature station does not display
both temperatures after the 15
minutes please retry the set up as
stated above. After both indoor and
outdoor temperatures are displayed
for 15 minutes you can place your
remote temperature sensor outdoors
and set your time.
The remote temperature sensor
should be placed in a dry, shaded
area. The remote temperature sensor
has a range of 80 feet. Any walls that
the signal will have to pass through
will reduce distance. An outdoor
wall or window can have up to 30
5
feet of resistance and an interior wall
can have up to 20 feet of resistance.
Your distance plus resistance should
not exceed 80 ft. in a straight line.
NOTE: Fog and mist will not harm
your remote temperature sensor but
direct rain must be avoided.
To complete the set up of your indoor
temperature station after the 15
minutes have passed please follow the
steps in the detailed set up guide on
page 8.
INVENTORY OF CONTENTS
1. The indoor weather station (Figure
1)
2. The remote temperature sensor
(TX6U) and mounting bracket.
(Figure 2)
3. 3 each, 1/2” Philips screws.
4. One strip of double sided adhesive
tape.
5. Instruction Manual and Warranty
Card.
6
Figure 2
Figure 1
Holder
ADDITIONAL EQUIPMENT
(not included)
1. 1 Philips screwdriver.
2. 2 Fresh AA Alkaline batteries.
3. 2 Fresh AA Alkaline batteries
DETAILED SETUP GUIDE
Battery Installation
7
1. Install 2 AA
batteries in the
remote temperature
sensor. Make sure
they do not spring
free, or start-up
problems may
occur.
2.
Install 2 AA
batteries in the
indoor weather
station. Do not
press any buttons
for at least fifteen
minutes.
Setting the time
1. Press and hold the “SET” key for 4
seconds.
2. The hour will flash.
3. Press and release the “+” key to
advance the hour.
4. Press and release the “SET” key.
5. The minute is flashing.
6. Press and release the “+” key to
advance the minutes.
7. Press and release the “SET” key to
exit programming.
8
9
FEATURES
Minimum and Maximum
Temperatures
1. Press and release the “MIN/MAX”
button, “MAX” appears between the
indoor and remote temperatures.
2. The recorded maximum indoor and
remote temperature is displayed.
3. Press and release the “MIN/MAX”
button.
4. “MIN” appears between the indoor
and remote temperatures.
5. The recorded minimum temperature
is displayed.
6. Press and release the “MIN/MAX”
button to exit min/max mode.
7. To view optional additional sensors,
press and release the “CH” button
while viewing the minimum or
maximum temperatures.
10
Resetting Min and Max Temperatures
To reset both the minimum and
maximum temperatures—press and
hold the “MIN/MAX” button for 5
seconds.
Adding Additional Remote
Temperature Sensors (optional)
The WS-7211U is able to receive
signals from 3 different remote
temperature sensors. Following are
some brief instructions for the basic
set-up of remote temperature sensor
units with the WS-7211U. These extra
remote temperature sensors can be
purchased through the same dealer as
this unit, or by contacting La Crosse
Technology directly. A TX6U will
monitor temperature only, a TX3U
will monitor temperature and display
the temperature on its LCD, and the
11
TX3UP will monitor the temperature
of water or soil via a probe.
When setting up multiple remote
temperature sensors, it is important to
remove the batteries from all existing
units in operation, then to insert
batteries first into all the remote
temperature sensors. Second install
batteries into the indoor weather
station and do not press any buttons
for ten minutes. Transmission
problems will arise if this is not done
correctly.
To view the temperature of a different
remote temperature sensor unit, press
and release the “CH” button. A shift
from one number to the next should
be observed in the OUTDOOR LCD.
12
Weather Forecast
The weather forecasting feature is
estimated to be 75% accurate. The
weather forecast is based solely upon the
change of air pressure over time. The WS-
7211U averages past air-pressure readings
to provide an accurate forecast, creating a
necessity to disregard all weather
forecasting for 12-24 hours after the unit
has been set-up, reset, or moved from one
altitude to another (i.e. from one floor of a
building to another floor). In areas where
the weather is not affected by the change
of air pressure, this feature will be less
accurate.
Weather Icons
There are 3 possible weather icons that
will be displayed in the FORECAST
LCD:
Sunny—indicates that
the weather is expected
to improve (not that the
weather will be sunny).
Sun with Clouds
indicates that the
weather is expected to
be fair (not that the
weather will be sunny
with clouds).
Clouds with Rain
indicates that the
weather is expected to
get worse (not that the
13
14
weather will be rainy).
The weather icons change when the unit
detects a change in air pressure. The icons
change in order, from “sunny” to “partly
sunny” to “cloudy” or the reverse. It will
not change from “sunny” directly to
“rainy”, although it is possible for the
change to occur quickly. If the symbols
do not change then the weather has not
changed, or the change has been slow and
gradual.
Weather Tendency Arrows
Other possible displays in the
FORECAST LCD are 2 weather tendency
arrows, one that points up (on the left side
of the LCD) and one that points down (on
the right side of the LCD). These arrows
reflect current changes in the air pressure.
An arrow pointing up indicates that the air
pressure is increasing and the weather is
expected to improve or remain good. An
15
arrow pointing down indicates that the air
pressure is decreasing and the weather is
expected to become worse or remain
poor. No arrow means the pressure is
stable.
MOUNTING
Note: To achieve a true temperature
reading, avoid mounting in direct
sunlight. We recommend that you mount
the remote temperature sensor on a North-
facing wall. The sending range is 80ft;
obstacles such as walls, concrete, and
large metal objects will reduce the range.
Place both units in their desired location
before permanently mounting.
Remote Temperature Sensor
Remove the mounting bracket from the
remote temperature sensor. Mount the
bracket in the desired location with either
screws or adhesive tape. Insert remote
temperature sensor into mounting bracket.
16
Indoor Weather Station
The indoor weather station comes with
the table stand already mounted. If you
wish to use the table-stand all that is
required is to place the indoor weather
station in an appropriate location.
To wall mount the indoor weather station
first remove the table stand. Next insert
an appropriate screw in your desired
location. Using the integrated hanging
hole on the back of the unit, slip indoor
weather station over the screw and pull
down to secure.
TROUBLESHOOTING
NOTE: For problems not solved, please
contact La Crosse Technology via e-mail
or phone, or visit our website,
www.lacrossetechnology.com
Problem: The LCD is faint
Solution: Replace batteries
17
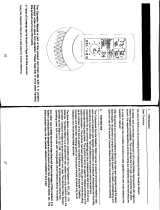
Problem: No outdoor temperature is
displayed.
Solution:
1. Remove all batteries, reinsert into
remote temperature sensor first, then
into the indoor weather station.
2. Place remote temperature sensor
closer to the indoor weather station.
3. Be sure all batteries are fresh.
4. Place remote temperature sensor and
indoor weather station in position so
the straight-line signal is not passing
through more than two or three
walls.
Problem: Temperatures do not match if
units are placed next to each other.
Solution:
Each temperature sensor is manufactured
to be accurate to within 1 degree plus or
minus and under normal conditions, so
two sensors could be as much as 2
degrees different. However, the difference
can be exaggerated further because the
sensors are designed for different working
18
environments. The indoor sensor is less
responsive to ambient air currents because
of the shielding effect of the display's
case. In addition, the case can act as a
heat sink to absorb and store heat from
external sources (i.e. handling of the case
or radiant heat). Also, the much greater
range of the outdoor temperature sensor
requires a different calibration curve than
the indoor range. Error is usually greater
at the extreme ends of a range, making it
harder to compare different ranges with
different curves. Under non-laboratory
conditions, it is difficult to compensate
for the above factors and obtain an
accurate comparison.
MAINTENANCE AND CARE
INSTRUCTIONS
Extreme temperatures, vibration, and
shock should be avoided to prevent
damage to the units.
19
Clean displays and units with a soft,
damp cloth. Do not use solvents or
scouring agents; they may mark the
displays and casings.
Do not submerge in water.
Do not subject the units to
unnecessary heat or cold by placing
them in the oven or freezer.
Opening the casings invalidates the
warranty. Do not try to repair the
unit. Contact La Crosse Technology
repairs.
20
SPECIFICATIONS
Transmitting
Frequency
433MHz
Measuring Temperatures
Indoor Weather
Station
32°F to 156.2°F
with 0.2 °F
resolution
Remote
Temperature
Sensor
-21.8 °F to 156.2°F
with 0.2°F resolution
Temp accuracy
+/- 1°F
Transmitting
range
Maximum 80 feet
(25m) open space
Temperature check
Indoor Every 10 seconds
Outdoor Twice in 10 minutes
Batteries—(Alkaline recommended)
Remote
Temperature
Sensor
2 x AA, 1.5V
Indoor Weather 2 x AA, 1.5V
  • Page 1 1
  • Page 2 2
  • Page 3 3
  • Page 4 4
  • Page 5 5
  • Page 6 6
  • Page 7 7
  • Page 8 8
  • Page 9 9
  • Page 10 10
  • Page 11 11
  • Page 12 12
  • Page 13 13
  • Page 14 14
  • Page 15 15
  • Page 16 16
  • Page 17 17
  • Page 18 18
  • Page 19 19
  • Page 20 20
  • Page 21 21
  • Page 22 22
  • Page 23 23
  • Page 24 24
  • Page 25 25
  • Page 26 26

La Crosse WS-7211U User manual

Category
Weather stations
Type
User manual
This manual is also suitable for

Ask a question and I''ll find the answer in the document

Finding information in a document is now easier with AI