Page is loading ...

Instruction
Manual
6113C_002-797e-07.23
Measuring spark
plugs
Type 6113C...
Type 6115C...
Type 6118C...


Page 16113C_002-797e-07.23
Thank you for choosing a Kistler quality product charac-
terized by technical innovation, precision and long life.
Information in this document is subject to change without
notice. Kistler reserves the right to change or improve its
products and make changes in the content without obliga-
tion to notify any person or organization of such changes
or improvements.
© 2017 ... 2023 Kistler Group. All rights reserved. Except
as expressly provided herein, no part of this manual may
be reproduced for any purpose without the express prior
written consent of Kistler Group.
Kistler Group products are protected by various intellectual
property rights. For more details visit www.kistler.com.
The Kistler Group includes Kistler Holding AG and all its
subsidiaries in Europe, Asia, the Americas and Australia.
Kistler Group
Eulachstrasse 22
8408 Winterthur
Switzerland
Tel. +41 52 224 11 11
info@kistler.com
www.kistler.com
Foreword
Foreword

Measuring spark plugs, Type 6113C..., 6115C..., 6118C...
6113C_ 002-797e-07.23Page 2
Content
1. Introduction .................................................................................................................................3
2. General notes ..............................................................................................................................4
2.1 Disposal instructions for electrical and electronic equipment .............................................4
2.2 Software upgrades and updates .........................................................................................4
3. Features and selection of spark plugs .....................................................................................5
3.1 General ...............................................................................................................................5
3.2 Characteristic data of a spark plug .....................................................................................6
3.3 Ignition voltage ...................................................................................................................7
3.4 Kistler Type designation for measuring spark plugs ...........................................................7
3.5 Selecting a measuring spark plug .....................................................................................7
3.5.1 Thread Type "M" and thread length "L" ................................................................9
3.5.2 Seal seat ...............................................................................................................9
3.5.3 Heat range.............................................................................................................9
3.5.4 Spark position "S" and maximum depth "A" ........................................................10
3.5.5 Electrode gap "G" ................................................................................................10
3.5.6 Ceramic diameter "D" and insulator length "K" ...................................................11
4. Commissioning .........................................................................................................................12
4.1 Scope of delivery and accessories ...................................................................................12
4.2 Installation ........................................................................................................................13
4.3 Mounting the spark plug terminal/ignition coil ...................................................................14
4.4 Connecting the sensor cable ............................................................................................15
4.5 PiezoSmart. ....................................................................................................................15
4.6 Using an ignition cable extension .....................................................................................16
4.7 Removal ...........................................................................................................................16
5. Maintenance ..............................................................................................................................18
5.1 Cleaning and checking the electrode spacing ..................................................................18
5.2 Replacing the sensor cable ..............................................................................................20
5.3 Replacing the pressure sensor .........................................................................................21
5.4 Replacing the insulator .....................................................................................................21
6. Troubleshooting ........................................................................................................................22
6.1 General information ..........................................................................................................22
6.2 Misring ............................................................................................................................22
7. Appendix ....................................................................................................................................24
Total pages 24

Introduction
Page 36113C_002-797e-07.23
1. Introduction
Please take the time to thoroughly read this instruction
manual. It will help you with the installation, maintenance,
and use of this product.
To the extent permitted by law Kistler does not accept any
liability if this instruction manual is not followed or products
other than those listed under Accessories are used.
Kistleroersawiderangeofproductsforuseinmeasuring
technology:
Piezoelectric sensors for measuring force, torque,
strain, pressure, acceleration, shock, vibration and
acoustic-emission
Strain gage sensor systems for measuring force and
torque
Piezoresistive pressure sensors and transmitters
Signal conditioners, indicators and calibrators
Electronic control and monitoring systems as well as
softwareforspecicmeasurementapplications
Data transmission modules (telemetry)
Kistler also develops and produces measuring solutions
fortheapplicationeldsengines,vehicles,manufacturing,
plastics and biomechanics sectors.
Our product and application brochures will provide you
with an overview of our product range. Detailed data
sheets are available for almost all products.
If you need additional help beyond what can be found
either on-line or in this manual, please contact Kistler's
extensive support organization.
Correvit® and RoaDyn® are registered trademarks of Kistler Holding AG

Measuring spark plugs, Type 6113C..., 6115C..., 6118C...
6113C_ 002-797e-07.23Page 4
2. General notes
2.1 Disposal instructions for electrical and electronic equipment
Do not dispose of old electronic instruments in municipal
trash. For disposal when the product has come to the end
of its service life, please return it to an authorized local
electronic waste disposal service or contact the nearest
KistlerInstrumentsalesoceforreturninstructions.
2.2 Software upgrades and updates
Kistler may occasionally supply upgrades or updates for
embedded software. Such upgrades or updates must
always be installed.
Kistler declines any liability whatsoever for any direct
or consequential damage caused by products running
on embedded software that has not been upgraded or
updated with the latest available software.

Features and selection of spark plugs
Page 56113C_002-797e-07.23
3. Features and selection of spark plugs
3.1 General
Kistler measuring spark plugs Type 6113C…(M10),
6115C…(M12) and 6118C…(M14) permit cylinder pressure
measurement without a separate measuring bore. The
world's smallest piezoelectric high temperature cylinder
pressure sensor is integrated into the measuring spark
plug.Thesensorisinstalledush-mounted,ensuringthat
the system has a high natural frequency. All three types
are therefore also suitable for indication at high engine
speeds and for knock detection.
The sensor cable and the ceramic of the measuring spark
plugs are exchangeable and serviceable (Chapter 5).
All three types are available in dierent geometries with
various heat ranges and spark positions. Kistler PiezoSmart
automatic sensor recognition is available as an option.
Fig. 1: A typical measuring spark plug and its
components
PiezoSmart® is a registered trademark of Kistler Holding AG

Measuring spark plugs, Type 6113C..., 6115C..., 6118C...
6113C_ 002-797e-07.23Page 6
3.2 Characteristic data of a spark plug
Spark plugs are available in various geometries and
designs.
The most commonly used thread sizes are M10, M12,
and M14.
Depending on the engine used, spark plugs can vary in
terms of:
Thread length
Sealseat(atortaperedseal)
Heat range
Spark position
Max. depth
Electrode gap
Diameter of the ceramic and length of the insulator
Fig. 2: Example of an original spark plug

Features and selection of spark plugs
Page 76113C_002-797e-07.23
3.3 Ignition voltage
Kistler spark plugs are designed for a maximum ignition
voltage of 40 kV (Type 6113C) and 45 kV (Type 6115C
and 6118C). This value can be exceeded depending
on the electrode gap and ignition energy. It is therefore
importanttomaintaintheelectrodegapdenedbyKistler.
The greater the gap, the greater the ignition voltage, and,
consequently, the more the unit is subject to wear. Also
see section 3.5.4.
3.4 Kistler Type designation for measuring spark plugs
Fig. 3: Ordering keys of measuring spark plugs
3.5 Selecting a measuring spark plug
The selection of a measuring spark plug is determined by
the original spark plug used. To be able to select a suit-
able measuring spark plug for your application, Kistler
needstoknowthespecicationoftheoriginalsparkplug
when you make an inquiry. The request sheet (Fig. 4)
can be found in the datasheet. If this information is not
available, an original spark plug can also be measured.
It is not possible to make selection solely from the type
number. There is no reference list available containing the
exact geometric and electrical data of spark plugs. Kistler
relies on the information provided by the customer for this.

Measuring spark plugs, Type 6113C..., 6115C..., 6118C...
6113C_ 002-797e-07.23Page 8
Fig. 4: Original spark plug data
Questions Regarding the Engine
Brand/type
Spark plug bore: Minimum diameter mm Shape: straight bent
Fuel Gasoline / E0 - E10 E85 / E100 CNG / LPG
Questions Regarding the Spark Plug
Brand/type
Thread MM x Thread length L mm
Spark position S mm Maximum depth A mm
Electrode spacing G mm Insulator diameter D mm
Isolator length K mm Length from seal C mm
Thread retreat E mm Heat value (Bosch/OEM)
Cable length (indicate) 1 m 2 m 3 m PiezoSmart (indicate): Yes No
Ground electrode shape factor none
Roof electrode
Roof electrode with needle
Side electrode(s)
Seal type SEAL flat conical
Compression seal Solid seal (thickness mm)
Cable connection nut N SAE CUP
Defined ground electrode system (indexed
mounting)
no (standard) yes (please send OEM spark plug)
Initial order amount Piece
Customer contact person Signature
Note
Date
Sales Center
Kistler Account Manager
Customer
Selecting a Measuring Spark Plug

Features and selection of spark plugs
Page 96113C_002-797e-07.23
3.5.1 Thread Type "M" and thread length "L"
The following Kistler measuring spark plugs are used
according to the dimensions of the original spark plug:
Type 6113C with M10x1 thread
Type 6115C with M12x1,25 thread
Type 6118C with M14x1,25 thread
M12 and M14 spark plugs are the most common for
passenger car engines, while motor cycle engines
predominantly use M10 spark plugs. The thread length is
based on the geometry of the cylinder head.
3.5.2 Seal seat
Selecting a seal seat is determined by the original spark
plug. Kistler measuring spark plugs are available with a
atsealorconicalsealseat.
3.5.3 Heat range
The heat range of a spark plug describes its ability to
absorb heat and dissipate it. The heat range is important
since, on the one hand, a determined minimum tempera-
ture needs to be reached (self-cleaning temperature) to
prevent deposits (primarily during idle running and at low
load) and hence misres. On the other hand, it should
also not result in overheating and pre-ignitions. The cor-
rect heat range of the original spark plug is determined
by full load measurements and also takes into account
any changes which may occur due to aging of the spark
plug and/or engine. How the heat range for the original
sparkplugisdened,however,variesfrommanufacturer
tomanufacturer.Kistlersparkplugsareclassiedaccord-
ing to the Bosch heat range. A comparison table therefore
needs to be used to determine the corresponding heat
range (Fig. 5). If possible, the original heat range should
be applied. An original spark plug can be replaced with a
measuring spark plug of a colder heat range but not with
one of a warmer heat range. For example, a spark plug
of heat range 6 can be replaced with a spark plug of heat
range 5 but not vice versa.

Measuring spark plugs, Type 6113C..., 6115C..., 6118C...
6113C_ 002-797e-07.23Page 10
Fig. 5: Heat ranges of original spark plugs
3.5.4 Spark position "S" and maximum depth "A"
The optimum position of the ignition spark depends on the
geometry of the combustion chamber and the combustion
process. With a spray-guided combustion process in
particular, the injection spray is pointed directly at the
electrode. The spark position "S" and the position of the
ground electrode are particularly important in such cases.
Measuring spark plugs with a precisely dened ground
electrode position when installed, can be manufactured
on request.
The spark position "S" of the measuring spark plug should
be orientated towards the value of the original spark plug.
The maximum depth "A" indicates how far the ground
electrode protrudes into the combustion chamber. The
measuring spark plug must not protrude any further
into the chamber than the original spark plug. This is to
prevent collision with moving parts.
3.5.5 Electrode gap "G"
In a gasoline engine, the mixture of gasoline and air is
ignitedexternallybyashoverbetweentheelectrodesof
thesparkplug.Thisashoverdependsonthedensityof
the gasoline mixture between the electrodes, electrode
gap and the electrode geometry. The required ignition
voltage must be provided for all the operating conditions
of the engine, particularly at high load as well as with
increased electrode wear.
For this reason, Kistler recommends checking the
electrode gap periodically every 50 h and adjusting it to
the minimum.

Features and selection of spark plugs
Page 116113C_002-797e-07.23
Fig. 6: Electrode gap
3.5.6 Ceramic diameter "D" and insulator length "K"
The diameter of the ceramic "D" and length of the
insulator "K" should ensure an optimum connection
between the ignition coil and the measuring spark plug.
Special attention should be paid to make sure that there
is no air gap between the insulator and the ignition coil.
Kistler uses isolators of size 7,7 mm with built-in diameter
adaptionmadefromglassbrereinforcedplastic(GRP),
size 9 mm or 10,5 mm.
Length and connector type of the insulator can be adapted
to that of the original spark plug using an individually
adjusted SAE nut or a CUP connector.
Fig. 7: Adaptability of the ceramic diameter and high voltage connection

Measuring spark plugs, Type 6113C..., 6115C..., 6118C...
6113C_ 002-797e-07.23Page 12
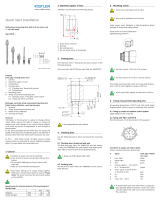
4. Commissioning
Fig. 8: Installation process
In engines equipped with aluminum cylinder heads, the
material around the measuring spark plug expands more
than the measuring spark plug itself when heated. This
can cause the measuring spark plug to become stuck. As
a general rule, Kistler therefore recommends mounting
and removing the measuring spark plugs only when the
engine has cooled down completely.
Depending on the installation situation and the type of
measuring spark plug, it is important to check how the
sensor cable can be mounted before installation. There
is no space for this in the ignition coil and it can therefore
result in damage to the sensor cable and the connector.
The connector of the ignition coil is to be adapted to the
installation situation using workshop tools if required.
4.1 Scope of delivery and accessories
Please refer to the data sheets of the measuring spark
plug for the scope of delivery and accessories:
Type 6113C document number 003-281
Type 6115C document number 003-269
Type 6118C document number 003-280

Commissioning
Page 136113C_002-797e-07.23
4.2 Installation
Please pay attention to the following when mounting the
measuring spark plug:
The contact surfaces on the spark plug and the cylinder
head, as well as the thread of the measuring spark plug
and the mounting bore in the cylinder head must be clean.
The cable and the ignition coil must also be clean, dry and
free of oil. The sensor cable in particular should be free
from oil contamination and should not be damaged.
Guide the cable of the sensor carefully through the
mounting tool. Hold on to the sensor and mounting tool
while doing this; there should be no tension on the cable.
Mounting examples for various bore diameters and the
suitable mounting tools can be found in the datasheets.
Gently lubricate the thread with anti-seize paste for high
alloy steels and screw in the measuring spark plug by
hand. The measuring spark plug must then be tightened
using Type 1300A11 torque wrench and the correct
torque in accordance with the recommendation in Fig. 10.
Once this has been done, the installation wrench can be
carefully removed – make sure not to damage the cable.
Fig. 9: Torque wrench Type 1300A11 and fork wrench
insert Type 1300A15
Fig. 10: Tightening torque

Measuring spark plugs, Type 6113C..., 6115C..., 6118C...
6113C_ 002-797e-07.23Page 14
4.3 Mounting the spark plug terminal/ignition coil
Apply a thin layer of ZK mounting grease Type 1067 to the
insulator. This prevents the plug to become fastened in
place and facilitates later removal.
Fig. 11: Application of a thin layer of mounting grease
Type 1067 to the ceramic / adaption (arrow)
Then, mount the spark plug terminal or ignition coil
carefully to the measuring spark plug. It is particularly
importanttoensurethattheignitioncoilisxedproperly
to minimize the lateral forces occurring on the insulator of
the spark plug.
The spark plug terminal/ignition coil must not push down
on the cable connector of the measuring spark plug or
damage the cable. The connector of the ignition module is
to be adapted to the installation situation using workshop
tools if required.

Commissioning
Page 156113C_002-797e-07.23
4.4 Connecting the sensor cable
The cable must not be kinked or unsupported. It must be
routed so that it is protected from vibration and heat (such
as exhaust pipe or radiant heat from the turbocharger) and
then xed in place. The cable includes a high-insulation
coaxial cable. Any contamination caused by oil, grease,
and aggressive liquid substances on the connector can
impair the measuring results.
The cable is screwed on to the delivered BNC coupling
(Type1721),hand-tightened,andconnectedtotheamplier
(only measuring spark plugs without PiezoSmart function).
4.5 PiezoSmart.
Kistler PiezoSmart automatic sensor recognition is
available for all measuring spark plug types.

Measuring spark plugs, Type 6113C..., 6115C..., 6118C...
6113C_ 002-797e-07.23Page 16
4.6 Using an ignition cable extension
An extension cable can be used for spark plugs in
applications on the test bench in which the engine is
accessible and is installed as a stationary unit. Fig. 12
and Fig. 13 show the corresponding cable.
Fig. 12: Ignition extension cable for SAE connection Type 1500B97A1/1500B97A2
Fig. 13: Ignition extension cable for SAE connection with TPC Adapter Type 1500B97A3/1500B97A4
Kistleroersthefollowing400mmlongcablevariantsfor
isolator diameters of 9mm and 10,5mm:
- Types 1500B97A1 and 1500B97A2 with SAE connection
- Types 1500B97A3 and 1500B97A4 with TPC adapter
for a direct mounting on the ignition coil.
In this case, the spark plug terminal is extended by
around 400 mm. The spark plug rail or the ignition coil do
nothavetobexedintheoriginalposition.Theceramic
must have the correct diameter (d = 10 ... 11 mm) in order
to ensure correct installation on the spark plug.
When using measuring spark plugs with CUP connection
it is necessary to replace these by the SAE nut of the
extension cable (if required, Kistler may provide longer
SAE connection nuts). Then, the CUP connection can
mounted at the end of the cable to the spark plug replica
and the ignition coil can be adapted. Use workshop
equipment to secure the ignition coil.

Commissioning
Page 176113C_002-797e-07.23
4.7 Removal
First, remove the sensor cable from the amplier and
disconnect it from the BNC coupling (for PiezoSmart
versions only). Then, remove the ignition coil / spark plug
terminal from the measuring spark plug. After that is done,
guide the sensor cable through the mounting tool and
engage it with the measuring spark plug. Ensure that the
mounting tool sits correctly on the measuring spark plug.
Now start to remove the measuring spark plug by turning
it carefully anti-clockwise – but only 2 complete rotations
at this stage. To prevent any dirt particles entering the
thread of the cylinder head or the combustion chamber,
the measuring spark plug recess should now be cleaned
using compressed air or a brush. The measuring spark
plug can now be completely unscrewed. If the measuring
spark plug is jammed, just unscrew it a little to prevent
the thread of the cylinder head becoming damaged. A few
drops of oil or a solvent containing oil can help the thread
move smoothly again. Then, screw the measuring spark
plug back in again to allow the solvent to take eect.
Afterallowingthesolventtotakeeectforashortamount
of time, the measuring spark plug can be completely
unscrewed.
Once the measuring spark plug is completely unfastened,
carefully remove it from the mounting bore. Make sure
that the cable does not become crushed or damaged as
you do this.

Measuring spark plugs, Type 6113C..., 6115C..., 6118C...
6113C_ 002-797e-07.23Page 18
5. Maintenance
5.1 Cleaning and checking the electrode spacing
The measuring spark plug requires regular maintenance
to ensure that it works reliably throughout its period of
use. While the engine is in operation, the spark plug gets
dirty (soot and accumulation of oil) and the electrodes
become worn. If the spark plug is heavily polluted or worn,
thispreventsconsistentashoverbetweentheelectrodes.
In such cases, reliable ignition can no longer be ensured.
Kistler therefore recommends cleaning the measuring
spark plugs periodically, checking the condition of the
electrodes every 50 h, and adjusting the electrode spac-
ing if necessary.
How to clean the spark plugs
1. Remove the spark plug from the engine (Chapter 4.7).
2. First, clean the thread with a brass brush and then
with Type 1003 cleaning spray.
3. Note: The measuring spark plug must never be
cleaned with a spraying machine or abrasives.
4. Check the spark plug for deposits and for any cracks
in the insulator, and check for any worn out electrodes.
5. The ceramic isolator must be cleaned – in case of
a damage, the isolator can be replaced by Kistler
(Chapter 5.4).
6. Test the electrode spacing with a feeler gauge and
adjust if necessary (Fig. 14).
7. Screw on the terminal connection nut and then tighten
it (0.5 N·m)
8. Maintenance is complete and the spark plug can be
re-installed in the engine (Chapter 4.2).
Fig. 14: Checking the electrode spacing with a
feeler gauge
Fig. 15: Adjust the electrode spacing using tool
Type 1253A
Fig. 16: Adjusting the electrode spacing using a
vise – carefully clamp the electrode
Fig. 17: Adjust the electrode spacing by care-
fully applying a vertical force
Fig. 18: Commercially available feeler gauge
/