Page is loading ...

USE AND CARE GUIDE
Model #
Item #
LAGUNA POINT 4PC SET W/ CUSHIONS
HAMPTONBAY.COM
THANK YOU
We appreciate the trust and conf
idence you have placed in Hampton Bay through the purchase of this table. We strive to
continually create quality products designed to enhance your home. Visit us online to see our full line of products available for your
home improvement needs. Thank you for choosing Hampton Bay!
855-HD-HAMPTON -1
Questions, problems, missing parts? Before returning to the store,
call Hampton Bay Customer Serv
ice
8 a.m. - 6 p.m., EST, Mon day

Table of Contents
Table of Contents............................................................2
Safety Information...........................................................2
Set Up Your Furniture Properly...................................2
Examine Your Furniture...............................................2
Observe Weight Limits.................................................2
Warranty.. .........................................................................2
What is Covered...........................................................2
What is Not Covered....................................................2
Pre-Assembly....................................................................3
Planning Assembly........................................................3
Hardware Included........................................................3
Package Contents................................................
....4,5,6
Assembly. .................................................................
Care and Cleaning...........................................................10
Safety Information
....7,8,9
2
Please contact 855-HD-HAMPTON for f
HAMPTONBAY.COM
urther assistance.
1-
SET UP YOUR FURNITURE PROPERLY
□ Ensure that all parts are assembled properly and fully tightened as per the instructions.
□ When placing in the desired location, ensure that all legs are resting on the
same surface.
EXAMINE YOUR FURNITURE
□ Examine occasionally to ensure that there are no
loose parts. If loose parts are found, they must be re-tightened fully
before additional use.
OBSERVE WEIGHT LIMITS
The weight limits for the following products are listed
below:
CAUTION:
your furniture, injuries
can occur.
Warranty
TWO YEAR FRAME, AND FABRIC LIMITED
WARRANTY
WEAVE
□ Chair: 300 lbs
□ Swivel Chair: 300 lbs
□ Loveseat: 500 lbs
□ Ottoman: 150 lbs
□ Table : 50 lbs
□ Sofa: 700 lbs
□ Rocking Chair: 300 lbs
□ Chaise Lounge: 300 lbs
□ Dining Table: 100 lbs
WHAT IS NOT COVERED
Contact the Customer Service Team at 855-HD-HAMPTON or visit
www
.
Hamptonbay
.
com
.
1-
We warrant the frame, weave and fabric to be free of manufacturing defects to the original purchaser for two years. For glass table
top we warrant 30 days from the date of purchase.
This warranty does not cover commercial use, hardware, acts of nature, fire, freezing and abusive use. In addition, purchased parts
are not covered under this warranty.
We reserve the right to make substitutions with similar merchandise, if the model in question is no longer in production.
□ Dining Chair: 200 lbs
If you overload
WHAT IS COVERED

3
Please contact 855-HD-HAMPTON for f
HAMPTONBAY.COM
urther assistance.
1-
Pre-Assembly
PLANNING ASSEMBLY
To prevent damage, place all parts on a soft surface during assembly. Remove all protective caps before beginning
assembly.
HARDWARE INCLUDED
Part Description Quantity
DD
21
EE
GG
2
GG
DD
AA
CC
BB
AA
Φ1/4 x 55 mm
BB
Washer
Φ6 mm
CC
18
Long Bolt
2
Φ1/4 x 20 mm
Bolt
Locking nut Φ6 mm
EE
Part Description Quantity
DD
16
EE
GG
2
Wrench
#13
1
FF
AA
BB
GG
AA
Φ1/4 x 55 mm
14
BB
Washer
Φ6 mm
CC
2
Long Bolt
Hex wrench
4mm
2
Φ1/4 x 20 mm
Bolt
Locking nut Φ6 mm
FF
1
Plastic washer Φ6 mm
43
1
FF
Φ1/4 x 40 mm
Bolt
Hex wrench
4mm
HH
HH
Wrench
#11
1
Plastic washer Φ6 mm
FF

4
Please contact 855-HD-HAMPTON for f
HAMPTONBAY.COM
urther assistance.
1-
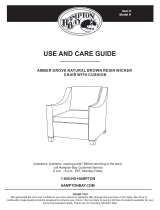
Pre-Assembly (continued)
PACKAGE CONTENTS(CHAIR)
A Seat 1
B Back 1
C Left Arm 1
F
Right Arm 1
D
Back Cushion 1E
Seat Cushion 1
C
A
D
B
E
F
Part
Description
Quantity

5
Please contact 855-HD-HAMPTON for f
HAMPTONBAY.COM
urther assistance.
1-
Pre-Assembly (continued)
PACKAGE CONTENTS(SOFA)
H
J
I
G
K
L
G Seat
1
H Back
1
C
Left Arm
1
F
Right Arm
1
D
Back Cushion
1
E
Seat Cushion
1
H
D
C
G
E
F
Part
Description
Quantity

6
Please contact 855-HD-HAMPTON for f
HAMPTONBAY.COM
urther assistance.
1-
I
J
K
L
M
N
Assembly
1
Attaching to side skirts to the
2
Attaching the front skirt
3
Attaching the table woven top
4
□
Completing the assembly
□
□
□
□
□
□
Place the back skirt (P) on a soft surface.
Attach the right side skirt (N) and the left side skirt (M)
to the back skirt (F) by aligning holes on the side
skirt (M)and (N) with the holes on the back skirt (P).
And inserting bolts (CC) with washers (DD). Tighten
half way using the Hex wrench (HH). Do not tighten
completely.
bolts (CC) with washers (DD).D
Put the front(O) onto the assembling table.
Tighten with o not fully
tighten .
Put the top (K) on a soft surface.
Use bolts (AA) to attach (N)and (M) to the top (K).
Fasting halfway using allen wrench (HH)
5
Please contact 855-HD-HAMPTON for f
HAMPTONBAY.COM
urther assistance.
1-
X2
_CC
AA
BB
_DD
X2
N
P
Fig1
Fig1
CC
DD
X2
_CC
_DD
X2
P
N
M
O
P
C
D
CC
DD
X4
_CC
_DD
X4
back skirt
M
N
F
E
K
X4
_CC
_DD
X4
XFF
_CC
Check and make adjustments as needed.
Fully tighten all the bolts (CC) with the Hex wrench
(HH) and cover with the bolt caps (DD).
Place the glass top(L) on the woven top (K) This table
is now ready for your enjoyment.
□
PACKAGE CONTENTS(COFFEE TABLE)
1
Table top
I
1Base J
2
1
L
1
M
triks kcaB
K
Side skirts
Front skirt
Part
Description
Quantity
K
I
M
J
K
L

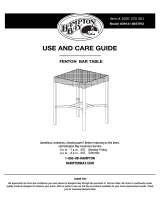
Chair Assembly
1
Attaching the right arm
2
Attaching the back
3
Attaching the left arm
4
Completing the assembly
Place the right arm (D) on a soft surface.
Attach the seat (A) to the right arm (D) by aligning
holes on the seat (A) with the holes on the right arm
(D) and inserting bolts (BB) with washers (EE).
Tighten half way using the Hex wrench (GG).
Tighten half way using the Hex wrench (GG).
Tighten half way
using the Hex wrench (GG).
Put the back ( B ) metal side into the hole of arm (D).
Attach right arm (D) to the back (B),fasten bolts (BB) and
washer (EE).
Insert two pins on the back (B)into the holes on arm (D) ,
fasten bolts (AA) and washer (EE).
Repeat steps1 and 2 to attach the left arm (C)
Check and make adjustment as needed.
Fully tighten all the bolts with the Hex wrench(GG) .
Place the seat cushion (F) and the back cushion(E)
on the chair.
This chair is now ready for your enjoyment.
7
Please contact 855-HD-HAMPTON for f
HAMPTONBAY.COM
urther assistance.
1-
EE
A
D
C
B
□
□
□
□
□
□
□
□
A
D
B
AA
BB
EE
BB
EE
BB
EE
CC
BB
EE
BB
BB
EE
□
□
E
F
A
D

Sofa Assembly
3
Attaching the left arm
4
Adding the caps
Repeat steps1 and 2 to attach the left arm (C)
Check and make adjustment as needed.
Fully tighten all the bolts with the wrench(GG) and
cover with the bolt caps (EE).
Place the seat cushion (F) and the back cushion(E)
on the chair.
This chair is now ready for your enjoyment.
AA
X2
BB
X2
AA
X4
BB
X4
AA
X3
BB
X3
EE
□
□
□
□
G
D
H
G
D
C
G
D
H
AA
AA
BB
BB
AA
BB
AA
AA
BB
BB
AA
BB
CC
X9
1
Attaching the right arm
2
Attaching the back
3
Attaching the left arm
4
Completing the assembly
Tighten half way using the Hex wrench (GG).
Tighten half way
using the Hex wrench (GG).
Put the back ( H ) metal side into the hole of arm (D).
Attach right arm (D) to the back (H),fasten bolts (BB) and
washer (EE).
Insert three pins on the back (B)into the holes on arm (D) ,
fasten bolts (AA) and washer (EE).
Repeat steps1 and 2 to attach the left arm (C)
Check and make adjustment as needed.
Fully tighten all the bolts with the Hex wrench(GG) .
Place the seat cushion (F) and the back cushion(E)
on the chair.
This chair is now ready for your enjoyment.
EE
D
C
□
□
□
□
□
□
□
□
A
D
B
AA
BB
EE
BB
EE
BB
EE
EE
BB
EE
BB
BB
EE
□
□
E
F
8
Please contact 855-HD-HAMPTON for f
HAMPTONBAY.COM
urther assistance.
1-
Place the right arm (D) on a soft surface.
Attach the seat (G) to the right arm (D) ,fasten with
bolts (BB) with washers (EE). Tighten half way using
the Hex wrench (GG).

1
Attaching to side skirts to the
2
Attaching the front skirt
3
Attaching the table woven top
4
Completing the assembly
□
□
□
□
□
Place the back skirt (N) on a soft surface.
Attach the right side skirt (L)to the back skirt (N),
Tighten half way using
the Hex wrench (DD).
fasten
with bolts ( BB) and washer (CC).
Repeat previous step for the left side skirt (K) .
Put the top (I) on a soft surface.
Use bolts (BB) and washer (CC) to attach (K) and (L)
to the top (I).Fasting halfway using Hex wrench (DD).
9
Please contact 855-HD-HAMPTON for f
HAMPTONBAY.COM
urther assistance.
1-
X2
_BB
BB
CC
_CC
X2
L
N
Fig1
Fig1
BB
CC
X2
_BB
_CC
X2
N
L
K
M
N
K
L
BB
CC
X4
_BB
_CC
X4
back skirt
K
L
N
M
I
X4
_BB
_CC
X4
Coffee table Assembly
□
□
Check and make adjustments as needed.
Fully tighten all the bolts (BB) with the Hex wrench(CC) .
Place the glass top(J) on the woven top (I) This table
is now ready for your enjoyment.
□
bolts (BB) with washers (CC).D
Put the assembling table onto the .
Tighten with o not
fully tighten .
front (M)
AA
EE
1
Attaching to side skirts to the
2
Attaching the base
3
Attaching the front side
4
□
Fastening the bolts
□
□
□
□
□
□
Attach the right side skirt (K)to the back skirt (M),
Tighten half way using
the Hex wrench (GG).
Place the back skirt (M) on a soft surface.
fasten
with bolts ( AA) and washer (EE).
Repeat previous step for the other side skirt .
AA
EE
J
M
Fig1
Fig2
AA
EE
M
K
K
back skirt
□
Put the base (J) on side skirt (K) as shown ,fasten with
bolts (AA) with washers (EE).Tighten half way using the
Hex wrench (GG).
K
K
K
M
L
K
K
L
I
N
Fully tighten
all the bolts (AA) with
Turn the assembling storage box upward as shown.
Check and make adjustment as needed.
Hex wrench (GG).
bolts (AA) with washers (EE).D
Put the assembling table onto the .
Tighten with o not
fully tighten .
front (L)
M
K
J
AA
E
E
K
L
M

Completing the assembly
6
□
□
his table is now ready for your enjoyment.
Attach side skirt (K) by aligning hole on the top (I) with
the hole on the piston.
Insert a bolt (AA) with washer (EE) and (FF) , fully
tighten with Hex wrench (GG).
Repeat below step for the other side skirt (K).
T
10
Please contact 855-HD-HAMPTON for f
HAMPTONBAY.COM
urther assistance.
1-
□
□
K
K
I
M
L
Coffee table Assembly
I
5
□
Attaching the top
□
EE
CC
EE
DD
L
Make the holes on (L) and top (I )in a line.
Put long bolts(CC) going through the holes and
tighten with locking nuts (DD) by using wrench (HH)
and Hex wrench(GG), fully tighten.
EE
CC
EE
DD
AA
EE
FF

Care and Cleaning
□
□ If your set includes cushions or mesh fabric, they may be cleaned by hand with a mild solution of soap and water.
Rinse cushion thoroughly and allow to drip dry. Do not machine wash or tumble dry, as cushions may shrink.
□
Do not use bleach or solvents on fabrics. When cleaning the table top make sure to use a soft, clean cloth that
a cool, dry place.
does not bleed color as well.
Before using, wipe with a clean, dry cloth. Do not use bleach or solvents. When not in use, store furniture in
11
Please contact 855-HD-HAMPTON for f
HAMPTONBAY.COM
urther assistance.
1-

Questions, problems, missing parts? Before returning to the
store,
call Home Depot Customer Service
8 a.m. - 6 p.m., EST, Mon day-Friday
Retain this manual for future use.
HAMPTONBAY.COM
855-HD-HAMPTON
-1
/