Analog way Vertige Quick start guide

Category
Flat panel accessories
Type
Quick start guide

This manual is also suitable for

Analog Way Vertige VRC300 is a powerful high-end remote controller that brings simple and flexible show creation and management to the user's fingertips. It can control several screens and multiple LiveCore™ devices independently or linked, and other devices over IP such as Midra switchers, matrix routers, media players, or PTZ cameras.

Analog Way Vertige VRC300 is a powerful high-end remote controller that brings simple and flexible show creation and management to the user's fingertips. It can control several screens and multiple LiveCore™ devices independently or linked, and other devices over IP such as Midra switchers, matrix routers, media players, or PTZ cameras.

Verge™ - Ref. VRC300
QUICK START GUIDE
Thank you for choosing Analog Way and the Verge™. By following these simple steps, you will be able to
setup and use within minutes your powerful high-end Remote Controller. Verge™ is a revoluonary Remote
Controller integrang new ways of creang and managing large events and mul-venues. The Verge™ brings
a simple and exible approach to show creaon and management. Verge™ can control several screens and
mulple LiveCore™ devices (Ascender 48 - 4K - PL, Ascender 32 - 4K - PL, Ascender 16 - 4K, SmartMatriX Ultra,
NeXtage 16 - 4K, NeXtage 08 - 4K), independently or linked with an idencal device (addive modularity),
linked with an expansion module, or synchronized (associave modularity). Verge™ can also control other
devices over IP, such as Midra switchers, matrix routers, media players, PTZ cameras.
• 1 x Vertige™ (VRC300)
• 2 x Power supply cords
• 1 x User manual (PDF version)*
• 1 x Quick start guide (PDF version)*
* User manual and Quick start guide are available on www.analogway.com.
REAR PANEL DESCRIPTION
Read the following secons in the given order to
get started with Verge™:
• Rear panel descripon
• Front panel descripon
• Seng up the Verge™
• Conguring a Show
• Running a Show
If connecng the Verge™ and the devices directly,
make sure to use an Ethernet crossover cable (the
Verge™ connects to the controlled devices with
standard Ethernet LAN networking equipment).
Otherwise you can use a standard Ethernet hub
and straight cables.
1. Power Supply:
Dual, redundant power supply with fuse as standard
equipment.
2. On/O buon:
Switch on/o the device.
3. Connecon panel:
Ethernet LAN adapters for device control.
1 2
3
Go to our website to register your product(s)
and be noed about new rmware versions:
hp://bit.ly/AW-Register
WHAT’S IN THE BOX
GETTING STARTED WITH THE VERTIGE
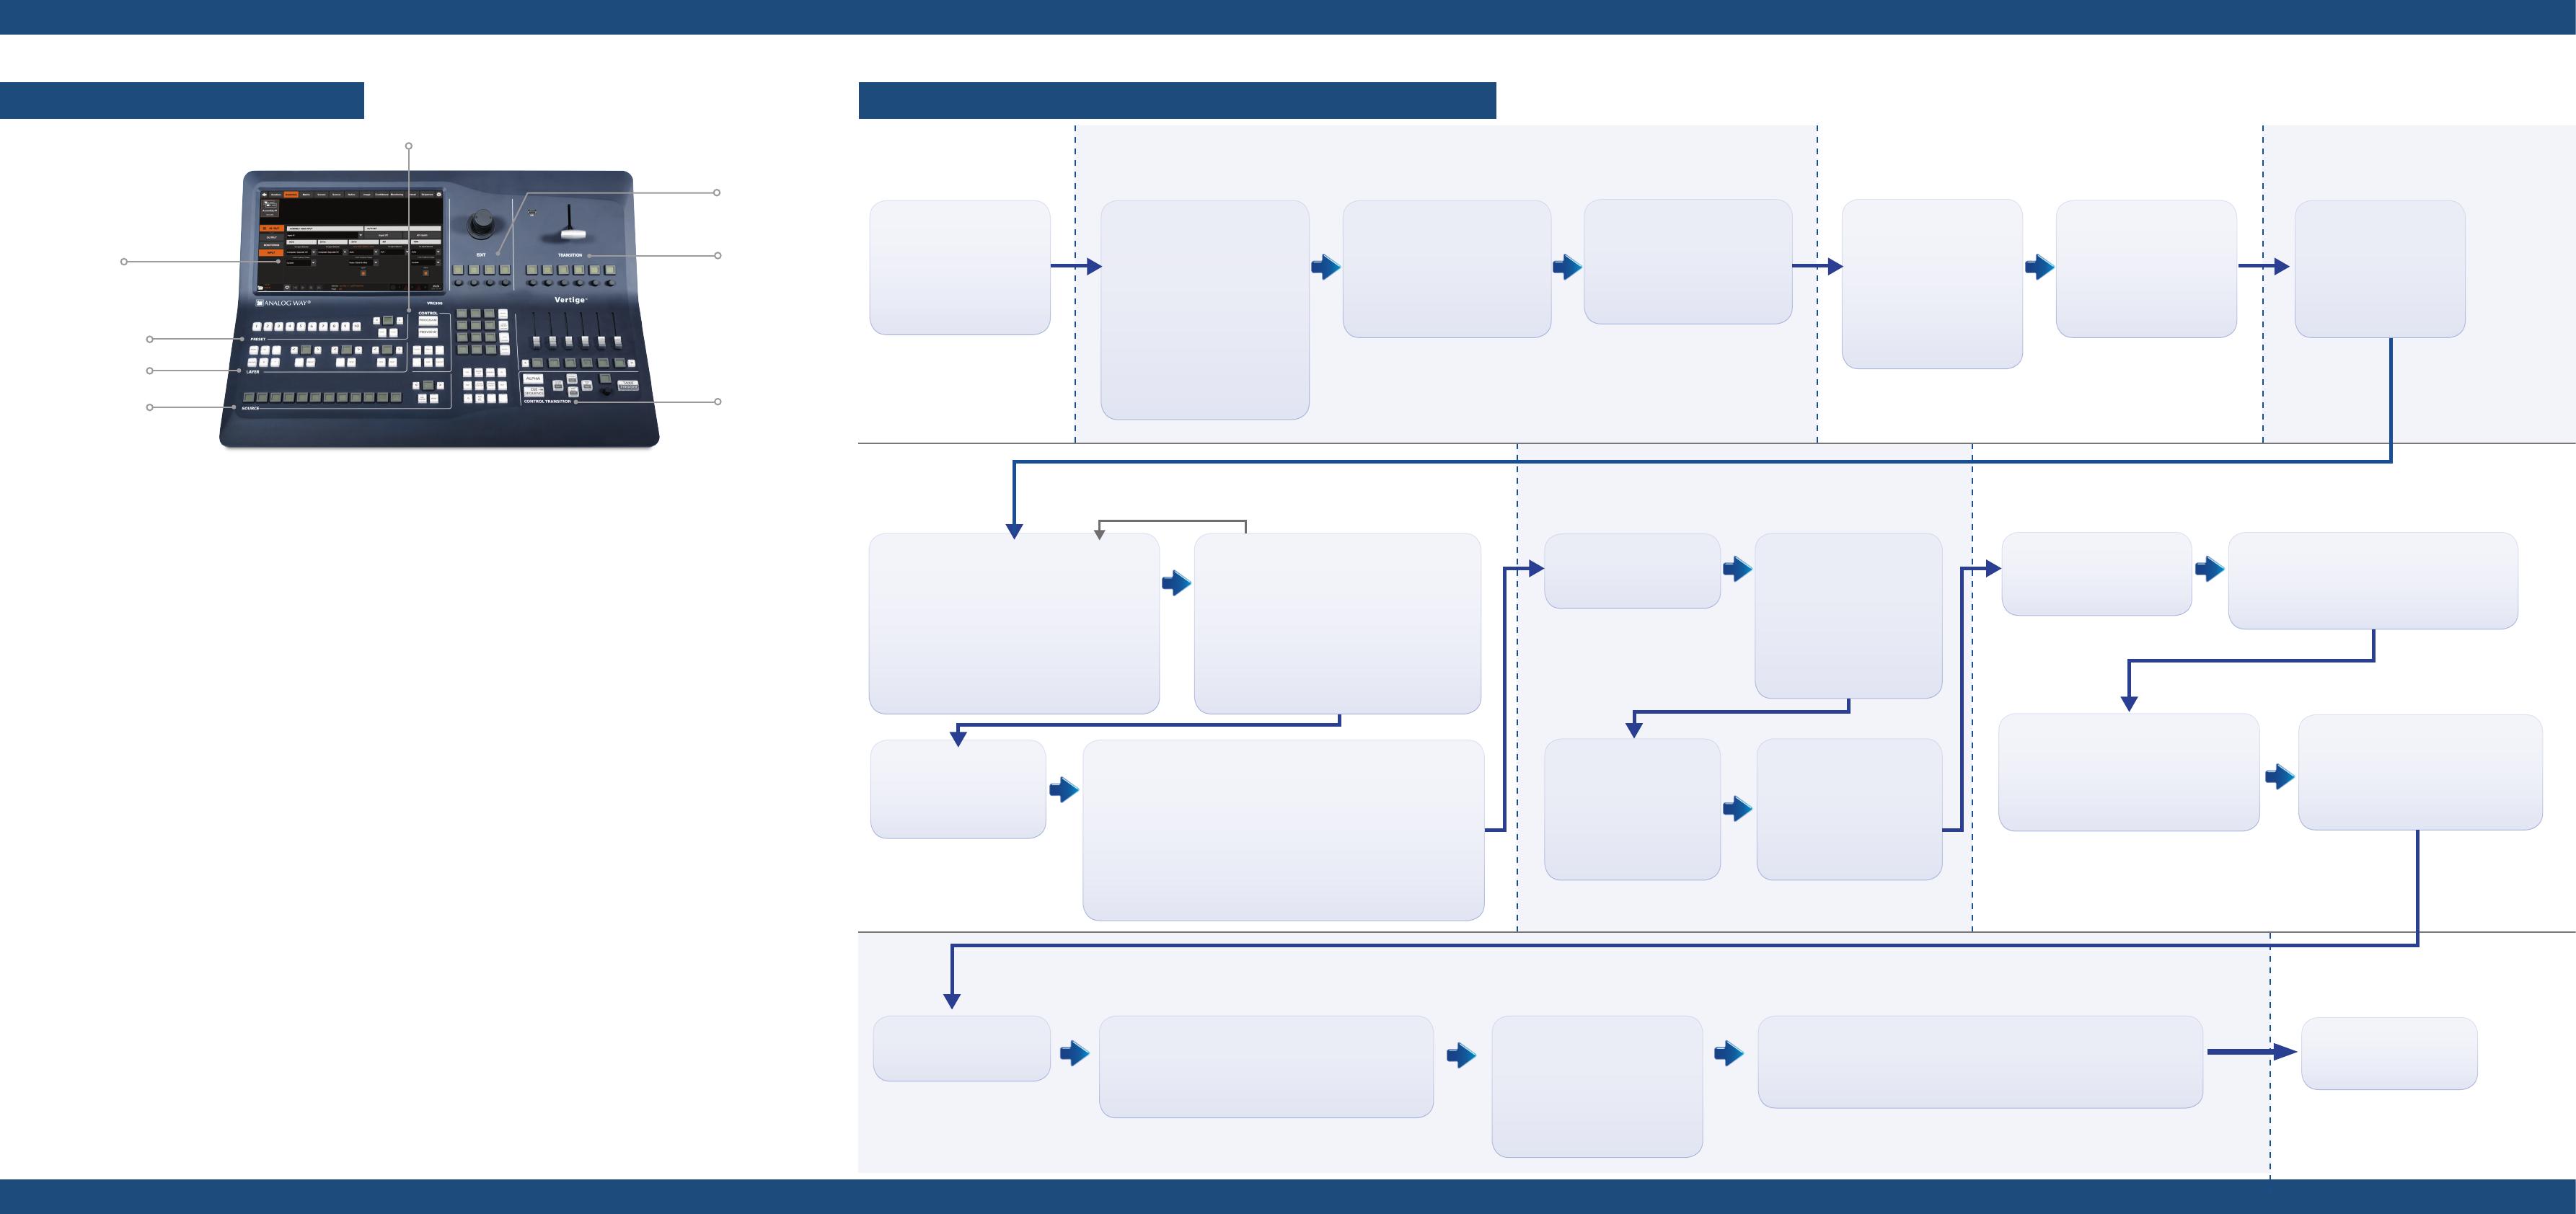
FRONT PANEL DESCRIPTION SETTING UP THE VERTIGE & CONFIGURING A SHOW
1- Touch screen
The 15’’6 wide touchscreen comfortably displays on
the same page the representaon of the Program
& Preview of a typical scene (Blend + 2 satellites).
The representaon of the whole scene will allow you
to work on mulple layers from dierent screens at
the same me (to change background sources, for
example). The representaon of both Program &
Preview states will allow you to switch presets at any
me (even during an eect) like with the LiveCore™
series.
2- Preset secon
This secon allows you to save and load your
scene presets. 10 preset keys and a page browsing
mechanism allows you to organize and access up to
100 presets.
3- Layer secon
This secon allows you to select layers in dierent
screens and edit them simultaneously. Mulple layer/
screen criteria can be used to perform advanced
layer selecons.
4- Source secon
This secon allows you to assign sources to the
selected layers on Program or Preview. 12 source
keys and a page browsing mechanism allows you to
organize and access up to 120 sources. The name of
a source will be displayed on the corresponding LCD
key.
5- Control secon
This secon allows you to select the preset to work
with (Program or Preview), and apply basic funcons
to all selected layers (like Freeze, Clear, Unify...).
6- Edit secon
This secon allows you to edit the selected layers in
three dierent ways: roughly via the joysck, nely
via the encoders or directly via the numpad. With
its 12 contextual LCD keys, the block displaying the
numpad (the EDIT pad) also provides access to a
variety of edit tools such as pages of shortcuts, layer
presets and macros.
7- Transion secon
This secon allows you to use the T-Bar for a smooth
transion eect between presets. The individual,
motorized sliders can be used to transion individual
screens, and they show the current state of the
screen.
8- Control Transion
This secon allows you to take all your acve screens
and control the transion me globally.
You can also enable the CUE SEQUENCE buon to
control the cue sequence playback (play, next step,
stop ...).
1
2
3
4
8
7
5
6
Starng the Verge™
Press Start
Creang a User
Select the CREATE opon.
Enter a name and
a password (oponal).
Press Create.
Conguring the Verge™
Network
Press the SETTINGS buon in
the upper-right corner.
Select the Network tab then
the EDIT opon.
Select the Ethernet port you
want to use.
Enter the desired IP address,
subnet mask and gateway.
Press Apply.
Logging in
Select the LOGIN opon.
Select a user.
Press Login.
Creang a Show
Select the CREATE opon.
Enter a name.
Press Create.
Note: Creang a show
will automacally create a
default iteraon.
Loading a Show
Select the LOAD opon.
Select a show.
Press Load.
Wizard Step 1 (Assembly)
In the Device Type eld, select the type of
device that will be handled by this assembly.
In the Device Extension eld, select the opon
that matches your assembly conguraon
(Single, Linked with Slave, Linked with LOE
or Synchronized). If your device(s) have an
opon (4K or 4K - PL), then make sure to
select it in the Device Opon eld.
Wizard Step 2 (Devices)
Enter the IP address of the Master device. If
you have selected the Synchronized opon,
then check the Slave #X boxes to enable
up to three addional devices that will be
synchronized with the Master device. Then
adjust each device IP address to match
your network conguraon. Press the Next
buon to connue.
Wizard Step 4 (Screens)
Rename each screen if necessary, select the mode (Grid or
Custom Canvas) and congure the corresponding sengs. Press
Create.
Note 1: The wizard will automacally create an assembly with its devices
and streams, the screens, the sources and the front panel key bindings.
Note 2: If your event requires creang other devices and screens, use
the wizard as many mes as necessary.
Note 3: Aer using the wizard, you may have to adjust some default
sengs (assemblies / screens / sources / ...).
Wizard Step 3 (Scene)
Select the total number
of screens wired to your
devices.
Conguring an Assembly
Select the ASSEMBLY tab.
Select an assembly.
Conguring a Source
Select the SOURCE tab.
Select a source.
Running the Show
Select the PRESET tab
Enjoy!
Conguring a Screen
Select the SCREEN tab.
Select a screen.
Conguring the Internal Rate
Select the PRECONFIG/RATE
opon.
Choose the desired
mode (Internal, Follow or
Framelock).
Adjust the sengs.
Renaming the Source
Select the EDIT opon.
Enter a name / Press Apply.
Note: Use a short name with a maximum of two
words to ensure readability on LCD buons.
Conguring the screen areas
Select the AREA / LAYOUT opon. Congure
the format seng (ming, rotaon...) as well
as the AOI and Posion (Custom Canvas mode
only).
Conguring the Inputs
In the le menu, select IN/
OUT and then INPUT.
Press All Inputs to set up
automacally all the inputs
of the devices.
Conguring the Source key
binding
Select the EDIT opon.
Navigate to an available key.
Press the corresponding buon
on the touchscreen.
Press Apply.
Conguring the streams mapping
Select the MAP / QUICK opon.
Select the nave stream that will get displayed on the selected nave
layers when the corresponding source key is pressed in the front panel.
Conguring the Screen Mapping
Select the AREA / MAP opon.
Make sure each screen area is mapped
to the correct device output.
Conguring the Streams
Select the STREAM / LIVE
opon.
Make sure each "Live"
stream matches the correct
input plug.
Conguring the So Edge blending
(Grid mode only)
Select the BLENDING opon.
Adjust the covering.
Adjust the black levels.
Adjust the blending curves.
Loading an Iteraon
Select the LOAD opon.
Select an iteraon.
Press Load.
5
8
9
6 7
1 2 3 4
Analog Way SAS - Headquarters
Tel.: +33 (0)1 81 89 08 60
Fax: +33 (0)1 57 19 04 54
2/4 rue Georges Besse
92160 Antony
FRANCE
Sales/General informaon:
saleseuro@analogway.com
Technical support:
techsupport@analogway.com
Tel.: +33 (0)1 81 89 08 76
Analog Way Inc.
Toll free: +1 855 353 4988
Fax.: +1 646 779 3890
3047 Summer Oak Place
Buford, GA 30518
USA
Sales/General informaon:
salesusa@analogway.com
Technical support:
techsupport@analogwayusa.com
Analog Way Pte Ltd
Tel.: +65 6292 5800
Fax: +65 6292 5205
152 Beach Road
#15-03 Gateway East
SINGAPORE 189721
Sales/General informaon:
sales@analogwayasia.com
Technical support:
techsupport@analogwayasia.com
RUNNING THE SHOW
Layer Selecon
Backgrounds, frames, PIPs, and logos are all considered layers.
Selected layers are highlighted in orange on the touchscreen.
The rst selected layer is further highlighted with a viewnder
icon. To select a layer, there are several opons:
Selecng Layers from the touchscreen: At any me when the Preset page is displayed, a layer may be
selected by directly touching it on the touchscreen. Touching another layer will release your current selecon
and select the new layer. To select mulple layers, or remove a layer from your selecon, you will need to use
the [+]/[-] selecon modier keys on the Verge™ keyboard.
Selecng Layers from the Layer Selecon buons: At any me, a layer or group of layers may be selected
by directly pressing one of the Layer Selecon buons (please read the user manual for further informaon
on this topic).
Source selecon
Sources allow you to:
• Fill a layer or group of layers with a source.
Fill a nave layer or group of nave layers with a nave
source (the NATIVE mode must be enabled).
All the sources and nave sources need to be congured beforehand during show setup. Sources and their
corresponding key bindings can be automacally created when using the Iteraon Wizard. Nave sources on
the other hand must be created manually.
Use the [<]/[>] buons to navigate source pages and nd a source. Then simply press the corresponding
source key to ll the selected layer(s) with the source.
Transion secon
You have dierent opons to transion from Preview to Program:
- The T-Bar for a manual smooth transion
- The Take buon for an automac med transion
- Independent faders for a manual transion per screen.
Below each fader, there is an LCD key displaying the name of
the Screen associated to the fader; use the [<]/[>] buons to shi the view if you have more than 6 screens
in your scene.
Preset selecon
A Preset contains all the layer informaon about all
the layers on all acve screens. Presets stored using the
Verge™ console are stored within the Verge™ show, and
can be exported and imported to another console. By default, the unit will operate in preset Load mode.
To save a preset, rst create the content that you wish to save on either the program or preview screens. To
save a preset from Program, make sure that the PROGRAM buon is selected. To save a preset from Preview,
make sure that the PREVIEW buon is selected. To save a preset, acvate the SAVE buon. Navigate to the
required preset bank slot page and then press once on the corresponding preset slot buon. The preset
buon will turn yellow, indicang that the preset has been successfully saved. Note that the system will
automacally switch back to preset Load mode. If you aempt to overwrite an exisng preset, you will need
to conrm the acon by pressing the blinking preset buon again.
To load a preset, rst make sure that the PREVIEW buon is selected if you wish to load the preset to Preview,
or that the Program buon is selected if you wish to load the preset to Program. To load a preset, make sure
the LOAD buon is acvated. Navigate the preset bank pages if required and then press the preset
slot buon
corresponding to the preset you wish to load. The preset will be loaded to program or preview, depending
on which buon has been selected. If you have loaded your preset to preview, you will need to press TAKE to
view it on the Program screens. If you load a preset directly to program, the new aributes including sources,
size, posion, border, etc will cut into place. Presets can be saved, loaded and renamed directly from the
Preset page. (Please read the user manual for further informaon on this topic).
For complete details and operaons procedures, please refer to the Verge™
Users manual and our website for
further informaon: www.analogway.com
140154 - 03/07/2017
Firmware: V04 - VRC300-QSG
All Analog Way products have a 3 year warranty on parts and labor, return to factory, but do not include
faults resulng from user negligence, any unauthorized modicaons, electrical surges, mishandling (drop/
crush), and/or any other damage caused by misuse.
Please note: The included carrying case and protecve foam is not covered under warranty.
WARRANTY AND SERVICE
CONTACT INFORMATION
GOING FURTHER WITH THE VERTIGE
UNITED STAT ES
FRANCE
ITALY
SINGAPORE
GERMANY
UNITED KINGDOM
UNITED STAT ES
FRANCE
ITALY
SINGAPORE
GERMANY
UNITED KINGDOM
UNITED STAT ES
FRANCE
ITALY
SINGAPORE
GERMANY
UNITED KINGDOM
UNITED STAT ES
FRANCE
ITALY
SINGAPORE
GERMANY
UNITED KINGDOM
The Americas
Europe, Middle East & Africa
Asia Pacific
  • Page 1 1
  • Page 2 2
  • Page 3 3

Analog way Vertige Quick start guide

Category
Flat panel accessories
Type
Quick start guide
This manual is also suitable for

Analog Way Vertige VRC300 is a powerful high-end remote controller that brings simple and flexible show creation and management to the user's fingertips. It can control several screens and multiple LiveCore™ devices independently or linked, and other devices over IP such as Midra switchers, matrix routers, media players, or PTZ cameras.

Ask a question and I''ll find the answer in the document

Finding information in a document is now easier with AI