Canon MP360 SERIES User manual
- Category
- Print & Scan
- Type
- User manual

HT1-22
3
4-
000
-V.1.
0
XX2
003
A
©
CANON INC. 2003
©
PRINTED IN THAILAND
120
V
ENG

Canon MP370/360 User’s Guide.
Copyright
This manual is copyrighted by Canon U.S.A., Inc. with all rights reserved.
Under the copyright laws, this manual may not be reproduced in any form, in whole or in part,
without the prior written consent of Canon U.S.A., Inc.
© 2003 Canon U.S.A., Inc.
Disclaimer
Canon U.S.A., Inc. has reviewed this manual thoroughly in order that it will be an easy-to-use guide
to your Canon MP370/360 Series. All statements, technical information and recommendations in
this manual and in any guides or related documents are believed reliable, but the accuracy and
completeness thereof are not guaranteed or warranted, and they are not intended to be, nor should
they be understood to be, representation or warranties concerning the products described.
Specifications are subject to change without notice.
As an ENERGY STAR partner, Canon U.S.A., Inc., has determined that this
product meets the ENERGY STAR guidelines for energy efficiency.
All information regarding non-Canon products was compiled from publicly available information.
No representation is made regarding the accuracy thereof.
Exif Print
This machine supports Exif 2.2 (also called “Exif Print”).
Exif Print is a standard for enhancing the communication between digital cameras and printers.
By connecting to an Exif Print-compliant digital camera, the camera’s image data at the time of
shooting is used and optimized, yielding extremely high quality prints.
Trademarks
• Canon is a registered trademark.
• ScanGear is a registered trademark of Canon Inc.
• MultiPASS is a trademark of Canon Inc.
• Microsoft
®
and Windows
®
are registered trademarks of Microsoft Corporation in the U.S. and
other countries.
• CompactFlash™ is a trademark of SanDisk Corporation.
•MEMORY STICK
®
is a registered trademark of Sony Corporation.
• SmartMedia™ is a trademark of Toshiba Corporation.
• Microdrive™ is a trademark of International Business Machines Corporation.
• MultiMedia Card™ is a trademark of the MultiMedia Card Association.
• xD-Picture Card™ is a trademark of Fuji Photo Film Corporation.
• SD Secure Digital™ is a trademark of Toshiba Corporation.
• All other product and brand names are registered trademarks or trademarks of their respective
owners.
Canon U.S.A., Inc.
One Canon Plaza
Lake Success, NY 11042, U.S.A.

1
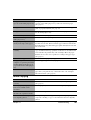
XHow To Use The Documentation Provided
Set-Up Sheet
(Printed documentation)
Be sure to read this sheet first.
This sheet includes instructions for setting up your machine and
getting it ready for use.
Follow all steps in this sheet before using your machine.
User’s Guide (This guide) Read this guide when starting to use the machine.
After following instructions in the Set-Up Sheet, read this guide for
instructions on printing from your computer, direct photo printing
from select digital cameras and memory cards (MP370 only),
copying, and scanning.
Software Guide
(Electronic documentation)
This guide is available on the Setup CD-ROM.
Refer to this guide for full instructions on printing and scanning
from your computer. This guide, included as a PDF file on the
Setup CD-ROM, describes details of each function, as well as the
methods of use of the MP Drivers and MP Toolbox. To read this
manual, see page 118.
Photo Application Guide
(Electronic documentation)
This guide is available on the Setup CD-ROM.
This guide, included as an HTML file, describes the utility
software on the Setup CD-ROM, such as Easy-PhotoPrint and
Easy-WebPrint, including instructions on how to scan data,
various printing methods, and details of functions. Like the
Software Guide, this guide also is included on the Setup CD-ROM.
To read this manual, see page 118.

2
X Contents
How To Use The Documentation Provided........1
Contents ............................................................2
Reading The Document.....................................4
1 Introduction
Features Of Your Machine .................................6
Main Components And Their Functions ............7
Machine..........................................................7
Operation Panel .............................................9
Menu Flow .......................................................11
2 Document Handling
Document Requirements .................................13
Loading Documents.........................................14
3 Paper Handling
Recommended Paper And Requirements .......15
Canon Specialty Media ................................15
Selecting The Correct Paper........................16
Canon Specialty Media ................................16
General Paper Guidelines............................20
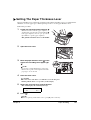
Setting The Paper Thickness Lever .................21
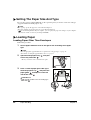
Setting The Paper Size And Type ....................22
Loading Paper .................................................22
Loading Paper Other Than Envelopes .........22
Loading Envelopes.......................................23
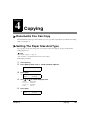
4Copying
Documents You Can Copy...............................25
Setting The Paper Size And Type ....................25
Making Copies .................................................26
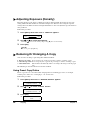
Adjusting Image Quality (Resolution) ..............27
Adjusting Exposure (Density) ..........................28
Reducing Or Enlarging A Copy........................28
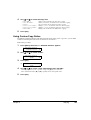
Using Preset Copy Ratios ............................28
Using Custom Copy Ratios ..........................29
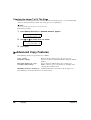
Copying An Image To Fit The Page .............30
Advanced Copy Features ................................30
Copying Two Pages To Fit Onto A Single
Page .....................................................31
Borderless Copying......................................32
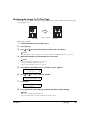
Repeating An Image On A Page..................34
Creating A Mirror Image...............................36
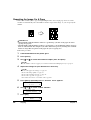
Shrinking An image To Fit The Page............37
5 Photo Printing From
A Memory Card (MP370)
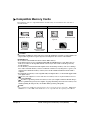
Compatible Memory Cards ..............................39
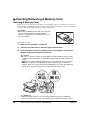
Inserting/Removing A Memory Card ...............40
Inserting A Memory Card.............................40
Removing A Memory Card...........................41
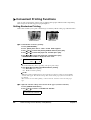
Convenient Printing Functions.........................42
Setting Borderless Printing ..........................42
Setting Vivid Photo Printing .........................43
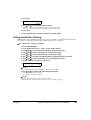
Setting Date Printing ....................................44
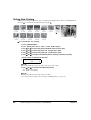
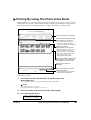
Printing By Using The Photo Index Sheet .......45
Printing All Images...........................................49
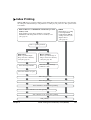
Index Printing...................................................51
Printing An Index..........................................52
Printing A Single Image ............................... 54
Printing A Range Of Images........................ 56
DPOF (Digital Print Order Format)
Printing................................................. 59
6 Photo Printing Directly From A
Digital Camera (MP370)
Paper Types For A Digital Camera.................. 61
Printing Directly From A Digital Camera.......... 62
7 Becoming Familiar With The
Software
Installing The Software.................................... 64
System Requirements..................................... 64
Software Components..................................... 66
MP Drivers................................................... 66
MP Toolbox.................................................. 66
Utility Software............................................. 66
Using The MP Toolbox To Scan Images ......... 66
Uninstalling, Reinstalling The Software........... 67
Uninstalling The MP Toolbox ....................... 67
Uninstalling The MP Drivers ........................ 68
Reinstalling .................................................. 68
8 Printing From Your Computer
Before Printing ................................................ 69
Is The Software (MP Drivers) Installed?...... 69
Is The Machine Specified As
[Set as Default Printer]?....................... 69
Is The Correct Paper Set In The
Multi-purpose Tray? ............................. 69
Printing Documents......................................... 70
Canceling Printing ........................................... 71
Canceling Before The Machine Starts
Printing................................................. 71
Canceling After the Machine Starts
Printing................................................. 71
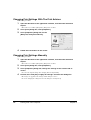
Changing Print Settings .................................. 71
Changing Print Settings With The Print
Advisor................................................. 72
Changing Print Settings Manually ............... 72
9Scanning
About Scanning Images.................................. 73
Before Scanning.............................................. 73
Scanning Methods .......................................... 73
Scanning Using The MP Toolbox................. 74
Scanning From An Application Software ..... 75
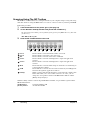
Scanning With The Operation Panel
Of The Machine ................................... 76
10 Maintenance
Replacing Ink Tanks ........................................ 77
Low Ink Warning .......................................... 77
When To Replace An Ink Tank .................... 77
Compatible Ink Tanks .................................. 77
Replacing An Ink Tank................................. 78
Resetting The Ink Counter........................... 80

3
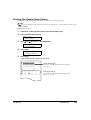
Checking The Ink level .................................81
Maintaining The Print Head .............................82
Flowchart Of Print Head Maintenance .........82
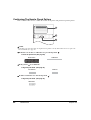
Printing The Nozzle Check Pattern ..............83
Confirming The Nozzle Check Pattern.........84
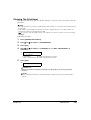
Cleaning The Print Head..............................85
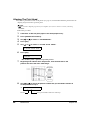
Aligning The Print Head ...............................86
Using The Calibration Function....................87
Setting The Power Save Timer.....................88
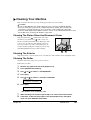
Cleaning Your Machine....................................89
Cleaning The Platen Glass And Document
Cover....................................................89
Cleaning The Exterior ..................................89
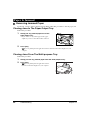
Cleaning The Roller .....................................89
11 Troubleshooting
Problems Installing And Uninstalling
Software ...............................................90
MP Drivers/MP Toolbox ................................90
MP Toolbox Only...........................................90
MP Drivers Only ............................................90
Paper Is Jammed.............................................92
Removing Jammed Paper.............................92
Clearing Jams In The Paper Output
Tray ......................................................92
Clearing Jams From The Multi-purpose
Tray ......................................................92
If There Are Repeated Paper Jams ............93
No Power .........................................................94
Nothing Displays On The LCD (There Is No
Power) ..................................................94
Cannot Copy Or Print ......................................94
Cannot Print At All, Cannot Print Correctly....94
When Copying Or Printing From A
Computer..............................................94
When Copying ............................................95
Paper Curls ...................................................96
Outputting Stops In-progress ........................96
When Copying Or Printing From A
Computer..............................................96
When Copying ............................................96
Memory Card Problems (MP370) ....................97
Memory Card Is Not Recognized ..................97
Images On The Memory Card Are Not
Recognized ..........................................97
Cannot Print Correctly From The Memory
Card......................................................97
Cannot Write To A Memory Card From PC...98
Removable Disk Does Not Appear In
Windows Explorer ................................98
The [Unplug/Eject] Icon Does Not Appear
(Windows 2000) ...................................98
The Machine Does Not Appear In [Hardware
devices] In The [Add/Remove
Hardware] Dialog Box
(Windows 2000) ...................................99
In Windows Explorer, You Cannot Display
[Thumbnails] (Windows 2000)..............99
The Memory Card Is Recognized As A Drive
Other Than [Removable Disk]..............99
Computer Cannot Be Started ....................... 99
Problems Printing From Your Computer ....... 100
Cannot Print To A Shared Printer ............... 101
Problems Scanning....................................... 101
You Tried To Create A Multi-page PDF,
But Were Not Able To Scan
Multiple Documents ........................... 103
When You Click A Button On The MP
Toolbox, An Unwanted Application
Opens ................................................ 103
You Opened The Properties Dialog Box
From The [Scanners and Cameras]
Icon And Changed The Settings,
But The Settings Were Not
Activated (Windows 2000) ................. 103
Cannot Scan Correctly With Multi-Scan ..... 104
Scanned Image Is Displayed Large
(Small) On The Computer Screen ..... 104
The Cover Cannot Be Closed ....................... 105
The Inner Cover Cannot Be Closed............ 105
The Paper Output Tray Cannot Be
Closed................................................ 105
The Paper Output Tray Cannot Be
Opened .............................................. 105
When The [Alarm] Lamp Flashes ............... 106
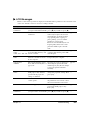
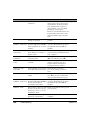
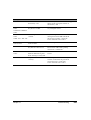
LCD Messages ........................................... 107
Cannot Print Properly From A Digital
Camera (MP370) ............................... 110
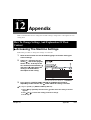
12 Appendix
How To Change Settings, And Explanation
Of Their Content ................................ 111
Accessing The Machine Settings................ 111
Settings ......................................................... 112
Function key: [COPY] ................................ 112
Function key: [PHOTO PRINT] (MP370) ... 113
Function key: [Additional Functions].......... 114
Settings For Paper Types ............................. 116
For Copying ............................................... 116
For Photo Printing (MP370)....................... 116
For Photo Index Sheet Printing (MP370)... 117
Displaying Electronic Manuals Stored On
The Setup CD-ROM .......................... 118
About The Software Guide............................ 120
About The Photo Application Guide .............. 120
Using The Online Help .................................. 121
Using The Utility Software............................. 121
Safety Information ......................................... 122
Legal Limitations On Use Of Your Product
And Use Of Images ........................... 128
Users In The U.S.A. ...................................... 129
Specifications ................................................ 130
General Specifications............................... 130
System Requirements ............................... 132
Copy Specifications ................................... 132
Photo Print Specifications (MP 370).......... 133
Print Specifications .................................... 133
Scan Specifications ................................... 134
Index ............................................................. 135

4
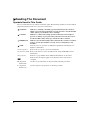
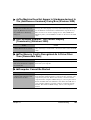
XReading The Document
Symbols Used In This Guide
Please read the list below of symbols used in this guide. The following symbols are used to indicate
important instructions. Be sure to obey these instructions.
WARNING
Indicates a warning concerning operations that may lead to death or
injury to persons if not performed correctly. In order to use the machine
safely, always pay attention to these warnings.
CAUTION
Indicates a caution concerning operations that may lead to injury to
persons or damage to property if not performed correctly. In order to
use the machine safely, always pay attention to these cautions.
IMPORTANT
Indicates operational warnings and restrictions. Be certain to read these
items to operate the machine correctly, and to avoid damage to the
machine.
NOTE
Indicates notes for operation or additional explanations. Reading these is
highly recommended.
See Set-Up Sheet Refer to the Set-Up Sheet for more information.
See Software Guide Refer to the Software Guide (included on the Setup CD-ROM) for more
information.
(See page nn) Indicates a page number where additional information can be found.
Indicates the description applies to the machine when connected to a
computer.
z (Operation
branch title)
Used for an operation that can be performed in branch procedures.
1. (Operation
branch text)
Used to explain each operation of a branch procedure.
PC

5
Keys Used In This Guide
Please read the descriptions below of notations of keys and messages used in this guide.
Terms Used In This Guide
Please read the list below of terms and abbreviations used in this guide.
[key name] Text enclosed in these brackets indicates a key on the operation panel of the
machine or an item on the computer to be manipulated.
Example: [Color]
<message> Text enclosed in these brackets indicates a message or selectable menu item
which appears on the LCD (Liquid Crystal Display).
Example: <PHOTO PAPER PRO>, <OFF>
machine General term used to represent the MP370 or MP360.
default A setting that remains in effect unless you change it.
document The original sheets of paper, pages of a book, or photographs you copy or
scan with the machine.
paper Paper on which you can print with the machine.
menu A list of settings from which you select an item to set up or change. A menu
has a title which appears on the LCD.
click,
double-click
Term that indicates selecting a command or option on your computer,
generally with a mouse.
point Term that indicates moving a mouse pointer onto a desired item.
right-click Term that indicates clicking the right button of a mouse.
/(Slash) Used when consecutively listing OS or model names. For example,
“Windows 2000/XP” indicates “Windows 2000” and “Windows XP.”
PC
PC
PC

6 Introduction Chapter 1
Chapter
1
Introduction
X Features Of Your Machine
Thank you for purchasing the Canon MP370/360. Your machine incorporates the following
functions in one simple-to-operate device:
You may select to use your machine as a stand-alone device for copying and photo printing
(MP370). Alternatively, connect your machine to a computer and you will have a fully integrated
printer/copier/scanner/photo printer. The utility software supplied with your machine enables you
to perform a variety of tasks from your computer effortlessly and efficiently.
Photo printer . . . . . . . . .
(MP370 only)
Prints photo-quality images from any digital camera or memory card,
without using a computer.
Copier . . . . . . . . . . . . . . . Makes color or black & white copies. Also, applies advanced copy
features to your copies.
Printer. . . . . . . . . . . Prints photographs, vivid color and crisp black and white documents
from your computer.
Scanner . . . . . . . . . . Scans high-resolution images to your computer and processes them
easily using the utility software supplied.
PC
PC

Chapter 1 Introduction 7
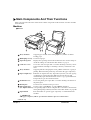
X Main Components And Their Functions
This section provides the name and location of main components of this machine, and also describes
their functions.
Machine
z Exterior
* MP370 only
Tray extension Supports paper loaded on the multi-purpose tray. Pull it out before
loading paper.
Multi-purpose tray Used to load paper.
Operation panel Displays the operating status of the machine. It is also used to change or
check the settings of each function. For details, see page 9.
Card slot cover* Covers the card slot. Open this cover when inserting a memory card or
Compact Flash card adapter containing a memory card into the card
slots.
Tray extension Supports printouts. Grasping the notch, pull this out before copying or
printing. When not being used, keep it closed in the paper output tray.
Paper output tray Printouts are output to this tray. Open the tray before you start copying
or printing, by pressing the Open button. If closed, the tray will
automatically open when the machine starts to copy or print. When not
being used, keep it closed in the machine.
Document cover Covers the platen glass. Open this cover when loading a document on
the platen glass.
Platen glass Used to load a document to be processed.
Direct print port
(for digital camera)*
Used to connect a PictBridge- or Canon Bubble Jet Direct-
corresponding digital camera or digital video camcorder to the machine
when printing images directly from the camera. For details, see page 60.
Open button Press this button to open the paper output tray accommodated in the
machine.
IMPORTANT
• The paper output tray will not open when the machine is placed on a tilted surface.

8 Introduction Chapter 1
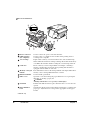
z Rear view and interior
* MP370 only
Power connector Used to connect the power cord of the machine.
USB connector
(for computer)
Used to connect a computer to the machine when printing from or
scanning to the computer.
Access lamp* Lights when a memory card is inserted into the card slot. This lamp
flashes while the machine is reading or writing data from/to the memory
card. When the machine finishes reading the card, the lamp shuts off.
Card slot* Insert a memory card or Compact Flash card adapter containing a
memory card into these slots when photo printing. The machine is
equipped with two kinds of card slots.
Memory card eject
button*
Press this button to remove the Compact Flash card adapter, Microdrive
memory card, or CompactFlash from the card slot.
Print head holder Used to install a print head.
Inner cover Open this cover when setting the paper thickness lever, replacing the
ink tanks, or clearing a paper jam.
CAUTION
• Printing with the inner cover open may result in injury.
Scan unit Lift this unit until it locks into place when the inner cover needs to be
opened.
Paper thickness
lever
Switches the distance between the print head and paper according to the
paper type. Adjust the lever to the position appropriate for the paper
loaded.

Chapter 1 Introduction 9
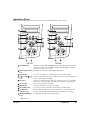
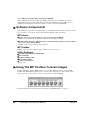
Operation Panel
This section describes the keys on the operation panel, and their functions and locations.
[ON/OFF] key Turns the machine ON and OFF. Before turning ON the machine, make
sure the scan unit is closed. When turning ON and OFF, keep the key
pressed for at least one second.
[Photo Index Sheet]
key*
Switches the machine to Photo Index Sheet mode.
[Menu] key Accesses the settings to customize operation of your machine.
[W (–)] and [X (+)]
keys
Scroll through menu selections, and increase or decrease the number of
copies or the image file number.
[Set] key Selects or confirms settings. Also, press this key to recover to standby
mode after correcting paper jams and other errors that stop printing.
[Color] key Starts color copying or scanning.
[Black] key Starts black & white copying or scanning.
[Stop/Reset] key Cancels operations and returns the machine to standby mode.
[Additional
Functions] key
Switches the machine to user mode, in which you can customize the
settings, including the ink level warning and maintenance settings.
[PHOTO PRINT]
key*
Switches the machine to photo print mode.
* MP370 only
MP370 MP360

10 Introduction Chapter 1
IMPORTANT
• When unplugging the power cord, be sure to press [ON/OFF] first. When you press [ON/OFF], the
print head is protected by the cap to prevent the ink from drying. Turn the machine OFF with [ON/
OFF]. When unplugging the power cord, be sure to unplug it after turning the machine OFF with
[ON/OFF].
• When not using the machine for a long time, to prevent degradation of the print head, print or copy
in both black & white and in color, or perform print head cleaning, about once a month.
• Numerous nozzles are installed in the print head for high-precision printing. Just as the uncapped tip
of a ballpoint pen or marker becomes dry and unusable if not used for a long period of time, the print
head nozzles become blocked by dried ink. Periodically printing or cleaning the print head can
prevent this blockage.
NOTE
• The power cannot be turned OFF with [ON/OFF] when the machine is performing printing, scanning or
copying operations.
• Your machine performs a print head cleaning every time you plug in the machine. This ensures optimum
print quality but also consumes a small amount of ink during the cleaning process.
[SCAN] key Switches the machine to scan mode. In scan mode, the machine scans a
document to your computer according to the settings selected. This key
is used when the machine is connected to a computer.
[COPY] key Switches the machine to copy mode.
[Alarm] lamp Flashes when the machine is turned ON or OFF, when an error occurs,
or when paper or ink has run out.
LCD (Liquid
Crystal Display)
Displays messages, menu selections, and the operation status.

Chapter 1 Introduction 11
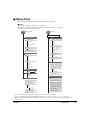
X Menu Flow
Refer to this menu flow when setting features of this machine.
NOTE
• For details on Special Copy features, see Chapter 4.
• For details on the Photo Print mode and Photo Index Sheet features, see Chapter 5.
• Default settings are shown in bold type.
ENLARGE/REDUCE
PRESET RATIO
25% MIN.
95% A4→LTR
100%
170% 5"×7"→LTR
212% 4"×6"→LTR
400% MAX.
ZOOM
25%-100%-400%
FIT-TO-PAGE
PAPER SELECT
SIZE
LTR
4"×6"
5"×7"
A4
TYPE
PLAIN
GLOSSY
HIGH RES.
TRANS.
PHOTO PRO
PHOTO PLUS
OTHER
DENSITY
-LT DK+
IMAGE QUALITY
NORMAL
FINE(PHOTO)
FAST
SPECIAL COPY
2 on 1
*1
BORDERLESS COPY
*2
IMAGE REPEAT
*3
AUTO
MANUAL
VERTICAL
HORIZONTAL
MIRROR IMAGE
ENTIRE IMAGE
INDEX
SELECT PAPER SIZE
LTR
4"×6"
5"×7"
A4
SELECT PAPER TYPE
PHOTO PAPER PRO
PLAIN PAPER
HIGH RES. PAPER
PHOTO PAPER PLUS
GLOSSY
OTHER PHOTO PAPER
PRINT DATE
OFF
ON
VIVID PHOTO
OFF
ON
ALL IMAGES
SELECT PAPER SIZE
SELECT PAPER TYPE
BORDERLESS PRINT
OFF
ON
PRINT DATE
VIVID PHOTO
SINGLE IMAGE
FILE NO:
NUMBER OF PRINTS
SELECT PAPER SIZE
SELECT PAPER TYPE
BORDERLESS PRINT
PRINT DATE
VIVID PHOTO
PHOTO PRINT MODE
MP370/360 MP370
COPY
PHOTO
PRINT
*
1
You can use this feature only when the paper size is set to <LTR> or <A4>.
*
2
You can use this feature only when the paper size is set to <LTR>, <4"×6">, <5"×7">, or <A4>.
*
3
When selecting <MANUAL> for <IMAGE REPEAT>, you can select 1-4 times for <HORIZONTAL> and
<VERTICAL>.

12 Introduction Chapter 1
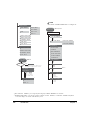
SELECT RANGE
*1
IMAGE NUMBER FIRST IMAGE:
LAST IMAGE:
DATE DATE: From
DATE: To
SELECT PAPER SIZE
SELECT PAPER TYPE
BORDERLESS PRINT
PRINT DATE
VIVID PHOTO
DPOF
SELECT PAPER SIZE
SELECT PAPER TYPE
BORDERLESS PRINT
VIVID PHOTO
ALL PAGES
*2
LAST IMAGE
*2
LAST 30 IMAGES
LAST 60 IMAGES
LAST 90 IMAGES
LAST 120 IMAGES
MOST RECENT DATE
SELECT RANGE
*2
DATE: From
DATE: To
SCAN
MP370
Photo Index
Sheet
Scan
Print
Scans a Photo Index Sheet to print the selected
photographs according to the circles you fill.
PRINT/SCAN
(MP370)
INK VOLUME
LOW INK WARNING
ON
OFF
INK COUNT RESET BLACK INK CHANGED?
COLOR INK CHANGED?
MAINTENANCE
NOZZLE CHECK
CLEANING
HEAD REFRESHING
ALIGN PRINT HEAD
ROLLER CLEANING
CALIBRATION
QUIET PRINTING
OFF
ON
EXTENSION AMOUNT
SMALL
LARGE
CARD PROTECT
ON
OFF
DISPLAY LANGUAGE
ENGLISH
FRENCH
SPANISH
PORTUGUESE
POWER SAVE TIMER
1 HOUR
4 HOURS
8 HOURS
MP370/360
Additional
Functions
USER DATA
*
1
For <SELECT RANGE>, you can specify the range by <IMAGE NUMBER> or <DATE>.
*
2
For Photo Index Sheet, you can select <ALL PAGES>, <LAST IMAGE>, or <SELECT RANGE> only when
31 or more images are stored on the memory card.
NOTE
• For details on Additional Functions, see Chapter 12.

Chapter 2 Document Handling 13
Chapter
2
Document Handling
X Document Requirements
The documents you load on the platen glass for copying or scanning must meet these requirements:
NOTE
• Multi-Scan is a function for scanning multiple documents (small-size documents) at a time.
For more information, see Software Guide, located on your Setup CD-ROM.
Document
type
• All types of paper documents
• Photographs
• Books
Size
(W × L)
Max. 8 1/2 in. × 11 3/4 in.
(216 mm × 297 mm)
Quantity • 1 sheet
• 10 documents for Multi-Scan
Thickness Max. 3/4 in. (20 mm)
PC
PC

14 Document Handling Chapter 2
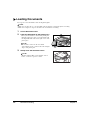
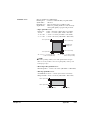
X Loading Documents
To copy or scan a document, set it on the platen glass.
NOTE
• Make sure any glue, ink, or correction fluid on the document is completely dry before loading.
• Make sure no staples or clips are attached to the document before loading.
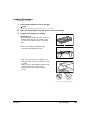
1 Lift the document cover.
2 Load your document on the platen glass.
• Place your document face down on the platen glass.
• Align the upper left corner of your document with
the alignment mark on the lower right corner of the
platen glass.
NOTE
• The machine cannot scan the area within
approximately 1/8 in. (3 mm) of the front and right
edges of the platen glass.
3 Gently close the document cover.
NOTE
• Thick documents (Max. 3/4 in./20 mm), such as
books, can also be copied or scanned.

Chapter 3 Paper Handling 15
Chapter
3
Paper Handling
X Recommended Paper And Requirements
The following paper is recommended for use with your machine. Please be sure to follow the
guidelines and meet the requirements when loading paper in the multi-purpose tray.
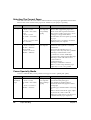
Canon Specialty Media
Canon recommends that you use genuine Canon paper to insure optimal print quality.
*
1
If the paper does not feed properly, fan the sheets prior to loading them (up to 10) in the multi-purpose
tray. Fanning the sheets will prevent them from sticking together.
NOTE
• For envelopes and T-shirt Transfer, set the paper thickness lever position to the right. For the other paper
types, set it to the left.
Paper Type Load Limit Printer Driver Setting for
[Paper Type]
Plain paper Approx. 100 sheets
(20 lb. or 75 g/m
2
)
[Plain Paper]
Envelopes Approx. 10 envelopes [Envelope]
Paper Type Load Limit Printer Driver Setting for
[Paper Type]
High Resolution Paper Approx. 80 sheets [High Resolution Paper]
Glossy Photo Paper 10 sheets*
1
(Letter/A4)
20 sheets (4
" × 6")
[Glossy Photo Paper]
Matte Photo Paper 10 sheets [Matte Photo Paper]
Photo Paper Plus Glossy 10 sheets*
1
(Letter/A4/5" × 7")
20 sheets (4
" × 6")
[Photo Paper Plus Glossy]
Photo Paper Pro 10 sheets*
1
(Letter/A4)
20 sheets (4
" × 6")
[Photo Paper Pro]
Transparencies 30 sheets [Transparency]
T-Shirt Transfers 1 sheet [T-shirt Transfer]
PC
PC

16 Paper Handling Chapter 3
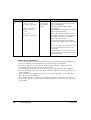
Selecting The Correct Paper
This section describes the characteristics and intended use of each paper applicable to this machine.
Refer to this section and select the paper most suitable for your purpose of printing.
Canon Specialty Media
Canon recommends that you use genuine Canon paper to insure optimal print quality.
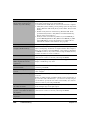
Paper Type Size Purpose Guidelines And Restrictions
Plain paper Letter
(8 1/2 in. × 11 in./
215.9 mm × 279.4 mm)
Legal
(8 1/2 in. × 14 in./
215.9 mm × 355.6 mm)
A4
(8 1/4 in. × 11 3/4 in./210
mm × 297 mm)
Printing from
your computer/
photo printing/
copying
• 17 lb.–28 lb. (64 g/m
2
–105 g/m
2
)
• The machine supports the paper sizes
shown on the left in portrait orientation.
• You can use regular copier paper, cotton
bond paper, or typical letterhead.
• Your machine does not require special ink
jet paper.
• Legal-size paper can only be used when
printing from your computer.
Envelopes US Commercial No. 10
(9 1/2 in. × 4 1/8 in./
241 mm × 105 mm)
European DL
(8 5/8 in. × 4 3/8 in./
220 mm × 110 mm)
Printing from
your computer
• You may be able to load other envelopes,
but Canon cannot guarantee consistent
performance.
• Do not use the following types of
envelopes since they may cause problems:
- Envelopes with windows, holes,
perforations, cutouts, double flaps,
pressure seals, and peel-off sealing strips.
- Envelopes made with embossed or
treated surfaces.
- Sealed envelopes.
- Envelopes with letters enclosed.
• Remove each envelope from the paper
output tray as soon as it is printed.
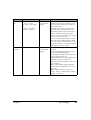
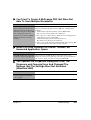
Paper Type Size Purpose Guidelines And Restrictions
High
Resolution
Paper
Letter
(8 1/2 in. × 11 in./
215.9 mm × 279.4 mm)
A4
(8 1/4 in. × 11 3/4 in./
210 mm × 297 mm)
Printing from
your computer/
/photo printing/
copying
• This type of paper provides better color
reproduction than plain paper.
• It is suitable for printing business
documents that feature graphics and for
photographs.
• Load the paper with the whiter side facing
up.
• Remove the sheets from the paper output
tray before the count reaches 50.
• If the paper curls, remove each sheet as it
is delivered in the paper output tray.

Chapter 3 Paper Handling 17
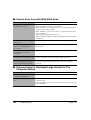
Glossy
Photo Paper
Letter
(8 1/2 in. × 11 in./
215.9 mm × 279.4 mm)
A4
(8 1/4 in. × 11 3/4 in./
210 mm × 297 mm)
4" × 6"
(4 in. × 6 in./
101.6 mm × 152.4 mm)
Printing from
your computer/
photo printing
/copying
• This paper is thicker than High Resolution
Paper and has a glossy surface to produce
printouts close to photograph quality.
• This paper is suitable for borderless
printing.
• Do not touch the printing surface until the
ink has dried.
• Load the paper with the whiter side facing
up.
• Remove the sheets from the paper output
tray before the count reaches 10.
• Do not use the loading support sheet
included with this paper.
• If the ink takes a long time to dry, remove
each sheet as soon as it is printed.
Matte Photo
Paper
Letter
(8 1/2 in. × 11 in./
215.9 mm × 279.4 mm)
A4
(8 1/4 in. × 11 3/4 in./
210 mm × 297 mm)
Printing from
your computer
• This is paper that is thick to suppress gloss.
• This is matte water-resistant paper and
provides superior color reproduction.
• It is suitable for a variety of printing
purposes such as paper crafts, calendars
and matte photographs.
• By using borderless printing, you can print
without any white borders.
• Load the paper with the whiter side facing
up.
• Do not touch the printing surface until the
ink has dried.
• Remove each sheet as soon as it is printed.
Photo Paper
Plus Glossy
Letter
(8 1/2 in. × 11 in./
215.9 mm × 279.4 mm)
A4
(8 1/4 in. × 11 3/4 in./
210 mm × 297 mm)
4" × 6"*
1
(4 in. × 6 in./
101.6 mm × 152.4 mm)
5" × 7"
(5 in. × 7 in./
127 mm × 177.8 mm)
Printing from
your computer/
photo printing
• This is a thick paper with a glossy
water-resistant coating and provides
superior color reproduction.
• It is ideal for printing high-quality
photographs.
• By using borderless printing, you can print
without any white borders.
• Load the paper with the glossy side facing
up.
• Remove each sheet from the paper output
tray as soon as it is printed.
*
1
For borderless printing
Paper Type Size Purpose Guidelines And Restrictions

18 Paper Handling Chapter 3
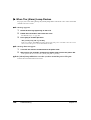
Photo Paper
Pro
Letter
(8 1/2 in. × 11 in./
215.9 mm × 279.4 mm)
A4
(8 1/4 in. × 11 3/4 in./
210 mm × 297 mm)
4" × 6"*
1
(4 in. × 6 in./
101.6 mm × 152.4 mm)
Printing from
your computer/
photo printing/
copying
• This is a thick paper with a glossy finish
that provides superior color reproduction
and good lightfastness.
• It is ideal for printing high-quality
photographs.
• By using borderless printing, you can print
without any white borders.
• For 4" × 6" cards, by printing the image
beyond the perforations, you can then trim
the borders to produce a photograph
without any white borders.
• Do not trim the borders before printing.
• Load the paper with the glossy side facing
up.
• For 4" × 6" cards, remove the cards from
the paper output tray before the count
reaches 20.
• For other than 4" × 6" cards, remove the
paper from the paper output tray before the
count reaches 10.
*
1
For borderless printing
Photo Paper Pro guidelines
• Do not touch the print surface until the ink is dry (approx. 30 minutes). Colors in dark images
may appear indistinct at first, but will become clearer after approx. 30 minutes.
• Images may smudge if you place them in an album before the ink is completely dry. It is
recommended that you allow the ink to dry for 24 hours.
• Do not attempt to dry the ink with a hair dryer or by exposing printouts to direct sunlight.
• Do not store or display printouts in hot, damp, or humid conditions. Never expose them to heat
or direct sunlight.
• Store printouts in photo albums, photo frames, or presentation binders to protect them from
direct exposure to air or sunlight.
• Do not mount printouts in an adhesive-type album as you may not be able to remove them.
• Be aware that some types of clear plastic folders and albums may cause the edges of the paper
to turn yellow.
Paper Type Size Purpose Guidelines And Restrictions
Page is loading ...
Page is loading ...
Page is loading ...
Page is loading ...
Page is loading ...
Page is loading ...
Page is loading ...
Page is loading ...
Page is loading ...
Page is loading ...
Page is loading ...
Page is loading ...
Page is loading ...
Page is loading ...
Page is loading ...
Page is loading ...
Page is loading ...
Page is loading ...
Page is loading ...
Page is loading ...
Page is loading ...
Page is loading ...
Page is loading ...
Page is loading ...
Page is loading ...
Page is loading ...
Page is loading ...
Page is loading ...
Page is loading ...
Page is loading ...
Page is loading ...
Page is loading ...
Page is loading ...
Page is loading ...
Page is loading ...
Page is loading ...
Page is loading ...
Page is loading ...
Page is loading ...
Page is loading ...
Page is loading ...
Page is loading ...
Page is loading ...
Page is loading ...
Page is loading ...
Page is loading ...
Page is loading ...
Page is loading ...
Page is loading ...
Page is loading ...
Page is loading ...
Page is loading ...
Page is loading ...
Page is loading ...
Page is loading ...
Page is loading ...
Page is loading ...
Page is loading ...
Page is loading ...
Page is loading ...
Page is loading ...
Page is loading ...
Page is loading ...
Page is loading ...
Page is loading ...
Page is loading ...
Page is loading ...
Page is loading ...
Page is loading ...
Page is loading ...
Page is loading ...
Page is loading ...
Page is loading ...
Page is loading ...
Page is loading ...
Page is loading ...
Page is loading ...
Page is loading ...
Page is loading ...
Page is loading ...
Page is loading ...
Page is loading ...
Page is loading ...
Page is loading ...
Page is loading ...
Page is loading ...
Page is loading ...
Page is loading ...
Page is loading ...
Page is loading ...
Page is loading ...
Page is loading ...
Page is loading ...
Page is loading ...
Page is loading ...
Page is loading ...
Page is loading ...
Page is loading ...
Page is loading ...
Page is loading ...
Page is loading ...
Page is loading ...
Page is loading ...
Page is loading ...
Page is loading ...
Page is loading ...
Page is loading ...
Page is loading ...
Page is loading ...
Page is loading ...
Page is loading ...
Page is loading ...
Page is loading ...
Page is loading ...
Page is loading ...
Page is loading ...
Page is loading ...
Page is loading ...
Page is loading ...
Page is loading ...
-
 1
1
-
 2
2
-
 3
3
-
 4
4
-
 5
5
-
 6
6
-
 7
7
-
 8
8
-
 9
9
-
 10
10
-
 11
11
-
 12
12
-
 13
13
-
 14
14
-
 15
15
-
 16
16
-
 17
17
-
 18
18
-
 19
19
-
 20
20
-
 21
21
-
 22
22
-
 23
23
-
 24
24
-
 25
25
-
 26
26
-
 27
27
-
 28
28
-
 29
29
-
 30
30
-
 31
31
-
 32
32
-
 33
33
-
 34
34
-
 35
35
-
 36
36
-
 37
37
-
 38
38
-
 39
39
-
 40
40
-
 41
41
-
 42
42
-
 43
43
-
 44
44
-
 45
45
-
 46
46
-
 47
47
-
 48
48
-
 49
49
-
 50
50
-
 51
51
-
 52
52
-
 53
53
-
 54
54
-
 55
55
-
 56
56
-
 57
57
-
 58
58
-
 59
59
-
 60
60
-
 61
61
-
 62
62
-
 63
63
-
 64
64
-
 65
65
-
 66
66
-
 67
67
-
 68
68
-
 69
69
-
 70
70
-
 71
71
-
 72
72
-
 73
73
-
 74
74
-
 75
75
-
 76
76
-
 77
77
-
 78
78
-
 79
79
-
 80
80
-
 81
81
-
 82
82
-
 83
83
-
 84
84
-
 85
85
-
 86
86
-
 87
87
-
 88
88
-
 89
89
-
 90
90
-
 91
91
-
 92
92
-
 93
93
-
 94
94
-
 95
95
-
 96
96
-
 97
97
-
 98
98
-
 99
99
-
 100
100
-
 101
101
-
 102
102
-
 103
103
-
 104
104
-
 105
105
-
 106
106
-
 107
107
-
 108
108
-
 109
109
-
 110
110
-
 111
111
-
 112
112
-
 113
113
-
 114
114
-
 115
115
-
 116
116
-
 117
117
-
 118
118
-
 119
119
-
 120
120
-
 121
121
-
 122
122
-
 123
123
-
 124
124
-
 125
125
-
 126
126
-
 127
127
-
 128
128
-
 129
129
-
 130
130
-
 131
131
-
 132
132
-
 133
133
-
 134
134
-
 135
135
-
 136
136
-
 137
137
-
 138
138
-
 139
139
-
 140
140


Canon MP360 SERIES User manual
- Category
- Print & Scan
- Type
- User manual
Ask a question and I''ll find the answer in the document
Finding information in a document is now easier with AI
Related papers
Other documents
-
 Tech air TAXC001 Datasheet
-
Excel TB140- Black Operating instructions
-
-
Pitney Bowes DM450c Owner's manual
-
Lanier MP CW2201 Read this first
-
Medion Photo Scanner S82005 MD 85903 User manual
-
Roland MPX-70 User manual
-
 Cool-Icam CIC-280 User manual
-
Sony UP-DF500 User manual
-
Duplo DP-21S II User manual

