Page is loading ...

bajaj electricals limited Page 1 of 6
KNOW YOUR
Bajaj
Storage Water Heater
Dear Customer,
Congratulations! You are now the proud owner of a Bajaj Storage Water Heater, the most durable, dependable and
safe product in the market today. And we mean what we say.
Why? Because we at Bajaj understand your concern, your need for reassurance. So we designed our Storage Water
Heaters with one single minded objective - Safety. Total protection for you and your family, for years to come.
This manual will answer all your questions and remove your doubts. We have provided a detailed description of our
Storage Water Heaters and clear instructions for Installation and operation. Read this manual carefully, follow the
instructions and we guarantee you will never have to worry about your Storage Water Heaters again.
KNOW YOUR BAJAJ STORAGE WATER HEATER
How does it function?
1. Every Bajaj Storage Water heater Unit is made of
a. an outer body, inner tank, heating element
b. Safety devices like safety valve, Thermostat, Thermal cut-out, fusible plugs and
c. Thermal insulation to retain heat.
2. When the tank is full (this becomes clear when water starts flowing through the outlet) switch ON the power
supply.
3. The heating element heats up the water. At a pre-fixed temperature, the Thermostat automatically switches
OFF the power supply to the unit which is indicated by the switching OFF of green lamp.
4. You can now take the water out through the outlet. Because of the design of the heater & displacement
principle, fresh cold water keeps entering through the inlet.
5. As temperature of water inside the tank drops, the Thermostat again switches ON the power supply to the
heater. When this happens, water starts heating up again. This process continues till you switch OFF the
main power supply to the heater after usage.
6. Since it takes a longer time for the water to heat up in storage water heater, it is advisable to switch ON the
power supply to the unit well in advance of the actual usage.
7. During normal functioning, red lamp does not glow. In case it glows, call the nearest Bajaj Sales and Service
Centre.

bajaj electricals limited Page 2 of 6
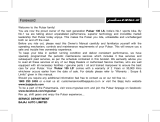
HOW IS IT MADE? (Fig. 1)
OUTER CASING: This is made of superior quality, rust resistant, mild steel.
It is powder-coated in variety of colours for an attractive, long-lasting, two-
tone finish.
INNER TANK: this is made from 99.85% pure electrolytic extra thick
copper, with reinforced welding at joints. It is suitable for both hard and soft
water. Tested as per BIS specifications it can withstand pressure up to 80
P.S.I. (6.00 Kg./cm
2
).
ALL BAJAJ STORAGE WATER HEATERS ARE WITH INNER TANK MADE
OF PURE COPPER.
HEATING ELEMENT: The heating element is extra long, direct immersion
type, mineral filled and housed in a copper tube. Highly efficient, it can be
removed and serviced/replaced easily. What's more it is 'Bajaj' & 'ISI'
marked.
Neon Lamps: These are red and green neon-gas filled lamps which indicate
the functioning of Thermostat and thermal cut-out. They are mounted on
the heater unit itself. The operation of these lamps is explained in the
'Operating Instructions'.
Insulation: Bajaj Water heaters are designed for high
degree of efficiency. Resin bonded fiber glass wool pad
which is made from insect proof and fire resistant
material is fitted between the outer casing and the
inner tank for optimum insulation i.e. to ensure
minimum heat loss. This insulation keeps the water hot
for a longer period of time.
Hardware: All Bajaj Water Heaters are provided with
Hardware (screws, nuts, washers and bolts) made of
rust resistant stainless steel. This facilitates servicing
of the unit.
SAFETY SYSTEMS
All Bajaj Storage water heaters are provided with the following safety devices. These devices control temperature and
pressure and hence ensure complete and smooth operation.
SAFETY VALVE: When the pressure inside the tank or at the inlet becomes more than 3 Kg/cm
2
this device operates.
It opens and starts dripping.
THERMOSTAT: This is a 178 mm (7") stem type automatic temperature control device. It is set to operate at 60
o
C. It
is 'Bajaj' and 'ISI' marked.
THERMAL CUT-OUT: This is a "Bajaj" marked bimetallic, stem-type, quick action temperature control device that
operates at 90
o
C. It is fitted with a push-button that can be operated by hand. In case the Thermostat fails or the
heater is operated without water the red lamp glows ON indicating that this device has operated. In such a case call an
electrician to check the unit. THIS DEVICE ALSO HELPS IN PREVENTING DRY HEATING OF THE ELEMENT IN CASE THE
UNIT IS OPERATED WITHOUT WATER.
FUSIBLE PLUG: All Bajaj Storage Water Heaters are provided with fusible plug, at the bottom. In the rare case that
the Thermostat & Thermal cut-out fails, this plug melts, releasing hot water and steam. Thus it helps in avoiding
untoward accidents.
VENT PIPE: All Bajaj Storage water Heaters have a vent pipe for extra protection. The vent pipe can be extended
upto the water tank situated above and left open into the atmosphere.
This device gives protection against both high and low pressures and is the safest method of installation.

bajaj electricals limited Page 3 of 6
NON-RETURN DEVICE: There is a siphon hole on the inlet pipe inside the inner tanks of all Bajaj Storage Water
Heaters. When pressure inside the tank becomes low, this siphon hole prevents back flow of water. It acts as a non
return device upto a certain level of low pressure. Thus it prevents collapse of the tank due to vacuum formation.
BENEFITS
1. A two-year guarantee.
2. Attractive colours in two tone powder coated finish.
3. Suitable for single point usage.
4. The largest dealer and After Sales Network available in the country.
5. Rust resistant Stainless Steel Hardware facilitates easy servicing.
THE HOW AND WHERE OF INSTALLATION AND OPERATION
A. Fix the Water heater in a perfectly straight position at a suitable height
from the floor.
B. There should be enough space around the heater for easy installation and
servicing.
C. Make sure that supporting walls or fixture are strong enough to carry the
weight of the heater when it is completely filled with water. A typical
installation (for vertical and horizontal mountings) is shown in Fig. 2,3,4
&5. For overall and mounting dimensions please refer the technical
specifications table.
D. There should be a minimum space of 50 cm between the top of the heater
and the roof. This is to make sure that the heater can be removed and
taken out when necessary.
E. The heater should be saved from being damaged by splashing of water.
Therefore, keep a minimum space of about 1.8 m. between the floor and
bottom of the heater.
F. When the mounting is horizontal, keep a minimum space of 50 cm between
the wall and inlet/outlet pipes so that parts can be easily removed for
servicing etc.
WATER SUPPLY
A. You can connect the heater directly to municipal water supply or vent pipe
above the water-tank on top of your house.
B. If the height is more, use a Pressure reducing valve at the inlet.
C. The water pressure should also not be too low. The minimum distance between the heater and the water
supply tank should be at least 2 meters.
D. YOU SHOULD INSTALL THE VENT PIPE FROM THE TOP OF THE HEATER ABOVE THE LEVEL OF THE WATER
SUPPLY TANK. THERE, IT SHOULD BE LEFT OPEN TO THE ATMOSPHERE. THIS IS THE SAFEST METHOD OF
INSTALLATION.
WATER CONNECTIONS
Do not connect the cold and hot water pipe lines directly to the heater. Instead, connect them using flexible tubes of
appropriate material. Never use plastic tube especially at the outlet because it cannot withstand the heat. In case of

bajaj electricals limited Page 4 of 6
direct pipe connections, tightening of couplings using a wrench can damage the heater unit. USE A CONTROL VALVE
AT THE INLET. MAKE SURE THAT IT IS ALWAYS KEPT OPEN.
Technical Specification Table. Check where your storage Water Heater Fits in. (Ref Fig.2, 3, 4 &5)
Overall dimensions
(in mm)
Model Capacity
(in Litres)
Element
Rating
(in Kw)
Time
required to
raise the
Temp. by
35
o
C
(in minutes)
Weight of
Water
Heater
(in Kgs)*
Pipe
Connec
tion
(in BSP)
A B C D
E Colours
Round Vert ISI 6 3.0 8 13.50 1/2" 174
185
370 228
15
Round Vert ISI 10 3.0 12 16.03 1/2" 214
195
445 264
14
Round Vert ISI 15 2.0 20 29.00 1/2" 214
235
475 303
14
Round Vert ISI 25 2.0 30 36.00 1/2" 214
385
663 303
14
Round Vert
Dwarf ISI
25 2.0 30 26.50 1/2" 214
260
540 355
14
Round Vert ISI 35 2.0 55 50.0 1/2" 214
335
650 355
14
Round Horz ISI
15 2.0 20 28.50 1/2" 214
235
475 303
14
Round Horz ISI
25 2.0 30 38.50 1/2" 214
285
663 303
14
Designer ISI 15 2.0 30 29.00 1/2" 214
234
488 332
14
Designer ISI 25 2.0 30 36.00 1/2" 214
384
650 332
14
All models are
available in
following
colours:
Ivory, White,
Maroon, Blue,
Pink, Grey.
* When completely filled with water.
Horizontal models are available in Floor and Wall mounting configurations.
These can be easily converted from Wall mounting to floor mounting and vice versa.
Due to continuous efforts for improvement, specifications are subjected to changes.
WIRING
All the electrical connections inside the Heater are done at
the factory. The water heater is provided with a supply
cord and 3 pin plug, which should be connected to main
power supply. Make sure that the connections in the plug
and socket are right, and proper earthing is provided to
the unit.
1. Thermal cut-out
2. Heating Element
3. Thermostat
4. Green Neon Lamp.
5. Red Neon Lamp.
THE OPERATION PROCESS
Operation Instructions:
Normally, Water heaters are connected to the water-tank
situated on top of the house. Since the heater unit is
designed to operate at a given working pressure, the
exact installations are different. To help you install the unit correctly, various alternatives are shown in Fig. 9, 10, 11,
12 and 13.
1. Do not switch ON before filling the heater unit with water.
2. Leave the hot water outlet open and open the inlet valve to allow the heater unit to be filled with water. After
it is full the water will start flowing out from the outlet.
3. Now close the tap at the outlet. ALWAYS KEEP THE INLET VALVE OPEN.
4. Switch ON the power supply. Green neon lamp will glow ON to indicate that water is getting heated.
5. When the water has reached the set temperature green light will go OFF. This indicates that the thermostat
has operated and has switched OFF the power supply to the unit. You should withdraw the water only after
the green light has switched OFF. Hot water is now available for use.
6. It takes time for the water to get heated Therefore, switch ON the unit well in advance before use. The
Heater unit can always be kept ON. Insulation keeps the water hot and thermostat makes sure that the
electric supply is alternately switched ON and OFF.

bajaj electricals limited Page 5 of 6
7. Every once in a while, check the working of the neon lamps to make sure that the thermostat and thermal
cutout are working properly.
8. The red-neon lamp glows ON when i) the thermostat fails OR ii) water temperature reaches
boiling point OR iii) the heater unit is operating without water. This indicates that the thermal
cut-out has operated thereby switching OFF the main power supply to the unit. In such a case
contact the nearest Bajaj sales or service centre.
9. The power supply to the Heater can be kept ON continuously. But is is advisable to switch it OFF when the
unit is not in use for a long time to save on electricity.
Bajaj Storage water heater Performance Parametres as Per BIS
Model Capacity
(in Litres)
Element Rating
(in KW)
Max. Hot Water
Output
(at
o
C)
Reheating Time
(in minutes)
Mixing Factor
(%)
Round Vert ISI 6 3.0 50
o
9 30
Round Vert ISI 10 3.0 50
o
10 30
Round Vert ISI 15 2.0 50
o
20 30
Round Vert Dwarf
ISI
25 2.0 50
o
35 30
Round Vert ISI 25 2.0 50
o
35 30
Round Vert ISI 35 2.0 50
o
40 30
Round Horz ISI 15 2.0 50
o
25 30
Round Horz ISI 25 2.0 50
o
40 30
Designer ISI 15 2.0 50
o
20 30
Designer ISI 25 2.0 50
o
35 30
INSTALLATION CHART (FIG. 7)
i. Inlet water pressure is less than 30 P.S.I. OR
ii. Height of water-tank is less than 70 ft. from the water heater OR
iii. Water tank is situated less than 5 floors from the water heater. In such a case if possible remove the vent
nut and extend the vent pipe upto the top level of overhead water supply tank.
INSTALLATION CHART (Fig. 8)
i. Inlet water pressure is more than 30 P.S.I. OR
ii. Height of water-tank is more than 70 ft. from the water heater OR
iii. Water tank is situated more than 5 floors from the water heater.
Pre and Post operative care
Precautions:

bajaj electricals limited Page 6 of 6
1. Read Installation and Operating instructions carefully.
2. Get a qualified plumber/electrician to install the unit.
3. THE INLET VALVE SHOULD ALWAYS BE KEPT OPEN.
4. To minimise scaling of heating element, which happens more in areas with hard water, simply lower the
setting of the thermostat a little. Drain the water periodically. However this should be done through a
qualified technician only.
5. Scaling of the heating element can be removed by scrapping.
6. Always get the unit serviced once in two years.
7. Use genuine spare parts when replacement is necessary.
8. Switch OFF the power supply to the unit and drain out the water when the heater unit is not in use. This
prevents scaling of element and increases its life.
9. In case the red lamp glows ON do not operate the unit by resetting the thermal cut-out. Please
contact the nearest Bajaj Sales and service station to check if there is a fault.
10. Always drain out the water when i) the unit has to be serviced OR ii) When the unit is not in use. Use the
drain pipe provided separately to drain out the water.
11. In case of any problem with the heater contact the nearest Bajaj sales or service centre.
12. Be very sure that you do not increase the setting of the thermostat more than the pre-fixed temperature.
DON'TS
1. Safety valve, thermostat and thermal cut-out are used to control temperature and pressure.
These are very sensitive and pre-set devices. Do not tamper with them or try to change their
settings. This could prove hazardous and should be strictly avoided.
2. Do not switch ON the beater till it is completely filled with water.
/