
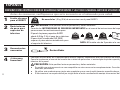
BASP
1
INSTRUCTION MANUAL
GET IT
RIGHT
THE FIRST TIME
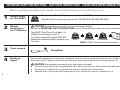
Follow this step-by-step
instruction manual to
speed up your installation.

WE’RE HERE TO HELP
Our US-based install experts
are standing by to help.
Call us at:
800-359-5520
Or, chat at:
SANUS.com/chatSP
2

3
Please read through these instructions completely to be sure you’re comfortable with this easy install process.
Also check your TV owner’s manual to see if there are any special requirements for mounting your TV.
Tools needed
Before getting started, let’s make sure this accessory is perfect for you!
1
2
3
4
CAUTION: Avoid potential personal injuries and property damage!
● This accessory may not be compatible with other add-on accessories. Verify with all pertinent owner’s manuals.
● Do not use this product for any purpose not explicitly specifi ed by manufacturer.
● Manufacturer is not responsible for damage or injury caused by incorrect assembly or use.
Ready to
begin?
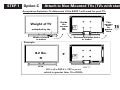
Weight
Restrictions
for TV Mounts
Weight Limit
for the BASP1
CAUTION: Avoid potential personal injuries and property damage!
Review the IMPORTANT SAFETY INSTRUCTIONS in your TV mount’s instruction manual to verify weight restrictions.
Do not exceed 3 lbs. (1.3 kg) of accessories for the BASP1 panel.
Questions? Visit accents.sanus.com or call 1-800-359-5520 (UK: 0800-056-2853).
3 lbs.
(1.3 kg)
This BASP1 Small Parts Panel adds 1 lb.
(0.45 kg) to the weight of your TV.
Your total (combined) weight MUST NOT
exceed the maximum weight rating for your
TV mount.
IMPORTANT SAFETY INSTRUCTIONS – SAVE THESE INSTRUCTIONS – PLEASE READ ENTIRE MANUAL PRIOR TO USE
NOTE: DO NOT install more than 2 panels.
TOTAL
WEIGHT
(plus) (plus) (plus) (equals)
1 lb.
(0.45 kg)
BASP1
__ lbs.
(__ kg)
Your Mount
__ lbs.
(__ kg)
Accessories TV
__ lbs.
(__ kg)
Screwdriver
Page is loading ...

5
Parts and Hardware Included
Parts and Hardware
WARNING:
This product contains small items that could be a choking hazard if swallowed. Before starting assembly, verify all parts are included
and undamaged. If any parts are missing or damaged, do not return the damaged item to your dealer; contact Customer Service. Never use damaged parts!
NOTE: Not all hardware included will be used.
Hook and Loop Straps
Panel
01 x1
02 x2

6
Parts and Hardware Included
M4 X 6 mm
M6 X 12 mm
M6 X 35 mm
M8 X 35 mm
22 mm
M8 X 20 mm
M4 X 12 mm
M4 X 35 mm
TV Screws
Mounting ScrewsRetaining Screw
Washers
Spacers
03 x1
04 x1
05 x1
06 x1
07 x4
10 x4
11 x4
12 x4
08 x4
09 x4

7
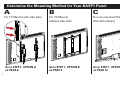
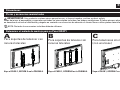
Determine the Mounting Method for Your BASP1 Panel
Go to STEP 1, OPTION A
on PAGE 8
Go to STEP 1, OPTION B
on PAGE 9
Go to STEP 1, OPTION C
on PAGE 12
For TV Mounts with side slots For TV Mounts
without side slots
For non-mounted TVs
(TVs with stands)
ABC

8
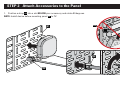
STEP 1 Option A Attach to a Wall Mount WITH Slots
Before installing panel
01
, install the TV brackets
B
onto the TV. If the TV is already mounted to the wall, you may need to remove
it for better access. Refer to your TV mount’s installation manual for TV bracket assembly or TV removal.
Attach panel
01
on either TV bracket
B
fi t the tabs of the panel into the side slots of the TV bracket
B
. Secure the panel with the
M4 x 6 mm retaining screw
03
.
Continue with STEP 2 on PAGE 14.
01
B
01
B
NOTE: DO NOT install more than 2 panels.
Interference?
Move TV
brackets
B
up or down
on the TV
to clear the
notch.
03
01

9
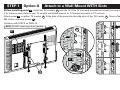
STEP 1 Option B Attach to a Wall Mount WITHOUT Slots
1. Remove the TV from the wall plate or arm assembly
(if mounted).
Refer to your TV mount’s installation manual for TV removal.
Before installing panel
01
:
2. Remove the TV bracket
B
from the TV (if installed).
NOTE: Remember the locations of all the hardware AND the TV
bracket
B
to reassemble onto your TV.
IMPORTANT: SAVE ALL TV screws, washers and spacers
(optional) you remove, to reattach your TV bracket
B
.
B
Screws
Washers
Wall Plate
Arm Assembly
Spacers (optional)

10
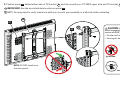
3. Position panel
01
behind either side of TV bracket
B
and line up with your TV VESA upper hole and TV bracket
B
.
IMPORTANT: Use the top slotted-hole location on panel
01
.
NOTE: You may need to verify clearance with your mount’s arm assembly or wall plate before installing.
B
01
B
01
CAUTION:
Verify adequate
thread engagement with the screw,
washer and BASP1 panel
01
.
- Too short will not hold the panel.
- Too long will damage the TV.
Too Short Too Long
Correct
NOTE: DO NOT install more
than two panels.

11
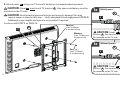
4. Attach panel
01
using your TV mount’s hardware (screws/washers/spacers).
CAUTION: Panel
01
must touch TV bracket
B
. Any spacers/adapters must be
mounted on the TV side.
CAUTION: Avoid potential personal injuries and property damage! You may
require longer screws for this step - - verify adequate thread engagement (PAGE 9).
Additional screw lengths and spacers are provided if required.
Continue with STEP 2 on PAGE 14.
1x
01
B
CAUTION: Panel
01
must touch TV
bracket
B
. Any spacers/adapters must
be mounted on the TV side.
CAUTION: Panel
01
must touch TV
bracket
B
. Any spacers/adapters must
be mounted on the TV side.
Screws
(from TV Mount
or hardware bag)
Washers
(from TV Mount or
hardware bag)
With Spacers
Without Spacers
Spacers
(from TV Mount
or hardware bag)
01
B
1x
01
B

12
STEP 1 Option C Attach to Non-Mounted TVs (TVs with stands)
Weight of TV
Width of stand
in inches
Divide
the
answer
by
the
15
Distance between holes
in inches
This
answer
must
be
greater
than
multiplied by the
Acceptance Equation: To determine if the BASP1 will work for your TV:
8.2 x 32 = 262.4 ÷ 7.87 = 33.34
which is greater than 15 = OKAY!
Example:
8.2 lbs.
32 in.
÷
×
8.2 x
3
2 = 262.4 ÷ 7.87
=
33
.
34
which is greater than 15 = OKAY
!
Example
:
8
.2 lbs
.
3
2 in
.
÷
×

13
Attach panel
01
to the back of the TV directly into one of the TV’s VESA mounting holes using a mounting screw and washer in one
of the round holes of panel
01
as shown.
NOTE: Install device before mounting panel
01
to TV.
NOTE: DO NOT install more than two panels.
Continue with STEP 2 on PAGE 14.
0.33 in.
[8.4 mm]
0.20 in.
[5.2 mm]
0511
10
04
06

14
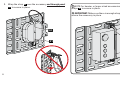
STEP 2 Attach Accessories to the Panel
1. Position a strap
02
into a slot BELOW your accessory and rotate 90 degrees.
NOTE: Install device before mounting panel
01
to TV.
01
02
02
02

15
2. Wrap the strap
02
over the accessory and through panel
01
to secure in place.
01
NOTE: for heavier or larger-sized accessories, use two
straps
02
to secure in place.
IMPORTANT: Make sure there is enough strap overlap to
secure the accessory in place.
02
02
02

16
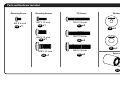
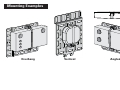
Mounting Examples
Overhang Vertical Angled
Page is loading ...
Page is loading ...
Page is loading ...
Page is loading ...
Page is loading ...
Page is loading ...

Register your new mount and tell us
how you like it for a chance to win in
our monthly sweepstakes.
Entering is quick and easy. Visit
SANUS.com/1234 and follow three
simple steps for your chance to win.
"Monthly Prize" sweepstakes rules
and restrictions apply. Visit
SANUS.com/1234 for details.
ONE MORE THING: BE A WINNER!

SANUS • 6436 City West Parkway • Eden Prarie, MN 55344 USA
©2016 Milestone AV Technologies. All rights reserved. SANUS is a division of Milestone.
All other brand names or marks are used for identification purposes and are trademarks of their respective owners.
800-359-5520 • [email protected] • SANUS.com
When you share your handiwork
with your friends, tag
#sanusspaces
for a chance to be featured in the
Inspiration Gallery on SANUS.com.
IT’S TIME TO SHOW OFF
SanusSystems
CHAT WITH US
pinterest.com/Sanus
BE INSPIRED
SanusSystems
WATCH AND LEARN
SANUS.com
WE MAKE IT EASY
6901-002610 00
-
 1
1
-
 2
2
-
 3
3
-
 4
4
-
 5
5
-
 6
6
-
 7
7
-
 8
8
-
 9
9
-
 10
10
-
 11
11
-
 12
12
-
 13
13
-
 14
14
-
 15
15
-
 16
16
-
 17
17
-
 18
18
-
 19
19
-
 20
20
-
 21
21
-
 22
22
-
 23
23
-
 24
24


Ask a question and I''ll find the answer in the document
Finding information in a document is now easier with AI
in other languages
- español: Sanus BASP1 Guía de instalación
Related papers
-
Sanus SA405 Installation guide
-
Sanus VisionMount LT25 User manual
-
-
-
-
-
-
-
-