Page is loading ...

BLL2
INSTRUCTION MANUAL
GET IT
RIGHT
THE FIRST TIME
Follow this step-by-step
instruction manual to
speed up your installation.

2
WE’RE HERE TO HELP
Our US-based install experts
are standing by to help.
Call us at:
800-359-5520
Or, chat at:
SANUS.com/chatSP
Get it right the first time.
HeightFinder™ shows you
where to drill.
Check it out at:
SANUS.com/1172
Want to watch a video that
shows how easy this DIY
project will be?
Watch it now at:
SANUS.com/2522
Recommended placement

3
150 lbs.
(68.0 kg)
125 lbs.
(56.6 kg)
IMPORTANT SAFETY INSTRUCTIONS – SAVE THESE INSTRUCTIONS – PLEASE READ ENTIRE MANUAL PRIOR TO USE
Before getting started, let’s make sure this mount is perfect for you!
Please read through these instructions completely to be sure you’re comfortable with this easy install process.
Also check your TV owner’s manual to see if there are any special requirements for mounting your TV.
If you do not understand these instructions or have doubts about the safety of the installation, assembly or use
of this product, contact Customer Service at 1-800-359-5520 (UK: 0800-056-2853).
Do you have
all the tools
needed?
1
2
3
4
What is your
wall made of?
CAUTION: Avoid potential personal injuries and property damage!
● This product includes directions and hardware for use with wood stud, solid concrete and concrete block walls –
DO NOT install into drywall alone. For information on how to use this product with steel stud walls contact Customer
Service and ask about the steel stud mounting kit.
● The wall must be capable of supporting fi ve times the weight of the TV and mount combined.
● Do not use this product for any purpose not explicitly specifi ed by manufacturer.
● Manufacturer is not responsible for damage or injury caused by incorrect assembly or use.
Ready to
begin?
Does your TV
(including accessories)
weigh more
than
Para Español ver página 24
No
—
Perfect!
Yes
—
This mount is NOT compatible.
Visit MountFinder.Sanus.com or call 1-800-359-5520
(UK: 0800-056-2853) to fi nd a compatible mount.
For Wood Stud and
Solid Concrete or
Concrete Block Walls
For Steel
Stud Walls
Drywall
with steel
studs?
Drywall
with wood
studs?
Solid concrete
or concrete
block?
Call Customer Service: 1-800-359-5520 (UK: 0800-056-2853)
Perfect! Perfect!
Steel stud kit required [NOT INCLUDED]
CAUTION:
DO NOT install
into drywall alone
Wood Stud Install
Steel Stud Install
Concrete Install
Awl Awl
Pencil
Level
Stud
Finder
Stud
Finder
Screwdriver
Tape
Measure
3/16 in.
(5 mm)
Wood
1/2 in.
(13 mm)
Steel
Drill Bit Drill Bit
Electric
Drill
HammerDrill Bit
3/8 in.
(10 mm)
Concrete

4
Before you begin
Don’t stress out when you see
all the hardware included.
Extra TV screw sizes and lengths
are provided to fi t most TVs.
HARDWARE BAG
RELAX!
You only use four
of the TV screws.
Remove the stand from your TV
— if attached.
Install any accessories
you may have purchased — if they
require the TV to be removed from the
wall for assembly. The TV is removable
for future accessory purchases.

5
Read ALL CAUTION warnings.
These are IMPORTANT!
Protect the face of your TV
when laying it down for installation.
IMPORTANT: Read Important read
Soft clean surface
CAUTION: Avoid potential
Y
X
S
NOTE: Read read Dually Noted read
TIP: Read That's Helpful read read
Read Important Stuff read read rea
Must Read read read read read read
Read read read Safety First read re
Let’s Go
Secure part
X
to housing
Y
using screw
S
.
1
ASSEMBLE
TIP:
Each component has a number
designation. See PAGE 6.
Step-by-Step illustrations
speed up your installation.
Don’t get it? Read the detailed
explanation below each step.

6
M8 x 25mm
M6 x 12mm
M6 x 35mm
M8 x 50mm
M8 x 45mm
M8 x 35mm
M8 x 16mm
M8 x 20mm
5mm2.5mm 22mm
TV Washers
TV Spacers
TV Brackets
02
x4
07
x4
06
x4
03
x4
05
x4
08
x4
09
x4
10
x4
11
x4
12
x4
13
x4
04
x4
01
x2
Parts and Hardware for STEP 1
TV Screws
M8
TV Screws
M6
Attach TV Bracket to TVSTEP 1
WARNING:
This product contains small items that could be a choking hazard if swallowed. Before starting assembly, verify all parts are included
and undamaged. If any parts are missing or damaged, do not return the damaged item to your dealer; contact Customer Service. Never use damaged parts!
NOTE: Not all hardware included will be used.

7
TV Bracket
TV Bracket
a
b
CAUTION: Verify adequate thread engagement with your
screw/washer/spacer combination AND the TV brackets. (STEP 1.2).
TOO SHORT will not hold the TV and TOO LONG will damage the TV.
M6
M8
1.1 Select TV Screws
Determine which screw diameter (M6 or M8) fits the four
mounting holes on the back of your TV.
1.2 Determine Spacer Need
Too Short Correct Too Long
Round BackCables
Inset Holes
Flat Back
1311 12
131211
131211
If your TV included inset spacers or wall mount
adapters, see Troubleshooting on PAGE 28.
TV Bracket TV Bracket TV Bracket
11
1212
For
flat-back TVs,
no
spacers
11
,
12
or
13
are required.
For rounded-back TVs, cable interference or
inset holes, spacers
11
,
12
or
13
to create
extra space between the TV and TV bracket.
131211

8
01
4X
2
SECURELY TIGHTEN
b
Rounded-back TVs / Extra Space
10
13
a
Flat-back TVs
10
02 0209 09
1211
Install using the spacer, screw and washer combination you
selected for your TV.
1.3 Attach TV Bracket Assembly to TV
Center the TV brackets
01
over your TV's mounting hole pattern as
shown - making sure the brackets are at the same height.
1
POSITION
TIP:
The cords
C
on TV brackets
01
should be oriented on the
bottom on the TV.
C
C
C

9
M7 x 70 mm
M4 Hex
Fischer UX10 x 60R
16
x4
15
x1
14
x1
18
x1
17
x4
Parts and Hardware for STEP 2
M7 Screw
Wall Plate
Wall Plate Template
Driver Bit
Concrete Anchor
For concrete installations ONLY
CAUTION: Do not use in drywall or wood
Attach Wall Plate to Wall
STEP 2
WARNING:
This product contains small items that could be a choking hazard if swallowed. Before starting assembly, verify all parts are
included and undamaged. If any parts are missing or damaged, do not return the damaged item to your dealer; contact Customer Service. Never use
damaged parts!
NOTE: Not all hardware included will be used.

10
Max. 5/8 in. (1.5 cm)
Min. 16 in. (40.6 cm)
Min. 3 ½ in. (8.9 cm)
Min. 1 ½ in. (3.8 cm)
CAUTION: Avoid potential
personal injury or property damage!
● Drywall covering the wall
must not exceed 5/8 in. (1.5 cm)
● Minimum wood stud size:
common 2 x 4 in. (5.1 x 10.2 cm)
nominal 1 ½ x 3 ½ in. (3.8 x 8.9 cm)
● Minimum horizontal space
between fasteners:16 in. (40.6 cm)
● Stud centers must be verifi ed
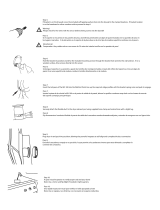
STEP 2A Wood Stud Installation
Locate the studs using a
stud finder.
Find the edges of the studs
using an awl or small drill bit.
Mark the centers of the
studs with a pencil.
1
LOCATE
2
VERIFY
3
MARK

11
14
4X
14
2 ¾ in. (7.0 cm)
3/16 in.
(5 mm)
Place the wall plate template
14
at your desired height and position the
slotted holes over your stud center lines. Level and mark the hole locations.
4
POSITION TEMPLATE
TIP:
To calculate your precise wall plate location, check out
our HeightFinder at sanus.com [www.sanus.com/1172].
Drill the four pilot holes using a 3/16 in. (5 mm) diameter drill bit.
IMPORTANT: Pilot holes must be drilled to a depth of 2 ¾ in. (7.0 cm).
5
DRILL
CAUTION:
Be sure you drill into the CENTER of the stud.
sanus.com
/1172
HeightFinder™
Visit
16

12
15
14
4X
STEP 2A (continued)
Install the four screws
16
and tighten only until they are pulled
firmly against the wall plate
15
.
Go to STEP 3 on PAGE 19.
6
REMOVE TEMPLATE
7
SECURELY TIGHTEN
Remove the wall plate template and discard.
Improper use could reduce the holding power of the screws
16
.
DO NOT over-tighten the screws
16
.
CAUTION:
Avoid potential personal injury or property damage!
16
18

13
14
4X
TIP:
TIP:
To calculate your precise wall plate location, check out
our HeightFinder at sanus.com [www.sanus.com/1172].
Min. 16 in. (40.6 cm)
1
POSITION TEMPLATE
Solid Concrete or Concrete Block Installation
● Mount the wall plate
15
directly onto the concrete surface
● Minimum solid concrete thickness: 8 in. (20.3 cm)
● Minimum concrete block size: 8 x 8 x 16 in. (20.3 x 20.3 x 40.6 cm)
● Minimum horizontal space between fasteners: 16 in. (40.6 cm)
STEP 2B
CAUTION: Avoid potential personal injury or property damage!
Position the wall plate template
14
on the wall at your desired height.
Level and mark the hole locations.
sanus.com
/1172
HeightFinder™
Visit

14
Never drill into the mortar between blocks.
CAUTION:
Never drill into the mortar between blocks.
2
DRILL
4X
CAUTION:
3
REMOVE TEMPLATE
Remove the wall plate template
14
and discard.
14
14
3/8 in.
(10 mm)
3 in. (7.6 cm)
Drill four pilot holes using a 3/8 in. (10 mm) diameter drill bit.
IMPORTANT: Pilot holes must be drilled to a depth of 3 in. (7.6 cm).
STEP 2B (continued)

15
15
4X
14
3
17
4X
CAUTION:
Be sure the anchors
17
are seated fl ush
with the concrete surface.
CAUTION:
5
SECURELY TIGHTEN
Insert four anchors
17
.
34
INSERT ANCHORS
16
18
Install the four screws
16
and tighten only until they are pulled
firmly against the wall plate
15
.
Improper use could reduce the holding power of the screws
16
.
DO NOT over-tighten the screws
16
.
CAUTION:
Avoid potential personal injury or property damage!
Go to STEP 3 on PAGE 19

16
Steel Stud Installations (kit required)
Min. 16 in. (40.6 cm)
CAUTION: Avoid potential
personal injury or property damage!
STEP 2C
Locate the studs using a
stud finder.
Find the edges of the studs
using an awl or small drill bit.
Mark the centers of the
studs with a pencil.
1
LOCATE
2
VERIFY
3
MARK
● Studs must be at least 2x4 / 25 ga.
● If back side of wall is unfi nished,
drywall must be installed to a minimum
of one stud left and right of the stud(s)
being used to install the mount
● Drywall must be a minimum of
1/2 in. (1.2 cm) thick on each
side of the studs, and a minimum
clearance of 1 ⅞ in. (4.8 cm)
behind the wall is required
● This product must be centered on
the studs
● Stud type and structural strength
must conform to the North American
Specification for the Design of Cold-
Formed Steel Structural Members
[362 S 125 18, C-Shape, S - Stud Section]
● Drywall must be secured to studs with
screws 12 in. (30.4 mm) on center
Steel Stud Installation Kit (NOT INCLUDED)
1/4-20 x 1.75
1/4
x4
S1
x4
S2
x4
S3
1/4-20 SNAP Toggle BB
.734 x .312 x .065 in.
*
Contact Customer Service at 1-800-359-5520 to have the additional hardware shipped directly to you.
*
*

17
1 in. (2.5 cm)
1/2 in.
(13 mm)
14
4X
Place the wall plate template
14
at your desired height and position the
slotted holes over your stud center lines. Level and mark the hole locations.
4
POSITION TEMPLATE
TIP:
To calculate your precise wall plate location, check out
our HeightFinder at sanus.com [www.sanus.com/1172].
Drill the four pilot holes using a 1/2 in. (13 mm) diameter drill bit.
IMPORTANT: Pilot holes must be drilled to a depth of 1 in. (2.5 cm).
Remove the wall plate template and discard.
5
DRILL
CAUTION:
Be sure you drill into the CENTER of the stud.
14
sanus.com
/1172
HeightFinder™
Visit

18
a
c
b
d
S1
S1
S1
P
15
4X
STEP 2C (continued)
Install the four screws
S2
and washers
S3
, and firmly tighten until
they are pulled flush against the wall plate
15
.
6
INSTALL ANCHORS
7
SECURELY TIGHTEN
All four screws
S2
MUST BE firmly tightened to prevent unwanted
movement of the wall plate
15
.
Ensure the wall plate is securely
fastened to the wall before continuing on to the next step.
CAUTION:
Avoid potential personal injury or property damage!
S1
a. Insert the four anchors
S1
* into the drilled holes. b. Pull to rotate the
anchor
S1
* inside the wall. c. Hold the end of the anchor
S1
*
, while
sliding the cap
P
against the drywall. d. Snap off the ends of the anchor
S1
*
to lock in place.
CAUTION:
Be sure cap
P
is
seated against the drywall surface.
S3 S2

19
15
01
15
NOTE:
TV brackets
01
can be slid anywhere along wall plate
15
for
optimal positioning of your TV.
Attach TV to Wall Plate
STEP 3
1
HANG
HEAVY! You may
need assistance
with this step.
2
ATTACH
Press the bottom of the TV into the wall plate
15
until you hear
the lock click, securing the TV in place.
Always make sure TV brackets
01
are in the locked position so
the TV is securely fastened to the wall plate
15
.
CAUTION:
Avoid potential personal injury or property damage!
01
15
01
01
15

20
Manage Cables
1. Pull down and hold both release cords
R
while gently pulling the bottom of the TV away from the wall until the kick stands fall into place.
CAUTION: To prevent breaking the locking latch: always pull and hold release cords
R
down while pulling the TV away from the wall.
2. Temporarily rest the TV on the kick stands
K
while assembling the cables on the TV.
CAUTION: TV is not secured to the wall when it is in the kick stand position. Assistance is recommended for this step.
3. Lift the kick stands
K
up while holding the TV.
4. Gently rest the TV back until the brackets click and lock the TV in place.
R
K
K
KR
01
01
01
01
15
1 2 3 4
/