Page is loading ...

OmniView
®
Serial
Console Server
User Manual
F1DP116Sea

Table of Contents
Product Overview....................................................................................................................1
Introduction ...................................................................................................................... 1
Package Contents ............................................................................................................ 1
Console Server Features .................................................................................................. 2
Equipment Requirements................................................................................................. 3
System Requirements ...................................................................................................... 3
Unit Display Diagrams ...................................................................................................... 4
LED Indicators, Button, and Connectors ......................................................................... 5
Specifications ................................................................................................................... 6
Local Installation ....................................................................................................................7
Desktop or Rack-Mounting ..............................................................................................8
Connecting the Target Devices to the Console Server .................................................... 9
Network Configuration .........................................................................................................10
Web-Browser Interface .................................................................................................. 10
Assigning IP from the Console Port--VT-100 (Console, Telnet, SSH) ........................... 13
Web-Browser Management Interface ............................................................................ 16
Network Settings ..................................................................................................................18
IP Configuration ............................................................................................................. 18
IP Filtering ...................................................................................................................... 19
Web-Server Configuration ............................................................................................. 21
Local .......................................................................................................................... 21
RADIUS and Local ..................................................................................................... 21
Dynamic DNS ................................................................................................................. 22
RADIUS .......................................................................................................................... 23
RADIUS-Server Configuration ........................................................................................ 24
HTTPS/SSL .................................................................................................................... 24
Serial Ports...........................................................................................................................25
Configuration .................................................................................................................. 25
Port Authentication .................................................................................................. 25
Port Enable/Disable ................................................................................................. 26
Port Title ................................................................................................................... 26
Operation Modes ..................................................................................................... 27
Console-Server Mode ........................................................................................ 27
Terminal-Server Mode ....................................................................................... 28
Dial-In Modem Mode ......................................................................................... 29
Serial-Port Parameters ............................................................................................. 29
Port Logging ............................................................................................................ 30
Break Function ......................................................................................................... 31
Connection ..................................................................................................................... 31
Telnet Java Applet ................................................................................................... 32
Serial-to-Serial Function ................................................................................................ 34

Table of Contents
System Status and Log .........................................................................................................37
System Status ................................................................................................................ 37
System Logging ............................................................................................................. 37
System Administration .........................................................................................................39
User Administration ........................................................................................................ 39
Add User .................................................................................................................. 39
Remove User ........................................................................................................... 40
Edit the Access Control List (ACL) ........................................................................... 41
Change Password .................................................................................................... 42
Date and Time (NTP) ..................................................................................................... 42
Firmware Upgrade ......................................................................................................... 43
Upgrade from the Web Interface ............................................................................. 43
SSL Certificate ............................................................................................................... 44
Secure HTTP Certificate .......................................................................................... 45
Reset to Factory-Default Settings .................................................................................. 49
Reboot............................................................................................................................ 49
Technical Data ......................................................................................................................50
Default Settings .............................................................................................................. 50
Appendix A: Adapters ...........................................................................................................51
Appendix B: Ethernet Pin-Outs (RJ45) .................................................................................54
Standard Ethernet Cable RJ45 Pin-Out ......................................................................... 54
Appendix C: Well-Known TCP/UDP Port Numbers ...............................................................55
Appendix D: Protocol Glossary..............................................................................................56
Appendix E: Creating CA Files ..............................................................................................58
Information ...........................................................................................................................60


1
section
Product Overview
Introduction
Thank you for purchasing the Belkin OmniView Serial Console Server (Console Server). This
device provides administrators secure monitoring and control of servers, routers, switches,
and other serial devices from anywhere on the corporate TCP/IP network, over the Internet,
or through dial-up modem connections, even when the server is unavailable through the
network.
The Console Server provides the following:
• Data-pathsecuritybymeansofSSHorWeb/SSL
• Asecure,encryptedwebinterfaceoverSSL(HTTPS)
• SSHv2encryption,tokeepserveraccesspasswordssafefromhackers
• SupportforallpopularSSHclients
• SecureaccessfromanyJava-enabledbrowser
• Connectionstoserial-consoleportsusingstandardCAT5cables,eliminatingthe
hassles of custom cabling
Package Contents
1 x OmniView Serial Console Server
1 x AC Power Cord
5 x Serial-to-RJ45 Adapter Kit (5 pcs)
1 x Local Console Port Serial Adapter
1 x 6 ft. RJ45-RJ45 CAT5 Cable
1 x Quick-Start Guide
1 x User Manual CD
1 x Rack-Mount Brackets and Screws
1 x Footpad Set

2
Product Overview
Console Server Features
• In-bandandout-of-bandmanagement
Console port management solutions offer remote, reliable, and secure access to serial-
console ports through in-band networks and out-of-band connectivity options, such as
serial terminal access and dial-up modem.
• Managenetworkdevices/serverscentrally,remotely,andsecurely
Reliable console-port management solutions allow you to encrypt sensitive data using
proven protocols such as SSH/v2, SSL.
• Diversedevicesmanagement
Simple ASCII or VT-100 terminal emulation is not sufficient to manage these wide-
ranging device types. Today’s data centers contain a broad mix of UNIX
®
, Linux
®
, RISC,
mainframe, and Windows
®
servers, as well as other serially managed devices such as
router, gateway, firewall, PBX, UPS, SAN, and NAS devices, and intelligent power strips.
• Proactivemonitoringandwarningtoassistsystemdiagnosis
Applications, and even operating systems, send messages to the system console.
These messages contain error and panic information that often precedes a system
crash. Unlike terminal servers, console-port servers buffer these messages in real time
and allow administrators to page through and search this data at a later time; they also
spontaneously send an email to alert IT administrator of the critical event.
• Remoteandsecurepowercontroller
Via serial port, this device acts as control master for controlling power strips. It can
control multiple power strips (up to 15).
• Providesserial-to-serialfunction
This allows the device to incorporate with a terminal converter to provide VGA and
keyboard ports locally, or connect the VGA/keyboard ports to a KVM switch to
consolidate the administration.
• Accessportlistsforusers
Thanks to the Access Control List (ACL) of user account administration, all users except
admin accounts, are authorized a set of serial ports. Users can access and make
configuration changes to those authorized serial ports assigned by an admin account.

3
section
Product Overview
Equipment Requirements
• UniversalConnectivityKit(included)
• RJ45-RJ45CAT5Cable(included)
System Requirements
Web browser
Java Plug-In
The Console Server’s web interface requires installing JRE (Java Runtime Environment) v6.0
and above. You can get the latest Java software from the website: http://www.java.com/en/
download/manual.jsp.
Browser
Operating System
Microsoft Internet Explorer
version 6.0 SP1 and later
Firefox version 2.0
and later
Windows 2000 SP2 Yes Yes
Windows Server 2003 Yes Yes
Windows XP Yes Yes
Windows Vista Yes Yes
Red Hat Linux 3 and 4 No Yes
Sun Solaris 9 and 10 No Yes
Novell SUSE Linux 9 and 10 No Yes
Fedora Core 4 and 5 No Yes
Mac OS X 10.4+ No Yes

4
Product Overview
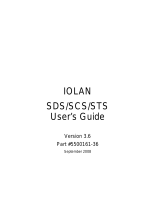
Unit Display Diagrams
Front/RearPanel
Fig. 1 Front View
Fig.2RearView
ReadyLED
PowerLED
LinkLED
Resetbut-
ton
IECpower LANport
Localconsoleport
PortLEDs
Deviceports

5
section
Product Overview
LED Indicators, Button, and Connectors
• RESETbutton: Quickly press and release the button to reboot the Console Server.
Press and hold the “Reset” button for more than five seconds to set the unit to its
default configuration settings.
• ETHERNETRJ45 connector: Ethernet interface
• CONSOLERJ45 connector: RS232 local console interface
• Other RJ45 connectors: serial ports
LED Indication
Power
Red–power indication
ON: power is applied
Link
EthernetLink/Act/10/100Mbps:
Orange–10BaseT Ethernet connection established
Green–100BaseT Ethernet connection established
Blinking: when data in activity
ON: when no data in activity and link connected
Ready Green – blinking per second when system is ready
PortActivity
(oneLED
per port)
Blue– traffic activity
ON: in use (successful port log-in)
Blinking: traffic activity on the serial port

6
Product Overview
Specifications
Note:Specifications are subject to change without notice.
Feature Specification
General
LEDs
Power (red)
Ready (green, normally blinking),
Link/Act/10/100Mbps (Ethernet orange: 10Mbps, green: 100Mbps)
Activity (blue for each serial port)
Push button for reset, or restore to default
RTC (real-time clock)
SerialInterface
16-port (F1DP116S)
Serial-port mode (RS232)
Serial connector (RJ45)
Baud rate (300 to 115200)
Flow control (None, RTS/CTS, Xon/Xoff)
LANInterface
RJ45 connector
IEEE 802.3 - 10/100BaseT
Auto-detecting, full/half-duplex selectable
PortFunction
OperationModes
Console server
Terminal server
Dial-in modem
Serial-to-serial (on port 16 only)
Protocols
TCP, UDP, IP, ARP, ICMP, HTTP/HTTPS, Telnet, DHCP/BOOTP, PPP,
SMTP, DNS, NTP
Dynamic DNS
ProtocolRelative
Function
TCP inactivity time (TCP keep-alive time)
Serial inactivity time
Port monitoring
Security
Password access
IP filtering
SSHv2
HTTPS/SSL
Authentication
Local user database
PAP/CHAP (for modem dial-in)
RADIUS
Management
Local console (menu or command line)
SSH, telnet
Web pages (HTTP/HTTPS)
Firmware upgrade via web interface
Port buffering and logging
Full-featured system status display
Power and
Environment
AC Input (100 ~ 240VAC, 50 ~ 60Hz)
Operating Temperature: -10° to 80° C
Storage Temperature: -20° to 85° C
Humidity: 0–90% non-condensing
Certications
CE, FCC
UL
Mechanical
1U 19˝ rack-mount
Dimensions (cm): 43.2 x 18.0 x 4.2

7
section
Local Installation
WheretoplacetheConsoleServer:
The enclosure of the Console Server is designed for stand-alone or rack-mount
configuration. The Console Server can be mounted to a standard 19-inch server rack using
the included rack-mount brackets and screws.
ConsiderthefollowingwhendecidingwheretoplacetheConsoleServer:
•thelocationofyourtargetdevicesinrelationtoyourconsole
•thelengthsofthecablesyouusetoconnectyourdevicestotheconsole
•thepowersource-Connectonlytothepowersourcespeciedontheunit.
When multiple electrical components are installed in a rack, ensure that the total
component power ratings do not exceed circuit capabilities.
Cable-LengthRequirements(forCAT5)
Serial binary data signals (RS232) transmit best up to distances of 50 feet (15m). Beyond that
length, the probability of signal degradation increases. For this reason, Belkin recommends
that the length of the CAT5 UTP cable between the Console Server and the connected
servers does not exceed 50 feet (15m).
CablesandAdapters
Belkin highly recommends you use Belkin Category 5e, FastCAT5e, or Category 6 Patch
Cables for your Console Server to help ensure the signal integrity.
BelkinUTPPatchCables:
A3L791-XX-YYY (CAT5e)
A3L850-XX-YYY (FastCAT™ 5e)
A3L980-XX-YYY (CAT6)
Refer to Appendix B on page 54 for pin-out guide.
BelkinSerialAdapter:
F1D120ea (RJ45F – DB9F DTE)
F1D121ea (RJ45F – DB25F DTE)
F1D122ea (RJ45F – DB25M DCE)
F1D123ea (RJ45F – DB25M DTE)
F1D124ea (RJ45F – RJ45M CISCO)
F1D120ea-8PK (8-pack of F1D120ea)
F1D124ea-8PK (8-pack of F1D124ea)
Refer to Appendix A on page 51 for detailed drawings of each Serial Adapter.

8
Local Installation
Desktop or Rack-Mounting
The Console Server can be placed on desktops or rack-mounted on 19-inch/1U racks.
Note: Before you begin, locate the MAC address and serial number on the back of the
Console Server. You may need these numbers later in the installation process, so it is highly
recommended that you record these numbers below before mounting the Console Server to
your rack.
The Console Server includes adjustable mounting brackets ideal for installation in 19-inch
racks. The mounting brackets feature three adjustment positions that allow you to set the
Console Server’s face flush with the ends of the rails, or to extend the Console Server past
the front of the rails. Please follow these simple steps to achieve the desired adjustment.
Rack-Mounting
1. Determine how far you would like the Console Server to protrude from the rack.
Select a bracket-hole scheme.
2. Attach the bracket to the side of the Console Server using the Phillips screws
provided. (Refer to diagram below.)
3. Mount the Console Server to the rack rails and secure with screws. (Refer to
diagram below.)
Your Console Server is now mounted securely to the rack and you are ready to connect your
target devices.
MACAddress SerialNumber

9
section
Local Installation
Connecting the Target Devices to the Console Server
1. Power down the target device(s) that will be connected to your Console Server.
2. Connect the Ethernet cable to the port labeled LAN.
3. Locate the included power cord and plug the appropriate end into the power
socket on the rear of the Console Server. Plug the other end into an appropriate AC
wall outlet.
Note: Allow about 100 seconds for the Console Server to complete the boot-up process.
4. Choose an available numbered port on the rear of your Console Server. Plug one
end of a UTP patch cable (4-pair, up to 15 meters) into the selected port, and plug
the other end into the target device. You may need to add the appropriate adapter
to interface with your target device. Please refer to Appendix A on page 51 in this
manual for more details.
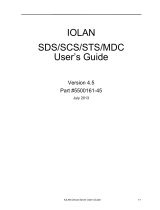
5. Repeat this procedure for all target devices. (Refer to diagram below.)
Fig.3CablingConnectionSetup—This diagram depicts sample cable connections for
different interfaces.
CAT5 cable
CAT5 cable
(straight)
CAT5 cable
(straight)
CAT5 cable
(straight)
Ethernet port
OR
Local console
port adapter
RJ45-to-
DB9M
adapter
DB9F
Controlling host
Devices to be controlled
Modem
Controlling host
CAT5 cable

10
Network Configuration
Before you can connect to a target device, you will need to configure the network settings.
The Console Server offers two methods of setting the network: via web-browser interface or
through the local console port.
The Console Server offers support for both Dynamic Host Configuration Protocol (DHCP)
and static IP addressing. Belkin recommends that an IP address be reserved for the Console
Server and that it remains static while connected to the network.
Web-Browser Interface
The web interface provides an easy way to configure the Console Server. The administrator
can configure all features through the Web.
InitialSettings
The following section provides instructions for setting the IP address for the OmniView Serial
Console Server.
Step1IdentifyingtheIPAddress
Once your Console Server has been connected to your network and is powered up, a
Dynamic Host Configuration Protocol (DHCP) server on your network will automatically
assign the Console Server an IP address, gateway address, and subnet mask.
To identify the IP address on your network, use the MAC address located on the back of the
Console Server. If no DHCP server is found on your network, the Console Server will boot
with the following static IP address: 192.168.2.156.
If you want to connect more than one Console Server to the same network and there is no
DHCP server available, connect each Console Server to your network one at a time, and
change the static IP address of each unit before connecting the next unit.
Note:IfaDHCPserverlaterbecomesavailableonyournetwork,theConsoleServer
willtakeanewIPaddressfromtheDHCPserver.TokeeptheoriginalstaticIP
address,youwillneedtodisableDHCP(seepage18).
Step2LoggingintotheWebInterface
After you identified the IP address of your device, open your web browser. A list of
supported browsers can be found on page 3.
Type in the Console Server’s IP address in the browser’s address field, using this format:
http://XXX.XXX.XXX.XXX (example: http://76.255.43.173). The login page will appear (see
next page). Bookmark the page for easy reference.

11
section
Network Configuration
Note:HTTPScanbeusedforcommunicationoveranencryptedsecuresocketlayer
(SSL).When first connecting to the Console Server’s HTTPS configuration page, two
browser security warnings may appear. Click “Yes” on both warnings.
LoginPage
Type in the following default user name and password (case-sensitive):
There are two levels of access privileges:
The administrator can add or remove a user easily via the web pages of system
administration.
UserName Password
admin admin
UserName DefaultPassword AccessPrivileges
admin admin Full access
(user define) (user define)
Only can access “Serial Port” and
“System Status”

12
Network Configuration
Click
. The web interface will open at the “Connect” page (see below).
Main-ConnectPage
Step3NetworkConguration
Click on “Network” to open the Network-Configuration page (see below).
Network-CongurationPage
Here you can assign a static IP and other network settings.
Click on “Save & Reboot” to store any network-configuration settings.
Note:If the user leaves the web browser idle for more than 30minutes, the login session will
time-out and terminate the session.
Login

13
section
Network Configuration
Assigning IP from the Console Port—VT-100 (Console, Telnet, SSH)
The Console Server also offers a user-friendly, menu-driven command-line interface. You
can simply connect a VT-100 terminal to the local console port to access the Console
Server. This is useful when you do not know the network settings of the Console Server, and
cannot access it. Through the local console port, you can view or change the settings (IP
address, subnet mask, etc.).
1. Connect the console port on the rear panel to a serial port on a PC host using
the CAT5 cable and the local console port RJ45/DB9F adapter, included with the
Belkin Console Server.
2. Configure a terminal emulation program, such as HyperTerminal, using the
following parameters:
• Baudrate=115200
• Databits=8
• Stopbits=1
• Parity=none
• Flowcontrol=none
Note:User names and passwords are the same as the ones set through the web interface.
The defaults are “admin/admin”.

14
Network Configuration
The following figure depicts the structure of the interface.
TheMenuLayout
Tier2menu
Tier1menu Productname Software version
Congurationinput
Navigationinput
Tier3menu

15
section
Network Configuration
Network>IPCong
The page to the left shows the IP configuration items.
1. For IPmode— You can press the SPACE bar to select Static mode or DHCP
mode.
2. For IPAddress,SubnetMask,DefaultGateway,PrimaryDNS,andSecondary
DNS— You can change these network settings.
3. After changing the settings and the final enter, the Console Server will prompt you
to confirm YES or NO. If YES, the Console Server will reboot and save the settings
into the flash memory.
Network>CurrentIP
To show the current network settings.
Network>IPFilter
To enable/disable IP filter function.
System>Reboot
To reboot the Console Server.
System>ResettoDefault
To reset configuration to factory-default settings.
Note: Only the admin user has the privilege to perform this function.
System>Status
To show the system status.
S-to-S>SelectSerial-to-SerialPort
To enable serial port-to-serial port connection through port 16. Refer to the “Serial-to-Serial
Function” section on page 34 for more details.

16
Network Configuration
Note:
Only the admin user has the privilege to log in to VT-100. All the other users are not
authorized to make configuration with VT-100.
Web-Browser Management Interface
The Console Server supports both HTTP and HTTPS (HTTP over SSL) protocols. Users must
authenticate themselves by logging in to the system with a correct user name and password.
To access the Console Server’s web-management pages, enter the unit’s IP address or
resolvable host name into the web browser’s URL/location field. This will direct you to the
login screen.
The figure on the next page shows the home page of the web-management interface. A
menu bar displays along the top of the page. The submenu will display along the left side of
the page, and will allow you to modify parameter settings for the top-menu item selected.
/