Page is loading ...

Installation and user’s guide Mpix-457HDMI
© STOREX 2008 Mpix-457HDMI Page 1/32
Mpix-457HDMI

Installation and user’s guide Mpix-457HDMI
© STOREX 2008 Mpix-457HDMI Page 2/32

Installation and user’s guide Mpix-457HDMI
© STOREX 2008 Mpix-457HDMI Page 3/32
Thank you very much for purchasing this latest STOREX model.
Before using your hard disk, we encourage you to completely read this
manual and keep it for later usage.

Installation and user’s guide Mpix-457HDMI
© STOREX 2008 Mpix-457HDMI Page 4/32
NOTES
EDIT function only supports FAT/16/32
Some Media Files can’t play in NTFS format system.
If you lost the file or can’t find the file in NTFS format system, please connect the Player to computer and
select “Disk manage/ defragment ” to force to do a fragment arrangement to settle it.
WARNING
To reduce the risk of fire or electric shock, do not expose this device to rain or moisture.
To avoid electrical shock, do not open the enclosure. Refer servicing to qualified personnel only.
The power adapter and AC cable must only be replaced by STOREX.
PRECAUTIONS
Safety
• This unit operates on 110 - 240 V AC, 50/60 Hz. Check that the unit’s operating voltage is identical with
your local power supply.
• To prevent fire or shock hazard, do not place objects filled with liquids, such as vases, on the device.
• Should any solid object or liquid fall into the cabinet, unplug the player and have it checked by qualified
personnel before operating it any further.
On power sources
• The player cannot be disconnected from the AC power source (mains) whenever it is connected to the wall
outlet, even though the player itself has been turned off.
• If you are intended not to use the player for a long time, be sure to disconnect the player from the wall
outlet. Disconnect the AC power cable (mains lead), grasp the plug itself; never pull the cable.
• The power adapter is appropriative for the player of Mpix-457HDMI, please don’t use any other type of
power adapter, otherwise, the Player may be damaged and cause accident.
On placement
• Keep the unit away from equipment that with strong magnets, such as microwave ovens and large
loudspeakers,etc.
• Do not put any heavy objects on the unit.
• Place the player in a location where is ventilated enough to spread the heat which builds up in the player
• Do not place the player in a location wherever is close to the heat sources and be suffered from direct
sunlight, excessive dust, or mechanical shock.
• Do not shake the Player; otherwise the hard disk may be damaged.
On cleaning
• Clean the inside, panel, and remote control with a soft cloth which moistened slightly with a mild detergent
solution. Do not use any type of abrasive pad, scouring powder or solvent such as alcohol or benzene.
IMPORTANT NOTICE
Caution: This player is capable of holding a still video image or on-screen display image on your television
screen indefinitely. If you leave the still video image or on-screen display image displayed on your TV for an
extended period of time, you risk permanent damage to your television screen. Plasma display panel
televisions and projection televisions are susceptible to this.

Installation and user’s guide Mpix-457HDMI
© STOREX 2008 Mpix-457HDMI Page 5/32
BEFORE PROCEEDING THE INSTALLATION
• Mpix-457HDMI is supplied tested and completed: any technical operations involving opening the product
or changing the internal hard disk will automatically cancel the warranty contract that covers the product.
• When installing driver is required to use the Mpix-457HDMI you have to run all the installation software
before connecting the Mpix-457HDMI to the computer by USB port.
• Feel free to visit our web site www.storex.eu
in order to find any modification or update about this user’s
installation and instruction or new firmware for Mpix-457HDMI’s peripheral devices.
• Connected by USB interface, Mpix-457HDMI is compatible with USB 2.0 and USB 1.1 standard. However
the data transfer rate up to 480 Mbits/sec is only possible if Mpix-457HDMI is connected by USB 2.0
interface, otherwise its performance is only 12 Mbits/sec maximum rate with USB1.1 interface.
• The OTG (On-The-Go) function will allow you to copy your files from a peripheral USB without using a
computer.
• Before contacting our technical support or After Sales services, please check first the « Frequently Asked
Questions » (F.A.Q) in our website, because your problems and the solution might already exist.
• More over, before returning the product to the distributor for repair, we invite you to contact our technical
Support to diagnose your problem: several products returned are not really defective that’s what our
after sale service has notified.
ACCESSORIES INCLUDED
• Audio/Video cable (1)
• Remote (1)
• Batteries (size AAA, 1.5V) (2)
• USB cable (1)
• Power Adapter (1)
• AC cable (1)
• Manual (1)

Installation and user’s guide Mpix-457HDMI
© STOREX 2008 Mpix-457HDMI Page 6/32
SUMMARY
Description ......................................................................... P.7
Remote control details…………………………………………………..P.8
Connection to computer....................................................... P.9
Connection to TV.................................................................. P.10
Starting the Mpix-457HDMI................................................... P.11
Quick explanation (Movie, Photo, Music) .......................... P.12
Advanced menu .................................................................. P.13
USB host ............................................................................ P.26
OTG function ..………………………………………………………………P.26
Features ............................................................................ P.27
Terms of warranty ............................................................. P.28
Registring the warranty ..................................................... P.28
Troubles shooting .............................................................. P.29

Installation and user’s guide Mpix-457HDMI
© STOREX 2008 Mpix-457HDMI Page 7/32
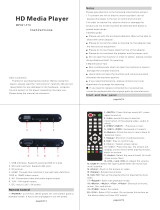
DESCRIPTION
1. Home button: Go to the main page of the menu
2. Stop: To stop playing files
3. Power button: Switch on the product to put on TV mode or Switch off the product to put it on
“standby” mode
4. Play/Pause: Play/Pause the current file
5. USB Host: To connect external USB devices
6. ON LED: to see the state of the power.
HDD LED: to see the state of playing files
7. IR: For receive of the signal of the remote control
8. CF: Memory card slot
9. LCD display: Display all the information during the play statue
10. SD/MMC/MD/XD: Memory card slot
11. Navigation pad: Up/down/left/right arrow to move into the menu and select file, enter to validate
the choice.
1. Coaxial: Sound output coaxial
2. Optical: Sound output optical
3. Video out : AV output (Composite)
4. HDMI: AV output (HDMI)
5. S-Video: Video output (S-Video)
6. USB 2.0 : To connect the Mpix-457HDMI to the PC
7. OFF/ON: Switch ON/OFF
8. DC IN: Power adapter input
9. Cr/Pr, Cb/Pb/Y: Video output (YUV)
ONLY USE THE POWER SUPPLY PROVIDED WITH MPIX-457HDMI

Installation and user’s guide Mpix-457HDMI
© STOREX 2008 Mpix-457HDMI Page 8/32
REMOTE CONTROL DETAILS
1. Standby : Turn ON/OFF the Mpix-457HDMI (Standby mode)
2. PAL/HDMI : Modify the display system
3. Setup : Setup mode
4. Target : Define the directory target (copy mode only)
5. Subtitle : Disable/Enable subtitle
6. Video out : Switch between different video output
7. Audio : Switch between different audio output
8. Digest : Display the thumbnail (photo mode)
Mode : Switch the different slide mode (photo mode)
9. Slide time : Modify the slide time between the pictures
10. Confirmation/Navigation keys
11. CH : Switch between different audio output
12. Skip : Skip to the previous scene
Skip to the next scene
13. Source : Optional button
14. 4:3/16:6 : Switch between 4:3PS, 4:3LB and 16:9
15. <0-9> : Numerical pad
16. EQ On/Off: Display graphical EQ (ON/OFF)
Type : Switch between different EQ
17. Movie : Direct access to “MOVIE”
18. Music : Direct access to “MUSIC”
19. Photo : Direct access to “PICTURE”
20. File : Direct access to “FILE”
21. Vol : Decrease or increase the volume
22. Time search : Go to specific point
23. +10 : Select the file number ten by ten
24. Play/Pause :
Put on Play/pause
25. Stop : Put on Stop
26. Prev : Previous file
Next : Next File
27. i : Show information of the selected file
28. Rotate : Rotate the picture 90° to the right
29. Home : go to the main page of the menu
30. Display : Display the information of the file
and switch to different display mode
31. Zoom : Zoom mode
32. Edit : Edit mode (open a window to allow to rename,
copy, delete…)
33. Repeat : Repeat mode
34. Backlight : Optional button
35. Mute : Mute ON/OFF

Installation and user’s guide Mpix-457HDMI
© STOREX 2008 Mpix-457HDMI Page 9/32
CONNECTION TO COMPUTER
1. Connect the DC adapter
2. Put the switch behind the product to ON
3. Connect the USB cable with the PC or MAC
4. The “Standby” LED lights on RED color
5. Take a look on “my computer”, the STOREX device will appears with an additional letter or for MAC
users it will automatically mount on the desktop
6. Just drag and drop or copy/paste all your files into the disk and enjoy watching.
Connection by the USB cable
STOREX
MAC
PC
Connection by the USB cable
Disk
mounted
after
USB

Installation and user’s guide Mpix-457HDMI
© STOREX 2008 Mpix-457HDMI Page 10/32
CONNECTION TO TV
1. Connect the DC adapter behind the Mpix-457HDMI
2. Connect your AV cable behind the product in one side and to the TV for the other side (as the
description see before)
3. Make sure that your TV is on the good channel; basically a schema can guide you (AV1, AV2, EXT1,
EXT2…)
4. Put the switch behind the product to ON
5. The “Standby” LED lights on RED color
6. Push the “Power” button in the front panel or by the remote control
7. The “HDD” LED lights on BLUE color
8. The LCD display “LOAD” and the TV display “Loading”
9. The home menu will appear after few seconds
NOTE:
Inserting Batteries into the Remote Control
You can control the player using the supplied remote. Insert two batteries (size AAA)
by matching the + and - ends on the batteries to the markings inside the
compartment. When using the remote, point it at the remote sensor on the player.
• Do not leave the remote in an extremely hot or humid place.
• Do not drop any foreign object into the remote casing, particularly when replacing the batteries.
• Do not expose the remote sensor to direct light from the sun or a lighting apparatus. Doing so may cause
a malfunction.
• If you do not use the remote for an extended period of time, remove the batteries to avoid possible
damage from battery leakage and corrosion.
1
2
3
4
1. Connection by the RCA cable
2. Connection by the HDMI cable
3. Rear TV
4. Rear M
p
ix-457HDMI

Installation and user’s guide Mpix-457HDMI
© STOREX 2008 Mpix-457HDMI Page 11/32
STARTING THE MPIX-457HDMI
The first “HOME” page shows 4 mains icons, which you can access from the remote control or directly in the
front panel (VIDEO, MUSIC, PHOTO and FILE), just select one of the four modes to use it with the arrows in
the center of the remote control and push “enter”. To use the remote control please refer to previous remote
control details.
Home page

Installation and user’s guide Mpix-457HDMI
© STOREX 2008 Mpix-457HDMI Page 12/32
Movie page Music page
Photo page File page
QUICK EXPLANATION
Video: Watch all your favorite movies in this mode (a direct access button make you jump directly in the
video mode with the remote control)
Music: Listen all your favorite music’s in this mode (a direct access button make you jump directly in the
music mode with the remote control)
Photo: Slide all your favorite pictures in this mode (a direct access button make you jump directly in the
photo mode with the remote control)
File: Browse all your files stored in the hard disk drive (only the compatible files), in this mode (a direct
access button make you jump directly in the file mode with the remote control)

Installation and user’s guide Mpix-457HDMI
© STOREX 2008 Mpix-457HDMI Page 13/32
ADVANCED MENU
Home Menu display
When the Hard Disk Drive only has one partition, directly displayed the home page:
When have several partitions, the maximum are four partitions, plug USB device, it shows USB DEV1:

Installation and user’s guide Mpix-457HDMI
© STOREX 2008 Mpix-457HDMI Page 14/32
Quick Setup Menu display
Once you are in the main menu you can set all the parameters (set TV mode, audio, language…)
Press “Setup” button.
1. Press buttons to select a language and press “enter” button. The player displays the
menu in the selected language.
2. Press buttons to select the setting that matches your TV type, and press “enter”
button. Default is “MULTI. SYSTEM”.
MULTI.SYSTEM: Outputs the video signal in the system of the VIDEO files, either PAL or NTSC. If your TV
is the DUAL system, select AUTO
NTSC: Changes the video signals of a PAL VIDEO files and outputs it in the NTSC system.
PAL: Changes the video signals of an NTSC VIDEO files and outputs it in the PAL system.

Installation and user’s guide Mpix-457HDMI
© STOREX 2008 Mpix-457HDMI Page 15/32
3. Press buttons for selecting which display mode you want to have: between 4:3 PAN
SCAN, 4:3 LETTER BOX or 16:9 (wide), press ‘Enter’ to validate.
4. Press
buttons for selecting the resolution 480i, 480p, 576i, 576p, 720p and 1080i,
and press “enter” button. Default is 480p.

Installation and user’s guide Mpix-457HDMI
© STOREX 2008 Mpix-457HDMI Page 16/32
5. Press buttons for selecting player’s digital audio output (Coaxial Digital 5.1CH), and
press “enter” button.
HINT:
If you connected an AV amplifier (receiver) using a digital coaxial cable, the audio signals of default setting
are turn on “DIGITAL OUTPUT”
AUTO: Select this to automatically detect the player’s digital audio output
SPDIF/RAM: The player’s RAW digital audio output
SPDIF/PCM: The player’s PCM digital audio output
5. Press
buttons for selecting disk tools and press “enter” button.
Format partition: Select to format the partition you are using.
Format full HDD: Select to format all hard disk.

Installation and user’s guide Mpix-457HDMI
© STOREX 2008 Mpix-457HDMI Page 17/32
6. Save and exit setup to select “EXIT SETUP” and press “enter” button.
HINT:
You can press “Setup” button on Remote to save and exit setup menu.
7. If you want to load factory defaults setting, to select “DEFAULTS/ RESET” and press “enter”
button.
Setup is finished and you go back to the main home page.

Installation and user’s guide Mpix-457HDMI
© STOREX 2008 Mpix-457HDMI Page 18/32
VIDEO MENU DISPLAY
Once in this mode, all your video files are shown, use the pad of the remote control to navigate up/down,
you’ll not see any folders, all the video file are mixed by alphabetic order
1- Press
on the Remote, and select a movie file, Press “enter” or “Play” button
Repeat Play Function
• Press “Repeat” button during playback.
• Each time press “Repeat” button change one mode:
• FOLDER: Only play the current folder in the order of the folder.
• SINGLE: Only play the current file.
• REP-ONE: Only repeat the current file.
• FOLDER REPEAT: Only repeat all the files that are in the current folder.
• DISC: Play all the files in order of the disk in the current partition.
• DISC REPEAT: Repeat all the files in order of the disk in the current partition.
PREV (previous)/NEXT (next) Search Function
• You can search for the next or previous chapter or scene using
/ on the Remote.
• During playback, press
or once briefly to go to the next or previous chapter/scene.
Fast forward or Fast reverse Scan Function
• Press or during playback, when you find the point you want, press to return to normal
speed.
• Each time you press
or during scan, the scan speed changes. With each press the indication
changes as shown below.
HINT:
Actual speeds may differ between media files.
Playback direction (Fast Forward): FFx2 / FFx4 / FFx6 / FFx8
Opposite direction (Fast Reverse): FRx2 / FRx4 / FRx6 / FRx8

Installation and user’s guide Mpix-457HDMI
© STOREX 2008 Mpix-457HDMI Page 19/32
Slow-motion Play Function
• Press
during playback.
• To return to normal speed, press
.
• Each time you press
during Slow-motion Play, the playback speed changes. With each press the
indication changes as follows:
• Playback direction:
×2 ---- ×4 ---- ×8
To Search for a folder or file using number buttons
• Press the number buttons to select the folder or file number you want to search.
HINT:
If you select the file number, the file will direct starts playback.
If you select the folder number, it will direct enter folder.
Time search Function (Movie only)
You can search for a scene using the time code.
• Press “Display” button, select “CHAPTER ELAPSED”.
Example: The“00:33:17”will display on screen (playing time of the current chapter).
• Press “Time-Search” button.
The“- -:- - :- -”will display on screen.
• Input the time code using the number buttons, then press “enter” button.
For example, to find the scene such as 1 hour, 15 minutes, and 10 seconds after beginning, just
enter “01:15:10.”
HINT:
If you enter time in wrong, the screen will not show the time.
Checking the Playing Time and Remaining Time
• You can check the playing time and remaining time
• Press “Display” button during playback.
• The following display appears.
o OFF: Turn off time display on screen
o CHAPTER ELAPSED: Display playing time of the current chapter on screen.
o CHAPTER REMAIN: Display remaining time of the current chapter on screen.
Changing the Audio Track
• If the video files with multilingual tracks, you can also change the language. With normal music and
video files, you can select the sound from either the right or left channel and listen to the sound of
the selected channel through both the right and left speakers.

Installation and user’s guide Mpix-457HDMI
© STOREX 2008 Mpix-457HDMI Page 20/32
When playing music or normal video files
• Press AUDIO during playback.
o Each time press “AUDIO/Stream” button change one channel:
o Mona Right > Mona Left > Stereo
• The default setting is underlined
o STEREO: the standard stereo sound
o Mona Left: the sound of the left channel (monaural)
o Mona Right: the sound of the right channel (monaural)
NOTE:
Depending on the media files, you may be able to change the audio track.
LEFT VOCAL, RIGHT VOCAL, AUDIO 1/2, AUDIO 2/2, AUDIO: C1, AUDIO: C2, AUDIO: C3 etc.
When playing a DVD VIDEO using “DVD Play” function
• Press “AUDIO/Stream” button during playback.
• Each time press “AUDIO/Stream” button change one language for the sound.
Displaying the Subtitles
• If subtitles file and movie, are under same folder, you can change the subtitles or turn them on and
off whenever you want while playing a movie.
When playing video files
• Press “SUBTITLE” button during playback. The screen will display subtitle.
• Press “SUBTITLE” button twice. The subtitle display will turn off.
HINT:
• The name of subtitle file must the same as the name of movie file , and they under the same folder.
For example: HDD1/ MOVIES/LOVE.srt
HDD1/MOVIES/LOVE.avi
• Depending on the media files, you may not be able to change the subtitles even if multilingual subtitles are
recorded on it. You also may not be able to turn them off.
• You can change the subtitles if the DivX video file has an “.AVI” or “.DIVX” extension and contains subtitle
information within the same file.
EQ Function (Equalizer)
• Press “EQ On/Off ” button during playback.
o EQUALIZER OFF: turn off equalizer
o EQUALIZER ON: turn on equalizer
o TYPE: to select equalizer type.
• When equalizer is “Type”, you can select equalizer type press “EQ Type” button.
• Each time press “EQ Type” button change one type:
Standard>Classic>Jazz>Rock>Pops>Ballad>Dance>Personal
• If you select “personally type”, you can press
button to setting equalizer.
/