Page is loading ...

1
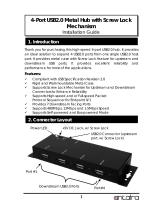
Thank you for purchasing this 4-Port USB2.0 USB Server (hereinafter
referred to as “The USB Server”). It provides an ideal solution to use USB
devices over Internet instantly. With its Client Software, the network
users can use the remote USB devices over a local network or the
Internet as if they were connected directly to your local PC.
The USB Server supports High speed USB devices such as printers,
scanners, digital cameras and USB Flash drives over the network. It is
ideal for home office, small office or industrial applications that access
the USB devices remotely.
Features:
Provides 4 USB2.0 Downstream Host Ports over Ethernet (or IP)
Supports Standard USB Hub Mode: the 4 USB Devices can be Accessed
by either Ethernet Port or the Upstream USB Connector
Allows Working With Remote USB Devices as with Local Ones
Supports High Speed/Full Speed USB2.0 Peripherals
Provides IEEE 802.3 10/100/1000Mbps, Auto Cross-over Ethernet Port
DC Jack and Terminal Blocks for DC +7~24V DC Power Input
Supports Windows XP, 2003, Vista and Win 7
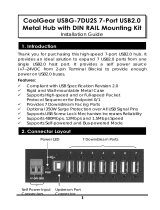
+7~24V DC
Power Input
Terminal Blocks
4-Port USB2.0 to Ethernet Adapter (USB over IP)
Installation Guide
1. Introduction
2. Connector Layout
+7~24V DC Power
Input DC Jack
RJ45 LAN
Connector
4 USB2.0 Downstream
Type-A Connectors
USB Status
LED
Power LED
Switch to Reset to
Default Settings
USB Upstream
Port

4S/8S RS232 to USB Multi Serial Adapter w/ Metal Case
2
DC Jack and Terminal Blocks Power Connectors: A 7V~24V DC
Power is required for this product. Power is supplied from either the
DC Jack or the Terminal Blocks, but not both at the same time.
RJ45 Ethernet Connector: 10/100/1000Mbps Ethernet port. It
supports auto cross-over feature. You can use the same cable to
connect to either a Hub/Switch or a host computer.
Type-B USB Upstream Port Connector: If connect it to the PC’s USB
host port, the USB server will be switched immediately to work as a
simple USB hub, however, the Ethernet port is not able to access
the USB devices any more. In this case, please make sure the
Ethernet is not accessing the USB devices (the USB devices are in
the free device state), otherwise, the USB devices may not
function properly.
USB Link LED: It indicates the USB devices are linked to Ethernet
port and are been accessing.
PWR LED: It lights when the DC power is on.
LAN LED Indicators: There are 2 LEDs on the RJ45 connector, they
are described as the following table:
LED Name
Color
LED Function
Link
Green
Steady on:
The Connection on the
Ethernet port is built and Active
Off: Ethernet Port Disconnected
Act
Yellow
Blinking:
Transferring Ethernet Data
Off: No Data Transferring on Ethernet
1. Use static electricity discharge precautions.
Remove possible static discharge potential from any objects that
the Adapter may come in contact with before installation. This
can be accomplished by touching a bare metal chassis rail after
you have turned off the power.
2. Attached the DC power source: there are 2 connectors can be
added the power to the unit. One is the DC Jack (by the AC /DC
Adapter) and the other is the 2-pin terminal blocks.
3. Hardware Installation

4S/8S RS232 to USB Multi Serial Adapter w/ Metal Case
3
3. Connecting LAN cable: Use a standard straight-through Ethernet
cable to connect to a Hub or Switch. If you connect the USB
Server to your computer’s Ethernet port instead, you don’t need
to change to a cross-over type cable since the Adapter provides
auto cross-over feature.
4. Connect the USB Server’s USB ports to your USB devices.
Typical Connection Diagram:
The USB Server comes with a user friendly client software which maps
USB devices connected to the USB server onto the local host machine.
4. Software Installation
Client PC1
Client PC2
Client PC3
Router/Hub
USB Server
WAN/DSL
(to Internet)
USB Printer
USB
Camera
USB DVD

4S/8S RS232 to USB Multi Serial Adapter w/ Metal Case
4
To access the USB devices on the USB Server, each Client PC should
install this GUI utility. We call it USB Server Program.
This GUI Utility provides Device Mapping functionality for a user to
connect and disconnect various devices found on the network. It also
includes a USB Server Manager that lists and provides option to
configure various setting on the USB server remotely.
The Utility was shipped in an Install Shield in the following folder on the
driver CD:
To Install the Install Shield, please go to the above folder, double click
the Install.exe program in the folder, follow the instruction of the
installer to complete the installation.
As soon as the utility is installed, to launch the USB Server Program,
please double click its shortcut icon on the desktop, after running it
once, the application will be placed in the system tray as shown in the
figure below. Double click the icon on the system tray to view and run
the Utility on your client PC.
Note: For the more detail about how to use this USB Server
Program, please refer to the PDF manual file in the same folder on the
driver CD.
USB Server Program
/