Page is loading ...

User’s Manual
2801550
LGA775 Pentium 4 Intel 865G
Industrial Motherboard

Acknowledgments
Award is a registered trademark of Award Software International,
Inc.
PS/2 is a trademark of International Business Machines
Corporation.
Intel and Pentium 4 are registered trademarks of Intel
Corporation.
Microsoft Windows is a registered trademark of Microsoft
Corporation.
Winbond is a registered trademark of Winbond Electronics
Corporation.
All other product names or trademarks are properties of their
respective owners.
ii 2801550 User’s Manual

Table of Contents
Introduction
.......................................................1
Product Description.............................................................1
Checklist..............................................................................2
Specifications ......................................................................3
Boar d Dimens ions...............................................................4
Installations
.......................................................5
Installing the CPU ...............................................................6
ATX Power Installation ......................................................6
Installing the Memory ......................................................... 7
Setting the Jumpers .............................................................8
Connectors on 2801550 ......................................................12
Watch dog Ti mer Configuration ............. .......................... .24
BIOS Setup
.......................................................27
Drivers Installation
......................................51
Intel 865G Chipset Software Intallation Utility................ 52
Intel 86 5G C hips et Graphi cs Drive r..................................55
Realtek AC97 Codec Audio Driver Installation................ 57
Intel PR O LA N Dr ive rs Insta llation.. ................................58
Appendix
...........................................................59
A. I/O Port Addres s Map. ..................................................59
B. Interrupt Request Lines (IRQ)......................................60
2801550 User’s Manual iii

This page is intentionally left blank.
iv 2801550 User’s Manual

INTRODUCTION
Introduction
Product Description
The world's first Pentium 4 LGA775 industrial motherboard based on
the Intel® 865G chipset, 2801550, supports processor FSB of
533/800MHz for processor speeds of up to 3.8GHz. With two DDR
memory socket on board, the motherboard accommodates a maximum
memory capacity of 2GB. Integrated chipset-graphics features CRT
VGA support with up to 64MB shared memory, while Ethernet
functionality is provided by an Intel® 10/100Mb and an optional
Gigabit Ethernet.
Supporting the latest LGA775 processors, the 2801550 supports four
COM ports based on the Winbond I/O chipset on board. A total of six
USB 2.0 ports can be used, as well as two serial ATA ports for high
data transfers. Advanced storage comes in the form of a type 2 Compact
Flash socket.
Interface function is available with one 8X AGP slot, four PCI slots and
two ISA slots. This ATX-form-factor board has dimensions of 305mm
by 244mm. Other features include a watchdog timer and 4-in/4-out
digital I/O.
The board comes in three models, as of this writing – 2801550, 2801550F
and 2801550V. 2801550 has 10/100Mb Ethernet, while 2801550F has both
10/100Mb and Gigabit Ethernet. 2801550V uses the 865GV chipset, has
10/100Mb Ethernet, but without AGP slot.
2801550 User’s Manual 1

INTRODUCTION
Checklist
Your 2801550 package should include the items listed below.
The 2801550 Industrial motherboard
This User’s Manual
1 IDE Ribbon Cable
1 Bracket for 1 Serial Port
1 Bracket for 2 Serial Ports
1 SATA Cable
I/O Shield Plate
1 CD containing the following:
Chipset Drivers
Flash Memory Utility
2 2801550 User’s Manual

INTRODUCTION
Specifications
Form Factor ATX
CPU Type LGA 775 (Intel® Pentium® 4 / Celeron D)
System Speed 2.53GHz~3.8GHz
CPU Operating
Frequency
533MHz / 800MHz
Green /APM APM1.2
CPU Socket LGA775
Chipset Intel® 865G / 865GV Chipset
GMCH: 82865G 932-pin FC-BGA
ICH5: 82801EB 460-pin MBGA
FWH
BIOS Award BIOS; Support ACPI function
Cache 256K/1MB/2MB Level 2 cache
VGA 82865G built-in, support CRT
AGP port AGP 8X interface
st LAN Intel 82551QM 10/100Mb Ethernet
nd LAN Intel 82547GI (CSA port) 1 Gigabit LAN controller
Audio ICH5 built-in audio controller + AC97 Codec
ALC655 (5.1 channel)
Memory type 2 x DDR 2.5V DDR400/333/266 SDRAM DIMM
module (support dual channel), Max. - 2GB
LPC I/O Winbond 83627HF: IrDAx1 Parallel x1, COM1
(RS-232), COM2 (RS-232/ RS422/RS485), FDC
1.44MB, Hardware monitor (3 thermal inputs, 8
voltage monitor inputs, VID0-4 , 1 chassis open
detection , 3 Fan Header)
Secondary IO Fintek F81216 support COM3, COM4 (RS-232)
RTC/CMOS ICH5 built-in
Battery Lithium Battery
Keyboard Controller Winbond 83627HF built-in
EPP/ECP Yes
IDE ICH5 built-in, IDE1, 2 (Ultra DMA 33/66/100)
CF connector 1 port, type II (use IDE2 slave)
Serial ATA connector 2 ports
Board Size 12 x 9.5
D-type connectors PS/2 keyboard/mouse, VGA (CRT), COM1, Printer,
Audio, (USBx2 +RJ-45) x2
Power Connector ATX 12V 24-pin
Expansion Slots AGP slot, 4 PCI Slots, 2 ISA slots
(2801550V has no
AGP slot)
PCI to ISA Bridge Winbond 83628,83629
USB 6 ports, USB 2.0 (D-sub x 4 + pin header x 2)
IrDA Pin header
Digital I/O 4 in / 4 out
Watchdog Timer Yes (256 segments, 0,1,2255. sec/min)
System Voltages +5V, +12V, -12V, 5VSB, -5V, 3.3V
2801550 User’s Manual 3

INTRODUCTION
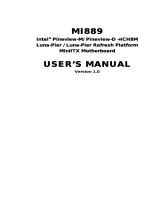
Board Dimensions
4 2801550 User’s Manual

INSTALLATIONS
Installations
This section provides information on how to use the jumpers and
connectors on the 2801550 in order to set up a workable system. The
topics covered are:
Installing the CPU........................................................................ 6
ATX Power Installation ............................................................... 6
Installing the Memory.................................................................. 7
Setting the Jumpers...................................................................... 8
Connectors on 2801550 ............................................................... 12
Watchdog Timer Configuration ................................................. 24
2801550 User’s Manual 5

INSTALLATIONS
Installing the CPU
The 2801550 motherboard supports a LGA 775 processor socket for
Intel® Pentium® 4 processors.
The LGA 775 processor socket comes with a lever to secure the
processor. Refer to the pictures below, from left to right, on how to place
the processor into the CPU socket.
Please note that the cover of the
LGA775 socket must always be installed during transport to avoid
damage to the socket.
ATX Power Installation
Power is provided to the 2801550 motherboard with the ATX1 standard
24-pin ATX power supply connector and J5 ATX 12V power connector.
These two power connectors should be utilized for the motherboard to
function.
6 2801550 User’s Manual

INSTALLATIONS
Installing the Memory
The 2801550 motherboard supports two DDR memory sockets for a
maximum total memory of 2GB in DDR memory type. The memory
module capacities supported are 64MB, 128MB, 256MB, 512MB and
1GB. The following table lists the supported DDR DIMM
configurations. Intel 865G supports configurations defined in the
JEDEC DDR DIMM specification only (A,B,C). Non-JEDEC standard
DIMMs such as double-sided x16 DDR SDRAM DIMMs are not
supported.
Supported DDR DIMM Configurations.
Density 64 Mbit 128 Mbit 256 Mbit 512 Mbit
Device
Width
Single/
Double
18 4-pin
DDR
X8 X1 6 X8 X16 X8 X1 6 X8 X1 6
S S/DS SS/DS S S/DS S S/DS S S/DS S S/DS S S/DS S S/DS
64/128MB 32MB/NA 128/256MB 64MB/NA 256/512MB 128MB/NA 512/1024M 256MB/NA
Installing and Removing Memory Modules
To install the DDR modules, locate the memory slot on the motherboard
and perform the following steps:
1. Hold the DDR module so that the key of the DDR module align with
those on the memory slot.
2. Gently push the DDR module in an upright position until the clips of
the slot close to hold the DDR module in place when the DDR module
touches the bottom of the slot.
3. To remove the DDR module, press the clips with both hands.
Lock
DDR Module
Lock
Lock Lock
2801550 User’s Manual 7

INSTALLATIONS
Setting the Jumpers
Jumpers are used on 2801550 to select various settings and features
according to your needs and applications. Contact your supplier if you
have doubts about the best configuration for your needs. The following
lists the connectors on 2801550 and their respective functions.
Jumper Loca tions on 2801 550 ..........................................................9
Configuring the CPU Frequency .................................................. 10
JP1, JP2, JP3: RS232/422/485 (COM2) Selection ....................... 10
JP4: Clear CMOS Contents ..........................................................10
JP5: 10/100Mb LAN Enable/Disable ...........................................10
8 2801550 User’s Manual

INSTALLATIONS
Jumper Locations on 2801550
Jumpers on 2801550 ...................................................................Page
JP1, JP2, JP3: RS232/422/485 (COM2) Selection....................... 10
JP4: Clear CMOS Contents.......................................................... 10
JP5: 10/100Mb LAN Enable/Disable........................................... 10
2801550 User’s Manual 9

INSTALLATIONS
Configuring the CPU Frequency
The 2801550 motherboard does not provide DIP switches to configure
the processor speed (CPU frequency). The CPU frequency and processor
side bus of the processor can be automatically detected by the
motherboard.
JP1, JP2, JP3: RS232/422/485 (COM2) Selection
COM1 is fixed for RS-232 use only.
COM2 is selectable for RS232, RS-422 and RS-485. COM3 and COM4
are fixed for RS-232 use only. The following table describes the jumper
settings for COM2 selection.
COM2
Function
Jumper
Setting
(pin closed)
JP1:
1-2
JP2:
3-5 & 4-6
JP3:
3-5 & 4-6
JP1:
3-4
JP2:
1-3 & 2-4
JP3:
1-3 & 2-4
JP1:
5-6
JP2:
1-3 & 2-4
JP3:
1-3 & 2-4
JP4: Clear CMOS Contents
Use JP4, a 3-pin header, to clear the CMOS contents.
Note that the
ATX-power connector should be disconnected from the motherboard
before clearing CMOS.
JP4 Setting Function
Pin 1-2
Short/Closed
Pin 2-3
Short/Closed
Normal
Clear CMOS
10 2801550 User’s Manual

INSTALLATIONS
JP5: 10/100Mb LAN Enable/Disable
If your motherboard comes with the Gigabit LAN functionality, you can
use this jumper to enable or disable it.
JP5 Setting Function
Pin 1-2
Short/Closed
Pin 2-3
Short/Closed
Enable
Disable
2801550 User’s Manual 11

INSTALLATIONS
Connectors on 2801550
The connectors on 2801550 allows you to connect external devices such
as keyboard, floppy disk drives, hard disk drives, printers, etc. The
following table lists the connectors on 2801550 and their respective
functions.
Conn ector Locati ons on 280 1550...................................................13
ATX1: ATX Power Supply Connector.........................................14
FDD1: Floppy Drive Connector ................................................... 14
IDE1 , IDE2 : EID E C onnecto rs.....................................................15
FAN1: CPU Fan Power Connector............................................... 16
FAN2: Chassis Fan Power Connector .......................................... 16
FAN3: System Fan Power Connector...........................................16
CN1: PS/2 Keyboard and PS/2 Mouse Connectors...................... 16
CN2, J1, J10, J13: Serial Ports ..................................................... 17
CN3: Parallel Port Connector ....................................................... 18
CN4: V G A CR T C onnec tor..........................................................18
CN5: USB and 10/100Mb LAN RJ45 Connectors....................... 19
CN6: USB and Gigabit LAN RJ45 Connectors............................ 19
CN7: Line Out, Line In, Mic Connector....................................... 19
J2: Digital 4-in 4-out I/O Connector.............................................20
J4: IrDA Connector ...................................................................... 20
J5: ATX 12V Power Connector....................................................20
J6: Compact Flash Connector.......................................................20
J7, J8: Serial ATA (SATA) Connectors .......................................20
J9: C D-In Audi o Con necto r..........................................................21
J11: External Audio Connector .................................................... 21
J12: USB Connector..................................................................... 21
J14: Wake on LAN Connector ..................................................... 21
J15: System Function Connector.................................................. 22
12 2801550 User’s Manual

INSTALLATIONS
Connector Locations on 2801550
Connectors on 2801550 ................................................................................................... Page
ATX1: ATX Power Supply Connector........................................................................................14
FDD1: Floppy Drive Connector .................................................................................................. 14
IDE1, IDE2: EIDE Connectors.................................................................................................... 15
FAN1: CPU Fan Power Connector..............................................................................................16
FAN2: Chassis Fan Power Connector......................................................................................... 16
FAN3: System Fan Power Connector.......................................................................................... 16
CN1: PS/2 Keyboard and PS/2 Mouse Connectors..................................................................... 16
CN2, J1, J10, J13: Serial Ports .................................................................................................... 17
CN3: Parallel Port Connector ...................................................................................................... 18
CN4: VGA CRT Connector......................................................................................................... 18
CN5: USB and 10/100Mb LAN RJ45 Connectors ..................................................................... 19
CN6: USB and Gigabit LAN RJ45 Connectors .......................................................................... 19
CN7: Line Out, Line In, Mic Connector ..................................................................................... 19
J2: Digital 4-in 4-out I/O Connector ........................................................................................... 20
J4: IrDA Connector......................................................................................................................20
J5: ATX 12V Power Connector................................................................................................... 20
J6: Compact Flash Connector...................................................................................................... 20
J7, J8: Serial ATA (SATA) Connectors ...................................................................................... 20
J9: CD-In Audio Connector.........................................................................................................21
J11: External Audio Connector ................................................................................................... 21
J12: USB Connector .................................................................................................................... 21
J14: Wake on LA N Connector .... ................................................................................................ 21
J15: System Function Connector................................................................................................. 22
2801550 User’s Manual 13

INSTALLATIONS
ATX1: ATX Power Supply Connector
Signal Name Pin # Pin # Signal Name
3.3V 13 1 3.3V
-12V 14 2 3.3V
Ground 15 3 Ground
PS-ON 16 4 +5V
Ground 17 5 Ground
Ground 18 6 +5V
Ground 19 7 Ground
-5V 20 8 Power good
+5V 21 9 5VSB
+5V 22 10 +12V
+5V 23 11 +12V
Ground 24 12 +3.3V
FDD1: Floppy Drive Connector
FDD1is a slim 26-pin connector and will support up to 1.44MB FDD.
Signal Name Pin # Pin # Signal Name
VCC 1 2 INDEX
VCC 3 4 DRV_SEL
VCC 5 6 DSK_CH
NC 7 8 NC
NC 9 10 MOTOR
NC 11 12 DIR
NC 13 14 STEP
GND 15 16 WDATA
GND 17 18 WGATE
GND 19 20 TRACK
NC 21 22 WPROT
GND 23 24 RDATA
GND 25 26 SIDE
14 2801550 User’s Manual

INSTALLATIONS
IDE1, IDE2: EIDE Connectors
IDE1: Primary IDE Connector
Signal Name
IDE1
IDE2
Reset ID E 1 2 Ground
Host data 7 3 4 Host data 8
Host data 6 5 6 Host data 9
Host data 5 7 8 Host data 10
Host data 4 9 10 Host data 11
Host data 3 11 12 Host data 12
Host data 2 13 14 Host data 13
Host data 1 15 16 Host data 14
Host data 0 17 18 Host data 15
Ground 19 20 Protect pin
DRQ0 21 22 Ground
Host IO W 23 24 Grou nd
Host IOR 25 26 Ground
IOCHRDY 27 28 Host ALE
DACK0 29 30 Ground
IRQ14 31 32 No connect
Address 1 33 34 No conn ect
Address 0 35 36 Address 2
Chip select 0 37 38 Chip select 1
Activity 39 40 Ground
IDE2: Secondary IDE Connector
Signal Name Pin # Pin # Signal Name
Reset ID E 1 2 Ground
Host data 7 3 4 Host data 8
Host data 6 5 6 Host data 9
Host data 5 7 8 Host data 10
Host data 4 9 10 Host data 11
Host data 3 11 12 Host data 12
Host data 2 13 14 Host data 13
Host data 1 15 16 Host data 14
Host data 0 17 18 Host data 15
Ground 19 20 Protect pin
DRQ1 21 22 Ground
Host IO W 23 24 Grou nd
Host IOR 25 26 Ground
IOCHRDY 27 28 Host ALE
DACK1 29 30 Ground
IRQ15 31 32 No connect
Address 1 33 34 No co nnect
Address 0 35 36 Address 2
Chip select 0 37 38 Chip select 1
Activity 39 40 Ground
[
2801550 User’s Manual 15

INSTALLATIONS
FAN1: CPU Fan Power Connector
Signal Name
1 Ground
2 +12V
3 Rotation detection
4 NC
FAN2: Chassis Fan Power Connector
FAN2 is a 3-pin header for the chassis fan. The fan must be a 12V fan.
Signal Name
1 Ground
2 +12V
3 Rotation detection
FAN3: System Fan Power Connector
FAN3 is a 3-pin header for a 12V fan.
Signal Name
1 Ground
2 +12V
3 Rotation detection
CN1: PS/2 Keyboard and PS/2 Mouse Connectors
PS/2 Mouse
PS/2 Keyboard
Below are the pin-out assignments of the connectors.
Signal Name Keyboard Mouse Signal Name
Keyboard data 1 1 Mouse data
N.C. 2 2 N.C.
GND 3 3 GND
5V 4 4 5V
Keyboard clock 5 5 Mouse clock
N.C. 6 6 N.C.
16 2801550 User’s Manual
/