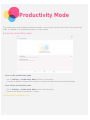
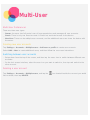
Lenovo Tab P11 boasts a long battery life with 7500mAh, a Qualcomm Snapdragon 662 processor for smooth performance, and a vibrant display for immersive visuals. Capture life's moments with its built-in camera, and stay connected with dual-band Wi-Fi and Bluetooth 5.1. Enjoy split-screen multitasking, productivity mode for enhanced workflow, and multi-user profiles for personalized experiences. Explore the world with GPS and A-GPS functionality, and relish the convenience of navigation buttons for easy control.
Lenovo Tab P11 boasts a long battery life with 7500mAh, a Qualcomm Snapdragon 662 processor for smooth performance, and a vibrant display for immersive visuals. Capture life's moments with its built-in camera, and stay connected with dual-band Wi-Fi and Bluetooth 5.1. Enjoy split-screen multitasking, productivity mode for enhanced workflow, and multi-user profiles for personalized experiences. Explore the world with GPS and A-GPS functionality, and relish the convenience of navigation buttons for easy control.


-
 1
1
-
 2
2
-
 3
3
-
 4
4
-
 5
5
-
 6
6
-
 7
7
-
 8
8
-
 9
9
-
 10
10
-
 11
11
-
 12
12
-
 13
13
-
 14
14
-
 15
15
-
 16
16
-
 17
17
-
 18
18
-
 19
19
-
 20
20
-
 21
21
-
 22
22
-
 23
23
-
 24
24
-
 25
25
-
 26
26
-
 27
27
-
 28
28
-
 29
29
-
 30
30


Lenovo Tab P11 boasts a long battery life with 7500mAh, a Qualcomm Snapdragon 662 processor for smooth performance, and a vibrant display for immersive visuals. Capture life's moments with its built-in camera, and stay connected with dual-band Wi-Fi and Bluetooth 5.1. Enjoy split-screen multitasking, productivity mode for enhanced workflow, and multi-user profiles for personalized experiences. Explore the world with GPS and A-GPS functionality, and relish the convenience of navigation buttons for easy control.
Ask a question and I''ll find the answer in the document
Finding information in a document is now easier with AI
Related papers
-
Lenovo Tab P11 2nd Generation User manual
-
Lenovo M10 Plus 10.3in 64GB FHD Tablet User manual
-
-
Lenovo Tab 4 10 Operating instructions
-
-
-
-
-
Lenovo Yoga Tab 13 User manual
-
Lenovo TB-J607Z Tab P11 5G Network Tablet User manual
Other documents
-
WOLF-Garten 3907000 Datasheet
-
Motorola Moto Tab G70 LTE User manual
-
Jpay JP6Mini WIFI Android Tablet PC User manual
-
Icon SMFOMC360526A User manual
-
 Spontbox Spontbox User manual
-
 Urbanworx UX33KMC1 User manual
-
Kiwi N809 User guide
-
Wacom Bamboo CTH-670 User manual
-
Wacom CTL470 User manual
-
 Inventec GIV100 Smart Audio Bar User manual


