
1
SSD7000 Series NVMe RAID Solutions
Mac Installation Guide
V1.04 – June, 2021

2
Contents
Overview..................................................................................................................................................4
Prerequisites............................................................................................................................................5
1. Apple T2 security Chip-Disable Secure boot....................................................................................... 6
Disabling Secure Boot............................................................................................................................ 6
2. Installing the Device Driver..................................................................................................................... 8
macOS High Sierra 10.13 Driver Installation Procedure.................................................................. 8
macOS Mojave10.14 and macOS Catalina 10.15 Driver Installation Procedure.......................... 11
3. Updating the Device Driver....................................................................................................................14
Updating the Device Driver (for macOS 10.13/10.14/10.15)............................................................ 14
4. Uninstalling the Device Driver...............................................................................................................16
Uninstalling the Device driver for macOS 10.13 and 10.14............................................................. 16
Uninstalling the Device Driver for macOS 10.15.............................................................................. 16
5. Installing the RAID Management Software (WebGUI).........................................................................17
Installing the WebGUI for macOS 10.13/10.14/10.15.......................................................................17
6. Updating the WEBGUI for macOS 10.13/10/14/10.15..........................................................................19
7. Uninstalling the WebGUI for macOS 10.13/10.14/10.15...................................................................... 19
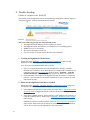
8. Trouble shooting.....................................................................................................................................21
Unable to connect to the WebGUI......................................................................................................21
This error can be triggered by one of the following issues:............................................................. 21
1. The HighPoint NVMe hardware is not recognized by macOS.....................................................21
2. The HighPoint NVMe device driver is not installed or is not loading properly...........................21
3. WEBGUI service is not running................................................................................................... 21
4. The system’s SIP status is incorrect..............................................................................................21
5. If you are using a T2 system; Secure Boot may not be disabled.................................................. 21
1. Verifying the HighPoint NVMe hardware............................................................................... 21
2. Make sure the HighPoint NVMe Driver is loaded...................................................................21
3. Check the SIP status................................................................................................................... 22
4. For T2 Systems: Make sure Secure Boot is disabled............................................................... 22
The WebGUI can't connect to a remote system................................................................................ 22
Appendix........................................................................................................................................................ 23
Collecting the macOS version............................................................................................................. 23
Check the security & privacy..............................................................................................................23
Verifying Product Installation............................................................................................................ 24
WEBGUI Screenshots..........................................................................................................................27
WEBGUI service restart..................................................................................................................... 27

3
Checking the SIP Status...................................................................................................................... 27
Systems with T2 chipsets – Secure Boot status..................................................................................27
Checking the Driver status and Version............................................................................................27
How to Collect System Logs................................................................................................................28

4
Overview
This guide includes important hardware/software requirements, installation & upgrade procedures,
and troubleshooting tips for using SSD7000 NVMe RAID controllers, the RocketStor 6661A-
NVMe Thunderbolt™ 3 NVMe RAID solution, and SSD6540/6540M RAID enclosures with a
macOS operating system.
Prerequisites
This section describes the base hardware and software requirements for SSD7000 series NVMe
RAID controllers & enclosures.
Driver Installation
This section covers driver installation, driver upgrade and driver uninstallation procedures for
SSD7000 series NVMe RAID controllers & enclosures in a macOS environment.
Troubleshooting
Please consult this section if you encounter any difficulties installing or using SSD7000 series
NVMe RAID controllers or enclosures. It includes descriptions and solutions for commonly
reported technical issues.
Appendix
This section describes how to collect trouble shooting information for support cases you have
submitted via our Online Support Portal.

5
Prerequisites
1) Make sure at least one NVMe SSD’s has been installed into the HighPoint NVMe controller
or enclosure. The driver will not install properly unless NVMe SSD’s are detected by the
hardware environment.
2) The SSD7101A-1/7120/6540/6540M/7103/7104/7140/7505/7540/7540L NVMe device must
installed into a PCIe 3.0 slot with x16 dedicated lanes. The SSD7204 can be installed into a
PCIe 3.0 x8 or x16 slot.
If you are using the RocketStor 6661A-NVMe or a SSD7000 NVMe RAID controller via the
RocketStor 6661A adapter, the RocketStor unit must be plugged into a Thunderbolt™ 3 port.
3) Operating System Support: macOS 10.13 or later
4) Before installing the driver and RAID Management software, you should log into the system as a
System Administrator.
5) Identify the system as either T2 or Non-T2 based – if the system has a T2 chip, make sure to
follow section 3 before attempting to install any software for the HighPoint NVMe device.

6
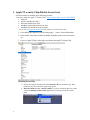
1. Apple T2 security Chip-Disable Secure boot
Secure Boot must be disabled on the following products:
Learn more About the Apple T2 Security Chip
:
https://support.apple.com/en-us/HT208862
iMac Pro
Mac Pro introduced in 2019
Mac mini introduced in 2018
MacBook Air introduced in 2018 or later
MacBook Pro introduced in 2018 or later
You can also use System Information to learn whether your Mac has this chip:
1. Press and hold the Option key while choosing Apple ( ) menu > System Information.
2. In the sidebar, select either Controller or iBridge, depending on the version of macOS in
use.
3. If you see "Apple T2 chip" on the right, your Mac has the Apple T2 Security Chip.
Disabling Secure Boot
1) Restart the computer and then press the Command + R keys simultaneously. Keep
holding the keys down until the Apple Logo appears.
2) When the menu bar says: “macOS Utilities”, you have booted into Recovery mode.
Launch the Startup Security Utility application by selecting it from the Utilities
menu.

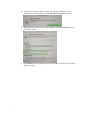
7
3) A dialog box will appear, telling you that you will need to authenticate as an
Administrator to make changes, click the Enter macOS Password… button.
4) When the Startup Security Utility window appears, select No Security under the
Secure Boot options.
5) Select Restart from the Apple menu to restart your Mac, and wait for your normal
Desktop to appear.

8
2. Installing the Device Driver
Current drivers can be downloaded from each product’s Software Downloads webpage.
Product
Download Page
SSD7101A-1
https://www.highpoint-tech.com/USA_new/series-ssd7101a-1-download.htm
SSD7120
https://highpoint-tech.com/USA_new/series-ssd7120-download.htm
SSD7204
https://highpoint-tech.com/USA_new/series-ssd7204-download.htm
SSD7104
https://highpoint-tech.com/USA_new/series-ssd7104-download.htm
SSD6540M
https://highpoint-tech.com/USA_new/series-ssd6540m-download.htm
SSD6540
https://highpoint-tech.com/USA_new/series-ssd6540-download.htm
SSD7103
https://highpoint-tech.com/USA_new/series-ssd7103-download.htm
SSD7140
https://highpoint-tech.com/USA_new/series-ssd7140-download.htm
RS6661A-NVMe
https://highpoint-tech.com/USA_new/series-rs6661a-nvme-download.htm
SSD7505
https://highpoint-tech.com/USA_new/series-ssd7500-download.htm
SSD7540
https://highpoint-tech.com/USA_new/series-ssd7500-download.htm
SSD7540L
https://highpoint-tech.com/USA_new/series-ssd7500-download.htm
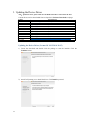
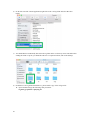
macOS High Sierra 10.13 Driver Installation Procedure
1) Restart the computer and then press the Command + R keys simultaneously. Keep holding
the keys down until the Apple logo appears. Click on Utilities in the upper left corner and
select Terminal.
2) Open a Terminal window and enter the following command:
csrutil disable
3) Select Restart from the Apple menu to restart your Mac, and wait for your normal Desktop to
appear.
4) After rebooting, confirm that SIP is in the disabled state. Open terminal and type the
following command:
csrutil status

9
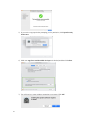
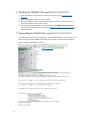
1) Next, start the driver installation procedure. Locate the download and double click the
package to start the installer. Click the Continue button:
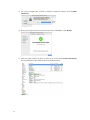
2) macOS will prompt you to install the driver. Click Install to proceed.
3) You will be prompted that a reboot is needed to install the software. Click Continue
Installation.
4) If no pop-ups appear, please proceed to the next step of installation. Click Restart.

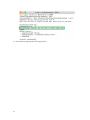
10
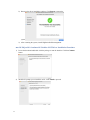
5) If you receive a popup window prompting you for permission, click Open Security
Preferences.
6) Make sure App Store and identified developers is checked, and then click Allow.
7) You will receive a popup window, prompting you to restart. Click OK.

11
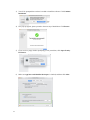
8) Return to the driver installation window. Click Restart to restart the
system.
9) After restarting the system, install HighPoint RAID management.
macOS Mojave10.14 and macOS Catalina 10.15 Driver Installation Procedure
1) Locate the download and double click the package to start the installer. Click the Continue
button:
2) macOS will prompt you to install the driver. Click Install to proceed.

12
3) You will be prompted that a reboot is needed to install the software. Click Continue
Installation.
4) If no pop-ups appear, please proceed to the next step of installation. Click Restart.
5) If you receive a popup window prompting you for permission, click Open Security
Preferences.
6) Make sure App Store and identified developers is checked, and then click Allow.

13
7) You will receive a popup window, prompting you to restart. Click OK.
8) Return to the driver installation window. Click Restart to restart the
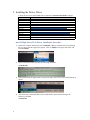
system.
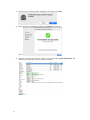
9) After the system restarts, the driver’s status can be viewed under System Information; The
following screenshot shows the driver has been loaded:

14
3. Updating the Device Driver
Note
:
Update the driver, please make sure the RAID controller is connected to the host.
Current drivers can be downloaded from each product’s Software Downloads webpage.
Product
Download Page
SSD7101A-1
https://www.highpoint-tech.com/USA_new/series-ssd7101a-1-download.htm
SSD7120
https://highpoint-tech.com/USA_new/series-ssd7120-download.htm
SSD7204
https://highpoint-tech.com/USA_new/series-ssd7204-download.htm
SSD7104
https://highpoint-tech.com/USA_new/series-ssd7104-download.htm
SSD6540M
https://highpoint-tech.com/USA_new/series-ssd6540m-download.htm
SSD6540
https://highpoint-tech.com/USA_new/series-ssd6540-download.htm
SSD7103
https://highpoint-tech.com/USA_new/series-ssd7103-download.htm
SSD7140
https://highpoint-tech.com/USA_new/series-ssd7140-download.htm
RS6661A-NVMe
https://highpoint-tech.com/USA_new/series-rs6661a-nvme-download.htm
SSD7505
https://highpoint-tech.com/USA_new/series-ssd7500-download.htm
SSD7540
https://highpoint-tech.com/USA_new/series-ssd7500-download.htm
SSD7540L
https://highpoint-tech.com/USA_new/series-ssd7500-download.htm
Updating the Device Driver (for macOS 10.13/10.14/10.15)
1) Locate the download and double click the package to start the installer. Click the
Continue button:
2) macOS will prompt you to install the driver. Click Install to proceed.

15
3) You will be prompted that a reboot is needed to install the software. Click Continue
Installation.
4) If no pop-ups appear, please proceed to the next step of installation. Click Restart.
5) After the system restarts, the driver’s status can be viewed under System Information;
the screenshot below shows that the driver has loaded properly.

16
4. Uninstalling the Device Driver
Uninstalling the Device driver for macOS 10.13 and 10.14
To uninstall the NVMe driver, you will need to open a Terminal window and enter the following
command:
sudo rm -rf /Library/Extensions/HighPointNVMe.kext
Uninstalling the Device Driver for macOS 10.15
To uninstall the NVMe driver, you will need to open a Terminal window and enter the following
command:
sudo rm -rf /Library/Extensions/HighPointNVMe.kext
sudo kextcache –i /

17
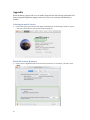
5. Installing the RAID Management Software (WebGUI)
Installing the WebGUI for macOS 10.13/10.14/10.15
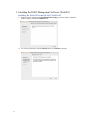
1) Double click the package named HighPointWebGUI.pkg to start the installer. When the
window appears, click the Continue button.
2) You will be promoted to click the Install button. Click Install to continue.

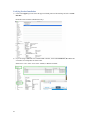
18
3) You will then be promoted to enter the Administrator Username and Password. Once
these have been entered, click Install Software to continue.
4) The WebGUI Management software has been installed. Click Close to complete the
procedure.

19
6. Updating the WEBGUI for macOS 10.13/10/14/10.15
1) First, uninstall the current WebGUI. Please refer to item 7 below (Uninstalling the
WebGUI).
2) After uninstalling the WebGUI, reboot macOS.
3) Once the system has rebooted, download the latest version of the WebGUI from the
appropriate Software Downloads webpage.
4) Locate the download and double click the package named HighPointWebGUI.pkg to
start the installer. Please refer to Installing the WebGUI for macOS 10.13/10.14/10.15 for
more information.
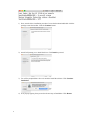
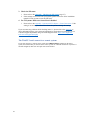
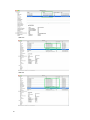
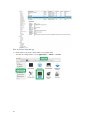
7. Uninstalling the WebGUI for macOS 10.13/10.14/10.15
To uninstall the WebGUI, access Applications, click on HPTWEBGUI, select uninstall, and
double-click the uninstall-WEBGUI.command. The uninstall command will automatically
open a terminal and uninstall the software:

20
Page is loading ...
Page is loading ...
Page is loading ...
Page is loading ...
Page is loading ...
Page is loading ...
Page is loading ...
Page is loading ...
Page is loading ...
Page is loading ...
-
 1
1
-
 2
2
-
 3
3
-
 4
4
-
 5
5
-
 6
6
-
 7
7
-
 8
8
-
 9
9
-
 10
10
-
 11
11
-
 12
12
-
 13
13
-
 14
14
-
 15
15
-
 16
16
-
 17
17
-
 18
18
-
 19
19
-
 20
20
-
 21
21
-
 22
22
-
 23
23
-
 24
24
-
 25
25
-
 26
26
-
 27
27
-
 28
28
-
 29
29
-
 30
30


Highpoint SSD7204 Installation guide
- Type
- Installation guide
- This manual is also suitable for
Ask a question and I''ll find the answer in the document
Finding information in a document is now easier with AI
Related papers
-
Highpoint SSD7101A-1 Installation guide
-
Highpoint SSD7120 User guide
-
Highpoint SSD7104 Quick Installation Guide
-
-
-
Highpoint SSD7204 Quick Installation Guide
-
Highpoint SSD7540 Quick Installation Guide
-
Highpoint SSD7103 Quick Installation Guide
-
-
Other documents
-
 High Point SSD7101A-1 User manual
-
Sony NPFW50 Product information
-
HighPoint Technologies SSD7140A Installation guide
-
Apple MacBook Pro Operating instructions
-
Studio Technologies STUDIO-TECHNOLOGIES 72 Level Meter Interface Operating instructions
-
 Leef iBRIDGE 16GB User manual
-
Apple MLA02LL User manual
-
Parallels Desktop 15.0 Quick Start
-
![BESIGN[Large Size] Besign Adjustable Latop Table, Portable Standing Bed Desk, Foldable Sofa Breakfast Tray, Notebook Computer Stand for Reading and Writing – Black](//vs1.manuzoid.com/store/data/000914356_2-e9e5bc9f4c7b12f9365134d90c50922d-160x210.png) BESIGN [Large Size] Besign Adjustable Latop Table, Portable Standing Bed Desk, Foldable Sofa Breakfast Tray, Notebook Computer Stand for Reading and Writing – Black User manual
BESIGN [Large Size] Besign Adjustable Latop Table, Portable Standing Bed Desk, Foldable Sofa Breakfast Tray, Notebook Computer Stand for Reading and Writing – Black User manual
-
Cable Matters 107009-BLK User manual


![BESIGN[Large Size] Besign Adjustable Latop Table, Portable Standing Bed Desk, Foldable Sofa Breakfast Tray, Notebook Computer Stand for Reading and Writing – Black](http://vs1.manuzoid.com/store/data/000914356_2-e9e5bc9f4c7b12f9365134d90c50922d-160x210.png)