
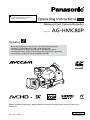
This product is eligible for the AVCCAM
3 Year Warranty Repair Program. For
details, see page 5 of Vol.1.
Volume
2
Note that Operation Instructions Vol.2 describes advanced
operations of the Memory Card Camera-Recorder.
For instructions on basic operations of the Memory Card
Camera-Recorder, refer to Operating Instructions Vol.1 (printed
documents) contained in the supplied CD-ROM.
Operating Instructions
Vol.2
M0710TU1080 -PS
VQT2Y43A (E)
Before operating this product, please read the instructions carefully and save this manual for
future use.
ENGLISH
Memory Card Camera-Recorder
Model No. AG-HMC80P

2
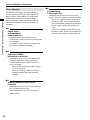
Contents
Chapter 1: Operations in AVCHD
mode
Shooting in manual mode .............................. 5
Switching to manual mode ............................... 5
Manual focusing ............................................... 5
Using focus assist ............................................. 6
Setting the aperture and gain ............................ 6
Adjusting the white balance
and black balance ......................................... 7
Shooting in progressive mode ...................... 9
Shooting techniques for
different targets .................................... 10
Self-portrait shooting ...................................... 10
Low angle shooting ......................................... 10
Zebra pattern .................................................. 10
Marker ............................................................. 11
Checking and displaying shooting status ........ 11
PRE REC ........................................................ 11
Optical Image Stabilizer .................................. 11
Adding effects to images ................................. 12
Using the USER buttons ................................ 12
Backlight compensation .................................. 12
Color bars ........................................................ 12
Wave form monitor function ............................. 12
Shot mark function .......................................... 13
Interval recording ............................................. 13
Time stamp function ........................................ 13
LAST CLIP function ......................................... 14
Adjusting the shutter speed ........................ 15
Synchro scan ................................................... 17
Selecting audio input ................................... 18
Using the built-in microphone / external
microphone (3.5 mm stereo mini jack) ....... 18
Using the external microphone or audio devices
connected to the XLR input terminal ........... 19
Adjusting the audio recording level ........... 20
Using scene files .......................................... 21
Loading scene files .......................................... 21
Setting and saving scene files ......................... 21
Initializing scene files ....................................... 22
Clip metadata ................................................ 23
Loading the metadata ...................................... 23
Selecting the USER CLIP NAME recording
method ........................................................ 24
Using the Counter ........................................ 25
Counter display ............................................... 25
Charging the built-in battery/
Setting the time code ........................... 26
Recharging the built-in battery ........................ 26
Setting the time code ....................................... 26
Specifying the time code ................................ 26
Setting user information .................................. 27
Operating SD Memory Cards....................... 28
Formatting SD Memory Cards ......................... 28
SD Memory Card recording times ................... 29
Dividing clips recorded onto
SD Memory Cards ....................................... 29
Removing SD Memory Card ........................... 30
Protecting SD Memory Cards .......................... 30
Repairing SD Memory Cards .......................... 30
Shooting photos ........................................... 31
Setting the aspect ratio / recording pixels ....... 32
Setting the picture quality ................................ 32
Displaying the histogram ................................. 32
Maximum number of photos ............................ 33
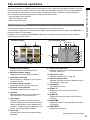
Clip and photo operations ........................... 35
During clip playback ........................................ 35
Read this first!
IMPORTANT SAFETY INSTRUCTIONS
Operating precautions
Precaution for use
Outline
Accessories/Optional accessories/Description of
parts
Preparation
Recharging the battery/Power sources/Adjusting
the grip belt/Attaching the shoulder strap/
Detaching and attaching the lens hood/Fitting the
eye cup/The remote control
Basic Operations
Turn on/off the camera/Tally lamp/Using the
cursor button/Using the viewfinder/Setting the
calendar/Basic shooting operations/Using the
zoom function/Using the setup menus/Setup
menu structure
Specifications
Volume 1
Volume 2

3
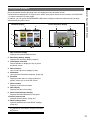
During photo playback ..................................... 37
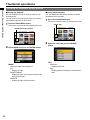
Thumbnail operations .................................. 38
Selecting the thumbnail display method .......... 38
Format card and card information ................... 39
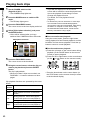
Playing back clips ........................................ 40
Set playback format ......................................... 41
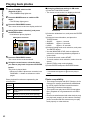
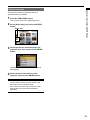
Playing back photos..................................... 42
Playback by date ............................................. 43
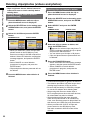
Deleting clips/photos
(videos and photos) .............................. 44
Deleting multiple clips or
photos simultaneously ................................. 44
Selecting clips or photos to delete ................... 44
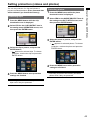
Setting protection (videos and photos) ...... 45
Protecting clips ................................................ 45
Protecting photos ............................................ 45
DPOF settings (photos) ............................... 46
Printing photos on a printer (PictBridge) ... 47
Useful playback functions ........................... 49
Adding a SHOT MARK to a clip....................... 49
Repeat playback .............................................. 49
Resume playback (RESUME PLAY) ............... 49
Viewing images on a television ....................... 49
Checking the date and time ............................. 49
Connecting external units ........................... 50
Headphones .................................................... 50
External microphone (Stereo mini jack
compatible) .................................................. 50
Computer (non-linear editing/file transfer) ...... 51
Video deck (Dubbing) ...................................... 51
TV/Monitor ....................................................... 52
Nonlinear editing .......................................... 53
Chapter 2: Operations in DV
mode
Shooting in manual mode ............................ 54
Switching to manual mode ............................. 54
Manual focusing ............................................. 54
Using focus assist ........................................... 55
Setting the aperture and gain .......................... 55
Adjusting the white balance
and black balance ....................................... 56
Shooting in progressive mode .................... 58
Shooting techniques for
different targets .................................... 59
Self-portrait shooting ...................................... 59
Low angle shooting ......................................... 59
Zebra pattern .................................................. 59
Marker ............................................................. 60
Checking and displaying shooting status ........ 60
PRE REC ........................................................ 60
Optical Image Stabilizer .................................. 60
Adding effects to images ................................. 61
Using the USER buttons ................................ 61
Backlight compensation .................................. 61
Color bars ........................................................ 61
Wave form monitor function ............................. 61
Shot mark function .......................................... 62
Interval recording ............................................. 62
Time stamp function ........................................ 62
LAST CLIP function ......................................... 63
Changing the size of images .......................... 63
Recording backup images .............................. 64
Adjusting the shutter speed ........................ 65
Synchro scan ................................................... 67
Selecting audio input ................................... 68
Using the built-in microphone / external
microphone (3.5 mm stereo mini jack) ....... 68
Using the external microphone or audio devices
connected to the XLR input terminal ........... 69
Adjusting the audio recording level ........... 70
Using scene files .......................................... 71
Loading scene files .......................................... 71
Setting and saving scene files ......................... 71
Initializing scene files ....................................... 72
Using the Counter ........................................ 73
Counter display ............................................... 73
1394 TC preset mode ...................................... 73
Charging the built-in battery/
Setting the time code ........................... 74
Recharging the built-in battery ........................ 74
Setting the time code ....................................... 74
Specifying the time code ................................ 74
Setting user information .................................. 75
Operating SD Memory Cards....................... 76
Formatting SD Memory Cards ......................... 76
SD Memory Card recording times ................... 77
Dividing clips recorded onto
SD Memory Cards ....................................... 77
Removing SD Memory Card ........................... 78
Protecting SD Memory Cards .......................... 78
Repairing SD Memory Cards .......................... 78
Clip operations ............................................. 79
During clip playback ........................................ 79
Thumbnail operations .................................. 81
Operating the thumbnail menu ........................ 81
Selecting the thumbnail display method .......... 81
Deleting clips ................................................... 81
Repairing clips ................................................. 82
Formatting SD Memory Cards ......................... 82
Displaying card and system information .......... 83
Playing back clips ........................................ 84
Useful playback functions ........................... 85
Adding a SHOT MARK to a clip....................... 85
Repeat playback .............................................. 85
Resume playback (RESUME PLAY) ............... 85
Viewing images on a television ....................... 85
Checking the date and time ............................. 85
Connecting external units ........................... 86
Headphones .................................................... 86
External microphone (Stereo mini jack
compatible) .................................................. 86
Video deck (Dubbing) ...................................... 87
Digital video (Dubbing) .................................... 88
TV/Monitor ....................................................... 89

4
Dubbing ......................................................... 90
Digital input/output ........................................... 90
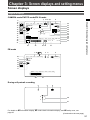
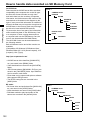
Chapter 3: Screen displays and
setting menus
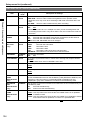
Screen displays ............................................ 91
Regular displays .............................................. 91
Main warning displays ..................................... 96
Setting the DISPLAY items .............................. 99
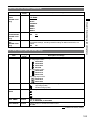
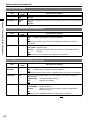
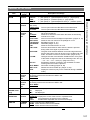
Setup menu list ........................................... 101
SCENE FILE screen ...................................... 101
CAMERA SETUP screen............................... 102
RECORD SETUP screen .............................. 103
PICTURE screen (AVCHD mode only).......... 105
PLAY SETUP screen ..................................... 106
OPERATION screen (AVCHD mode only) .... 106
PICT. SETUP screen (AVCHD mode only) .... 106
SW&DISP SETUP screen ............................. 107
OTHER FUNCTIONS screen ........................ 110
OPTION MENU screen (DV mode only) ....... 113
List of thumbnail menus
(DV mode only) ................................... 114
THUMBNAIL menu ........................................ 114
OPERATION menu........................................ 114
OTHER FUNCTIONS menu .......................... 114
Chapter 4: Reference
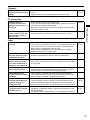
Before calling for service........................... 115
Updating the firmware ................................ 119
Cleaning ...................................................... 119
Cleaning the eye piece ............................... 119
Storage Precautions................................... 120
Software information .................................. 121
Recording format ........................................ 121
How to handle data recorded on
SD Memory Card ................................. 122
Index
Index ............................................................ 124
Contents (continued)

5
Chapter 1: Operations in AVCHD mode
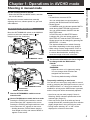
Shooting in manual mode
Set the shooting mode to AVCHD.
Select AVCHD with the MODE switch, and then
turn on the camera.
Set the unit to manual mode when manually
adjusting the focus, shutter speed, iris, gain and
white balance.
Switching to manual mode
Move the AUTO/MANUAL switch to the MANUAL
position to select the manual mode. ( will
disappear from the viewfinder.)
AUTO/MANUAL switch
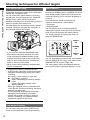
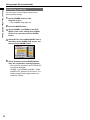
Manual focusing
FOCUS button
AUTO/MANUAL switch
Focus ring
RING selector switch
1
Use the AUTO/MANUAL switch to set to
manual mode.
2
Use the FOCUS button to switch the focus mode.
Pressing the FOCUS button switches to manual
focus mode where “MF” appears on the screen.
Pressing the FOCUS button again switches to auto
focus mode where “AF” appears on the screen.
Holding down the FOCUS button sets the
focal length to infinity and causes “MF95” to
appear on the screen.
•
•
When switching from auto mode to manual
mode:
Iris and focus are set to AUTO.
You can switch them to manual mode by
pressing the IRIS dial and FOCUS button.
Shutter speed
In CAMERA mode, the shutter speed of AUTO
mode during SHUTTER ON is preserved.
You can switch between ON/OFF with the
SHUTTER button.
In PHOTO mode, the SHUTTER status
is always ON. (You can cannot switch to
SHUTTER OFF with the SHUTTER button.)
Shutter speed can be changed by pressing the
SPEED SEL –/+ button.
The shortest distance from a back-focusing
lens differs depending on the zoom position.
When using a macro range and AF or MF on
the focus control information display appears
in reverse black and white, zooming may
cause the image to become unfocused.
•
•
•
•
3
The function allocated to the focus ring can
be changed with the RING switch.
FOCUS:
Adjust the focus.
ZOOM/IRIS:
Adjust the zoom or iris (aperture) setting.
You can change which functions are
assigned from the menus.
The factory default setting is ZOOM.
Temporarily switching to auto focus
You can also use auto focus mode while in manual
mode by assigning the (PUSH)AF function to one of
the USER buttons 1 to 3. Auto focus mode will be
enabled for as long as the USER button is pressed,
and the focal point will be automatically adjusted.
Auto focus may not work properly if there is
flickering. Select a shutter speed suited to the
ambient light. (Page 15)
If the auto focus mode is set with any format
except 60i and 60P, controlling the focus will take
slightly longer than in the normal focus mode.
During macro shooting “AF” or “MF” will be
displayed in a frame on the screen.
•
•
•
Chapter 1: Operations in AVCHD mode

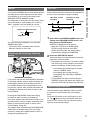
6
Chapter 1: Operations in AVCHD mode
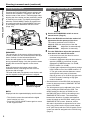
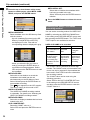
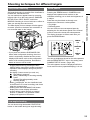
Setting the aperture and gain
IRIS dial
1
Use the AUTO/MANUAL switch to set to
manual mode. (Page 5)
2
Press the IRIS dial to switch the method of
adjustment for the aperture of the lens.
The method switches to AUTO IRIS or
MANUAL IRIS with each press of the dial.
AUTO IRIS:
Adjust the iris automatically.
MANUAL IRIS:
Adjust the iris manually.
3
Turn the IRIS dial to adjust the aperture of
lens when in the manual iris mode.
In the auto iris mode, the lens iris can be
corrected using this dial.
Increase in brightness beyond the maximum
aperture (OPEN) is performed via gain
adjustment (CAMERA mode: 0 to 24 dB;
PHOTO mode: 0 to 18 dB).
If further gain adjustment is necessary, assign
HIGH GAIN to one of the USER buttons 1 to
3. The gain mode switches between normal
and high with each press of the button.
Gain can be set to up to 34 dB in high gain mode.
In PHOTO mode, switching to high gain
mode is disabled.
Set the direction of the IRIS DIAL and aperture
control in the setup menus, SW&DISP SETUP
screen, IRIS DIAL.
The lens aperture can be adjusted in the focus
ring by setting the RING switch to IRIS. The
default setting for this item is ZOOM, so set
the RING SW item to IRIS in the setting menu
SW&DISP SETUP screen. The relationship
between the direction of rotation and aperture
control is based on the IRIS DIAL setting in the
SW&DISP SETUP screen. However, as this
will make it impossible to adjust the focus in the
focus ring, please set the focus control method
to AF (auto focus) with the FOCUS switch. Zoom
control can also be assigned to the FOCUS ring.
(Page 5)
•
•
•
•
•
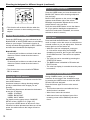
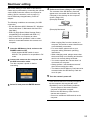
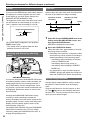
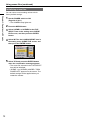
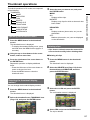
Using focus assist
Pressing the FOCUS ASSIST button enlarges the
center of the viewfinder, or displays a bar at the
bottom center of the screen. These displays make
aligning the focus easier and are particularly useful
in manual focus mode. The display that appears
when the FOCUS ASSIST button is pressed can
be configured with the FOCUS ASSIST SW item
in the setting menu SW&DISP SETUP screen.
(Page 107)
FOCUS ASSIST button
EXPANDED:
The central part of the screen will be enlarged by
a factor of about 4 in the vertical direction and by a
factor of about 6 in the horizontal direction.
A blue box will appear in the viewfinder screen
during expanded display. Only the operation status
display and counter will appear on the screen.
BAR:
A bar will appear at the bottom center of the
viewfinder screen, indicating the level of focus
alignment with its length.
The peak hold mark (▼) appears over the bar, and
the bar expands to the right as focus is aligned.
Focus not aligned Bar expands to right
as focus is aligned
BOTH:
Displays both the expanded display and focus bar.
This function cannot be used while the digital
zoom function is in use.
Press the FOCUS ASSIST button again to return
to the original screen.
•
•
Shooting in manual mode (continued)

7
Chapter 1: Operations in AVCHD mode
As you shrink the aperture to a near closed state,
resolution will decrease due to light diffraction.
You can prevent this by adjusting the shutter
speed and increasing the aperture size.
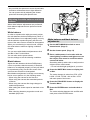
Adjusting the white balance and black
balance
When white balance adjustments are performed,
black balance adjustments are performed at the
same time.
White balance
In order to reproduce the white accurately, adjust
the ratio between the three RGB primary colors. If
the white balance is not adjusted properly, not only
will the white be reproduced poorly but the color
tones of the entire screen will also be downgraded.
When you are shooting in manual mode, readjust
the white balance whenever lighting conditions
change.
You can store white balance adjustments to Ach
and Bch of the Function Menu.
You can also use the preset values.
Use the settings to suit the shooting conditions.
Black balance
Adjust the ratio between the three RGB primary
colors to reproduce black accurately. If the black
balance is not adjusted properly, not only will black
be reproduced poorly, but the color tones of the
entire screen will also be downgraded.
Black balance adjustment is usually not necessary,
but be sure to perform it in the following cases.
When using the camera for the first time.
When using the camera after extended periods
of disuse.
When using the camera after large changes in
ambient temperature.
After setting the shutter speed to standard or low
speeds.
After switching between progressive mode and
standard (60i) mode.
•
•
•
•
•
•
WHITE BAL button
W
H
I
TE
B
A
L
A
U
T
O
/
M
A
N
U
A
L
IR
I
S
FO
C
U
S
FOCUS ASSI
S
T
F
O
C
U
S Z
O
O
M
/
IR
I
S
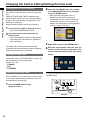
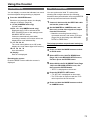
White balance and black balance
adjustments
1
Use the AUTO/MANUAL switch to set to
manual mode. (Page 5)
2
Set the shutter speed. (Page 15)
3
Place a white pattern in a location with the
same lighting conditions and light source as
the subject, then zoom in and fill the whole
screen with white.
Something white (a white cloth or wall) near the
subject can be used instead.
Do not include bright spotlights in your shot.
4
Press the WHITE BAL button to display Ach
or Bch.
The mode changes in order from ATW→ATW
LOCK→P3.2K→P5.6K→Ach or Bch→ATW
with each press of the button.
5
Press the FUNC/EXEC button to display the
Function Menu.
6
Press the ENTER button and select Ach or
Bch.
The mode switches between Ach and Bch with
each press of the ENTER button.
•

8
Chapter 1: Operations in AVCHD mode
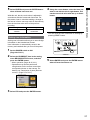
7
Press and hold the WHITE BAL button.
Adjustment takes a few seconds.
(The following messages appear on the
screen.)
Message during adjustment
AWB ABB
ACTIVE
Message after adjustment
AWB ABB OK
An error message appears on the viewfinder
screen when white balance adjustment is not
possible.
Message when adjustment cannot be
done
AWB NG
White balance cannot be adjusted if the ATW
(Auto Tracking White) function is working.
Black balance cannot be adjusted during
recording.
White balance cannot be adjusted during auto
mode. Only black balance can be adjusted.
White balance cannot be adjusted if the
shutter speed is set to less than 1/24.
•
•
•
•
Using presets
Use this feature when you have no time to make
white balance adjustments.
1
Use the AUTO/MANUAL switch to set to
manual mode. (Page 5)
2
Press the WHITE BAL button.
The mode changes in order from ATW→ATW
LOCK→P3.2K→P5.6K→Ach or Bch→ATW
with each press of the button.
Guide to the preset values
P3.2K (3200 K): halogen light
P5.6K (5600 K): outdoors
•
•
•
Auto Tracking White (ATW)
Using the ATW function enables the recording
environment to be automatically analyzed and an
optimum white balance to be constantly maintained
during recording.
To use the ATW function, set the white balance to
ATW mode by pressing the WHITE BAL button.
Depending on the environment, there may be
some error in the adjustment.
Use the procedure described on the previous
page whenever you need more precise white
balance.
•
•
Shooting in manual mode (continued)

9
Chapter 1: Operations in AVCHD mode
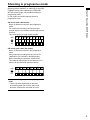
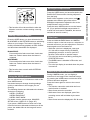
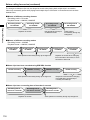
Shooting in progressive mode
Selecting either 1080/30P or 1080/24P for the REC
FORMAT option in the setting menu RECORD
SETUP screen (Page 103) enables shooting in
progressive mode.
In 720 mode, the camera always shoots in
progressive mode.
30P mode (with 1080 mode):
Shoot 30 frames a second in the progressive
mode.
For output and recording, the 30-frame-per-
second signal is converted to 60-field-per-second
interlace.
This mode gives you high quality images.
Ao Ae Bo BeCoCeDoDe Eo Ee Fo Fe GoGeHoHe Io Ie Jo Je
A B C D E F G H I J
30P
60i
24P mode (with 1080, 720 mode):
Shoot 24 frames a second in the progressive
mode.
(Only when the recording format is set to PH
1080/24P or PH 720/24P in AVCHD mode.)
Native recording is performed in 24P mode.
The external output signal is converted to a 2:3
format, 60 fps interlaced signal as follows.
A B C D E F G H
Ao Ae Bo Be Bo CeCoDeDoDe Eo Ee FoFe Fo
G
e
G
o
H
e
H
o
H
e
24P
60i
Note the following when shooting in progressive
mode.
There may be a slight delay to the start
of recording when you use the 24P mode
because 4 frames are recorded at a time.
•

10
Chapter 1: Operations in AVCHD mode
Shooting techniques for different targets
Self-portrait shooting
Self-portrait shooting is possible if the viewfinder is
rotated 180° towards the lens.
You can make them appear better by reversing
left and right. Go to the setup menus, SW&DISP
SETUP screen, SELF SHOOT, and select
MIRROR. Shooting in mirror mode has no effect on
what you actually shoot and record.
The date display for time stamps will also appear
reversed. (However, the dates are recorded in a
non-reversed state on the image.)
W
H
I
T
E
B
A
L
A
U
T
O
/
M
A
N
U
A
L
IR
IS
FOC
U
S
FOCU
S AS
SIST
F
O
C
U
S
Z
O
O
M
/
I
R
I
S
If you press and hold the DISP/MODE CHK
button when self-portrait shooting, the mirror
mode is temporarily disabled and the screen
displays information such as the configuration
status of all recording functions. Release the
button to return to mirror mode.
Mirror mode is also temporarily disabled when
menus are displayed.
Images played back by pressing the REC
CHECK button cannot be inverted horizontally.
Operation status displays during self-portrait
recording
No display: Cannot record (no card, etc.)
: Recording in progress
: (Red) Transitioning to recording standby
mode
(Green) Recording standby mode
: Warning display
When is displayed, turn the viewfinder back
in the direction of normal recording, and check
what the message says.
Holding down the DISP/MODE CHK button
displays the screen display information.
Images will be output normally to external
devices. In addition, only operation status
displays will appear on the screen.
•
•
•
•
•
Low angle shooting
You can shoot using the handle START/STOP
button on the handle during low angle shooting.
•
•
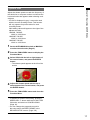
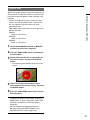
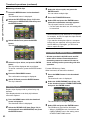
Zebra pattern
Pressing the ZEBRA button in CAMERA or PHOTO
mode displays zebra patterns and markers on the
viewfinder, allowing you to check the brightness of
a subject.
Parts that may be whited out through over
exposure are shown as a zebra pattern.
Very bright
Reflecting parts
You can remove most overexposed parts by
adjusting the iris and shutter speed in the manual
mode to remove the areas with zebra patterns.
The display changes as follows each time you
press the ZEBRA button.
CAMERA
PHOTO IN
DVAVCHD
AUDIO S
REC
SPEED SEL
ZEBRABARS
DISP / MODE CHK
SHUTTER
PB
AUTO
MANUAL
ZEBRA
ON
↓
MARKER
ON
↓
ZEBRA
OFF
You can set brightness levels for the zebra patterns
with the ZEBRA DETECT item in the setting menu
SW&DISP SETUP screen. (Page 108)
The zebra pattern cannot be displayed while the
focus assist function (expanded display) is in use.
•
•

11
Chapter 1: Operations in AVCHD mode
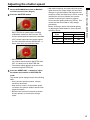
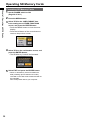
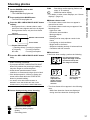
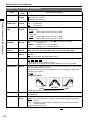
Marker
If you press the ZEBRA button while zebra patterns
are displayed, a marker appears near the center
of the display (if you have set the setup menu,
SW&DISP SETUP, MARKER to ON).
The brightness of the areas near the screen center
can be checked as a percentage (0 % to 99 %).
“99%↑” appears if the percentage is over 99.
99%
Image level detection area
Image level
Marker
The normal display reappears if you press the
ZEBRA button again.
The marker does not appear when the face
detection function is set to ON.
Checking and displaying shooting
status
DISP/MODE CHK button
If you press and hold the DISP/MODE CHK button
in recording standby mode or while recording, the
configuration status of all recording functions, a
list of USER button function assignments, focus
ring function, and all other camera information will
be displayed. Release the button to return to the
normal display.
Pressing the DISP/MODE CHK button during
recording or while recording is paused will
remove all displays from the screen except for the
operation status, counter, marker, and safety zone
display. Press the button again to return to the
normal display. (Page 99)
The display mode selected using the DISP/MODE
CHK button is retained even if you turn off the
camera by setting the POWER switch to OFF, or
change the operating mode.
•
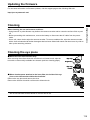
PRE REC
Record video and audio from three seconds before
the time of the operation to begin recording.
Operation to start
recording
Operation to stop
recording
Actual recording
time
PRE REC time
(Time)
1
Select ON for the PREREC MODE item in the
setting menu RECORD SETUP screen, and
then press the ENTER button.
PRE REC is displayed on the screen.
When the TCG item on the RECORD
SETUP screen has been set to REC
RUN in AVCHD mode, the setting will be
automatically changed to FREE RUN.
2
Press the START/STOP button.
Video and audio from approximately 3 seconds
previously will be recorded.
Recording of the previous 3 seconds of video
and audio may not be possible if recording is
started immediately in the following cases.
Immediately after switching from another
mode to CAMERA mode
Immediately after turning power on
Immediately after changing to PREREC
MODE item
The thumbnail for clips recorded using the
PREREC function will display the image from
when the START/STOP button was pressed.
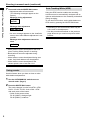
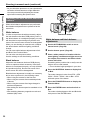
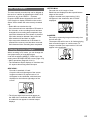
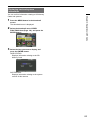
Optical Image Stabilizer
Use the Optical Image Stabilizer (OIS) to reduce
the effects of camera shake when shooting by
hand.
Press the OIS button to turn the function on and
off. The appears on the viewfinder when this
function is on. Turn the function off when using a
tripod for more natural images.
•
•
�
�
�
•

12
Chapter 1: Operations in AVCHD mode
MODE
CAMERA
PHOTO IN
DVAVCHD
REC
SPEED SEL
ZEBRABARS
SP / MODE CHK
SHUTTER
PB
OIS
This function will not be as effective when the
vibration is severe or when tracking a moving
subject.
Adding effects to images
Press the USER button you have allocated to the
BLACKFADE or WHITEFADE feature to add fading
effects to your images. The button’s function is
forcibly canceled during playback or REC CHECK
and also when thumbnails are displayed.
BLACKFADE:
Press and hold to fade out to black. Audio also
fades out. Fade-in starts when the button is
released.
WHITEFADE:
Press and hold to fade out to white. Audio also
fades out. Fade-in starts when the button is
released.
This function does not work while INTERVAL
REC is enabled.
Using the USER buttons
You can allocate one of 14 features to each of the
three USER buttons.
Use these buttons to change shooting settings
quickly or add effects to the images you are
shooting.
The following features are allocated to the buttons
at the time of shipping.
USER1: (PUSH)AF
USER2: BACKLIGHT
USER3: SHOT MARK
For details, see the setup menus, SW&DISP
SETUP screen, USER1 to 3. (Page 107)
If you press a USER button to which one of the
functions has been allocated and then turn off the
power, the added effect to the image will not be
retained.
•
•
Backlight compensation
Press the USER button you have allocated to the
BACKLIGHT feature when shooting subjects lit
from the back.
BACK LIGHT appears on the screen, and
appears at the bottom right of the screen.
Backlight compensation adjusts the iris so the
subject doesn’t come out dark.
Press the same USER button to turn the feature
off. (If you perform backlight compensation in
manual iris mode and it is disabled, the camera
switches to auto iris control.)
Color bars
Press and hold the BARS button in CAMERA
mode to output a color bar screen to a television or
external monitor so you can adjust them. Press the
button again to turn the feature off.
While the color bar is displayed, a test tone
of 1 kHz will be output from the PHONES
(headphone) terminal, the Pin jack OUT terminal,
or the HDMI terminal. There will be no speaker
output.
The color bar can be recorded by pressing the
START/STOP button.
The BARS button is disabled in PB mode and
PHOTO mode.
The color bar display is canceled when the power
is turned off.
Wave form monitor function
During CAMERA mode, you can display a
waveform for an image in the viewfinder screen
by pressing the USER button to which the WFM
function has been assigned.
Press the button again to return to the normal
display.
This function cannot be used while the focus
assist function is enabled.
Wave forms cannot be recorded.
While wave forms are displayed, part of the
recording screen will be hidden by the wave
forms.
•
•
•
•
•
•
•
Shooting techniques for different targets (continued)

13
Chapter 1: Operations in AVCHD mode
Shot mark function
The marks attached to the thumbnails of clips
are called shot marks. On the thumbnail screen
monitor you can select only those clips with a
shot mark and display them or play them back.
During recording, when you press the USER
button to which the SHOT MARK function has
been allocated, MARK ON appears in the LCD
monitor or the viewfinder, and a shot mark is set
for the thumbnail of the clip being recorded. If you
press the button again, the shot mark is released.
You can also set or release the shot marks by
performing the thumbnail operations for clips.
(Page 49)
However, note that you cannot set or release shot
marks during playback.
INVALID appears when you cannot set or release
shot marks.
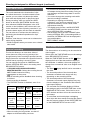
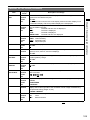
Interval recording
This function allows you to create short videos of
scenes that move slowly over long periods of time
through frame-by-frame recording at specified intervals.
Single frames are recorded at the specified interval,
with 24 frames equaling 1 second of video.
You can specify the interval in CAMERA mode
with the INTERVAL REC item in the setting menu
RECORD SETUP screen.
1 SECOND/10 SECONDS/30 SECONDS/1
MINUTE/2 MINUTES: Change the recording interval.
OFF: Disable interval recording.
appears on the screen.
Interval recording will be disabled when shooting
is finished.
Audio recording is disabled.
The PRE-REC function is disabled, even if it is
set.
Example
Recording
interval
Shooting
time
Video length
Sunsets
1
SECOND
30 min
to 1 hour
1 min 15 sec
to
2 min 30 sec
Butterfly
emerging
from
cocoon
10
SECONDS
2 hr to
4 hr
30 sec to
1 min
Flowers
blooming
30
SECONDS
1 hr to
3 hr
5 sec to
15 sec
The maximum shooting time is 24 hours.
When recording for long periods, use the AC
adaptor to eliminate battery concerns.
•
•
•
•
•
•
•
•
Do not remove the battery or disconnect the
AC adaptor during interval recording. Doing so
may damage recorded image data or result in
data loss.
You cannot change the recording mode while
interval recording is enabled.
Depending on lighting and shooting
conditions, color and focus settings may not
adjust automatically. In such cases, make
adjustments manually.
The digital zoom function, and BLACKFADE
and WHITEFADE functions cannot be used
while INTERVAL REC is enabled.
Set the below values for REC FORMAT when
setting INTERVAL REC. If the settings differ to
the below, INTERVAL REC will be displayed in
gray and disabled.
REC FORMAT: PH 1080/24P
When playing back a recorded video, set the
playback format to 1080/24P.
Photo shooting is disabled.
Even if you have not met 24 frames when you
stop recording, a 1 second video will be created.
•
•
•
•
•
•
•
•
Time stamp function
The date and time of recording can be recorded to
video images.
Select ON in the TIME STAMP item on the settings
menu RECORD SETUP screen.
When the TIME STAMP function is ON,
R
will be
displayed in front of the date and time display in
the viewfinder. In addition, the month display will
change from a numerical value to an English name
display.
The letter
R
display itself will not be recorded to
the video.
The size and position of the time and date
characters recorded to the image will vary
depending on the recording format.
The size and position of the time stamp
characters in external output displays may vary
from the displays in the viewfinder and external
input/output displays.
The recorded time and date display will follow
the settings made in the DATE/TIME item on the
SW&DISP SETUP screen. If this item is set to
OFF, the date and time will not be recorded as a
time stamp.
To avoid date and time displays overlapping
when clips with time stamps recorded are played
with this camera, please set the DATE/TIME item
on the SW&DISP SETUP screen to OFF.
•
•
•
•
•

14
Chapter 1: Operations in AVCHD mode
LAST CLIP function
The most recently recorded clip can be deleted at
the touch of a button by allocating the LAST CLIP
function to any of the USER 1 - 3 buttons.
Press the USER button allocated for the LAST
CLIP function to display YES/NO on the screen.
Select YES to delete the most recently recorded
clip.
Select NO not to delete the clip.
If the camera has been switched to PB mode or
PHOTO mode, or the recording format has been
changed since recording was completed, clips
cannot be deleted even if the button is pressed.
Clips also cannot be deleted if the power has
been switched off and back on again.
Clips cannot be deleted even if the button is
pressed if the memory card has been removed
and reinserted since recording was completed.
•
•
•
Shooting techniques for different targets (continued)

15
Chapter 1: Operations in AVCHD mode
1
Set the AUTO/MANUAL switch to MANUAL
to select manual mode. (Page 5)
2
Press the SHUTTER button.
CAMERA mode
SHUTTER ON is enabled after switching
to MANUAL mode from AUTO mode. The
shutter speed switches between the standard
(OFF) shutter speed and the shutter speed
you have selected with the SPEED SEL –/+
button each time you press the button.
PHOTO mode
You cannot switch between SHUTTER ON/
OFF. It is always set to SHUTTER ON.
The shutter speed appears at the left of the
screen during SHUTTER ON.
3
Press the SPEED SEL –/+ button to adjust
the shutter speed while in SHUTTER ON
mode.
The shutter speed changes as per the following
table.
As the shutter speed increases, camera
sensitivity decreases.
With auto iris control, as the shutter speed
increases, the aperture widens and the focal
length decreases.
Because the focal time increases at slower
shutter speeds, we recommend using a
tripod.
•
•
•
•
•
•
With artificial lighting and especially fluorescent
lights and mercury-vapor lamps, the luminance
changes in synchronization with the power line
frequency. When this frequency is 50 Hz, mutual
interference will occur between the camera-
recorder’s vertical sync frequency (approx.
60 Hz) and the lighting frequency (50 Hz). This
means that the white balance may change
periodically.
Before shooting in areas with artificial lighting
or adjusting the white balance, set the shutter
speed as follows.
Progressive
mode
Shutter speed
50 Hz 60 Hz
OFF (60i) 1/100 1/60 (OFF)
30P 1/50 (OFF) 1/60
24P
1/50 (OFF) 1/60
•
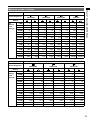
Adjusting the shutter speed

16
Chapter 1: Operations in AVCHD mode
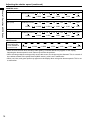
Adjusting the shutter speed (continued)
CAMERA mode:
With the 1080/60i or 720/60P formats
OFF (1/60)
SYNCRO SCAN 1/2 1/4 1/8 1/15
1/2000
1/30 1/60
1/1001/1201/2501/5001/1000
With the 1080/30P or 720/30P formats
OFF (1/50)
SYNCRO SCAN 1/2 1/4 1/8 1/15
1/2000
1/30 1/50
1/601/1201/2501/5001/1000
With the 1080/24P or 720/24P formats
OFF (1/50)
SYNCRO SCAN 1/2 1/3 1/6 1/12
1/2000
1/24 1/50
1/601/1201/2501/5001/1000
PHOTO mode:
Standard (1/60)
* SHUTTER OFF
is not available in
PHOTO mode.
1/2 1/4 1/8 1/15 1/30 1/60 1/100 1/120 1/180
1/2000 1/1500 1/1000 1/750 1/500 1/350 1/250
Under fluorescent and other discharge tube lighting, horizontal bands may appear on the display.
Adjusting the shutter speed in such cases may resolve the problem.
When shooting subjects moving quickly across the screen, the image may be distorted. This is a result of
the readout method of the pickup device (MOS sensor), and is not a malfunction.
White, red, blue, and green spots may appear on the display when using slow shutter speeds. This is not
a malfunction.
•
•
•

17
Chapter 1: Operations in AVCHD mode
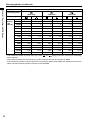
Synchro scan
Adjust the shutter speed to match the frequency of
the television or computer monitor to minimize the
horizontal noise that appears when shooting such
subjects.
If SYNC is displayed in grey, it cannot be used
with the current recording format. This function
will only operate for preset values for each
recording format.
Valid setting values will appear to the right of the
adjustment value.
10 80/60i, 720/60P:
1/60.0 to 1/250.0 sec
10 80/30P, 720/30P:
1/30.0 to 1/250.0 sec
10 80/24P, 720/24P:
1/24.0 to 1/250.0 sec
1
Set the AUTO/MANUAL switch to MANUAL
to select manual mode. (Page 5)
2
Press the FUNC/EXEC button to display the
Function Menu.
3
Select SYNC with the left or right button of
the cursor button, and press the ENTER
button.
The shutter speed appears at the left of the
screen.
4
Adjust the shutter speed with the up or
down button of the cursor button, and press
the ENTER button.
5
Press the FUNC/EXEC button and close the
Function Menu.
To activate a synchro scan setting, press the
SPEED SEL –/+ button while set to SHUTTER
ON mode, and switch to SYNCRO SCAN
(Page 16).
You can change the progressive mode in
the setup menu with REC FORMAT in the
RECORD SETUP screen. (Page 103)
•
•
•
•

18
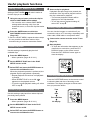
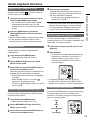
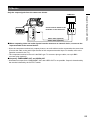
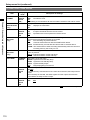
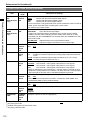
Chapter 1: Operations in AVCHD mode
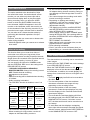
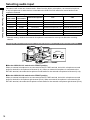
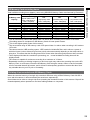
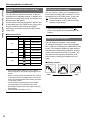
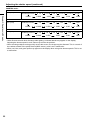
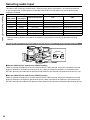
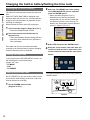
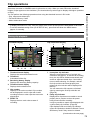
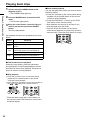
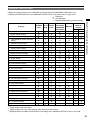
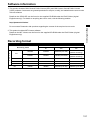
The camera will record two-channel audio. Select from the built-in microphone, an external microphone,
or any microphones or audio devices connected to the XLR CH1/CH2 terminal to record audio on the
respective channels.
Setting/State Recording Channel
AUDIO IN
CH1 switch
AUDIO IN
CH2 switch
External microphone CH1 CH2
FRONT FRONT Not connected Built-in microphone L-ch Built-in microphone R-ch
FRONT REAR Not connected Built-in microphone L-ch XLR CH2
REAR FRONT Not connected XLR CH1 Built-in microphone R-ch
FRONT FRONT Connected External microphone L-ch External microphone R-ch
FRONT REAR Connected External microphone L-ch XLR CH2
REAR FRONT Connected XLR CH1 External microphone R-ch
REAR REAR
–
*
XLR CH1 XLR CH2
*
With this setting, whether the external microphone is connected or not may not affect the recording
channel.
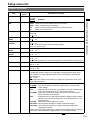
Using the built-in microphone / external microphone (3.5 mm stereo mini jack)
AUDIO IN
CH1
FRONT
REAR
CH2
Set the AUDIO IN CH1 switch to the FRONT position
When an external microphone is not connected to the EXT MIC terminal, the built-in microphone records
audio for the built-in microphone left channel (L-ch). When an external microphone is connected to the
EXT MIC terminal, the external microphone records audio for the external microphone left channel (L-ch).
Set the AUDIO IN CH2 switch to the FRONT position
When an external microphone is not connected to the EXT MIC terminal, the built-in microphone records
audio for the built-in microphone right channel (R-ch). When an external microphone is connected to the
EXT MIC terminal, the external microphone records audio for the external microphone right channel (R-ch).
■
■
Selecting audio input

19
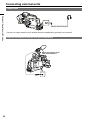
Chapter 1: Operations in AVCHD mode
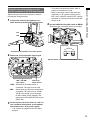
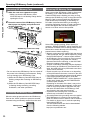
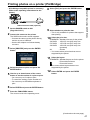
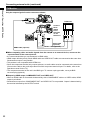
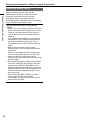
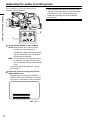
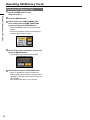
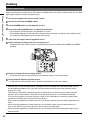
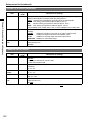
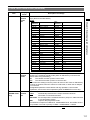
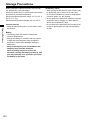
Using the external microphone or audio
devices connected to the XLR input terminal
Adjust the input level for the internal or external
microphone during shooting.
1
Connect the external microphone or an
audio device to the XLR CH1/CH2 terminal.
ヰワ
ロリ
ワ
ユ
ヮリ
ヤ
ロリ
ワ
ユ
ヮリ
ヤ
ヰョ
ョ ヰ
ョョ
モ
ヶ
ュリ
ヰ
リ
ワ
モ
ヶュ
リ
ヰ
ヰヶヵ
ヮ
リ
ヤ
ヌフ
ベヷ
ヰ
ワ
ヮ
リ
ヤヌ
フ
ベ
ヷ
ヤ
ラ
チ
ヒ ヤ
ラ
チ
ビ
ヤラ
チビ
ヤ
ラ
チヒ
An external microphone or an audio device
CH2
CH1
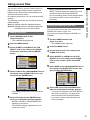
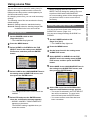
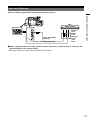
2
Switch the connected audio input signal
using the input level select switch.
ヰワ
ロリワユ ヮリヤ ロリワユ ヮリヤ
ヰョョ ヰョョ
モヶュリヰ
リワ
モヶュリヰ
ヰヶヵ
ヮリヤヌフベヷ
ヰワ
ヮリヤヌフベヷ
ヤラチヒ ヤラチビ ヤラチビ
ヤラチヒ
Input level
select switch
MIC + 48V ON/
OFF switch
LINE: Select when an audio device is
connected. The input level is 0 dB.
MIC: Select when an external microphone is
connected. The input level is -50 dB/
-60 dB. The setting can be changed
for MIC GAIN1 or MIC GAIN2 in the
setting menu RECORD SETUP screen.
(Page 104)
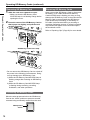
3
Set the input level select switch to + 48 V to
use a phantom microphone (a microphone
that requires the + 48 V power supply).
+ 48 V power is supplied to the XLR input
terminal.
•
The battery will discharge faster when a
phantom microphone is used.
When connecting a device that does not
support the + 48 V power supply, set the
MIC + 48 V ON/OFF switch to OFF. Setting
the switch to ON may cause the connected
device to fail.
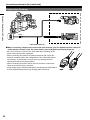
4
Set the AUDIO IN CH1/CH2 switch to REAR.
Audio from the connected device is recorded.
AUDIO IN
CH1
FRONT
REAR
CH2
Set the switch on the connected device to REAR.
•
•

20
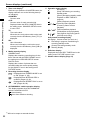
Chapter 1: Operations in AVCHD mode
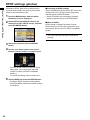
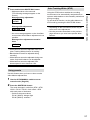
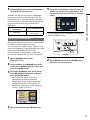
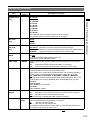
The recording level of audio signals during
recording can be adjusted.
AUDIO LEVEL
CH1 CH2
AUDIO SELECT AUDIO IN
CH1
AUTO
MAN
FRONT
REAR
CH2
2
1
1
Set the AUDIO SELECT switch to MAN.
AUTO: With the ALC (Auto Level Control)
function, the recording level is
automatically adjusted when the audio
input is excessively loud. The AUDIO
LEVEL knob is disabled.
MAN: The ALC (Auto Level Control) function
is disabled. The audio recording level
can be adjusted with the AUDIO LEVEL
knob.
If excessive inputs are expected, use the
AUTO mode.
2
Adjust the audio recording level with the
AUDIO LEVEL knob.
Adjust the audio recording level with the
AUDIO LEVEL knob according to the audio
level meter on the bottom of the viewfinder.
1
C
H
2
C
H
CH2 CH1
•
•
If the indicated audio level meter is red, and
then the audio has reached an excessive level
with reference to the standard input level.
Adjust the recording level with the AUDIO
LEVEL knob.
•
Adjusting the audio recording level
Page is loading ...
Page is loading ...
Page is loading ...
Page is loading ...
Page is loading ...
Page is loading ...
Page is loading ...
Page is loading ...
Page is loading ...
Page is loading ...
Page is loading ...
Page is loading ...
Page is loading ...
Page is loading ...
Page is loading ...
Page is loading ...
Page is loading ...
Page is loading ...
Page is loading ...
Page is loading ...
Page is loading ...
Page is loading ...
Page is loading ...
Page is loading ...
Page is loading ...
Page is loading ...
Page is loading ...
Page is loading ...
Page is loading ...
Page is loading ...
Page is loading ...
Page is loading ...
Page is loading ...
Page is loading ...
Page is loading ...
Page is loading ...
Page is loading ...
Page is loading ...
Page is loading ...
Page is loading ...
Page is loading ...
Page is loading ...
Page is loading ...
Page is loading ...
Page is loading ...
Page is loading ...
Page is loading ...
Page is loading ...
Page is loading ...
Page is loading ...
Page is loading ...
Page is loading ...
Page is loading ...
Page is loading ...
Page is loading ...
Page is loading ...
Page is loading ...
Page is loading ...
Page is loading ...
Page is loading ...
Page is loading ...
Page is loading ...
Page is loading ...
Page is loading ...
Page is loading ...
Page is loading ...
Page is loading ...
Page is loading ...
Page is loading ...
Page is loading ...
Page is loading ...
Page is loading ...
Page is loading ...
Page is loading ...
Page is loading ...
Page is loading ...
Page is loading ...
Page is loading ...
Page is loading ...
Page is loading ...
Page is loading ...
Page is loading ...
Page is loading ...
Page is loading ...
Page is loading ...
Page is loading ...
Page is loading ...
Page is loading ...
Page is loading ...
Page is loading ...
Page is loading ...
Page is loading ...
Page is loading ...
Page is loading ...
Page is loading ...
Page is loading ...
Page is loading ...
Page is loading ...
Page is loading ...
Page is loading ...
Page is loading ...
Page is loading ...
Page is loading ...
Page is loading ...
Page is loading ...
Page is loading ...
-
 1
1
-
 2
2
-
 3
3
-
 4
4
-
 5
5
-
 6
6
-
 7
7
-
 8
8
-
 9
9
-
 10
10
-
 11
11
-
 12
12
-
 13
13
-
 14
14
-
 15
15
-
 16
16
-
 17
17
-
 18
18
-
 19
19
-
 20
20
-
 21
21
-
 22
22
-
 23
23
-
 24
24
-
 25
25
-
 26
26
-
 27
27
-
 28
28
-
 29
29
-
 30
30
-
 31
31
-
 32
32
-
 33
33
-
 34
34
-
 35
35
-
 36
36
-
 37
37
-
 38
38
-
 39
39
-
 40
40
-
 41
41
-
 42
42
-
 43
43
-
 44
44
-
 45
45
-
 46
46
-
 47
47
-
 48
48
-
 49
49
-
 50
50
-
 51
51
-
 52
52
-
 53
53
-
 54
54
-
 55
55
-
 56
56
-
 57
57
-
 58
58
-
 59
59
-
 60
60
-
 61
61
-
 62
62
-
 63
63
-
 64
64
-
 65
65
-
 66
66
-
 67
67
-
 68
68
-
 69
69
-
 70
70
-
 71
71
-
 72
72
-
 73
73
-
 74
74
-
 75
75
-
 76
76
-
 77
77
-
 78
78
-
 79
79
-
 80
80
-
 81
81
-
 82
82
-
 83
83
-
 84
84
-
 85
85
-
 86
86
-
 87
87
-
 88
88
-
 89
89
-
 90
90
-
 91
91
-
 92
92
-
 93
93
-
 94
94
-
 95
95
-
 96
96
-
 97
97
-
 98
98
-
 99
99
-
 100
100
-
 101
101
-
 102
102
-
 103
103
-
 104
104
-
 105
105
-
 106
106
-
 107
107
-
 108
108
-
 109
109
-
 110
110
-
 111
111
-
 112
112
-
 113
113
-
 114
114
-
 115
115
-
 116
116
-
 117
117
-
 118
118
-
 119
119
-
 120
120
-
 121
121
-
 122
122
-
 123
123
-
 124
124
-
 125
125
-
 126
126


Ask a question and I''ll find the answer in the document
Finding information in a document is now easier with AI
Related papers
-
Panasonic AG-HMC150P User manual
-
-
-
-
Panasonic HC-X1500 Operating instructions
-
Panasonic AG-AC90PJ User manual
-
Panasonic AGCX8E Operating instructions
-
Panasonic AG-AC160AP User manual
-
-