

Your telephone equipment is approved for connection to the Public Switched Telephone
Network and is in compliance with parts 15 and 68, FCC Rules and Regulations and the
Technical Requirements for Telephone Terminal Equipment published by ACTA.
On the bottom of this equipment is a label indicating, among other information, the US
number and Ringer Equivalence Number (REN) for the equipment. You must, upon request,
provide this information to your telephone company.
The REN is useful in determining the number of devices you may connect to your telephone
line and still have all of these devices ring when your telephone number is called. In
most (but not all) areas, the sum of the RENs of all devices connected to one line should
not exceed 5. To be certain of the number of devices you may connect to your line as
determined by the REN, you should contact your local telephone company.
A plug and jack used to connect this equipment to the premises wiring and telephone
network must comply with the applicable FCC Part 68 rules and requirements adopted
by the ACTA. A compliant telephone cord and modular plug is provided with this product.
It is designed to be connected to a compatible modular jack that is also compliant. See
installation instructions for details.
• This equipment may not be used on coin service provided by the telephone company.
• Party lines are subject to state tariffs, and therefore, you may not be able to use your own
telephone equipment if you are on a party line. Check with your local telephone company.
• Notice must be given to the telephone company upon permanent disconnection of your
telephone from your line.
• If your home has specially wired alarm equipment connected to the telephone line,
ensure the installation of this product does not disable your alarm equipment. If you have
questions about what will disable alarm equipment, consult your telephone company or a
qualied installer.
Should your equipment cause trouble on your line which may harm the telephone network,
the telephone company shall, where practicable, notify you that temporary discontinuance
of service may be required. Where prior notice is not practicable and the circumstances
warrant such action, the telephone company may temporarily discontinue service
immediately. In case of such temporary discontinuance, the telephone company must: (1)
promptly notify you of such temporary discontinuance; () afford you the opportunity to
correct the situation; and (3) inform you of your right to bring a complaint to the Commission
pursuant to procedures set forth in Subpart E of Part 68, FCC Rules and Regulations.

3
The telephone company may make changes in its communications facilities, equipment,
operations or procedures where such action is required in the operation of its business and
not inconsistent with FCC Rules and Regulations. If these changes are expected to affect the
use or performance of your telephone equipment, the telephone company must give you
adequate notice, in writing, to allow you to maintain uninterrupted service.
This device complies with Part 15 of the FCC Rules. Operation is subject to the following two
conditions: (1) This device may not cause harmful interference; and () This device must accept
any interference received, including interference that may cause undesired operation.
This equipment has been tested and found to comply with the limits for a Class B digital
device, pursuant to Part 15 of the FCC Rules. These limits are designed to provide reasonable
protection against harmful interference in a residential installation.
This equipment generates, uses, and can radiate radio frequency energy and, if not installed
and used in accordance with the instructions, may cause harmful interference to radio
communications. However, there is no guarantee that interference will not occur in a particular
installation.
Privacy of Communications may not be ensured when using this product.
If this equipment does cause harmful interference to radio or television reception, which can be
determined by turning the equipment off and on, the user is encouraged to try to correct the
interference by one or more of the following measures:
• Reorient or relocate the receiving antenna (that is, the antenna for radio or television
that is “receiving” the interference).
• Reorient or relocate and increase the separation between the telecommunications
equipment and receiving antenna.
• Connect the telecommunications equipment into an outlet on a circuit different from that
to which the receiving antenna is connected.
If these measures do not eliminate the interference, please consult your dealer or an
experienced radio/television technician for additional suggestions. Also, the Federal
Communications Commission has prepared a helpful booklet, “How To Identify and Resolve
Radio/TV Interference Problems.” This booklet is available from the U.S. Government Printing
Ofce, Washington, D.C. 040. Please specify stock number 004-000-00345-4 when ordering
copies.
Notice: The changes or modications not expressly approved by the party responsible for
compliance could void the user’s authority to operate the equipment.

4
This telephone system meets FCC standards for Hearing Aid Compatibility.
Licensed under US Patent 6,47,009.
This equipment complies with FCC RF radiation exposure limits set forth for an uncontrolled
environment. This equipment should be installed and operated with a minimum distance of 0
centimeters between the radiator and your body. This transmitter must not be co-located or
operated in conjunction with any other antenna or transmitter.”
For body worn operation, this phone has been tested and meets the FCC RF exposure
guidelines when used with the belt clip supplied with this product. Use of other accessories
may not ensure compliance with FCC RF exposure guidelines.
This telephone is compliant with the DECT 6.0 standard which operates in the
1.9GHz to 1.93GHz frequency range. Installation of this equipment is subject
to notication and coordination with UTAM. Any relocation of this equipment
must be coordinated through and approved by UTAM. UTAM may be contacted
at 1-800-49-886.
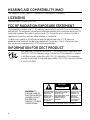
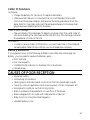
SEE MAR KING ON BOT TOM / BACK OF PRODUCT
RISK OF ELECTRIC SHOCK
DO NOT OPEN
WARNING: TO
PREVENT FIRE OR
ELECTRICAL SHOCK
HAZARD, DO NOT
EXPOSE THIS
PRODUCT TO RAIN
OR MOISTURE.
THE LIGHTNING
FLASH AND ARROW
HEAD WITHIN THE
TRIANGLE IS A
WARNING SIGN
ALERTING YOU OF
“DANGEROUS
VOLTAGE” INSIDE
THE PRODUCT.
CAUTION: TO REDUCE THE
RISK OF ELECTRIC SHOCK, DO
NOT REMOVE COVER (OR
BACK). NO USER
SERVICEABLE PARTS INSIDE.
REFER SERVICING TO
QUALIFIED SERVICE
PERSONNEL.
THE EXCLAMATION
POINT WITHIN THE
TRIANGLE IS A
WARNING SIGN
ALERTING YOU OF
IMPORTANT
INSTRUCTIONS
ACCOMPANYING
THE PRODUCT.
CAUTION:

5
EquipmEnt ApprovAl informAtion .................2
i
ntErfErEncE informAtion .............................3
H
EAring Aid compAtibility (HAc) .................4
l
icEnsing .....................................................4
fcc rf r
AdiAtion ExposurE stAtEmEnt ........4
i
nformAtion for dEct product ..................4
t
AblE of contEnts .......................................5
t
AblE of contEnts .......................................6
t
AblE of contEnts .......................................7
i
ntroduction ...............................................8
B
efore You Begin .............................................8
P
arts CheCklist ...........................................8
t
elePhone JaCk requirements.........................9
i
nstAllAtion .................................................9
D
igital seCuritY sYstem ...................................9
i
mPortant installation guiDelines .............. 10
H
AndsEt lAyout ................................. 10, 11
b
AsE lAyout ...............................................12
i
nstAlling tHE pHonE ..................................13
i
nstalling the hanDset BatterY ...................13
B
ase station ....................................................14
W
all mounting ..............................................15
A
nswEring systEm sEtup ............................15
s
etting the VoiCe PromPt language .......... 15
l
anguage ....................................................16
r
eCorDing the outgoing announCement .. 16
r
eVieWing the announCement ......................16
a
uDiBle quiCk setuP guiDe ..........................16
p
rogrAmming informAtion .........................17
t
ext entrY: ..................................................17
p
rogrAmming tHE bAsE ...............................17
a
nsWerer .........................................................17
a
nsWerer on/off ....................................17
s
eCuritY CoDe ............................................ 18
m
essage alert ........................................... 18
r
ings to ansWer .......................................18
m
essage length ........................................ 19
a
larm ...............................................................19
s
et alarm time ..........................................19
s
nooze ........................................................20
s
et CYCle time ...........................................20
s
et alarm meloDY ....................................20
P
hone settings ...............................................20
l
anguage ....................................................21
D
ate/time ...................................................21
s
et area CoDe ...........................................21
t
one/Pulse .................................................22
D
efault setting ......................................... 22
s
ounD settings ..............................................22
e
qualizer .................................................... 22
r
inger tone ...............................................23
r
inger Volume ...........................................23
k
eY tone ..................................................... 23
B
luetooth
®
s
etuP ........................................ 24
C
onneCt (anD Pair) ...................................24
m
Y DeViCes .................................................24
m
Y Base ......................................................25
p
rogrAmming tHE HAndsEt .........................25
a
larm ...............................................................25
s
et alarm time ..........................................26
s
nooze ........................................................26
s
et CYCle time ...........................................26
s
et alarm meloDY ....................................26
P
hone setting ................................................27
l
anguage ....................................................27
s
et time ......................................................27
s
et area CoDe ...........................................28
h
anDset name ........................................... 28
r
egistration ...............................................29
D
eregistration ...........................................29
g
loBal De-registration ........................... 29
D
efault setting ......................................... 30
s
ounD setting ................................................30
e
qualizer .................................................... 30
r
inger tone ...............................................31
r
inger Volume ...........................................31
k
eY tone ..................................................... 31
A
nswEring systEm opErAtion .....................32
a
nsWerer on/off ......................................... 32
m
ailBox inDiCator ..........................................32

6
leaVing a message ......................................... 32
s
Creening Calls from the Base ................... 32
m
emorY full ...................................................32
m
essage PlaYBaCk ..........................................33
l
eaVing a memo ..............................................34
A
nswEring systEm rEmotE AccEss ..............34
r
emote aCCess from CorDless hanDset ....34
m
emorY full ...................................................35
t
ElEpHonE opErAtion .................................35
V
isual inDiCators ...........................................35
Charge/in use i
nDiCator
on the Base ..........................................35
talk i
nDiCator anD sPkr inDiCator
on the hanDset ................................... 35
VmWi i
nDiCator on hanDset
anD the Base ........................................ 35
s
PeakerPhone oPeration ...............................35
V
olume settings .............................................36
m
aking a Call.................................................36
l
anDline Calls ...........................................36
C
ellular Calls ..........................................36
C
hain Dialing from memorY ................... 37
a
nsWering a Call ..........................................37
l
anDline Calls ...........................................37
C
ellular Calls ..........................................37
r
eCeiVing a lanDline Call
During a Cellular Call ...................... 38
r
eCeiVing a Cellular Call
During a lanDline Call ......................38
r
eCeiVing lanD line Call anD
C
ell Call simultaneouslY ..................38
a
VailaBle oPtions During a lanDline Call 38
m
ore............................................................38
i
nterCom ...................................................... 39
a
VailaBle oPtions During a Cell Call ......39
m
ore............................................................39
i
nterCom ...................................................... 39
t
ransfer to Cell ........................................39
m
aking a lanDline Call When
t
alking to Cell Call ..........................39
m
aking a Cell Call When
t
alking to lanD line Call .................39
C
onferenCe .....................................................39
C
all timer .......................................................40
a
uto stanDBY .................................................. 40
f
lash/Call Waiting ......................................40
l
ast numBer reDial .......................................40
P
age .................................................................. 41
P
aging from the Base/grouP Page .......41
m
ute .................................................................41
r
inger Volume (shortCut) ............................41
D
o not DisturB (DnD) ...............................42
c
AllEr id (cid) .........................................42
C
all Waiting Caller iD ................................ 42
CiD e
rror CoDes ...........................................43
r
eCeiVing CiD reCorDs ................................. 43
s
toring CiD reCorDs (in CiD memorY) .....43
r
eVieWing CiD reCorDs ................................43
D
ialing a CiD numBer .................................. 43
f
ormatting a CiD numBer Before Dialing 44
s
toring CiD reCorDs into Phone Book .... 44
D
eleting a CiD reCorD ................................. 45
c
All rEcords .............................................45
r
eCeiVeD Calls ...........................................45
D
ialeD Calls .............................................. 46
p
HonE book ...............................................46
f
or Base ..........................................................46
a
DDing Phone Book entries ................... 46
s
toring the last numBer DialeD ................ 48
i
nserting a Pause in the
D
ialing sequenCe(of a storeD numBer) .....48
r
eVieWing Phone Book reCorDs .................48
e
Diting a Phone Book reCorD ..................... 49
D
eleting a Phone Book reCorD ..................49
m
anaging the reCorD grouPing
in Phone Book ................................................49

7
aDDing the Phone Book entries
i
n DesireD grouP ................................50
D
eleting the Phone Book entries in
D
esireD grouP ..................................... 50
s
et grouP ring .........................................50
C
hanging the grouP name ..................... 50
m
anaging sPeeD Dialing reCorD ................50
a
DDing the sPeeD Dialing numBer ........50
e
Diting the sPeeD Dialing numBer.........51
D
eleting the sPeeD Dialing numBer ...... 51
t
ransferring the Phone Book
reCorD BetWeen hanDset(s) anD Base .........51
E
xtrA fEAturEs ..........................................52
r
oom monitoring ..........................................52
i
nterCom oPeration .......................................52
h
anDset to hanDset interCom Call ......52
r
eCeiVing an interCom Call ....................53
P
ush to talk ...............................................53
s
cHEdulEr ..................................................54
a
DDing a reminDer ....................................54
s
et snooze .................................................54
s
et CYCle time ...........................................55
s
et alarm meloDY ....................................55
r
eVieWing anD eDiting
the reminDer reCorD ......................... 55
D
eleting a reminDer reCorD ................... 55
c
onnEcting tHE bElt clip ...........................56
c
HAnging tHE bAttEry ................................56
b
AttEry sAfEty prEcAutions .......................56
d
isplAy mEssAgEs .......................................57
H
AndsEt sound signAls .............................58
t
roublEsHooting guidE ..............................59
t
elePhone solutions ................................59
C
aller iD solutions .................................61
B
atterY solutions .....................................61
c
AusEs of poor rEcEption ..........................61
g
EnErAl product cArE ..............................62
w
ArrAnty AssistAncE .................................62
l
imitEd wArrAnty ......................................63
A
ccEssory informAtion ..............................64
i
ndEx .........................................................65

8
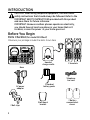
Make sure your package includes the items shown here.

9
For there will be additional handset, charge cradle,
belt clip, battery pack and cover than shown.
For there will be additional handsets, charge cradle,
belt clips, battery packs and covers than shown.
For there will be additional handsets, charge cradle,
belt clips, battery packs and covers than shown.
For there will be additional handsets, charge cradle,
belt clips, battery packs and covers than shown.
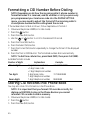
To use this phone, you need an RJ11C type modular telephone
jack, which might look like the one pictured here, installed in your
home. If you don’t have a modular jack, call your local phone
company to nd out how to get one installed.
Your cordless phone uses a digital security system to protect against false ringing,
unauthorized access, and charges to your phone line.

10
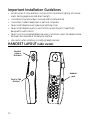
• Avoid sources of noise and heat, such as motors, uorescent lighting, microwave
ovens, heating appliances and direct sunlight.
• Avoid areas of excessive dust, moisture and low temperature.
• Avoid other cordless telephones or personal computers.
• Never install telephone wiring during a lightning storm.
• Never install telephone jacks in wet locations unless the jack is specically
designed for wet locations.
• Never touch non-insulated telephone wires or terminals, unless the telephone line
has been disconnected at the network interface.
• Use caution when installing or modifying telephone lines.

11
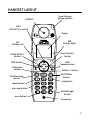
3
6
5
5
4

1
3
4
5
6
3
4

13
1. Locate battery and battery door which are packaged together inside a plastic bag
and are separate from the handset.
. Locate the battery compartment on the back of the handset.
3. Plug the battery pack cord into the jack inside the compartment.
4. Insert the battery pack.
5. Close the battery compartment by pushing the door up until it snaps into place.

14
. Install 4 AAA-size alkaline batteries (not included) for back up power in the event
of a power failure.
• Press the tab to open the battery compartment door located on the back of
the phone.
• Insert the batteries as shown on the diagram inside the battery compartment.
• Insert the tabs into place and snap the battery compartment door closed.
LOW BATTERY
3. Plug one end of the telephone line cord into the TEL LINE jack on the back of the
base and the other end into a modular jack.
1. Choose an area near an electrical outlet and a telephone wall jack (RJ11C), and
place your cordless telephone on a level surface, such as a desktop or tabletop,
or you may mount it on the wall.

15
4. Plug the AC power converter into the electrical outlet and the DC connector into
the jack on the bottom of the base.
5. Place the handset in the base cradle. The CHARGE IN USE indicator turns on,
verifying the battery is charging.
6. Use the number keys to enter the year and the date.
7. Press the Next (SKL) button to move to
Set Time menu.
8. Use the number keys to enter the time and use the
or button
to select AM or PM.
9. Press the Store (SKL) button to save the settings. You will hear a conrmation tone.
10.
1. Turn the base over.
. Attach the wall mounting pedestal by rst inserting the tabs on the open edge of
the pedestal into the slots on the lower portion of the bottom of the base. Then
push down and snap the pedestal into place.
3. Slip the mounting holes (on the back of the base) over the wall plate posts, and
slide the unit down into place. (Wall plate not included.)
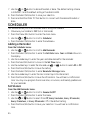
This section shows you how to set up your answering system to receive incoming
calls.
The voice prompt language on the base is the same as the display prompt language
on the base. If you select Spanish as your voice prompt language on the base, the
display prompt language will also be Spanish. The default prompt language is English

16
1. Make sure your base is (not in talk mode).
. Press the Menu (SKL) button to enter the main menu.
3. Use the
or button to scroll to Phone Settings.
4. Press the Select (SKL) button to enter the submenu.
5. Use the
or button to scroll to Language.
6. Press the Select (SKL) button to enter the menu.
7. Use the
or button to scroll to the desired language. The default is ENGLISH.
8. Press the Select (SKL) button to save your selection. You will hear a conrmation
tone.
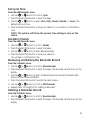
For best results when recording, you should be about nine inches from the
microphone, and eliminate as much background noise as possible.
1. Make sure your base is
(not in talk mode) and the answering system is .
. Press and hold the ANNOUNCE button until screen displays
ANNOUNCEMENT
RECORDING.
3. Begin speaking after you hear the beep.
4. Release the button when you nish your announcement.
Hi, this is (use your name here), We can’t answer the phone right now, so please
leave your name, number and a brief message after the tone, and we’ll get back to
you soon. Thanks.
Press and release the ANNOUNCE button to review your outgoing announcement.
If you need additional assistance; while in standby mode, press the REPEAT button on
the base and follow the voice instructions.

17
The base and/or handset menus give you access to all of the built-in features.
ONLY
Press the Menu (SKL) button to display the menu options,
then press the or button to navigate to the desired option.
Press the Select (SKL) button to activate a menu option. For details on programming,
refer to the applicable section. During programming, you may press the Back (SKR)
button at any time to exit the menu and keep the previous setting.
Use the number keys to enter characters. More than one letter is stored in each of the
number keys. For example, press the key twice for the letter B. Press the 1 key to
insert a space. Press the *TONE button to toggle between upper and lower case.
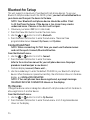
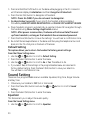
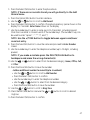
In the Answerer Menu, there are ve programmable submenus: Answerer On/Off,
Security Code, Message Alert, Rings to Answer and Message Length.
1. Make sure your base is
(not in talk mode).
. Press the Menu (SKL) button and
Answerer shows on the display.
3. Press the Select (SKL) button to enter the submenu.
This menu allows you to activate/deactivate the answering system.
Answerer
1. Use the
or button to scroll to Answerer On/Off.
. Press the Select (SKL) button to enter the submenu.

18
3. Use the or button to select On or Off. The default setting is On.
4. Press the Select (SKL) button to save your selection. You will hear a voice
announcement of conrmation.
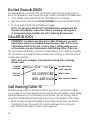
You can access the answering system from a tone-dial telephone in another
(remote) location. The security code is required for remote access, and it prevents
unauthorized access to your answering system.
Answerer
1. Use the
or button to scroll to Security Code.
. Press the Select (SKL) button to enter the menu. The current security code shows
on the display.
3. Use the number keys to enter your new 3-digit security code. The default setting is
1 2 3.
4.
Press the Select (SKL) button to save your selection. You will hear a conrmation tone.
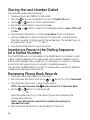
This feature sets your answering system to sound an alert tone from the base every
10 seconds when there are new messages.
Answerer
1. Use the
or button to scroll to Message Alert.
. Press the Select (SKL) button to enter the submenu.
3. Use the
or button to select On or Off. The default setting is Off.
4.
Press the Select (SKL) button to save your selection. You will hear a conrmation tone
.
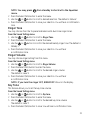
This feature lets you select the number of times you want the phone to ring before
the answering system answers the call.
Answerer
1. Use the
or button to scroll to Rings to Answer.
. Press the Select (SKL) button to enter the submenu.
3. Use the
or button to scroll and select from 3 Rings to 6 Rings or Toll Save
(TS). The default setting is 5 Rings.
4. Press the Select (SKL) button to save your selection. You will hear a conrmation
tone.

19
This option allows you to set the duration for the memo or incoming message
recording.
Answerer
1. Use the
or button to scroll to Message Length.
. Press the Select (SKL) button to enter the submenu.
3. Use the
or button to scroll and select from 1 minute to 3 minutes or No
Limit. The default setting is 3 minutes.
4. Press the Select (SKL) button to save your selection. You will hear a conrmation
tone.
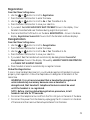
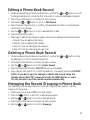
Set an alarm, then program the snooze time, occurance, and melody preferences.
1. Make sure your base is (not in talk mode).
. Press the Menu (SKL) button to enter the main menu.
3. Use the
or button to scroll to Alarm.
4. Press the Select (SKL) button to enter the submenu,
Alarm On/Off shows on the
display.
5. Use the
or button to scroll to On or Off.
6. Press the Select (SKL) button to save your selection. You will hear a conrmation
tone.
Alarm On
1. Press the Select (SKL) button to enter the menu.
Set Alarm shows on the display.
. Use the number keys to enter the time, then use the
or button to select
AM or PM. The default setting is 12:00AM.
3.
Press the Select (SKL) button to save your setting. You will hear a conrmation tone.

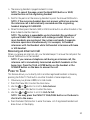
0
Alarm On
1. Use the
or button to scroll to Snooze: Off.
. Press the Select (SKL) button to enter the menu.
Snooze On/Off shows on the
display.
3. Use the
or button to select from Off, Every 5 minutes, Every 10 minutes,
Every 15 mintues, or Every 30 minutes. Off is the default setting.
4. Press the Store (SKL) button to save your selection. You will hear a conrmation
tone.
Alarm On
1. Use the
or button to scroll to Cycle: Once.
. Press the Select (SKL) button to enter the menu.
Alarm shows on the display.
3. Use the
or button to select Once or Daily. The default setting is Once.
4. Press the Select (SKL) button to save your selection. You will hear a conrmation
tone.
Alarm On
1. Use the
or button to scroll to Alarm Melody.
. Press the Select (SKL) button to enter the menu.
3. Use the
or button to select desired melody.
4. Press the Select (SKL) button to save your selection. You will hear a conrmation
tone.
To program the following sub-menus;
1. Make sure your base is
(not in talk mode).
. Press the Menu (SKL) button to enter the menu.
3. Use the
or button to scroll to Phone Settings.
4. Press the Select (SKL) button to enter the submenu.
Page is loading ...
Page is loading ...
Page is loading ...
Page is loading ...
Page is loading ...
Page is loading ...
Page is loading ...
Page is loading ...
Page is loading ...
Page is loading ...
Page is loading ...
Page is loading ...
Page is loading ...
Page is loading ...
Page is loading ...
Page is loading ...
Page is loading ...
Page is loading ...
Page is loading ...
Page is loading ...
Page is loading ...
Page is loading ...
Page is loading ...
Page is loading ...
Page is loading ...
Page is loading ...
Page is loading ...
Page is loading ...
Page is loading ...
Page is loading ...
Page is loading ...
Page is loading ...
Page is loading ...
Page is loading ...
Page is loading ...
Page is loading ...
Page is loading ...
Page is loading ...
Page is loading ...
Page is loading ...
Page is loading ...
Page is loading ...
Page is loading ...
Page is loading ...
Page is loading ...
Page is loading ...
Page is loading ...
Page is loading ...
-
 1
1
-
 2
2
-
 3
3
-
 4
4
-
 5
5
-
 6
6
-
 7
7
-
 8
8
-
 9
9
-
 10
10
-
 11
11
-
 12
12
-
 13
13
-
 14
14
-
 15
15
-
 16
16
-
 17
17
-
 18
18
-
 19
19
-
 20
20
-
 21
21
-
 22
22
-
 23
23
-
 24
24
-
 25
25
-
 26
26
-
 27
27
-
 28
28
-
 29
29
-
 30
30
-
 31
31
-
 32
32
-
 33
33
-
 34
34
-
 35
35
-
 36
36
-
 37
37
-
 38
38
-
 39
39
-
 40
40
-
 41
41
-
 42
42
-
 43
43
-
 44
44
-
 45
45
-
 46
46
-
 47
47
-
 48
48
-
 49
49
-
 50
50
-
 51
51
-
 52
52
-
 53
53
-
 54
54
-
 55
55
-
 56
56
-
 57
57
-
 58
58
-
 59
59
-
 60
60
-
 61
61
-
 62
62
-
 63
63
-
 64
64
-
 65
65
-
 66
66
-
 67
67
-
 68
68


Ask a question and I''ll find the answer in the document
Finding information in a document is now easier with AI
Related papers
Other documents
-
VTech mi6879 Quick start guide
-
RCA 21028 User manual
-
RCA 00023265 User manual
-
-
Panasonic KX-TG5230C Operating Instructions Manual
-
-
RCA 25210RE1 User manual
-
 Giant Telecom RAQBL300BS User manual
-
 Giant Telecom RAQBL300US User manual
-

