Page is loading ...

Chemical Concepts
410 Pike Road
Huntingdon Valley, PA 19006
MADE IN USA
Order online at counterbalanceshop.com or call 1.800.220.1966
These are general guidelines for installation methods, and may not apply to your application.
Always consult a qualied contractor and follow their recommendations for proper installation.
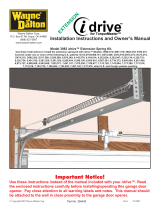
ADA Bracket Install
11 fasteners (not included)
Bracket (back)
Finishing Panel
Bracket
Bracket (back)
Optional Finishing Panel Installation
Attach your nishing
panel to bracket
11 fasteners (not included)
Bracket
Hold face panel with mounted clips
at same angle as bracket mount.
Slip down and over bracket.
ADA Bracket Spring Clip Installation Instructions
(clips & screws supplied with brackets)
Clips screwed to face panel
Face panel width varies
depending on mounting
distance between left
and right side brackets
1
5
⁄8”
Bracket
Screw clip to face panel
Left edge of clip is 1
5
⁄8” from edge of panel
(Opposite side of panel - right edge of clip is 1
5
⁄8” from edge of panel)
Top of clip is 13
5
⁄8” from top of bottom clip
1
5
⁄8”
3
1
⁄16”
Screw clip to face panel
Left edge of clip is 1
5
⁄8” from edge of panel
(Opposite side of panel - right edge of clip is 1
5
⁄8” from edge of panel)
Top of clip is 3
1
⁄
16
” from bottom of panel
The CounterBalance® ADA Vanity Bracket is the handicap accessible solution
for those tired of hitting their knees on most other sink fixtures.
1) Mount ADA Brackets to the wall securing it to meet local building
code required loading requirements for the vanity front edge.
Note: Double studs or metal mounting plates are
recommended for a stronger installation.
Note: Use ADA bowls when using the ADA Brackets
2) Install Spring Clips to the back of the Face Board
3) Spring Clips should be installed with 12 ¾ inches between the
top of the top bracket and the top of the bottom bracket.
4) There will be some side to side allowance on the clip installation
5) Be sure to allow 1” clearance between the top of your Face
Board and the bottom of the top portion of the bracket to allow
the Face Board to slide up for removal
Screw clip to face panel
Left edge of clip is 1
5
⁄
8
”
from edge of panel
(Opposite side of panel -
right edge of clip is 1
5
⁄
8
”
from edge of panel)
Top of clip is 13
5
⁄
8
” from
top of bottom clip
Screw clip to face panel
Left edge of clip is 1
5
⁄
8
”
from edge of panel
(Opposite side of panel -
right edge of clip is 1
5
⁄
8
”
from edge of panel)
Top of clip is 3
1
⁄
16
” from
bottom of panel
®
CounterBalance
®
ADA Bracket
CCH-CBADA21BL-IM
Installation Instructions
/