Advent ADVA10 User manual
- Category
- Car video systems
- Type
- User manual
This manual is also suitable for

10.1" Overhead In-Vehicle
Entertainment System
OWNER'S
MANUAL
®


• Do not use any solvents or cleaning materials when cleaning the video monitor.
• Do not use any abrasive cleaners, they may scratch the screen.
• Use only a lightly dampened lint free cloth to wipe the screen if it is dirty.
• Before putting on headphones always adjust the volume setting to the lowest position.
• Remember to leave the dome light switch in the off or auto position when the vehicle is
unattended, as the dome lights, if left on, can drain the vehicle battery.
• Do not put pressure on the screen.
Congratulations
Congratulations on your purchase of this In-Vehicle Entertainment System! The system has been designed to provide passengers with unlimited
content options delivering smiles for many miles. Please read the directions that follow to familiarize yourself with the product to ensure that you
obtain the best results from your equipment.
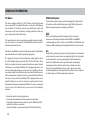
Safety Precaution
The system has been designed so that it can be directly controlled through the monitors touch screen interface or remotely controlled directly by
the user(s) using the VoxxLink APP. If the users are too young to control the system monitor themselves, adults in the vehicle can remotely control
the system monitor using the VoxxLink APP. It is recommended that physical source media such as DVDs, USB thumb drives, and SD cards are not
changed while the vehicle is in motion. Enjoy your entertainment system but remember that the safety of all passengers remains the number one
priority.
Important Notice
Installation of overhead products requires careful planning and preparation. Be extremely careful when working on a vehicle with side curtain air
bags. Do not route wires near any portion of the side curtain air bag assemblies. This includes any anchor points in A, B, C or D pillars of the vehicle.
Routing wires in these areas or running wires by the side curtain air bags can prevent the side curtain air bag from fully deploying which can result
in personal injury to vehicle occupants. If you have any questions regarding wire routing in a vehicle, please contact Voxx Technical Support at
1-800-645-4994.
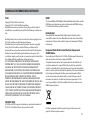
When connecting power and ground in a mobile video installation ensure that the ACC wire is fused at the point where it is connected to the
vehicle ACC wiring. Failure to do so can result in damage to the vehicle if a short circuit develops between the vehicle connection point and the
mobile video product.
An LCD panel and/or video monitor may be installed in a motor vehicle and visible to the driver if the LCD panel or video monitor is used for vehicle
information, system control, rear or side observation or navigation. If the LCD panel or video monitor is used for television reception, video or DVD
play, the LCD panel or video monitor must be installed so that these features will only function when the vehicle is in “park” or when the vehicle's
parking brake is applied.
An LCD panel or video monitor used for television reception, video or DVD play that operates when the vehicle is in gear or when the parking brake
is not applied must be installed to the rear of the driver's seat where it will not be visible, directly or indirectly, to the operator of the motor vehicle.
Warnings
Patented, refer to www.voxxintl.com/company/patents

TABLE OF CONTENTS
Features .................................................................................................................................................................................................................................. 5
Accessories ............................................................................................................................................................................................................................. 6
Controls and Indicators Diagram (Front View) .......................................................................................................................................................... 7
Getting Started ..................................................................................................................................................................................................................... 9
Home Main Menu ............................................................................................................................................................................................................. 10
System Applications ......................................................................................................................................................................................................... 12
..................................................................................................................................................................................................13
..................................................................................................................................................................................................................14
.............................................................................................................................................................................................................................16
....................................................................................................................................................................................18
USB & SD Card Playback .
WIFI Connection
VOXX LINK .
WFMM(Wireless FM Modulator) .
IR Headphone Transmitter
...............................................................................................................................................................................................19
User Interface Language...................................................................................................................................................................................................20
About Device & Check for Update ............................................................................................................................................................................... 21
Time Zone & Reset ............................................................................................................................................................................................................. 23
Brightness Control ............................................................................................................................................................................................................. 24
DVD Playback ........................................................................................................................................................................................................................25
Media & File Type Compatibility ....................................................................................................................................................................................26
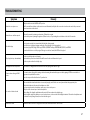
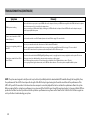
Troubleshooting ................................................................................................................................................................................................................. 27
General Specications ...................................................................................................................................................................................................... 29
Compliance Information .................................................................................................................................................................................................. 30

5
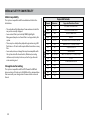
FEATURES
• Android Operating System
• Quad-core Processor
• RAM (8GB)
• Internal Memory (16GB)
• 10.1" TFT LCD Display (1024x600)
• Capacitive Multi-Touch Panel
• User Downloadable Apps
(Play Store, Chrome, Netflix and Disney Plus apps preloaded*)
• MicroSD Card (Supports up to 64GB)
• USB 2.0 Input (Supports up to 64GB)
• Integrated DVD Player
• 100 Channel Wireless FM Modulator
• Dual Channel IR Headphone Transmitter
• Wi-Fi 802.11 a/b/n/g Dual Band (Hotspot Required)
• VOXX LINK Remote Control (APP for Android and iOS)
* All trademarks and their respective logos cited herein are the property of their respective owners.

6
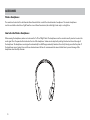
ACCESSORIES
Wireless Headphones
The monitor includes a built-in dual channel infrared transmitter for use with the included wireless headphones. The wireless headphones
must be used within a direct line of sight from the screen. Infrared transmission, like visible light, travels only in a straight line.
How to Use the Wireless Headphones
When wearing the headphones, make sure to observe the “Left” and “Right” labels. The headphones must be oriented correctly in order to receive the
audio signal. Press the power button located on the side of the headphone. Volume can be adjusted by rotating the wheel on the outside edge of
the headphone. The headphones are designed to automatically turn off after approximately 3 minutes of no activity to help prevent battery drain. If
the headphones are not going to be used for an extended amount of time it is recommended to remove the batteries to prevent damage of the
headphones due to battery corrosion.

7
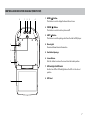
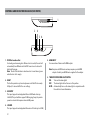
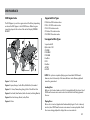
CONTROLS AND INDICATORS DIAGRAM FRONT VIEW
1. HOME ( ) Button
This button is used to display the Home Menu Screen.
2. POWER ( ) Button
This button is used to turn the system on/o.
3. EJECT (
) Button
This button is used for ejecting a disc from the built-in DVD player.
4. Dome Lights
Provide additional interior illumination.
5. Ventilation Openings
6. Screen Release
Push this button to release the screen from the locked position.
7. LCD Backlight Cut O Switch
Used to turn o the LCD backlight when the LCD is in the closed
position.
8. LCD Panel
1
5
6
7
8
4423

8
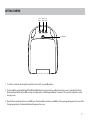
CONTROLS AND INDICATORS DIAGRAM SIDE VIEWS
1. DVD Disc Insertion Slot
For loading and removing discs. When a disc is inserted, the unit will
automatically turn ON and switch to DVD source. Insert a disc with
label side facing up.
Note: The disc slot indicator is red when a disc is inserted and green
when the disc slot is empty.
2. RESET
This button provides a system-level power reset. On left side nearby
USB port, It does not aect the user settings.
3. USB INPUT
This input supports media playback from a USB thumb drive (up
to.64GB). This port will also support USB charging (1amp) to provide
power to a device that requires external USB power.
4. SD CARD
This input supports media playback from micro SD cards (up to 64GB).
5. HDMI INPUT
For connection of devices with HDMI outputs.
Note: Requires an HDMI device and may require a special HDMI
adapter. Contact your HDMI device supplier for the adapter.
6. THREE POSITION DOME LIGHT SWITCH
ON - Turns on the dome lights.
OFF - The dome lights will not turn on in this position.
AUTO - Automatically turns on the dome lights in conjunction with
the vehicle's interior illumination.
24
563
1

9
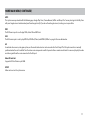
GETTING STARTED
1. To start the system, the vehicle ignition key switch must be in ACC or engine ON position.
2. The Power Button and Home Button will flash RED and BLUE while the system is booting up. Once the boot up process is completed, the Power
Button and Home Button will turn RED, and stay in Standby position. It will take approximately 12 seconds to 15 seconds to complete the system
boot up process.
3. Once the Power and Home buttons are solid RED, press the Power Button to turn the system ON and the logo image will appear on the screen. After
the logo image displays, the Home Main Menu will appear on the screen.
Screen Release
Home
Button
ON/OFF Eject
Button
Button

10
HOME MAIN MENU
HDMI
The HDMI inputs allow the user to enjoy high-denition digital images and high-quality sound by connecting an HD device such as a Blu-ray player or
smartphone with an HDMI output to the system. Plug in the HDMI device with a special adapter available from your mobile phone provider.
Notes:
• This source requires an HDMI enabled device and a special HDMI adapter. Contact your HDMI device supplier for the adapter.
• Phone functionality (phone calls, texting, etc.) may be limited while using the adapter.
• HDMI content is copy protected and is not available on the AV output of the AMOVA10/OVA10 System.
APPLICABLE HDMI FEATURE
- Input audio signal: 2 channel.
- Input video signal: 480p, 576p, 720p, 1080i, and 1080p.

11
HOME MAIN MENU CONTINUED
APPS
This system comes pre-loaded with the following apps: Google Play Store, Chrome Browser, Netix. and Disney Plus. You may also log into the Play Store
with your Google account and download your favorite apps directly. If you do not have Google account, creating one is easy and free.
DVD
The DVD source input is used to play DVDs, Audio CDs and MP3 discs.
USB
The USB source input is used to play MP3 les, JPEG les (Photos) and MPEG I, II les. See page 30 for more information.
AV
An external video source, video game system, or other audio/video devices can be connected to the AV input. This AV input connection is normally
performed when the unit is installed. Turn the video source component on with its power button or remote control and it is now ready to play the audio
and video signals from the source connected to the AV input.
Micro SD Card Slot
Supported SD Card Device up to 64GB.
SETUP
Allow user to access the system menu.

12
SYSTEM APPLICATIONS
This system comes pre-loaded with the following apps: Google Play
Store, Chrome Browser, Netix and Disney Plus. You may also log into the
Play Store with your Google account and download your favorite apps
directly. If you do not have Google account, creating one is easy and free.
1. Connect the AMOVA10/OVA10 monitor to a Wi-Fi hotpsot Refer to
page 14 for details.
2. Select "APPS" from the main menu screen.
3. Select the Play Store to download your choice of applications
(connection to a Wi-Fi hotspot is required).
4. Touch the log-in button and use the on-screen keyboard to enter
your Google account credentials to allow access to the Play Store.
5. Download and install the apps you wish to use on the system.
6. From the "APPS" main screen, you may choose the application you
wish to use on the system. Press the "HOME" button to exit any
applications and return to the "HOME" screen.
NOTES:
A total of (12) applications can be installed on the monitor.
Google Play Store, Chrome Browser, Netflix and Disney Plus are pre-
loaded from the factory and cannot be deleted.
Users can download (8) apps in addition to the (4) that are pre-loaded
on the monitor.
Once (8) apps have been downloaded to the monitor, an
app must be deleted before a new app can be downloaded.

13
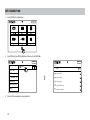
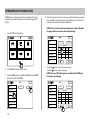
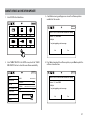
USB & SD CARD PLAYBACK
USB PLAYBACK
1. Insert a USB device into monitor USB port.
SD CARD PLAYBACK
1. Insert a Micro SD Card into the monitor.
2. Select USB source in the Main Menu.
2. Select SD source in the Main Menu.
3. Select the playing mode Video, Music or Photo.
3. Select the playing mode Video, Music or Photo.
SCREENOFF
SD CARD
VIDEO
MUSIC
PHOTO
USB
SCREENOFF
VIDEO
MUSIC
PHOTO
SCREENOFF
SD CARD
VIDEO
MUSIC
PHOTO
USB
SCREENOFF
VIDEO
MUSIC
PHOTO

14
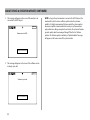
WIFI CONNECTION
1. Select SETUP in the Main Menu.
2. Select WIFI and turn ON the WLAN and then touch the WLAN Bar.
SCREENOFF
WIFI
VOXX LINK
WFMM
IR TRANSMITTER
LANGUAGE
ABOUT DEVICE
RESET
ONWLAN
SCREENOFF
Wi-Fi
On
Vehicle Wi-Fi
Mom's Phone
Dad's Phone
Grandma's Phone
Grandpa's Phone
᱘
3. Select a Wi-Fi network from the available list.

15
WIFI CONNECTIONCONTINUED
4. Touch the line to enter the password, and the on-screen keyboard will appear.
5. Enter the Wi-Fi password using the on screen keyboard. Then press "DONE" to enter the password.
6. The monitor will now connect to the Wi-Fi network. Once a Wi-Fi network is saved into memory, the monitor will automatically reconnect to that
network as long as the Wi-Fi setting is set to "ON".
NOTE: Up to (10) Wi-Fi hotspots can be saved in the memory to the monitor.

16
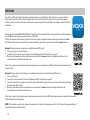
VOXX LINK
Voxx Link is an APP developed for Android and Apple smartphones and tablets that allows full system remote control and
visual monitoring of the system without having to directly see or directly touch the monitor. This is a great tool to allow
content selection and control of the system for actual users who may be infants and toddlers, too young to control the system
themselves.
Download and install the VOXX LINK APP from the Google Play Store or Apple APP Store onto your Android or iOS Smartphone.
Scan the QR codes on this page to get direct access to the APPs.
If the system monitor and the device you wish to control the system using Voxx Link are not already connected to the same
Wi-Fi network, both system monitor and the intended controlling smart device must be connected to the same network.
Example 1 (Using hotspot on smartphone to establish internet/APP access)
1. Turn on your phone's personal hotspot.
2. Connect the system monitor to your phone's hotspot following the Wi-Fi instructions on page 14.
3. Once the system monitor and the smartphone are connected to the same network, the smartphone will show as the
connected device in the Voxx Link setup menu.
In this setup scenario, the smartphone becomes the gateway to accessing the Internet/APPs and it also becomes the Voxx Link
remote control.
Example 2 (Using a vehicle's built-in hotspot or a portable hotspot device to establish internet/APP access)
1. Turn on the hotspot.
2. Connect the system monitor to the hotspot following the Wi-Fi instructions on page 14.
3. Connect the smart device you wish to control the system with to the hotspot (connect smart device to the hotspot through
the smart device Wi-Fi setup).
4. Once the system monitor and the smartphone are connected to the same network, the hotspot will show as the
connected device in the Voxx Link setup menu.
In this setup scenario, the hotspot becomes the gateway to accessing the Internet/APPs and it also becomes the network for the monitor
and the Voxx Link controlling device.
NOTE: If the network name does not display on the monitor in the Voxx Link setup menu, press the "Scan" button in the upper right hand
corner of the monitor to refresh the list.

17
VOXX LINKCONTINUED
18:00
80%
VOXX
LINK
Google Play
VOXX LINK
Kevin_Android_R&D
Tools
INSTALL
18:00
80%
VOXX
LINK
VOXX
REAR SEAT INFOTAINMENT
AVAILABLE NETWORK
AMOVA10/OVA10_1a144
᱘᱘
᱘
᱘᱘
᱘
᱘
SCREENOFF
WIFI
VOXX LINK
WFMM
IR TRANSMITTER
LANGUAGE
ABOUT DEVICE
RESET
SCREENOFF
Scan Searching...
TP-LINK_72DA
Secured with WPA/WPA2
TP-LINK_363C
Secured with WPA/WPA2
Thomas_S9
Secured with WPA/WPA2
TP-LINK_565A
Secured with WPA/WPA2
You must connect to WiFi first
SCREENOFF
Scan Thomas_S9 Connected
TP-LINK_72DA
Secured with WPA/WPA2
TP-LINK_363C
Secured with WPA/WPA2
Thomas_59
Secured with WPA/WPA2
TP-LINK_565A
Secured with WPA/WPA2
Device Name: AMOVA10/OVA10_1a44
1. Once the network connection is established between the controlling device and the system monitor, open the Voxx Link APP.
2. After the initial splash screen, the monitor will display under "Available Network".
3. Select the monitor you wish to control. Once selected, that monitor's display will appear on the controlling device.
4. To select a different monitor (multiple Overhead Monitor Installation), exit to the controlling device's home screen and go back into the
Voxx Link APP to select a different monitor.
NOTES:
1. In the available network listing, the monitor currently connected to the controlling device will be highlighted in green.

18
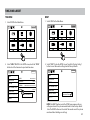
WFMM(WIRELESS FM MODULATOR)
WFMM allows you to broadcast audio content from the system
monitor to your vehicle's factory audio system through an FM
station.
1. Select SETUP in the Main Menu.
2. Select WFMM inside the SETUP screen.
3. Touch the ON button to turn ON the WFMM, Touch the OFF
button to turn OFF the WFMM.
4. Touch the frequency button to select your preferred frequency, and tune
your radio FM to the same frequency. This will allow you to listen to the
audio from the monitor through your FM Radio.
NOTE: For best results and to avoid interference, select an FM radio
frequency that does not have content broadcasting.
5. Touch the
button to go to the previous page.
Touch the button to go to next page.
NOTE: There are 100 total frequencies available, with 20 dierent
frequencies on each page.
SCREENOFF
WIFI
VOXX LINK
WFMM
IR TRANSMITTER
LANGUAGE
ABOUT DEVICE
RESET
ON OFF
SCREENOFF
WIFI
VOXX LINK
WFMM
IR TRANSMITTER
LANGUAGE
ABOUT DEVICE
RESET
ON OFF
88.1MHz 89.1MHz 90.1MHz 91.1MHz
88.3MHz 89.3MHz 90.3MHz 91.3MHz
88.5MHz 89.5MHz 90.5MHz 91.5MHz
88.7MHz 89.7MHz 90.7MHz 91.7MHz
88.9MHz 89.9MHz 90.9MHz 91.9MHz
FREQUENCY
SCREENOFF
WIFI
VOXX LINK
WFMM
IR TRANSMITTER
LANGUAGE
ABOUT DEVICE
RESET
ON OFF
92.1MHz 93.1MHz 94.1MHz 95.1MHz
92.3MHz 93.3MHz 94.3MHz 95.3MHz
92.5MHz 93.5MHz 94.5MHz 95.5MHz
92.7MHz 93.7MHz 94.7MHz 95.7MHz
92.9MHz 93.9MHz 94.9MHz 95.9MHz
FREQUENCY
SCREENOFF
WIFI
VOXX LINK
WFMM
IR TRANSMITTER
LANGUAGE
ABOUT DEVICE
RESET
ON OFF
SCREENOFF
WIFI
VOXX LINK
WFMM
IR TRANSMITTER
LANGUAGE
ABOUT DEVICE
RESET
ON OFF
88.1MHz 89.1MHz 90.1MHz 91.1MHz
88.3MHz 89.3MHz 90.3MHz 91.3MHz
88.5MHz 89.5MHz 90.5MHz 91.5MHz
88.7MHz 89.7MHz 90.7MHz 91.7MHz
88.9MHz 89.9MHz 90.9MHz 91.9MHz
FREQUENCY
SCREENOFF
WIFI
VOXX LINK
WFMM
IR TRANSMITTER
LANGUAGE
ABOUT DEVICE
RESET
ON OFF
92.1MHz 93.1MHz 94.1MHz 95.1MHz
92.3MHz 93.3MHz 94.3MHz 95.3MHz
92.5MHz 93.5MHz 94.5MHz 95.5MHz
92.7MHz 93.7MHz 94.7MHz 95.7MHz
92.9MHz 93.9MHz 94.9MHz 95.9MHz
FREQUENCY

19
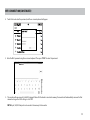
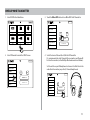
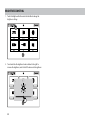
IR HEADPHONE TRANSMITTER
1. Select SETUP in the Main Menu.
2. Select IR Transmitter inside the SETUP screen.
3. Touch the ON or OFF button to turn ON or OFF the IR Transmitter.
4. Select the desired Channel (A or B) for the IR Transmitter.
It is recommended to select Channel A for one monitor and Channel B
for the other monitor (use for Multiple Overhead monitor installation).
Set the switch on your IR Headphones to channel A or B to listen to the
audio from the monitor you prefer. (2 Channel Headphones)
SCREENOFF
WIFI
VOXX LINK
WFMM
IR TRANSMITTER
LANGUAGE
ABOUT DEVICE
RESET
ON
CHANNEL A
CHANNEL B
OFF
SCREENOFF
WIFI
VOXX LINK
WFMM
IR TRANSMITTER
LANGUAGE
ABOUT DEVICE
RESET
ON OFF
SCREENOFF
WIFI
VOXX LINK
WFMM
IR TRANSMITTER
LANGUAGE
ABOUT DEVICE
RESET
ON OFF
88.1MHz 89.1MHz 90.1MHz 91.1MHz
88.3MHz 89.3MHz 90.3MHz 91.3MHz
88.5MHz 89.5MHz 90.5MHz 91.5MHz
88.7MHz 89.7MHz 90.7MHz 91.7MHz
88.9MHz 89.9MHz 90.9MHz 91.9MHz
FREQUENCY
SCREENOFF
WIFI
VOXX LINK
WFMM
IR TRANSMITTER
LANGUAGE
ABOUT DEVICE
RESET
ON OFF
92.1MHz 93.1MHz 94.1MHz 95.1MHz
92.3MHz 93.3MHz 94.3MHz 95.3MHz
92.5MHz 93.5MHz 94.5MHz 95.5MHz
92.7MHz 93.7MHz 94.7MHz 95.7MHz
92.9MHz 93.9MHz 94.9MHz 95.9MHz
FREQUENCY
SCREENOFF
WIFI
VOXX LINK
WFMM
IR TRANSMITTER
LANGUAGE
ABOUT DEVICE
RESET
ON
CHANNEL A
CHANNEL B
OFF
SCREENOFF
WIFI
VOXX LINK
WFMM
IR TRANSMITTER
LANGUAGE
ABOUT DEVICE
RESET
ON
CHANNEL A
CHANNEL B
OFF

20
USER INTERFACE LANGUAGE
1. Select SETUP in the Main Menu.
2. Select Language inside the SETUP screen.
3. Select your preferred language.
SCREENOFF
WIFI
VOXX LINK
WFMM
IR TRANSMITTER
LANGUAGE
ABOUT DEVICE
RESET
ENGLISH
ESPAÑOL
FRANÇAIS
এѽИކ
ޙߎ寉
Page is loading ...
Page is loading ...
Page is loading ...
Page is loading ...
Page is loading ...
Page is loading ...
Page is loading ...
Page is loading ...
Page is loading ...
Page is loading ...
Page is loading ...
Page is loading ...
-
 1
1
-
 2
2
-
 3
3
-
 4
4
-
 5
5
-
 6
6
-
 7
7
-
 8
8
-
 9
9
-
 10
10
-
 11
11
-
 12
12
-
 13
13
-
 14
14
-
 15
15
-
 16
16
-
 17
17
-
 18
18
-
 19
19
-
 20
20
-
 21
21
-
 22
22
-
 23
23
-
 24
24
-
 25
25
-
 26
26
-
 27
27
-
 28
28
-
 29
29
-
 30
30
-
 31
31
-
 32
32


Advent ADVA10 User manual
- Category
- Car video systems
- Type
- User manual
- This manual is also suitable for
Ask a question and I''ll find the answer in the document
Finding information in a document is now easier with AI
Related papers
-
Advent ADVEXL10 Operating instructions
-
-
-
-
-
-
-
-
Advent ADVUNI300 Operating Instructions Manual
