Canon 0580B002 User manual
- Category
- Bridge cameras
- Type
- User manual
This manual is also suitable for

QT5-0210-V02 XXXXXXXX ©CANON INC.2006 PRINTED IN THAILAND
Canon U.S.A., Inc.
One Canon Plaza, Lake Success, NY 11042, U.S.A.
Canon Inc.
30-2, Shimomaruko 3-chome, Ohta-ku, Tokyo 146-8501, Japan
Canon Canada, Inc.
6390 Dixie Road, Mississauga, Ontario, L5T 1P7, Canada
Canon Latin America, Inc.
703 Waterford Way, Suite 400, Miami, FL 33126, U.S.A.
Canon Mexicana
Boulevard Manuel Avila Camacho No. 138 PB
y Pisos 15, 16 y 17, Colonia Lomas de Chapultepec
Delegación Miguel Hidalgo, CP 11000, Mexico D.F.
User’s Guide
User’s Guide
QT5-0210-V02
ENG
The following ink tanks are compatible with this machine.
For details on ink tank replacement, refer to “Replacing Ink Tanks” in this guide.
Office All-in-One

Getting Help from Canon
Help Us Help You Better
Before you contact Canon, please record the following information.
Serial Number (located on the inside of the product): ____________________
Model Number (located on the front of the product): _____________________
Setup CD-ROM number (located on the CD-ROM): _____________________
Purchase Date:__________________________________________________
Customer Technical Support Sequence*
1.Internet — www.canontechsupport.com
For quick and comprehensive self-help in an intuitively guided interactive troubleshooting
environment, the place to start is our helpful tech support web site. In addition, the latest
driver downloads, answers to frequently asked questions, product information, and
“where to buy” instructions are found here.
2.Email Tech Support — www.canontechsupport.com
For individual attention to a special issue, try emailing our friendly technical support repre-
sentatives, specially trained to communicate quick, easy, and logical solutions to your
inquiries within 24 hours.
3.Toll-Free Live Tech Support — (1-800-828-4040)
This option provides live telephone technical support, free of service charges, Monday-
Saturday (excluding holidays), during your product’s 1 year limited warranty period. Tele-
phone Device for the Deaf (TDD) support is available at (1-866-251-3752).
4.Extended Service and Support — www.canonesp.com
Canon CarePAK Extended Service Plan is a cost-attractive and easy-to-use extended
service program that provides up to three full years of service and support coverage at a
very attractive price. CarePAK offers toll-free Canon technical support and includes
Canon’s superb InstantExchange product replacement program. For further information
about extending your Canon service and support, call (1-800-385-2155), or visit our Web
site at www.canonesp.com. CarePAK must be purchased during your product’s war-
ranty period.
For more information and updated program specifics, please visit our web site at
www.canontechsupport.com.
* Support program specifics are subject to change without notice.
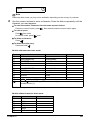
Ordering Information
For additional supplies, use the following descriptions and order numbers.
Description Order #
Ink Tanks
CLI-8 BK 0620B002
CLI-8 C 0621B002
CLI-8 M 0622B002
CLI-8 Y 0623B002
PGI-5 BK 0628B002
Canon Specialty Papers
Photo Paper Plus Glossy (4" x 6"/20 sheets) 7980A007
Photo Paper Plus Glossy (4" x 6"/50 sheets) 7980A012
Photo Paper Plus Glossy (4" x 6"/120 sheets) 7980A022
Photo Paper Plus Glossy (5" x 7"/20 sheets) 7980A019
Photo Paper Plus Glossy (8.5" x 11"/20 sheets) 7980A006
Photo Paper Plus Double Sided (5" x 7"/10 sheets) 9981A006
Photo Paper Plus Double Sided (8.5" x 11"/10 sheets) 9981A005
Photo Paper Plus Double Sided Album Kit (5" x 7") 0041B005
Photo Paper Plus Double Sided Album Kit (8.5" x 11") 0041B006
Photo Paper Pro for Borderless Printing (4" x 6"/20 sheets) 1029A014
Photo Paper Pro for Borderless Printing (4" x 6"/75 sheets) 1029A027
Photo Paper Pro (8.5" x 11"/15 sheets) 1029A004
Photo Paper Pro (8.5" x 11"/30 sheets) 1029A028
Photo Paper Pro (8" x 10"/20 sheets) 1029A059
Matte Photo Paper (4" x 6"/120 sheets) 7981A014
Matte Photo Paper (8.5" x 11"/50 sheets) 7981A004
Photo Paper Glossy (4" x 6"/50 sheets) 0755B021
Photo Paper Glossy (4" x 6"/100 sheets) 0775B022
Photo Paper Glossy (8.5" x 11"/50 sheets) 0775B023
Photo Paper Glossy (8.5" x 11"/100 sheets) 0775B024
Glossy Photo Paper Credit Card Size 9157A023
Photo Stickers 0001C001
High Resolution Paper (8.5" x 11"/100 sheets) 1043A011
Call 1-800-OK-CANON to locate a dealer near you, or visit the Canon eStore at
www.estore.usa.canon.com.
© 2006 Canon U.S.A., Inc. Canon is a registered trademark of Canon Inc. in the United States and may be a registered
trademark or trademarks in other countries. All other product and brand names are trademarks of their respective own-
ers. As an E
NERGY STAR
®
partner, Canon U.S.A., Inc. has determined that this product meets the ENERGY STAR
®
guidelines for energy efficiency.

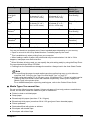
Table of Contents
1
Copyright ........................................................3
Disclaimer.......................................................3
Model Name ...................................................4
Trademarks.....................................................4
How to Use the Documentation Provided.........4
Safety Precautions ...........................................5
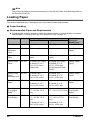
Reading the Document...................................10
Symbols Used in This Guide ........................10
Legal Limitations on Use of Your Product and
Use of Images ................................................11
1 Before Printing .......................................12
Main Components and Their Functions........12
Turning the Machine ON and OFF ...............18
Document Handling ......................................19
Loading Paper ..............................................22
Changing the Page Size and Media Type ....37
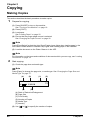
2 Copying...................................................40
Making Copies..............................................40
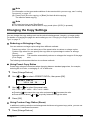
Changing the Copy Settings.........................41
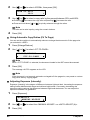
Using Useful Copy Functions .......................45
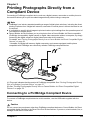
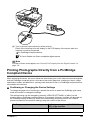
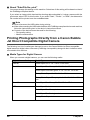
3 Printing Photographs Directly from a
Compliant Device ...................................53
Connecting to a PictBridge Compliant
Device...........................................................53
Printing Photographs Directly from a
PictBridge Compliant Device ........................55
Printing Photographs Directly from a Canon
Bubble Jet Direct Compatible Digital
Camera.........................................................58
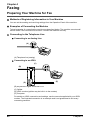
4 Faxing......................................................60
Preparing Your Machine for Fax...................60
Sending Faxes..............................................71
Receiving Faxes ...........................................78
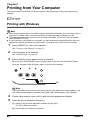
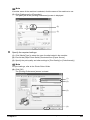
5 Printing from Your Computer ...............84
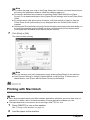
Printing with Windows...................................84
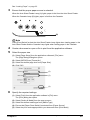
Printing with Macintosh.................................86
6 Scanning Images....................................89
About Scanning Images................................89
Scanning Methods........................................89
7 Changing the Machine Settings............91
Changing the Settings ..................................91
PRINT SETTINGS........................................91
FAX SETTINGS............................................92
OTHERS.......................................................96
RESTORE DEFAULT...................................96
SAVE CONFIG .............................................97
LOAD CONFIG.............................................97
8 Routine Maintenance ............................ 98
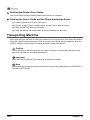
Replacing an Ink Tank..................................98
Getting the Ink Level Information..................98
Knowing When to Replace Ink Tank ............99
Replacing Ink Tanks.....................................99
When Printing Becomes Faint or
Colors are Incorrect....................................103
Printing the Nozzle Check Pattern..............104
Print Head Cleaning ...................................105
Print Head Deep Cleaning..........................106
Aligning the Print Head Automatically ........106
Cleaning Your Machine ..............................107
9 Troubleshooting .................................. 111
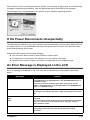
If the Power Disconnects Unexpectedly .....113
An Error Message is Displayed on the
LCD ............................................................113
Cannot See the Display on the LCD...........119
Ink Does Not Come Out/Printing is Blurred/
Colors are Wrong/White Streaks/
Straight Lines are Misaligned/
Cannot Print to End of Job .........................119
Back of Paper is Smudged/Paper Does Not
Feed Properly/Printed Surface is
Scratched ...................................................122
Paper Jams ................................................127
Document Jams..........................................130
Cannot Print Properly from the Digital
Camera.......................................................133
Cannot Install the MP Drivers.....................135
Cannot Connect to Computer Properly ......137
Problems Receiving Faxes.........................138
Problems Sending Faxes ...........................140
Telephone Problems ..................................141
Problems Scanning ....................................141
An Error Message Appears
on the Screen .............................................146
If You Cannot Resolve the Problem ...........149
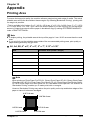
10 Appendix .............................................. 151
Printing Area...............................................151
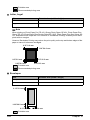
How to Read the On-screen Manuals ........153
Uninstalling the On-screen Manuals...........153
Transporting Machine.................................154
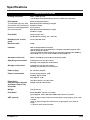
Specifications .............................................155
Users in the U.S.A. ...................................... 160
Pre-Installation Requirements for MP530...160
Connection of the Equipment .....................160
In Case of Equipment Malfunction..............161
Rights of the Telephone Company.............161
FCC Notice.................................................161
Canon U.S.A., INC. LIMITED WARRANTY
--- (USA Only).............................................163
Users in Canada .......................................... 166
Pre-Installation Requirements for Canon
Facsimile Equipment ..................................166


3
Canon MP530 User’s Guide
Copyright
This manual is copyrighted by Canon Inc. with all rights reserved.
Under the copyright laws, this manual may not be reproduced in any form, in whole or in part, without
the prior written consent of Canon Inc.
© 2006 Canon Inc.
Disclaimer
Canon Inc. has reviewed this manual thoroughly in order that it will be an easy-to-use guide to your
Canon MP530 Series. All statements, technical information and recommendations in this manual
and in any guides or related documents are believed reliable, but the accuracy and completeness
thereof are not guaranteed or warranted, and they are not intended to be, nor should they be
understood to be, representation or warranties concerning the products described.
Specifications are subject to change without notice.
As an ENERGY STAR
®
partner, Canon Inc., has determined that this product
meets the ENERGY STAR guidelines for energy efficiency.
All information regarding non-Canon products was compiled from publicly available information. No
representation is made regarding the accuracy thereof.
Super G3 is a phrase used to describe the new generation of fax machines that
use ITU-T V.34 standard 33.6 Kbps* modems. Super G3 High Speed Fax
machines allow transmission time of approximately 3 seconds* per page which
results in reduced telephone line charges.
* Approximately 3 seconds per page fax transmission time based on ITU-T No.1
Chart (Standard Mode) at 33.6 Kbps modem speed.
The Public Switched Telephone Network currently supports fax modem speeds of
28.8 Kbps or lower, depending on telephone line conditions. Sending and
receiving fax machines need to conform to ITU-T V.34 guidelines.
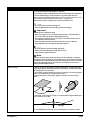
This machine supports Exif 2.2 (also called “Exif Print”).
Exif Print is a standard for enhancing the communication between digital cameras
and printers.
By connecting to an Exif Print-compliant digital camera, the camera’s image data
at the time of shooting is used and optimized, yielding extremely high quality
prints.

4
Model Name
K10269 (PIXMA MP530)
Trademarks
z "Windows" is a trademark of Microsoft Corporation, registered in the United States and other
countries.
z "Macintosh" and "Mac" are trademarks of Apple Computer, Inc., registered in the U.S. and other
countries.
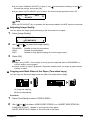
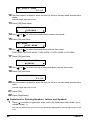
How to Use the Documentation Provided
Easy Setup Instructions
(Printed documentation)
Be sure to read this sheet first.
This sheet includes instructions for setting up your machine and getting
it ready for use.
User’s Guide
(This guide)
On-screen Manuals
Read this guide when starting to use the machine.
After following instructions in the Easy Setup Instructions, read this
guide for instructions on printing from your computer, direct photo
printing from selected digital cameras, copying, faxing, and scanning.
Refer to these guides as needed for full instructions on some of the
more advanced features.
Printer Driver Guide
Refer to this guide for full instructions on setting the printer driver.
Scan Guide
Refer to this guide for full instructions on scanning operation and
settings.
FAX Driver Guide
Refer to this guide for full instructions on setting the fax driver.
Photo Application Guide
Refer to this guide for instructions on using various application
software included on the Setup CD-ROM.

5
Safety Precautions
Safety Precautions
Please read the safety warnings and cautions provided in this guide to ensure that you use your
machine safely. Do not attempt to use the machine in any way not described in this guide.
Warning
You may cause an electric shock/fire or damage the machine if you ignore any of these safety
precautions.
Location Do not place the machine close to flammable solvents such as alcohol or thinners. If
flammable substances come into contact with electrical parts inside the machine, it may
result in fire or electrical shock.
Power supply Never attempt to plug or unplug the machine from the power supply when your hands are
wet. This may result in electrical shock.
Always push the plug all the way into the power outlet. If the prongs of the power plug
come into contact with metal objects, it may result in fire or electrical shock.
Never damage, modify, stretch or excessively bend or twist the power cord. Do not place
heavy objects on the power cord. These actions may cause electrical damage and result in
fire or electrical shock.
Never plug the machine into a power socket that is shared with other equipment (extension
lead/cord, 2- or 3-way adapter, etc.). This may result in fire or electrical shock.
Plug the machine into a standard 110-240 V AC, 50/60 Hz (depending on your local electrical
requirements), two-prong* grounded outlet. Operate the machine only from the type of
power source indicated on the machine's label or a fire, electrical shock, or malfunction
may occur. If you are unsure of the type of power available, consult your local power
company.
* The shape of the plug and outlet may vary depending on the country of purchase.
Do not allow the power cord to be near objects that emit heat. The outer cover of the power
cord may melt resulting in fire or electrical shock.
Never use the machine if the power cord is bundled or knotted. Knots in the cord may
result in fire or electrical shock.
If you detect smoke, unusual smells or strange noises around the machine, immediately
unplug the machine at the power supply and contact the Canon Customer Care Center.
Using the machine in such conditions may result in fire or electrical shock.
Periodically, unplug the machine and use a dry cloth to wipe off any dust or dirt collected
on the plug and the power outlet.
If the machine is placed at a location exposed to a lot of dust, smoke, or high humidity, the
dust collected on the plug absorbs moisture and may cause insulation failure and fire.
Maintenance Do not service the machine yourself except as specifically described in this guide. If further
servicing is required, contact the Canon Customer Care Center.
When storing the machine, choose a location where the machine is not exposed to dust.
Dust accumulation may prevent the machine from operating properly.
Use a damp cloth to clean the machine. Never use flammable solvents such as alcohol,
benzene or thinners. If flammable solvents come in contact with electrical components
inside the machine, it could cause a fire or electrical shock.
Always turn OFF the power and unplug the machine from the power outlet before cleaning
the machine.
If you leave on or accidentally switch the machine ON while cleaning it, it may result in
injury or damage the machine.

6
Safety Precautions
Handling Do not attempt to disassemble or modify the machine. There are no user serviceable parts
inside the machine.
The machine contains high-voltage components. Never attempt any maintenance
procedure not described in this guide. Incorrect maintenance procedures may damage the
machine, or cause a fire or electrical shock.
Do not drop paper clips, staples, or other metal objects inside the machine. Also do not
spill water, liquid, or flammable substances inside the machine. If these items come into
contact with high-voltage parts inside the machine, it may result in fire or electrical shock.
If these items are dropped or spilled in the machine, turn OFF the power and unplug the
power cord immediately with dry hands. Then contact the Canon Customer Care Center.
Do not use flammable sprays near the machine.
This could cause a fire or electrical shock if the spray comes into contact with electrical
components inside the machine.
There are high-voltage components inside the machine. If you are looking inside the
machine to clear paper jams etc., do not allow metal objects such as jewelry to come into
contact with the inside of the machine. Contact may result in burns or electrical shock.
Others This product emits low level magnetic flux. If you use a cardiac pacemaker and feel
abnormalities, please move away from this product and consult your doctor.
When setting the machine near electric products with fluorescent lighting, separate the
machine at least 5.9 inches (15 cm) from electric products equipped with fluorescent
lighting. If you place it near to them, the machine may malfunction as a result of the noise
emitted by the fluorescent lighting.
When turning OFF the power, be sure to press [ON/OFF] and confirm that the Alarm Lamp
has shut off. If you pull the power plug out of the wall outlet while the Alarm Lamp is lit or
flashing, the Print Head is not protected, and you may not be able to print later.
Caution
You may cause injury or damage the machine if you ignore any of these safety precautions.
Location Do not block or cover the ventilation port or any openings on the machine with objects, as
it may cause the inside of machine to overheat and cause a fire.
Place the machine on a flat, stable, vibration-free surface that is strong enough to support
its weight. If the machine topples over, it may result in injury. (For the weight of the
machine, see “Appendix” on page 151.)
Do not use or store the machine outdoors.
Do not install the machine near devices that contain magnets or generate magnetic fields,
such as speakers.
To ensure proper ventilation, make sure the machine is approximately 4 inches (10 cm)
away from walls and other equipment.
Do not install the machine in a location that is very humid or dusty, in direct sunlight,
outdoors, or close to a heating source.
Installing in such a location may result in fire or electrical shock.
To avoid the risk of fire or electrical shocks, install the machine in a location with an
ambient temperature range of 41°F to 95°F (5°C to 35°C) and humidity of 10% to 90%
(condensation free).
Do not place the machine on a thick rug or carpet.
If fibers or dust come inside the machine, it could cause a fire.

7
Safety Precautions
Power supply Never remove the plug by pulling on the cord.
Pulling on the power cord may damage the cord and cause a fire or electrical shock.
When turning OFF the power, be sure to press [ON/OFF] and unplug the machine.
However, if the machine is unplugged during printing, the Print Head is not protected with
the cap that prevents the ink from drying. This may affect the print quality of the machine
when printing later.
During electrical storms, turn OFF the power and disconnect the power cord from the
power outlet.
Do not use an extension cord as this may result in fire or electrical shock.
Ensure that the area around the power outlet is kept clear at all times so you can easily
unplug the power cord if necessary. Otherwise you will be unable to disconnect the power
plug in case of an emergency, and it may result in fire or electrical shock.
Never use a power supply source other than the one rated for the machine in the country
where you purchased the machine as it may result in fire or electrical shock.
The operating requirement of this machine is as follows:
110-240 V AC, 50/60 Hz (depending on local electrical requirements)
Do not plug the machine into the same circuit as appliances such as an air conditioner,
television, or copier. These devices generate electrical noise which may interfere with your
machine’s operation.
Whenever you turn OFF the power and unplug the machine, wait at least one minute before
you plug it in again.
Use only the power cord that came with the machine. Using a different power cord may
cause electric leakage or damage to the machine.
Turn OFF the power and unplug the machine in the following conditions:
z When the power cord or plug is damaged or frayed.
z If liquid has spilled into the machine.
z If the machine has been exposed to rain or water.
z If the machine does not operate normally when you have followed the instructions in the
guides included with your machine.
z If the machine does not operate normally when you have followed the instructions
provided in “Troubleshooting” on page 111.
z If the machine has been dropped or damaged.
z If the machine exhibits a distinct change in performance, indicating a need for servicing.
Turn OFF the power and disconnect the power cord if the machine will not be used for a
long period such as during holidays.
The socket-outlet shall be installed near the equipment and shall be easily accessible.

8
Safety Precautions
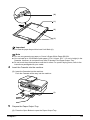
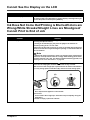
Handling Close the Document Cover gently to avoid catching
your hand. Failing to do so may result in personal
injury.
Do not press down hard on the Document Cover when
using the Platen Glass to scan thick books. This may
damage the Platen Glass and Document Cover and/or
result in personal injury.
Do not place the following objects on top of the machine. If such objects come into contact
with internal electrical components, the machine may short-circuit, resulting in fire or
electrical shock.
z Metal objects such as jewelry and watches
z Containers of water or other liquids such as glasses, vases, or pot plants
If water does spill inside the machine, turn OFF the power immediately by pressing the [ON/
OFF], and disconnect the power cord. Then, contact the Canon Customer Care Center.
Do not touch the high-voltage electrical parts as this may result in electrical shock.
Do not place heavy objects on top of the machine as these may topple over and result in
injury.
When removing paper jammed in the machine, be careful not to get ink on your hands or
clothing. If ink gets on your hands or clothing, wash them soon in running water. If you use
hot water, the ink may adhere and become difficult to remove.
After printing, do not touch the electrical contacts of the Print Head. They will be hot and
may result in burns or electrical shock.
Do not subject the machine to strong physical shock or vibration. This can damage the
machine’s components.
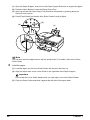
Before moving the machine, turn OFF the power and unplug the machine.
When moving the machine, carry the machine at both
ends.
A distinct change in performance may indicate a need for servicing.
Do not insert your hands into the machine while it is printing.
Parts inside the machine are moving and this may result in injury.
Do not turn the machine upside down.
Ink may leak out and stain clothing or the surrounding area.
Adjust only those controls that are covered by the instructions in the guides since
improper adjustment of other controls may result in damage and require extensive repair
by a qualified technician to restore the product to normal operation.
When storing or transporting the machine, do not tilt it, stand it on its side, or turn it upside
down. Doing so may cause ink to leak out.

9
Safety Precautions
Print Head/Ink tanks For safety reasons, store print heads and ink tanks out of the reach of small children.
If a child ingests any ink, consult a doctor immediately.
Do not shake print heads or ink tanks.
Ink may leak out and stain clothing or the surrounding area.
Never touch the Print Head.
IMPORTANT SAFETY INSTRUCTIONS
When using your telephone equipment, basic safety precautions should always be followed to
reduce the risk of fire, electric shock and injury to persons, including the following:
1. Do not use this product near water, for example, near a bath tub, wash bowl, kitchen sink or
laundry tub, in a wet basement or near a swimming pool.
2. Avoid using this product during an electrical storm. There may be a remote risk of electric
shock from lightning.
3. Do not use this product to report a gas leak in the vicinity of the leak.
SAVE THESE INSTRUCTIONS

10
Reading the Document
Reading the Document
Symbols Used in This Guide
Please read the list below of symbols used in this guide. The following symbols are used to indicate
important instructions. Be sure to obey these instructions.
Warning
Indicates a warning concerning operations that may lead to death or injury to persons if not
performed correctly. In order to use the machine safely, always pay attention to these warnings.
Caution
Indicates a caution concerning operations that may lead to injury to persons or damage to property if
not performed correctly. In order to use the machine safely, always pay attention to these cautions.
Important
Indicates operational warnings and restrictions. Be certain to read these items to operate the
machine correctly and to avoid damage to the machine.
Note
Indicates notes for operation or additional explanations. Reading these is highly recommended.
Read this when the machine is connected to a Windows
®
system.
Read this when the machine is connected to a Macintosh
®
system.

11
Legal Limitations on Use of Your Product and Use of Images
Legal Limitations on Use of Your Product
and Use of Images
It may be unlawful to make copies of, scan, print or use reproductions of the following documents.
The list provided is non-exhaustive. When in doubt, check with a legal representative in your
jurisdiction.
z Paper money
z Money orders
z Certificates of deposit
z Postage stamps (canceled or uncanceled)
z Identifying badges or insignias
z Selective service or draft papers
z Checks or drafts issued by governmental
agencies
z Motor vehicle licenses and certificates of title
z Traveler’s checks
z Food stamps
z Passports
z Immigration papers
z Internal revenue stamps (canceled or
uncanceled)
z Bonds or other certificates of indebtedness
z Stock certificates
z Copyrighted works/works of art without
permission of copyright owner

Chapter 1
12 Chapter 1
Before Printing
Before Printing
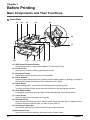
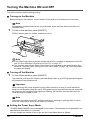
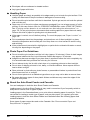
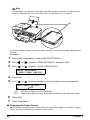
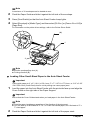
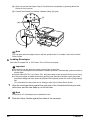
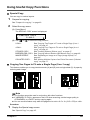
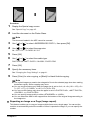
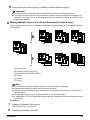
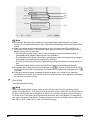
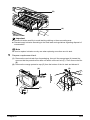
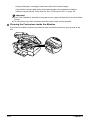
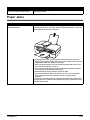
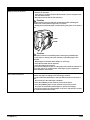
Main Components and Their Functions
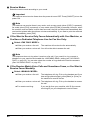
Front View
(1) ADF (Auto Document Feeder)
Automatically scans in documents loaded in the Document Tray.
(2) Feeder Cover
Open this cover when clearing jammed documents.
(3) Document Guides
Adjust these guides to match the document width.
(4) Paper Support
Supports paper loaded on the tray. Extend it before loading paper by putting your finger in
the rounded hollow and pulling out the extension until it stops.
(5) Paper Guide
When loading paper, ensure that the left edge just touches this guide.
To move the Paper Guide, pinch the knob and slide in the appropriate direction.
(6) Auto Sheet Feeder
Load paper here before printing. Paper feeds automatically, one sheet at a time.
(7) Cover Guide
Align the right side of the paper to this guide.
(8) Document Tray
Open this tray to load a document. Once loaded, the document is fed one page at a time.
Load the document with the side you want to scan face up.
(9) Document Output Slot
Documents scanned from the Document Tray are delivered here.
(10) Document Cover
Open this cover when loading a document on the Platen Glass.
(1) (2)
(13)
(11)
(10)
(9)
(8)
(3)
(6)
(7)
(4) (5)
(12)

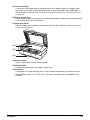
Chapter 1 13
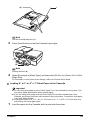
Before Printing
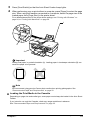
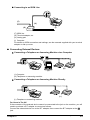
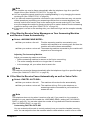
(11) Direct Print Port
Connect the USB cable when printing directly from a digital camera or a digital video
camcorder or a mobile phone equipped with a camera compatible with PictBridge or
Canon Bubble Jet Direct. See “Printing Photographs Directly from a Compliant Device”
on page 53.
(12) Paper Output Tray
Printouts are output to this tray. It opens automatically when copying or printing is started.
If it is closed, press the Open Button.
(13) Operation Panel
Used to change the settings or operate the machine. See “Operation Panel Name and
Functions” on page 16.
(14) Platen Glass
Used to load a document to be processed.
(15) Open Button
Press this button to open the Paper Output Tray.
(16) Cassette
Load paper to be used regularly here. Paper feeds automatically, one sheet at a time.
Photo Stickers and 2.13" x 3.39" / 54.0 x 86.0 mm size paper are not loadable in the
Cassette.
(14)
(15)
(16)

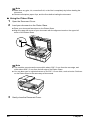
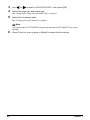
14 Chapter 1
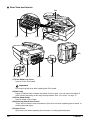
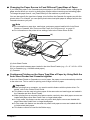
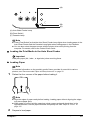
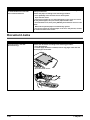
Before Printing
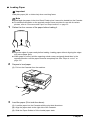
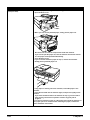
Rear View and Interior
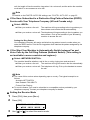
(17) Print Head Lock Lever
Used to fix the Print Head.
(18) Ink Lamp
Lights or flashes red to indicate the status of the ink tank. You can check the status of
each ink tank according to the way its lamp flashes. See “Ink Lamps” on page 15.
(19) Print Head Holder
Used to install a Print Head.
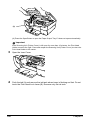
(20) Scanning Unit (Printer Cover)
This is the unit used to scan documents. Open this unit when replacing the ink tanks, or
clearing jammed paper.
(21) Inner Cover
Open this cover when replacing the ink tanks, or clearing jammed paper.
Important
Do not pull up this lever after installing the Print Head.
(20)
(17)
(18)
(19)
(21)
(27) (26)
(25)
(22)
(24) (23)

Chapter 1 15
Before Printing
(22) Duplexing Transport Unit
Open this unit when clearing jammed paper after pulling out the Cassette.
(23) Power Cord Connection
This is the connector used to connect the provided power cord.
(24) Rear Cover
Open this cover when clearing jammed paper.
(25) USB Port
This is the connector used to connect the machine to a computer using a USB cable.
(26) Telephone Line Jack
Connect the telephone line here.
(27) External Device Jack
Connect the external device here.
Important
While the machine is printing from or scanning images to the computer, or the computer
is in the sleep mode or standby mode, do not disconnect and connect the USB cable.
Note
z For information on how to install the Print Head and ink tanks, refer to the Easy Setup
Instructions.
Ink Lamps
z You can check the status of each ink tank according to the way its lamp flashes.
On: The machine is ready to print.
Slow flashing (about three seconds): Ink is low. Prepare a new ink tank. For details, see
“Getting the Ink Level Information” on page 98.
Fast flashing (about one second): Ink tank is empty, or the machine is not ready due to an
error.
Off: Make sure all the ink tanks are installed properly. If an ink lamp cannot light even after
reinstalling ink tanks, an error has occurred and the machine is not ready to print.

16 Chapter 1
Before Printing
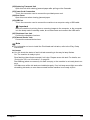
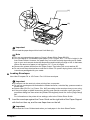
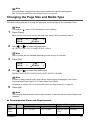
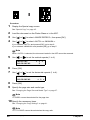
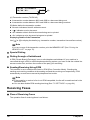
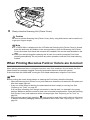
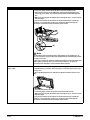
Operation Panel Name and Functions
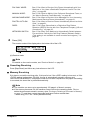
(1) [ON/OFF]
Turns the machine ON and OFF. Before turning ON the machine, make sure the
Document Cover is closed.
(2) [COPY]
Switches the machine to the Copy mode. Flashes when the machine is turned on.
(3) [FAX]
Switches the machine to the Fax mode.
(4) In Use/Memory Lamp
Flashes when the telephone line is in use. Lights when there are documents stored in the
machine's memory.
(5) [SCAN]
Switches the machine to the Scan mode. This button is used when the machine is
connected to a computer (Refer to the Scan Guide).
(6) Alarm Lamp
Lights or flashes orange, when an error occurs, or when paper or ink has run out.
(7) [Exposure]
Sets the copy intensity and fax intensity.
(8) [Enlarge/Reduce]
Sets the reduction or enlargement ratio for copying.
(9) LCD (Liquid Crystal Display)
Displays messages, menu selections, and the operation status.
(10) [Menu]
Displays menus to configure copy, fax, or machine settings.
(11) Numeric Buttons
Enters numerical values such as the number of copies, as well as fax/telephone numbers
and characters.
(12) [Redial/Pause]
Redials the last dialed number using numeric buttons. Also enters pauses between or
after numbers when dialing or registering numbers.
(13) [Coded Dial]
Press this button and a two-digit code to dial a pre-registered fax/telephone number.
Note
z The machine cannot receive faxes when the power is off.
z The power cannot be turned OFF while the machine is sending or receiving faxes, or
when there are unsent faxes stored in the machine’s memory.
(10)
(19)
(2)
(3)
(4)
(9) (11)(1) (5) (7) (8)
(24) (22)
(20)
(18) (17) (14)
(6)
(15)
(12)
(13)
(16)(23) (21)(26) (25)

Chapter 1 17
Before Printing
(14) [Tone]
Switches temporarily to tone dialing. Also changes the mode when entering characters.
(15) [OK]
Finalizes your selection for the menu or setting item.
Restores the machine to normal operation after a printing error was resolved, or if paper
jams are cleared. Ejects documents remaining in the ADF.
(16) [(-) ] and [ (+)]
Scrolls through menu selections, and increases or decreases the number of copies. For
the fax settings, [ ] cancels the entered character, and [ ] enters a space between
characters.
(17) [Back]
Returns to the previous screen.
(18) [Stop/Reset]
Cancels operations. If this button is pressed during printing, the machine aborts printing.
Resets the settings for the number of copies, for the ratio of reduction/enlargement, for
the intensity, and on <1.SPECIAL COPY>.
Also enables you to return to the standby screen after you set some menus.
(19) [Color]
Starts color copying or faxing.
(20) [Black]
Starts black & white copying or faxing.
(21) [Paper]
Sets the page size and media type for copying, and for received faxes.
(22) [Two-Sided]
Selects two-sided copying.
(23) [Image Quality]
Sets the copy resolution and fax resolution.
(24) [Feed Switch]
Selects the paper source. Press this toggle switch to change the paper source between
the Auto Sheet Feeder and Cassette.
(25) Cassette Lamp
Lights when the Cassette is selected.
(26) Auto Sheet Feeder Lamp
Lights when the Auto Sheet Feeder is selected.

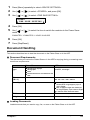
18 Chapter 1
Before Printing
Turning the Machine ON and OFF
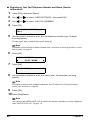
Turn on the machine before starting printing.
Turning on the Machine
Before turning on the machine, confirm that the Print Head and ink tanks are set into place.
1 To turn on the machine, press [ON/OFF].
[COPY] flashes green for a while, and then turns on.
Turning off the Machine
1 To turn off the machine, press [ON/OFF].
The machine is off when the currently selected Mode button (e.g. [COPY]) stops flashing and
all Operation Panel lamps are off.
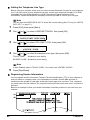
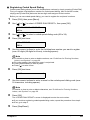
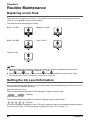
Setting the Power Saver Mode
<POWER SAVER MODE> will be displayed on the screen, if the machine is not operated for the
specified time (the default is 5 minutes).
You can change the interval of time to go into the Power Saver Mode as follows:
Note
If preparatory operations above are not yet finished, follow the Easy Setup Instructions to
complete them.
Note
z If the Alarm Lamp lights or flashes orange and an error message is displayed on the LCD,
see “An Error Message is Displayed on the LCD” on page 113.
z The machine goes into the Power Saver Mode if not operated for the specified time (the
default is 5 minutes) (See “Setting the Power Saver Mode” on page 18). Press any button
to restore the display.
Important
When removing the power plug after turning off the machine, be sure to check that all the
lamps on the Operation Panel are not lit. If the power plug is removed from the wall outlet with
the lamps on the Operation Panel lighting or flashing, the machine cannot protect its Print
Head and may be unable to print.
Note
The power cannot be turned OFF while the machine is sending or receiving a fax, or when
there are unsent faxes stored in the machine’s memory.
Page is loading ...
Page is loading ...
Page is loading ...
Page is loading ...
Page is loading ...
Page is loading ...
Page is loading ...
Page is loading ...
Page is loading ...
Page is loading ...
Page is loading ...
Page is loading ...
Page is loading ...
Page is loading ...
Page is loading ...
Page is loading ...
Page is loading ...
Page is loading ...
Page is loading ...
Page is loading ...
Page is loading ...
Page is loading ...
Page is loading ...
Page is loading ...
Page is loading ...
Page is loading ...
Page is loading ...
Page is loading ...
Page is loading ...
Page is loading ...
Page is loading ...
Page is loading ...
Page is loading ...
Page is loading ...
Page is loading ...
Page is loading ...
Page is loading ...
Page is loading ...
Page is loading ...
Page is loading ...
Page is loading ...
Page is loading ...
Page is loading ...
Page is loading ...
Page is loading ...
Page is loading ...
Page is loading ...
Page is loading ...
Page is loading ...
Page is loading ...
Page is loading ...
Page is loading ...
Page is loading ...
Page is loading ...
Page is loading ...
Page is loading ...
Page is loading ...
Page is loading ...
Page is loading ...
Page is loading ...
Page is loading ...
Page is loading ...
Page is loading ...
Page is loading ...
Page is loading ...
Page is loading ...
Page is loading ...
Page is loading ...
Page is loading ...
Page is loading ...
Page is loading ...
Page is loading ...
Page is loading ...
Page is loading ...
Page is loading ...
Page is loading ...
Page is loading ...
Page is loading ...
Page is loading ...
Page is loading ...
Page is loading ...
Page is loading ...
Page is loading ...
Page is loading ...
Page is loading ...
Page is loading ...
Page is loading ...
Page is loading ...
Page is loading ...
Page is loading ...
Page is loading ...
Page is loading ...
Page is loading ...
Page is loading ...
Page is loading ...
Page is loading ...
Page is loading ...
Page is loading ...
Page is loading ...
Page is loading ...
Page is loading ...
Page is loading ...
Page is loading ...
Page is loading ...
Page is loading ...
Page is loading ...
Page is loading ...
Page is loading ...
Page is loading ...
Page is loading ...
Page is loading ...
Page is loading ...
Page is loading ...
Page is loading ...
Page is loading ...
Page is loading ...
Page is loading ...
Page is loading ...
Page is loading ...
Page is loading ...
Page is loading ...
Page is loading ...
Page is loading ...
Page is loading ...
Page is loading ...
Page is loading ...
Page is loading ...
Page is loading ...
Page is loading ...
Page is loading ...
Page is loading ...
Page is loading ...
Page is loading ...
Page is loading ...
Page is loading ...
Page is loading ...
Page is loading ...
Page is loading ...
Page is loading ...
Page is loading ...
Page is loading ...
Page is loading ...
Page is loading ...
Page is loading ...
Page is loading ...
Page is loading ...
Page is loading ...
Page is loading ...
Page is loading ...
Page is loading ...
Page is loading ...
Page is loading ...
Page is loading ...
Page is loading ...
Page is loading ...
Page is loading ...
-
 1
1
-
 2
2
-
 3
3
-
 4
4
-
 5
5
-
 6
6
-
 7
7
-
 8
8
-
 9
9
-
 10
10
-
 11
11
-
 12
12
-
 13
13
-
 14
14
-
 15
15
-
 16
16
-
 17
17
-
 18
18
-
 19
19
-
 20
20
-
 21
21
-
 22
22
-
 23
23
-
 24
24
-
 25
25
-
 26
26
-
 27
27
-
 28
28
-
 29
29
-
 30
30
-
 31
31
-
 32
32
-
 33
33
-
 34
34
-
 35
35
-
 36
36
-
 37
37
-
 38
38
-
 39
39
-
 40
40
-
 41
41
-
 42
42
-
 43
43
-
 44
44
-
 45
45
-
 46
46
-
 47
47
-
 48
48
-
 49
49
-
 50
50
-
 51
51
-
 52
52
-
 53
53
-
 54
54
-
 55
55
-
 56
56
-
 57
57
-
 58
58
-
 59
59
-
 60
60
-
 61
61
-
 62
62
-
 63
63
-
 64
64
-
 65
65
-
 66
66
-
 67
67
-
 68
68
-
 69
69
-
 70
70
-
 71
71
-
 72
72
-
 73
73
-
 74
74
-
 75
75
-
 76
76
-
 77
77
-
 78
78
-
 79
79
-
 80
80
-
 81
81
-
 82
82
-
 83
83
-
 84
84
-
 85
85
-
 86
86
-
 87
87
-
 88
88
-
 89
89
-
 90
90
-
 91
91
-
 92
92
-
 93
93
-
 94
94
-
 95
95
-
 96
96
-
 97
97
-
 98
98
-
 99
99
-
 100
100
-
 101
101
-
 102
102
-
 103
103
-
 104
104
-
 105
105
-
 106
106
-
 107
107
-
 108
108
-
 109
109
-
 110
110
-
 111
111
-
 112
112
-
 113
113
-
 114
114
-
 115
115
-
 116
116
-
 117
117
-
 118
118
-
 119
119
-
 120
120
-
 121
121
-
 122
122
-
 123
123
-
 124
124
-
 125
125
-
 126
126
-
 127
127
-
 128
128
-
 129
129
-
 130
130
-
 131
131
-
 132
132
-
 133
133
-
 134
134
-
 135
135
-
 136
136
-
 137
137
-
 138
138
-
 139
139
-
 140
140
-
 141
141
-
 142
142
-
 143
143
-
 144
144
-
 145
145
-
 146
146
-
 147
147
-
 148
148
-
 149
149
-
 150
150
-
 151
151
-
 152
152
-
 153
153
-
 154
154
-
 155
155
-
 156
156
-
 157
157
-
 158
158
-
 159
159
-
 160
160
-
 161
161
-
 162
162
-
 163
163
-
 164
164
-
 165
165
-
 166
166
-
 167
167
-
 168
168
-
 169
169
-
 170
170
-
 171
171
-
 172
172
-
 173
173
-
 174
174
-
 175
175
-
 176
176


Canon 0580B002 User manual
- Category
- Bridge cameras
- Type
- User manual
- This manual is also suitable for
Ask a question and I''ll find the answer in the document
Finding information in a document is now easier with AI
Related papers
-
Canon iP4500 - PIXMA Color Inkjet Printer Quick start guide
-
Canon PIXMA MP600 Quick start guide
-
Canon 1438B002 - PIXMA iP4300 Photo Printer User manual
-
Canon PIXMA iP100 Owner's manual
-
Canon 1446B002 Quick start guide
-
-
-
Canon MP960 User manual
-
Canon MP970 User manual
-
Other documents
-
Panasonic Photo Printer PV-PD2000 User manual
-
JVC GVSP2 User manual
-
Mitsubishi Electric 900D-ID User manual
-
-
Mitsubishi CP3020DAE User manual
-
-
-
Sony FAX-B140 User manual
-
Olympus CAMEDIA P-300E Instructions Manual
-
Roland MPX-70 User manual