Page is loading ...

0600-0041-0010 Rev. C Made in the U.S.A.
January 2007 $15.00
User’s Manual
Registered Company
Winona, Minnesota USA
ISO 9001
TOTAL
3 Year Warranty
CUSCUSTOMERER
SATISFTISFACTICTION
Series SD31
Single Display PID Controller
with Optional Countdown Timer
1241 Bundy Boulevard., Winona, Minnesota USA 55987
Phone: +1 (507) 454-5300, Fax: +1 (507) 452-4507 http://www.watlow.com

Safety Information
We use note, caution and warning symbols throughout this book to draw your attention to
important operational and safety information.
A “NOTE” marks a short message to alert you to an important detail.
A “CAUTION” safety alert appears with information that is important for protecting your
equipment and performance. Be especially careful to read and follow all cautions that apply
to your application.
A “WARNING” safety alert appears with information that is important for protecting you,
others and equipment from damage. Pay very close attention to all warnings that apply to
your application.
The safety alert symbol, ç (an exclamation point in a triangle) precedes a general CAUTION
or WARNING statement.
The electrical hazard symbol, Ó (a lightning bolt in a triangle) precedes an electric shock
hazard CAUTION or WARNING safety statement.
Technical Assistance
If you encounter a problem with your Watlow controller, review your configuration informa-
tion to verify that your selections are consistent with your application: inputs, outputs,
alarms, limits, etc. If the problem persists, you can get technical assistance from your local
Watlow representative (see back cover), by e-mailing your questions to wintechsupport@wat
-
low.com or by dialing +1 (507) 494-5656 between 7 a.m. and 5 p.m., Central Standard Time
(CST). Ask for for an Applications Engineer. Please have the following information available
when calling:
• Complete model number • All configuration information
• User’s Manual • Factory Page
Warranty
The Series SD31 is manufactured by ISO 9001-registered processes and is backed by a three-
year warranty.
Return Material Authorization (RMA)
1. Call Watlow Customer Service, (507) 454-5300, for a Return Material Authorization
(RMA) number before returning any item for repair. If you do not know why the product
failed, contact an Application Engineer or Product Manager. All RMA’s require:
• Ship to address • Bill to address
• Contact name • Phone number
• Method of return shipment • Your P.O. number
• Detailed description of the problem • Any special instructions
• Name and phone number of person returning the product.
2. Prior approval and an RMA number, from the Customer Service Department, is needed
when returning any unused product for credit. Make sure the RMA number is on the outside
of the carton and on all paperwork returned. Ship on a Freight Prepaid basis.
3. After we receive your return, we will examine it and try to verify the reason for returning it.
4. In cases of manufacturing defect, we will enter a repair order, replacement order or issue
credit for material returned. In cases of customer mis-use, we will provide repair costs and
request a purchase order to proceed with the repair work.
5. To return products that are not defective, goods must be be in new condition, in the orig-
inal boxes and they must be returned within 120 days of receipt. A 20 percent restocking
charge is applied for all returned stock controls and accessories.
6. If the unit is unrepairable, you will receive a letter of explanation. and be given the
option to have the unit returned to you at your expense or to have us scrap the unit.
7. Watlow reserves the right to charge for no trouble found (NTF) returns.
The Series SD31 User’s Manual is copyrighted by Watlow Winona, Inc., © December 2004
with all rights reserved.
ç
CAUTION or
WARNING
Ó
Electrical
Shock Hazard
CAUTION or WARNING

Watlow Series SD31 ■ 1 ■ Table of Contents
Chapter 1: Overview . . . . . . . . . . . . . . . . . . . . . . . . . .2
Chapter 2: Install and Wire . . . . . . . . . . . . . . . . . . . . .4
Chapter 3: Keys and Displays . . . . . . . . . . . . . . . . .14
Home Page Overview . . . . . . . . . . . . . . . . . . . . . .15
Adjusting the control set point . . . . . . . . . . . . . . . .15
Operations Page Overview . . . . . . . . . . . . . . . . .16
Setup Page Overview . . . . . . . . . . . . . . . . . . . . . .17
Programming Page Overview . . . . . . . . . . . . . . . .18
Factory Page Overview . . . . . . . . . . . . . . . . . . . . .18
Chapter 4: Home Page . . . . . . . . . . . . . . . . . . . . . . .19
Chapter 5: Setup Page . . . . . . . . . . . . . . . . . . . . . . .21
Chapter 6: Operations Parameters Table . . . . . . . .29
Chapter 7: Programming Page . . . . . . . . . . . . . . . . .34
Chapter 8: Countdown Timer . . . . . . . . . . . . . . . . . .36
Chapter 9: Factory Page and Calibration . . . . . . . .43
Chapter 10: Features . . . . . . . . . . . . . . . . . . . . . . . . .48
Saving and Restoring User Settings . . . . . . . . . . .49
Operations Page . . . . . . . . . . . . . . . . . . . . . . . . . .49
Autotuning . . . . . . . . . . . . . . . . . . . . . . . . . . . . . .49
Manual Tuning . . . . . . . . . . . . . . . . . . . . . . . . . . . .50
Inputs . . . . . . . . . . . . . . . . . . . . . . . . . . . . . . . . . . .50
Control Methods . . . . . . . . . . . . . . . . . . . . . . . . . .52
Alarms . . . . . . . . . . . . . . . . . . . . . . . . . . . . . . . . . .56
Communications . . . . . . . . . . . . . . . . . . . . . . . . . .58
Troubleshooting . . . . . . . . . . . . . . . . . . . . . . . . . . .60
Error Messages . . . . . . . . . . . . . . . . . . . . . . . . . . .62
Appendix . . . . . . . . . . . . . . . . . . . . . . . . . . . . . . . . . . .63
Specifications . . . . . . . . . . . . . . . . . . . . . . . . . . . . .63
Ordering Information . . . . . . . . . . . . . . . . . . . . . . .65
Index . . . . . . . . . . . . . . . . . . . . . . . . . . . . . . . . . . .66
Prompt Index . . . . . . . . . . . . . . . . . . . . . . . . . . . . .68
Declaration of Conformity . . . . . . .Inside Back Cover
TC
Table of Contents

Watlow Series SD31 ■ 2 ■ Chapter 1 Overview
The Watlow Series SD31 PID, is a microprocessor-
based temperature controller available in the 1/32 DIN
panel mount size. The Series SD31 has a single, uni-
versal input that accepts various thermocouples, RTDs
(resistive temperature devices) or process inputs. (See
the Specifications in the Appendix for further details).
The Series SD31 PID controller offers up to two
outputs. Outputs can be configured as heat, cool, timer,
retransmit, alarm or off (deactivated). The control out-
puts can be independently configured for PID or On-
Off control. PID settings include proportional band, re-
set (or integral) and rate (or derivative).
Standard Series SD31 features include an IP65/
NEMA 4X front panel rating; CE compliance, UL,
CUL, CSA and NSF agency approvals: single, four-digit
displays in red or green; autotuning for heat and cool
outputs; ramp to set point, to gradually warm up your
thermal system; and automatic/manual capability with
bumpless transfer. A low-voltage model is also avail-
able.
Advanced features include Modbus, EIA-485 serial
communications to interface with PC software applica-
tions; and INFOSENSE™ technology that provides
low-cost, high-accuracy thermal sensing.
Other operator-friendly features include LED indi-
cators to aid in monitoring and setting up the con-
troller, as well as a calibration offset at the front panel.
The Watlow Series SD31 automatically stores all infor-
mation in non-volatile memory and provides an addi-
tional back-up for user-selected settings.
For more information on these and all other product
features, refer to the Features Chapter and the Appen-
dix.
Features and Benefits
INFOSENSE™ Technology
• Improves sensor accuracy by a minimum of 50%.
User Definable Menu System
• Simplifies operator interface
User Definable Default Settings
• Restores to user defined controller settings
Advanced Control Algorithm
• Improved process control.
WATVIEW™ Software
• Operation, configuration and data logging with a
standard Windows
®
PC.
Up to Two Outputs
• Application versatility.
• Configuration flexibility.
Ramp to Set Point
• Controls the rate of temperature changes.
Countdown Timer
• Optional countdown timer
Overview
1
Control In
p
u
t
p
Out
p
ut
1
C
ontrol or Alar
m
Out
p
ut
2
Control
,
Alarm or Communication
s
p
p
Figure 2 — Series SD31 inputs and outputs.

Watlow Series SD31 ■ 3 ■ Chapter 1 Overview
How to use the Series SD31 controller
Before you use your Series SD31 controller, it must
be installed and configured correctly. Which setup
steps you need to perform will depend on how
you will use it.
If you purchased the controller to design into
your products:
You will need to do the first three steps and maybe
some of the fourth step. Some wiring, such as the final
wiring of a communications connection or an alarm
output for signaling an external device, might be left to
the end user. In highly specialized applications with lit-
tle variation in operation and heat load, the OEM
might configure almost all the parameters.
If you purchased the controller to design and in-
stall into new equipment for your own use or to
retrofit into existing equipment:
You will need to complete all four steps.
If you purchased the controller installed in
equipment designed around it:
You will probably only need to do the fourth step. In
some instances, you may need to wire it for serial com-
munications and/or an alarm output. Some serial com-
munications parameters on the Setup Page may need
to be changed.
Step 1: Mount and install the controller.
The Series SD31 controller is designed to be panel
mounted in a standard DIN opening. It is a 1/32 DIN
size controller. Cut the correct size hole into the panel
and mount the controller, using its mounting brackets.
See Chapter Two for details on installation and mount-
ing.
If you retrofit the Series SD31 controller into an ex-
isting application, you may need to use a Watlow
adapter plate to adapt it to the smaller controller size.
Step 2: Wire the controller.
The controller will need to have its power, input and
output wiring installed. The wiring depends on the spe-
cific model number of the Series SD31 controller. The
dimension illustrations in Chapter Two show the loca-
tion of the model number. Use the model number to de-
termine which wiring diagrams to follow for your con-
troller. See Chapter Two for wiring details.
Step 3: Configure the Setup Page.
Setup Page parameters tell the controller what in-
put and output devices are wired to the controller and
how the controller should function. Without the proper
Setup Page settings, the controller will not operate or
could operate erratically. Since these settings require
detailed knowledge on the wiring and operation of the
equipment, the OEM or the designer normally pro-
grams these parameters. Some settings, such as the
baud rate or controller address, are Setup Page param-
eters, but would probably be set by the end user.
These settings should be recorded for future refer-
ence. The settings can also be stored using the [Us;rS]
parameter, on the Factory Page. For saving and restor-
ing parameters, see Chapter Eight, Features. For de-
tails on configuring the Setup Page, see Chapter Five,
Setup Page.
Step 4: Configure the Operations Page.
The Operations Page contains the parameters that
the equipment operator may need to set or change from
time to time. This includes calibration offset, autotune,
PID parameters and alarm set points. In some cases
the OEM manufacturer may set most of these parame-
ters because the equipment operates with little varia-
tion (i.e., always the same temperature, always the
same heat load). In equipment where demands could
vary significantly, the OEM may leave parameter ad-
justments to the end user (i.e., many different tempera-
ture settings, different heat loads).
The Operations Page on the Series SD31 controller
is customizable so that only the parameters that the
operator may need to use will appear in the display.
Settings that won’t need to be adjusted can be hidden
from the operator, using the Programming Page. For
more details on the Programming Page, see Chapter
Eight, Features. For details on configuring parameters
on the Operations Page, see Chapter Six, Operations
Parameters Tables. Once you have verified the con-
troller is operating properly, be sure to document all of
your parameter settings. Each parameter table has
a settings column for you to write in your values.

ç
Caution: Follow the installa-
tion procedure exactly to
guarantee a proper IP65/NE-
MA 4X seal. Make sure the
gasket between the panel
and the rim of the case is not
twisted and is seated proper-
ly. Failure to do so could re-
sult in damage to equipment.
Note: Contact your local Green-
lee supplier for the appropriate
punch kit and cutout tools re-
quired for rapid mounting.
To remove spring clamp con-
nector, pull straight back.
To remove screw clamp con-
nector, pull straight up.
Spring clamp wiring connec-
tor note:
To insert the wire, push the
wire into the desired connec-
tion number, and it should
automatically lock into place.
To remove the wire, press
and hold the orange release
tab with a small screwdriver.
Pull the wire out of the con-
nection. Solid or tinned wire
recommended.
Watlow Series SD31 ■ 4 ■ Chapter 2 Install and Wire
Install and Wire
2
Series SD31 Controller Dimensions
100.9 mm
(3.98 in)
Ridges
Tabs with Teeth
Model Number
Customer Front Panel
0.48 mm (0.019 in) maximum gap between
controller front and customer front panel
8.6 mm
(0.34 in)
Front
Top
Back
Figure 4a — Dimensions
30.7 mm
(1.21 in)
53.6 mm
(2.11 in)
12.7 mm
(0.50 in)
minimum
45.0 to 45.6 mm
(1.77 to 1.79 in)
Panel Cutout
Panel Thickness
1.5 to 9.5 mm
(0.060 to 0.375 in)
22.2 to 22.5 mm
(0.87 to 0.89 in)
12.7 mm
(0.50 in)
minimum
SET
SET
47.2 mm
(1.86 in)
29.3 mm
(1.15 in)
Figure 4c — SD31 with other
than a Universal Process Output
installed for output 1
(S D 3 1 - _ (C,K or J) _ _ - _ _
_ _).
Figure 4b — SD31 with a Uni-
versal Process Output installed
for output 1
(S D 3 1 - _ F _ _ - _ _ _ _).
1
2
3
4
56
8 9
10 11
1
2
3
4
8
9 10
11
5
6
7
Series SD31 — Wiring Connectors
NOTE: The SD31 model number determines which con-
nector diagram applies to your unit.
Screw clamp
connnector
Spring clamp
connnector

Watlow Series SD31 ■ 5 ■ Chapter 2 Install and Wire
Installing the Series SD31 Controller
1. Make the panel cutout using the mounting template dimensions in this chapter.
2. Check that the rubber gasket lies in its slot at the back of the bezel. Insert the
controller into the panel cutout.
3. While pressing the bezel firmly against the panel, slide the mounting bracket
over the back of the controller.
4. If the installation does not require an IP65/NEMA 4X seal, slide the bracket
up to the back of the panel enough to eliminate the spacing between the gas-
ket and the panel.
For an IP65/NEMA 4X seal, use your thumb to lock the tabs into place while
pressing the controller from side to side. Don’t be afraid to apply enough pres-
sure to properly install the controller. If you can move the controller back and
forth in the cutout, you do not have a proper seal. The tabs on each side of the
bracket have teeth that latch into the ridges.
Each tooth is staggered at a different depth (from the front) so only one of the
tabs on each side is ever locked into the ridges at any time. Either the two
middle tabs or the two tabs diagonal from each other will be engaged.
5. If the matching tabs are not engaged, you do not have an IP65/NEMA 4X seal.
The space between the bezel and panel must be 0 to 0.48 mm (0 to 0.019 in)
maximum.
Removing the SD31 Controller
1. Remove the terminal cover and all the wiring connectors from the back of the
controller.
2. Slide a thin, wide tool (putty knife) under all three mounting tabs on the top
and then the bottom, while pushing forward on the back of the case. Be ready
to support the controller as it slides out of the panel cutout.
IP65/NEMA 4X
Seal Example
Gasket
Bezel
Panel
Mounting
Bracket
Mounting Tab
Mounting Ridge
Case
Arrows indicate the
direction of pull to
remove the
connectors.
ç
Caution: Follow the installa-
tion procedure exactly to
guarantee a proper IP65/NE-
MA 4X seal. Make sure the
gasket between the panel
and the rim of the case is
not twisted and is seated
properly. Failure to do so
could result in damage to
equipment.

Watlow Series SD31 ■ 6 ■ Chapter 2 Install and Wire
Ó
Warning:
Use National Electric (NEC) or
other country-specific standard
wiring and safety practices when
wiring and connecting this con-
troller to a power source and to
electrical sensors or peripheral
devices. Failure to do so may re-
sult in damage to equipment and
property, and/or injury or loss of
life.
Spring clamp wiring connector
note:
To insert the wire, push the wire
into the desired connection num-
ber, and it should automatically
lock into place. To remove the
wire, press and hold the orange
release tab with a small screw-
driver. Pull the wire out of the
connection. Solid or tinned wire
recommended.
Ó
WARNING: If high voltage is ap-
plied to a low-voltage controller,
irreversible damage will occur.
Wiring the Series SD31
The model number for each output option appears with its wiring dia-
gram. Check the label on the controller and compare your model number to
those shown here and to the model number breakdown in the Appendix of
this manual.
The connectors on the back of the Series SD31 are different for different
model numbers. See page 4. Where two different combinations of connectors
may appear, we show both in the diagrams.
All outputs are referenced to a de-energized state.
All wiring and fusing must conform to the National Electric Code and to
any locally applicable codes as well.
Figure 6a — High Voltage AC Power Wiring
SD31 - H _ _ _ - _ _ _ _ High
• Nominal voltage: 100 to 240VÅ (ac)
Figure 6b — Low Voltage AC Power Wiring
SD31 - L _ _ _ - _ _ _ _ Low
• Nominal voltage: 24‡ (ac/dc)
• Class 2 power source required for agency compliance
1
2
-
+
1
2
3
1
2
1
2
3
Isolation Blocks
Electrical isolation exists between each of these blocks.
Relay outputs (mechanical and solid-state) provide isolation through their
relay contacts. Each relay output is isolated from the blocks above and is
isolated from other relay outputs.
Sensor Input
Switched DC Outputs
Analog Process Outputs
Power Supply Input EIA/TIA-485 Communi-
cations Input

ç
Warning:
Use National Electric (NEC) or
other country-specific standard
wiring and safety practices when
wiring and connecting this con-
troller to a power source and to
electrical sensors or peripheral
devices. Failure to do so may re-
sult in damage to equipment and
property, and/or injury or loss of
life.
Spring clamp wiring connector
note:
To insert the wire, push the wire
into the desired connection num-
ber, and it should automatically
lock into place. To remove the
wire, press and hold the orange
release tab with a small screw-
driver. Pull the wire out of the
connection. Solid or tinned wire
recommended.
Note: To prevent ground loops,
isolation needs to be maintained
from input to output when using
switched DC or analog process
outputs.
ç
WARNING: Process input may
not have sensor break protec-
tion. Outputs can remain full on.
Watlow Series SD31 ■ 7 ■ Chapter 2 Install and Wire
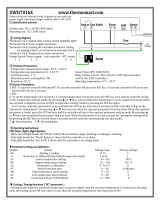
Figure 7a — Thermocouple Input
(all model numbers)
Thermocouples are polarity sensitive. The negative lead (usually red) must be
connected to terminal 11.
• Input impedance: >20 MΩ
Figure 7b — RTD Input (100
ΩΩ
DIN curve 0.00385
ΩΩ
/
ΩΩ
/°C)
(all model numbers)
Terminals 8 and 11 must be shorted for a two-wire RTD. For three-wire RTDs,
the S1 lead (usually white) must be connected to terminal 10.
• Nominal excitation current: 390 µA
Figure 7c — 0 to 10V
ÎÎ
(dc) Process Input
(all model numbers)
• Input impedance 20 kΩ, dc only
Figure 7d — 0 to 50mV
ÎÎ
(dc) Process Input
(all model numbers)
• Input impedance >20 MΩ, dc only
3
4
8
9 10
11
5
6
7
9
11
6
8 9
10 11
9
11
+
-
3-wire RTD
6
8 9
10 11
S1 10
S3 11
S2 8
4
8
9 10
11
5
6
7
10
11
8
2-wire RTD
6
8 9
10 11
S1 10
11
S2 8
4
8
9 10
11
5
6
7
10
11
6
8 9
10 11
+10
-11
4
8
9 10
11
5
6
7
10
11
6
8 9
10 11
10
11
+
-

Watlow Series SD31 ■ 8 ■ Chapter 2 Install and Wire
Figure 8a — 0 to 20 mA Process Input
(all model numbers)
• Input impedance 100 Ω, dc only
• Controller does not supply power for the current loop
Figure 8b — Output 1 Mechanical Relay
SD31 - _ J _ _ - _ _ _ _
• Form A contact
• 2 A, resistive
• 125 VA pilot duty, 120/240VÅ (ac), inductive
• See Quencharc note
• 240VÅ (ac) maximum
• 30VÎ (dc) maximum
• For use with ac or dc
• Minimum load current 10 mA
• Output does not supply power
Figure 8c — Output 1 Solid-state Relay
SD31 - _ K _ _ - _ _ _ _
• Form A contact
• 0.5 A maximum, resistive
• 20 VA pilot duty, 120/240VÅ (ac), inductive
• See Quencharc note
• 24 to 240VÅ (ac)
• Minimum load current 10 mA
• Maximum leakage current 100 µA
• Not for use with direct current (dc)
• Output does not supply power
Internal Circuitry
COM.
N.O.
Solid-state Relay
5
6
Solid-state Switch
4
56
normally open 6
common 5
Internal Circuitry
COM.
N.O.
Mechanical Relay
5
6
4
56
normally open 6
common 5
8
9 10
11
5
6
7
+
+
-
-
Transmitter
Power
Supply
Two Wire Transmitter Wiring
8
11
+
-
4
8
9 10
11
5
6
7
8
11
6
8 9
10 11
8
11
+
-
ç
WARNING: Process input may
not have sensor break protec-
tion. Outputs can remain full on.
ç
Warning:
Use National Electric (NEC) or
other country-specific standard
wiring and safety practices when
wiring and connecting this con-
troller to a power source and to
electrical sensors or peripheral
devices. Failure to do so may re-
sult in damage to equipment and
property, and/or injury or loss of
life.
Quencharc Note:
Switching pilot duty inductive
loads (relay coils, solenoids,
etc.) with the mechanical relay
or solid-state relay output op-
tions requires use of an R.C.
suppressor.
Watlow carries the R.C. sup-
pressor Quencharc brand name,
which is a trademark of ITW
Paktron. Watlow Part No. 0804-
0147-0000.
Spring clamp wiring connector
note:
To insert the wire, push the wire
into the desired connection num-
ber, and it should automatically
lock into place. To remove the
wire, press and hold the orange
release tab with a small screw-
driver. Pull the wire out of the
connection. Solid or tinned wire
recommended.

Watlow Series SD31 ■ 9 ■ Chapter 2 Install and Wire
Figure 9a — Output 1 Switched DC
SD31 - _ C _ _ - _ _ _ _
• Supply current 30 mAÎ (dc) maximum
• Supply voltage 6 to 12VÎ (dc)
• Not recommended for switching mechanical relays
• Output supplies power
Figure 9b — Output 1 Process
SD31 - _ F _ _ - _ _ _ _
• Analog output is scalable between 0 to 10VÎ (dc) or 0 to 20 mAÎ (dc)
• Load capability: voltage 1 kΩ minimum; current 800 Ω maximum
• Output supplies power
• Cannot use voltage and current output at the same time
Figure 9c — Output 2 Mechanical Relay
SD31 - _ _ J _ - _ _ _ _
• Form A contact
• 2 A, resistive
• 125 VA pilot duty, 120/240VÅ (ac), inductive
• See Quencharc note
• 240VÅ (ac) maximum
• 30VÎ (dc) maximum
• For use with ac or dc
• Minimum load current 10 mA
• Output does not supply power
Internal Circuitry
COM.
N.O.
Mechanical Relay
3
4
2
3
4
3
4
normally open
common
4
8
5
6
7
volts+ 6
com- 7
amps+ 5
Internal Circuitry
dc-
dc+
Load
Switched DC
-
+
5
6
4
56
5
6
dc+
dc-
ç
Warning:
Use National Electric (NEC) or
other country-specific standard
wiring and safety practices when
wiring and connecting this con-
troller to a power source and to
electrical sensors or peripheral
devices. Failure to do so may re-
sult in damage to equipment and
property, and/or injury or loss of
life.
Note: To prevent ground loops,
isolation needs to be maintained
from input to output when using
switched DC or analog process
outputs.
Quencharc Note:
Switching pilot duty inductive
loads (relay coils, solenoids,
etc.) with the mechanical relay
or solid-state relay output op-
tions requires use of an R.C.
suppressor.
Watlow carries the R.C. sup-
pressor Quencharc brand name,
which is a trademark of ITW
Paktron. Watlow Part No. 0804-
0147-0000.
Spring clamp wiring connector
note:
To insert the wire, push the wire
into the desired connection num-
ber, and it should automatically
lock into place. To remove the
wire, press and hold the orange
release tab with a small screw-
driver. Pull the wire out of the
connection. Solid or tinned wire
recommended.

ç
Warning:
Use National Electric (NEC) or
other country-specific standard
wiring and safety practices when
wiring and connecting this con-
troller to a power source and to
electrical sensors or peripheral
devices. Failure to do so may re-
sult in damage to equipment and
property, and/or injury or loss of
life.
Quencharc Note:
Switching pilot duty inductive
loads (relay coils, solenoids,
etc.) with the mechanical relay
or solid-state relay output op-
tions requires use of an R.C.
suppressor.
Watlow carries the R.C. sup-
pressor Quencharc brand name,
which is a trademark of ITW
Paktron. Watlow Part No. 0804-
0147-0000.
Note: To prevent ground loops,
isolation needs to be maintained
from input to output when using
switched DC or analog process
outputs.
Figure 10a — Output 2 Solid-state Relay
SD31 - _ _ K _ - _ _ _ _
• Form A contact
• 0.5 A maximum, resistive
• 20 VA pilot duty, 120/240VÅ (ac), inductive
• See Quencharc note
• 24 to 240VÅ (ac)
• Minimum load current 10 mA
• Maximum leakage current 100 µA
• Not for use with direct current (dc)
• Output does not supply power
Figure 10b — Output 2 Switched DC
SD31 - _ _ C _ - _ _ _ _
• Maximum supply current 30 mAÎ (dc)
• Supply voltage 6 to 12VÎ (dc)
• Not recommended for switching mechanical relays
• Output supplies power
Figure 10c — Output 2 EIA/TIA-485
SD31 - _ _ U _ - _ _ _ _
• Isolated [50 VÎ (dc)]
• Half duplex
• For more communications information, see the Features chapter
2
3
4
T+/R+ 3
T-/R- 4
Internal Circuitry
dc-
dc+
Load
Switched DC
-
+
3
4
2
3
4
dc+ 3
dc- 4
Internal Circuitry
COM.
N.O.
Solid-state Relay
3
4
Solid-state Switch
2
3
4
3
4
normally open
common
Watlow Series SD31 ■ 10 ■ Chapter 2 Install and Wire

Watlow Series SD31 ■ 11 ■ Chapter 2 Install and Wire
When choosing an EIA/TIA 232 to 485 converter, look for
one with the following features:
Two-wire capability
EIA/TIA-485 can be implemented as a two-wire sys-
tem or a four-wire system. Most Watlow controllers,
including the Series SD31, use two-wire communica-
tions when working with EIA/TIA-485. The converter
selected must have a two-wire mode. Some convert-
ers can only be used in a four-wire mode.
Automatic Send Data control
In a two-wire system, both the transmitted signals
and the received signals travel over the same pair of
wires, so the converter must have a method of chang-
ing from the transmit mode to the receive mode.
Some converters require the toggling of a control line
(usually the RTS line) to perform this transition,
while others use an automatic timing circuit. The
toggling method is dependent on the PC software to
toggle the control line and the PC’s operating system
to make that transition happen in a timely manner.
Because of these dependencies, the best choice for a
converter is one with automatic control.
Isolation
Converters are available with or without input-to-
output isolation. An isolated converter is not a re-
quirement when used with the Series SD31, but it is
recommended to avoid ground loops. Isolation could
be a consideration when the Series SD31 will be
used on a network with other devices that may re-
quire isolation.
Power Supply
Many converters can be powered up either through
the signals of a serial port or through an external
power supply. Because some computers, such as lap-
tops, do not always provide enough power to supply
the converter, we recommend using an external pow-
er supply with specifications as recommended by the
converter manufacturer. Isolated converters may re-
quire two supplies.
Biasing and termination
If the system does not work properly, it may need
termination resistors at each end of the network. A
typical installation would require a 120-ohm resistor
across the transmit/receive terminals (3 and 4) of the
last controller in the network and the converter box.
Pull-up and pull-down resistors may be needed at
the converter to maintain the correct voltage during
the idle state. The pull-up resistor is connected be-
tween the positive of the DC supply and the T+/R+
terminal. The pull-down resistor is connected be-
tween the negative of the DC supply and the T-/R-
terminal.
Selecting an EIA/TIA-232 to EIA/TIA-485 Converter
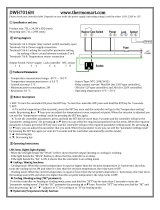
Figure 11a — B&B Converters
Non-Isolated Converter - 485SD9TB
B&B Electronics Manufacturing Company,
(815) 433-5100, http://www.bb-elec.com/
Figure 11b — B&B Converters
Isolated Converter - 4850I9TB
B&B Electronics Manufacturing Company,
(815) 433-5100, http://www.bb-elec.com/
Figure 11c — Wiring bias and termination resistors.
Controllers must be wired in a daisy chain configuration.
Add a 120
ΩΩ
termination resistor on the last controller.
B
A
GND
T+/R+
T-/R-
SD
SD SD
EIA/TIA 485
Converter
Power Supply
DC
3
3
3
44
4
485OI9TB
RS-232
RS-485
TD(B)
RD(A)
RD(B)
GND
+12VDC
TD(A)
+
-
120V (ac)
T-/R-
T+/R+
4
3
Watlow p/n 0830-0473-0002Watlow p/n 0803-0473-0005
12 Volt
Power
Supply
T-/R-
TD (A)
TD (B)
T+/R+
120VÅ (ac)
Power
Supply
+
–
GND
4
3
485SD9TB
GND
12VÎ (dc)
Watlow p/n 0830-0473-0002
Watlow p/n 0830-0473-0001
6 ft. comms cable -
Watlow p/n 0830-0473-0003

Watlow Series SD31 ■ 12 ■ Chapter 2 Install and Wire
Ethernet Gateway
The EM00-GATE-0000 is a bridge that allows up
to 32 Watlow controllers to be directly connected to
an Ethernet network.
The gateway provides a bridge for Modbus mes-
sages between the Ethernet bus and EIA-485 or
EIA-232 links. The Gateway supports full product
configuration monitoring and configuration of run-
time parameters via MODBUS TCP over TCP/IP
using a software package such as Watlow’s
WATVIEW™.
The Series SD31 can be configured using
WATVIEW with or without the EM Gateway.
For more information, go to www.watlow.com and
search on EM Gateway.
Figure 12a — Connecting to the Watlow EM Gateway
(Ethernet to EIA/TIA 485 Serial Modbus connection).
Controllers must be wired in a daisy chain configuration.
Note: UL Approved, Class 2, power supply required as EM
Gateway power source: 24VÎ (dc), part 0830-0474-000.
T+/R+
T-/R-
3
4
Ethernet
RJ45
24Võ (ac/dc)

Watlow Series SD31 ■ 13 ■ Chapter 2 Install and Wire
Notes:

Watlow Series SD31 ■ 14 ■ Chapter 3 Keys and Displays
Keys and Displays
3
Note: After 60 seconds with no key presses, the controller reverts to the Home Page.
SET
1
2
%
RDY
SDXX
Four Digit, LED Display:
• Indicates process value or
set point information
or
• Page name, prompt name
or prompt value, depend-
ing upon the key combi-
nation pressed.
Timer Indication (timer
option only)
Colon indicates status of
timer.
Active Output
Indicator Lights
Lit when the correspon-
ding controller output or
alarm is on.
Ready Status Indica-
tor Light (timer op-
tion only)
Lit when the correspon-
ding controller output is
on.
Auto-Manual Control
Indicator Light
On: Manual Mode (open-
loop control)
Off: Auto Mode (closed-
loop control)
Set Key
Press to view set point, process or
parameter values, depending on
[~dsp} setting. Release ß Key
to view page or parameter informa-
tion.
Infinity Key
Returns to the Home Page.
Press and hold the Infinity Key ˆ
for about 2 seconds to enter the
Operations Page.
Clears latching alarms.
Up and Down Keys
On the Home Page, adjusts the set
point (you may need to press and
hold the ß Key depending on
[~dsp} setting).
On other pages, selects parame-
ters, or allows changing parameter
values when ß Key is pressed.

Watlow Series SD31 ■ 15 ■ Chapter 3 Keys and Displays
Home Page Overview
The Home Page is the default display of the Series
SD31 controller. The Home Page can be configured to
display either the process value or set point value. (see
the {~Dsp} prompt on the Setup Page.) This parameter
determines what parameters and values are displayed.
Automatic Mode
The % indicator light is off.
Manual Mode
The % indicator light is on.
Error condition
The % indicator light is on. If the controller was in Auto mode it will
switch to Manual mode when it detects an input error.
Alarm Message
During Ramping
The display alternates between the current set point achieved in the
ramp, the actual process value and the target set point. The prompt
appears in the display first and then the value for that prompt.
To change the target set point value, press and hold the ß Key
and adjust the set point value using the UP ¿ or DOWN ¯Keys.
Once the current set point reaches the target set point value, the
ramp is complete and the display stops alternating.
* Appears if [~dsp] = [~pro]. If [~dsp] = [~set], press the
ß Key to view this parameter.
** Appears if [~dsp] = [~pro]. If [~dsp] = [~set], you do not
need to press the
ß Key to view this parameter.
Note: See Timer chapter for additional displays available with the
timer option.
**Current
set point
prompt
**Current
set point
value
*Current
process
prompt
*Current
process
value
**Target
set point
prompt
**Target
set point
value
[``rP]->[``75]->[proc]->[`~72]->[rP;tg]->[`100]
* [A1;Lo]->[``75] Actual temperature
**Press ß Key [A1;Lo]->[``80] Set point value
Alarm message alternates with set point or process val-
ue (auto mode) or power setting (manual mode).
The corresponding output indicator light is on.
* [Er;In] Error message
**Press ß Key [``0;0] Output power setting (Use Up
¿ or Down ¯ keys to raise or
lower the set point.)
* [``75] Actual temperature
**Press ß Key [``0;0] Output power setting (Use Up
¿ or Down ¯ keys to raise or
lower the set point.)
* [``75] Actual temperature
**Press ß Key [``75] Set point value
(Use Up ¿ or Down ¯ keys to
raise or lower the set point.)
%
Adjusting the control set point
The controller must be in automatic mode. Adjust the
control set point on the Home Page. It is not necessary to
enter any other page. With [~dsp] = [~pro] (on Setup
Page), the process temperature appears in the display.
Press and hold the ß Key to display the control set
point.
To adjust the set point:
1. Ensure the controller is in the automatic mode and
that you are on the Home Page. If you are on any
other page, press the Infinity Key ˆ.
2. The process temperature is displayed in the display
window. Press and hold the ß Key, and use the
Up Key ¿ to increase the set point or press the
Down Key ¯ to decrease the set point value.
3. The controller will automatically begin using the
new set point after three seconds. or press the Infini-
ty Key ˆ to immediately use the new value.
With [~dsp] = [~set] (on Setup Page), the control set
point appears in the display, if the controller is in the au-
tomatic mode.
To adjust the set point:
1. Ensure the controller is in the automatic mode and
that you are on the Home Page. If you are on any
other page, press the Infinity Key ˆ.
2. The temperature set point is displayed in the dis-
play window. Press the Up Key ¿ to increase the
temperature. Press the Down Key ¯ to decrease the
temperature.
3. The controller will automatically begin using the
new set point after three seconds. or press the Infini-
ty Key ˆ to immediately use the new value.
Note: The [`lOC] parameter can lock the ability to adjust the set
point. If you are unable to adjust the set point, check [`lOC] set-
ting on the Setup Page.
Note: To stop the Series SD31 controller from controlling to a set
point, press and hold the
ßKey and press the DOWN ¯Key until
the set point value displays [`OFF]. A set point value of one less
than the SP Low value turns the control outputs off and the controller
will no longer attempt to maintain a set point.
ç
Caution:
The controller is in the manual mode when the percent LED %
is lit. If the controller is in the manual mode, the manual out-
put power value is displayed in place of the automatic mode
control set point. Setting this value can force an output to stay
on regardless of the temperature reading. Always ensure you
are in the automatic mode when adjusting the temperature
set point value.

Watlow Series SD31 ■ 16 ■ Chapter 3 Keys and Displays
Operations Page Overview
The Operations Page contains parameters accessed during
normal day-to-day operation. The Series SD31 provides a
patented user-definable menu system, allowing the user to
customize the Operations Page contents.
To go to the Operations Page, press and hold the Infinity
Key ˆ for about three seconds from the Home Page.
• Press the Down ¯ or Up ¿ keys to move through the
Operations Page parameters.
• To view or change a parameter value, press and hold
the ß Key.
• Press the Down ¯ or Up ¿ keys to change the parame-
ter value.
• Press the Infinity Key ˆ at any time to return to the
Home Page.
Operations Page
With Timer Option / Without Timer Option (typical de-
faults)
Note: Hardware configuration and programming selections determine
what parameters appear on the Operations Page. A maximum of 20 pa-
rameters can be defined on the Operations Page.
[hour] Countdown Timer Hours / [Po;ht] Power Heat
[Min] Countdown Timer Minutes / [A-m] Auto-Manual
[~Sec] Countdown Timer Seconds / [~Aut] Autotune
[~rdy] Ready Band / [~CAL] Calibration Offset
[Ct;SP] Closed Loop Timer Set Point / [ht;m] Heat Con-
trol Method
[Po;ht] Power Heat / [Pb;ht] Proportional Band Heat
[~Aut] Autotune / [re;ht] Reset Heat
[~CAL] Calibration Offset / [ra;ht] Rate Heat
[ht;m] Heat Control Method / [h;hyS] Heat Hysteresis
[Pb;ht] Proportional Band Heat / [CL;M] Cool Control
Method
[re;ht] Reset Heat / [Pb;CL] Proportional Band Cool
[ra;ht] Rate Heat / [rE;CL] Reset Cool
[CL;M] Cool Control Method / [rA;CL] Rate Cool
[Pb;CL] Proportional Band Cool / [C;hyS] Cool Hysteresis
[rE;CL] Reset Cool / [A1;hi] Alarm 1 High
[rA;CL] Rate Cool / [A1;Lo] Alarm 1 Low
[A1;hi] Alarm 1 High / [A2;hi] Alarm 2 High
[A1;Lo] Alarm 1 Low / A2;Lo] Alarm 2 Low
[A2;hi] Alarm 2 High / [none] No selection
[A2;Lo] Alarm 2 Low / [none] No selection
¯
[Oper]

Watlow Series SD31 ■ 17 ■ Chapter 3 Keys and Displays
[Ot`1] Output 1 Function
[Ctr1] Control Method 1
[Ftb1] Fixed Time Base 1
[PL`1] Power Limit 1
[PSL1] Output Power Scale Low 1
[PSh1] Output Power Scale High 1
[nLF1] Output Non-linear Function 1
[AO1;U] Analog Output 1 Units
[O1;Lo] Analog Output 1 Scale Low
[O1;hi] Analog Output 1 Scale High
[r1;So] Output 1 Retransmit Source
[r1;Lo] Output 1 Retransmit Low Scale
[r1;Hi] Output 1 Retransmit High Scale
[r1;CO] Output 1 Retransmit Offset
[ti;F1] Output Timer Function 1
[S;M1] Signal Time Minutes 1
[`S;S1] Signal Time Seconds 1
[Ot`2] Output 2 Function
[Ctr2] Control Method 2
[Ftb2] Fixed Time Base 2
[PL`2] Power Limit 2
[PSL2] Output Power Scale Low 2
[PSh2] Output Power Scale High 2
[nLF2] Output Non-linear Function 2
[ti;F2] Output Timer Function 2
[S;M2] Signal Time Minutes 2
[`S;S2] Signal Time Seconds 2
[hyS1] Alarm 1 Hysteresis
[Lgc1] Alarm 1 Logic
[LAt1] Alarm 1 Latching
[SiL1] Alarm 1 Silencing
[dSP1] Alarm 1 Message
[hyS2] Alarm 2 Hysteresis
[Lgc2] Alarm 2 Logic
[LAt2] Alarm 2 Latching
[SiL2] Alarm 2 Silencing
[dSP2] Alarm 2 Message
[ACLF] AC Line Frequency
[Unit] Units of Measurement
[I;Err] Input Error Latching
[FAIL] Input Error Failure Mode
[MAn] Input Error Power
[`dSP] Active Displays
[``rP] Ramp to Set Point Mode
[rP;Sc] Ramp Scale
[rP;rt] Ramp Rate
Addr] Modbus Device Address
[bAud] Baud Rate
[`LOC] Lockout
Setup Page Overview
The Setup Page contains parameters that define
basic controller functions. Go to the Setup Page
for initial configuration or if your application re-
quirements change. Be sure to program the Setup
Page first!
Always press the Infinity Key ˆ to return to the
Home Page.
You must start from the Home Page.
To go to the Setup Page, press both the Up ¿ and
Down ¯ keys for about three seconds.
• Press the Down ¯ or Up ¿ keys to move
through the Setup Page parameters.
• To view a parameter value, press and hold
the ß Key.
• To change a parameter value, press and hold
the ß Key and use the Down ¯ or Up ¿
keys to change the parameter value.
• Press the Infinity Key ˆ at any time to re-
turn to the Home Page.
[`SEt]
¯
Setup Page
[`Sen] Sensor Type
[`Lin] Linearization
[`C-F] Temperature Units
[S;deC] Temperature Decimal Places
[P;dEC] Process Decimal Places
[IS;En] InfoSense Enable
[IS;P1] InfoSense Point 1
[IS;P2] InfoSense Point 2
[IS;P3] InfoSense Point 3
[IS;P4] InfoSense Point 4
[Sc;Lo] Process Scale Low
[Sc;hi] Process Scale High
[P1;LE] Process Input Low Error
[P1;HE] Process Input High Error
[rg;Lo] Units Scale Low
[rg;hi] Units Scale High
[SP;Lo] Set Point Low Limit
[SP;hi] Set Point High Limit
[Ftr;E] Enable Input Filter
[FLtr] Filter Value
[ti;En] Timer Enable
[hour] Countdown Time Hours
[Min] Countdown Time Minutes
[`Sec] Countdown Time Seconds
[ti;St] Timer Start Method
[ti;SP] Timer Set Point
[`rdy] Ready Band
[rdy;L] Ready Light Enable
¯
Note: Hardware configuration and programming selections deter-
mine what parameters appear on the Setup Page.

Watlow Series SD31 ■ 18 ■ Chapter 3 Keys and Displays
Factory Page
[AMb] Ambient Temperature
[A;mn] Minimum Recorded Ambient Temperature
[A;ma] Maximum Recorded Ambient Temperature
[DSPL] Display Intensity
[A;Ot1] Output 1 Process Value
[rESt] Restore Factory Calibration
[Usr;r] Restore User Settings
[USr;S] Save User Settings
[dFLt] Default Parameters
[O;ty1] Output 1 Type
[O;ty2] Output 2 Type
[`S;Id] Software ID
[S;UEr] Software Version
[S;bld] Software Build Number
[PWr] Power Type
[`Sn-] Serial Number 1 (first four digits)
[`Sn_] Serial Number 2 (last four digits)
[tc;50] Thermocouple, 50mV
[tc;00] Thermocouple, 0mV
[tc;32] Thermocouple, 32°F
[`r;15] RTD, 15 ohm
[r;380] RTD, 380 ohm
[``U;1] Input Calibrate, 1.0 Volt
[``U;9] Input Calibrate, 9.0 Volt
[``A;4] Input Calibrate, 4.0 mA
[`A;16] Input Calibrate, 16.0 mA
[O1;1u] Output 1 Calibrate, 1.0 Volt
[O1;9u] Output 1 Calibrate, 9.0 Volt
[O1;4A] Output 1 Calibrate, 4.0 mA
[O1;16] Output 1 Calibrate, 16.0 mA
¯
Factory Page Overview
The Factory Page contains information on diagnostics,
calibration and restore-parameter functions.
To go to the Factory Page, press both the Up ¿ and
Down ¯ keys for about six seconds from the Home
Page.
• Press the Down ¯ or Up ¿ keys to move through
the Factory Page parameters.
• To view a parameter value, press and hold the
ß Key.
• To change a parameter value, press and hold the
ß Key and use the Down ¯ or Up ¿ keys to
change the parameter value.
• Press the Infinity Key ˆ at any time to return to
the Home Page.
Note: Hardware configuration and programming selections deter-
mine what parameters appear on the Factory Page.
[FAct]
Programming Page Overview
The Programming Page determines what parameters
the user wants to appear on the Operations Page. Se-
lect a parameter for any of the 20 Programming Page
locations, P1 to P20. These now appear on the Opera-
tions Page. All 20 locations have parameters selected as
defaults.
To go to the Programming Page, hold down the Infinity
key ˆ, then press the SET Key ß, and hold both
down for about six seconds.
• Press the Down ¯ or Up ¿ keys to move through
the Programming Page parameters, P1-P20.
• To view a parameter value, press and hold the
ß Key.
• To change a parameter value, press and hold the
ß Key and use the Down ¯ or Up ¿ keys to
change the parameter value.
• Press the Infinity Key ˆ at any time to return to
the Home Page.
Note: The hardware configuration and programming selections will
also determine what parameters appear on the Operations Page. A
Programming Page selection will not appear on the Operations
Page if the parameter is not active.
[Prog]
Programming Page
[~~P1] Parameter Location 1 (48)*
[~~P2] Parameter Location 2 (49)
[~~P3] Parameter Location 3 (50)
[~~P4] Parameter Location 4 (51)
[~~P5] Parameter Location 5 (52)
[~~P6 Parameter Location 6 (53)
[~~P7] Parameter Location 7 (54)
[~~P8] Parameter Location 8 (55)
[~~P9] Parameter Location 9 (56)
[~P10] Parameter Location 10 (57)
[~P11] Parameter Location 11 (58)
[~P12] Parameter Location 12 (59)
[~P13] Parameter Location 13 (60)
[~P14] Parameter Location 14 (61)
[~P15] Parameter Location 15 (62)
[~P16] Parameter Location 16 (63)
[~P17] Parameter Location 17 (64)
[~P18] Parameter Location 18 (65)
[~P19] Parameter Location 19 (66)
[~P20] Parameter Location 20 (67)
¯
*Programming Page parameters P1 through P20 are
Modbus register numbers 48 through 67
/