
Arc 24
Addendum to ElliptiGO Owner’s Manual for Processes Specific to the Arc 24

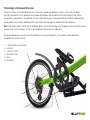
Terminology & Component Overview
6
2
3
45
1 3-SPEED INTERNAL GEARED HUB
2 CLICK BOX
3 8-SPEED CASSETTE
4 REAR DERAILLEUR
5 CHAIN
6 REAR BRAKE
The Arc 24 utilizes a 24 speed drivetrain consisting of an 8-speed rear derailleur system in series with a 3-speed
internally geared hub. The 3 speed hub and 8 speed rear deraileur are controlled via the left and right hand shifters
respectively. In operation the 3 speed hub acts like a triple chainring on a conventional bicycle with the added benefits
of being able to shift without pedaling and the elimination of chain drops associated with front derailleurs.
Note: For the description of each part listed below, please see the Terminology and Component Overview section of your
manual, which starts on Page 7, as well as the Component Overview in this addendum.
The picture below gives an overview of the ElliptiGO® Arc 24 rear components. These names will be referred to
throughout the owner’s manual.
1

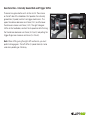
There are two gear selector units on the Arc 24. There is one
on the left side of the handlebars that operates the internally
geared hub (3-speed) and has two trigger mechanisms. The
upper thumb lever decreases resistance (3-2-1) and the lower
thumb lever increases resistance (1-2-3). The right side gear
shifter on the handlebars, controls the 8-speed cassette. Pushing
the thumb lever decreases resistance (8-7-6, etc) and pulling the
trigger finger lever increases resistance (1-2-3-4.etc).
Note: When shifting using the right shift mechanism, you must
pedal to change gears. The left shifter (3-speed internal) can be
used when pedaling or stationary.
Gear Selection – Internally Geared Hub and Trigger Shifter

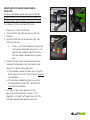
Adjusting the Internally Geared Hub on
the Arc 24
The instructions below are for adjusting the internally
geared hub only. For instructions on how to adjust the
derailleur, please see the section in the owner’s manual.
For a video visit https://youtu.be/Jxaz-HIhk
1. Place the Arc 24 on the kickstand.
2. Using the LEFT side shifter mechanism, shift into
2nd gear.
3. Locate the Click Box on the drive side (right side)
of the rear hub axle.
a. There is a small clear window on the click box
with two painted, parallel yellow lines. In 2nd
gear, the hub is properly adjusted when the
indicator needle is between the two yellow
lines.
4. Stand on the right side of the bike, facing the bike.
Looking at the indicator in the small window, note
where it is in relation to the yellow lines.
a. If the indicator is above the yellow lines, rotate the
barrel adjuster on the LEFT side shifter unit towards
the handlebars.
b. If the indicator is below the yellow lines, rotate
the barrel adjuster on the LEFT side shifter unit
away from the handlebars.
5. Shift from 1st gear to 3rd gear, back to 2nd
gear to ensure the alignment is correct. If the
alignment is still slightly o, repeat step 4 until the
indicator is between both parallel yellow lines.
2 3
3a

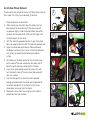
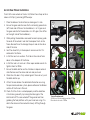
Arc 24 Rear Wheel Removal
1. Place the bike on the kickstand.
2. While standing on the right side of the bike, lean the
bike towards the kickstand to lift the rear wheel o
the ground slightly. Grab the foot platform and rotate
the drive arm forward while shifting into 8th gear (the
smallest cog on the cassette).
3. Shift the internally geared hub into 1st gear (the wheel
does not need to rotate to shift the internally geared hub).
4. Open the rear brake quick release. Please reference
the Brakes section of your Owner’s Manual for detailed
instructions on operating the brake quick release
system.
5. Push down on the black button on the click box and
pull the box o the rear wheel axle. Be careful not to
bend the push rod when removing the click box.
6. Use a 15mm open ended wrench to remove the axle
nuts from both sides of the rear wheel. Remove both
non-turn washers.
7. Lean the bike gently on the kickstand to provide
enough space between the wheel and the ground for
the wheel to drop out of the frame. Push the rear
wheel down and away from the frame.
8. Remove the chain from the cassette so the wheel is
completely free from the bike.
To remove the rear wheel on the Arc 24, follow these steps or
for a video visit https://youtu.be/ndH_XvXoWxw
2
3
5
6
4
8

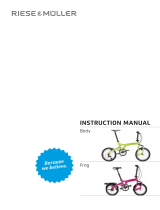
Arc 24 Rear Wheel Installation
1. Place the bike on the kickstand, or leaning on its side.
2. Ensure the gear selector lever for the internally geared hub
(left hand side shifter on the handlebars) is in 1st gear and
the gear selector for the derailleur is in 8th gear (the shifter
on the right side of the handlebars).
3. While pulling the derailleur rearward to create space, guide
the ends of the wheel’s axle into the dropout slots on the
frame. Be careful not to damage the push rod on the drive
side of the axle.
4. Seat the wheel fully in the dropouts and ensure that it is
centered in the frame.
5. Install the non-turn washers. The tab on the washer faces
down in the dropout of the frame.
6. Install the axle nuts and use a 15mm open ended wrench to
tighten them to 30Nm.
7. Ensure the black button on the click box is depressed and
slide the box over the drive-side axle and push rod.
8. When the click box is fully seated against the axle nut, push
the black button up.
9. Attach the rear brakes. For detailed information on using
the quick release brake system, please reference the Brakes
section of the Owner’s Manual.
10. Check that the chain is routed properly and the derailleur
is functioning correctly by leaning the bike against the
kickstand to lift the rear wheel o the ground and then
grabbing the foot platform with your hand and using it to
rotate the drive arm forward while slowly shifting through
the gears.
To install the rear wheel on the Arc 24, follow these steps or for a
video visit https://youtu.be/g2DfPwueajw
Torque Requirements:
Shifter lever for internally gear hub- 5-7Nm
Rear wheel axle nuts- 30 Nm
2
3
7
6
9
-
 1
1
-
 2
2
-
 3
3
-
 4
4
-
 5
5
-
 6
6


Ask a question and I''ll find the answer in the document
Finding information in a document is now easier with AI
Other documents
-
Razor Power A2 User manual
-
Apollo 2013 Owner's Manual & Technical Handbook
-
 Mongoose MULTI SPEED Owner's manual
-
 Avigo DUAL SUSPENSION MOUNTAIN BICYCLES User manual
-
Infinity Mountain Bicycle Owner's manual
-
 Pacific Cycle Mountain Bicycles; BMX Bicycles User manual
-
Schwinn Hollywood User manual
-
 RIESE & MULLER Birdy ab 2013 Owner's manual
-
 Pacific Cycle Bicycle Owner's manual
-
Currier Tech Ezip Owner's manual


