FXH150PSQW

RAB Lighting FXH150PSQW Operating instructions

  • Hello! I am an AI chatbot trained to assist you with the RAB Lighting FXH150PSQW Operating instructions. I’ve already reviewed the document and can help you find the information you need or explain it in simple terms. Just ask your questions, and providing more details will help me assist you more effectively!
Fixture should not be recessed.
LOCATION
FLEX FLOOD
Wall Mount Installation Instructions
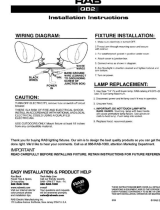
WIRING
All units are factory wired for 120v. If voltages other than 120V are
required, Remove the reflector and rewire for the appropriate voltage.
1. Connect the appropriate BLACK fixture lead to the
(+) LINE supply lead.
2. Connect the WHITE fixture lead to the (-) COMMON
supply lead.
3. Fixture ground wire must be connected to supply ground.
4. All unused leads must be capped and insulated.
IMPORTANT
READ CAREFULLY BEFORE INSTALLING FIXTURE. RETAIN INSTRUCTIONS FOR FUTURE REFERENCE.
RAB fixtures must be wired in accordance with the National
Electrical Code and and all applicable local codes. Proper grounding
is required for safety.
WARNING: MAKE CERTAIN POWER IS OFF BEFORE INSTALLING OR MAINTAINING FIXTURE
LAMP INSTALLATION
Caution:
Prior to installing, check that the lamp is of proper type and wattage. Observe lamp
manufacturer’s recommendations on lamp operation, ballast type and burning positions.
1. Disconnect power. Make sure fixture and lamp are cool enough to touch.
2.
Open fixture by removing the 4 door screws. Swing lens door down on hinges.
3. Insert lamp.
4. Before closing lens door make sure frame gasket is properly seated all around fixture.
5. Close door. Tighten 4 screws.
REPLACEMENT LAMPS:
High Pressure Sodium ANSI Metal Halide ANSI
Wattage Catalog # Code Wattage Catalog # Code
70 LHPS70 S62 50 LMH50 M110
100 LHPS100 S54 70 LMH70 M98
150 LHPS175 S55 100 LMH100 M90
150 LMH150PS M102
150 LMH150 M107
175 LMH175 M57
Fluorescent
Wattage Catalog #
42 LCFL42
CLEANING
Clean reflector and glass refractor with nonabrasive glass
cleaning solution or detergent. Rinse with clean water.
Caution: Be sure fixture temperature is cool enough
to touch.
TROUBLESHOOTING CHECKLIST:
1. Proper lamp is installed. Lamp is not faulty.
2. Fixture is wired properly.
3. Line voltage at the fixture is proper.
4. Fixture is grounded properly.
Down
Up
30˚Up
30˚ Down
Thank you for buying RAB lighting fixtures. Our aim is to design the best quality products so you can get the job done right.
We’d like to hear your comments. Call us at 888-RAB-1000, attention Marketing Department or email: [email protected].
LIGHT
FIXTURE
(+) LINE BLACK
(–) COMMON
WHITE
GROUND
SUPPLY
GROUND
GROUNDGROUND
RAB LIGHTING Tel: 888 RAB-1000 • Fax: 888 RAB-1232 • www.rabweb.com
WALL MOUNTING OPTIONS
1
Narrow
2
Loosen these
2 screws to
slide socket
BEAM SPREAD ADJUSTMENT
WARNING: Make certain power is off. The lamp socket can be moved
from the standard wide beam position (position 2)
to the rear position to provide a more narrow beam.
To adjust socket position, remove the reflector screws and carefully lift the reflector out of the fixture. Loosen the two
socket screws and slide socket into the desired position. Tighten screws. Replace the socket bracket and reflector.
Reflector screws (4)
Reflector
For Hands
Free Wiring:
Hook the inner
bracket hook
into the outer bracket
slot for easy
hands free wiring
Hook
Slot
No changes
required
Down Position
30˚ Down Position
1. Open the lens frame & remove the 4 screws
securing the reflector. Remove the reflector.
2. Remove the 2 bolts securing the
wall mount to the fixture.
3. Rotate the wall mount 180˚ and re-attach the
mounting bolts & lockwashers. Replace the reflector.
Wall Mount Bolts
& Lockwashers
A. Remove the 4 screws securing the inner
bracket to the wall mount.
B. Rotate the inner bracket 180˚ and
re-attach the screws & lockwashers.
C. Remove the rubber plugs from the
bottom of the wall mount and re-insert
them into the screw holes at the top
of the wall mount.
Outer Bracket
Inner Bracket
Rubber Plugs
MOUNTING TO A WEATHERPROOF BOX
The outer bracket has multiple mounting holes
to fit most weatherproof boxes. (recessed only)
1. Attach the outer bracket to the weatherproof
box and secure it to the inner bracket with
the 2 lock screws on the bottom of the
fixed wall mount.
2. For additional strength, the outer bracket can be
anchored to the wall by using the outer holes
on the bracket.
Outer Bracket
Outer Bracket
Mounting Screws
Rubber Plugs
Back View of
Wall Mount
Outer Bracket
Lock Screws
Inner Bracket
Inner Bracket
Attachment
Screws
Outer Bracket
Lock Screws
THESE INSTRUCTIONS DO
NOT COVER ALL DETAILS
OR VARIATIONS IN
EQUIPMENT NOR DO THEY
PROVIDE FOR EVERY
POSSIBLE CONTINGENCY
TO
BE MET IN
CONNECTION WITH
INSTALLATION, OPERATION
OR MAINTENANCE.
© RAB LIGHTING,9541-06/04
EASY INSTALLATION & PRODUCT HELP
Fax Back Tech Help Line
Faxed Tips & Specs, Call our friendly experts.
24 hours/day. 8AM - 5PM ET Mon. - Fri.
888 RAB-1236 888 RAB-1000
RAB LIGHTING
170 Ludlow Avenue Northvale, New Jersey 07647 U.S.A.
RAB
MAKES
IT
EASY!
www.rabweb.com e-mail
Visit our internet site for Your questions and requests
color product photos will be answered promptly.
and installation tips.
Up Position
Follow both
1-2-3 &
A,B,C below
30˚Up Position
Standard
(Factory Setting)
Follow
1-2-3
/