Page is loading ...

OPERATOR’S MANUAL
1800 PSI* @ 1.2 GPM
ELECTRIC PRESSURE WASHER
Model No. 99016
• Safety
• Assembly
• Operation
• Maintenance
• Parts
• Español, p. 15
=
=
=
=
ADVERTENCIA
Antes de utilizar el producto, lea este
manual y siga todas las Reglas de
Seguridad e Instrucciones de Uso.
WARNING
Before using this product, read this =
manual and follow all Safety Rules =
and Operating Instructions.
=
PRESSURE WASHER
CUSTOMERS HELPLINE
1-866-902-9690
HOURS: Mon. - Fri. 8 a.m. to 5 p.m. (ET)
* This pressure washer is rated in accordance to the Pressure Washer Manufacturers Association
(PWMA) standard PW101-2010 (Testing and Rating Performance of Pressure Washers).
* Esta limpiadora a presión está clasificad conforme a la norma PW101-2010 (comprobación y clasificació de rendimiento delimpiadoras
a presión) de la Asociación de fabricantes de bombas a presión (Pressure Washer Manufacturers Association, PWMA).
Sears Brands Management Corporation, Hoffman Estates, IL 60179 U.S.A.
Visit our Craftsman website: www.craftsman.com

TABLE OF CONTENTS
WARRANTY
WARRANTY ...........................................................................................2
SPECIFICATIONS ....................................................................................2
SAFETY RULES.......................................................................................3
FEATURES AND CONTROLS.....................................................................5
ASSEMBLY..............................................................................................6
OPERATION ...........................................................................................8
MAINTENANCE.....................................................................................11
STORAGE ............................................................................................12
TROUBLESHOOTING ............................................................................13
REPLACEMENT PARTS..........................................................................14
ESPAÑOL ...............................................................................................X
CRAFTSMAN LIMITED WARRANTY
FOR TWO YEARS from the date of sale this product is warranted against defects in material or workmanship.
WITH PROOF OF SALE a defective product will be replaced free of charge.
For warranty coverage details to obtain free replacement, visit the web page: www. craftsman. com/ warranty
This warranty does not cover spray guns, hoses, nozzle extensions, spray tips or filters, which are expendable parts that can wear out
from normal use within the warranty period.
This warranty is void if this product is ever used while providing commercial services or if rented to another person.
This warranty gives you specific legal rights, and you may also have other rights which vary from state to state.
Sears Brands Management Corporation, Hoffman Estates, IL 60179
PRODUCT SPECIFICATIONS
Pressure Washer Specifications
Max Outlet Pressure ....................................................1800 PSI*
Max Flow Rate ............................................................ .1.2 GPM*
Detergent Mix .......................................... See MFR’s Instructions
Water Supply Temperature ................ Not to exceed 100°F (40°C)
Motor ........................................................ Universal (brush) Type
Rated Voltage ........................................................... 120 Volts AC
Current ........................................................................ . 13 Amps
* This pressure washer is rated in accordance to the Pressure
Washer Manufacturers Association (PWMA) standard PW101-
2010 (Testing and Rating Performance of Pressure Washers).
SPECIFICATIONS
2
SAVE THESE INSTRUCTIONS
Read this manual carefully and become familiar with
your pressure washer. Know its applications, its
limitations, and any hazards involved.
Important Safety Information
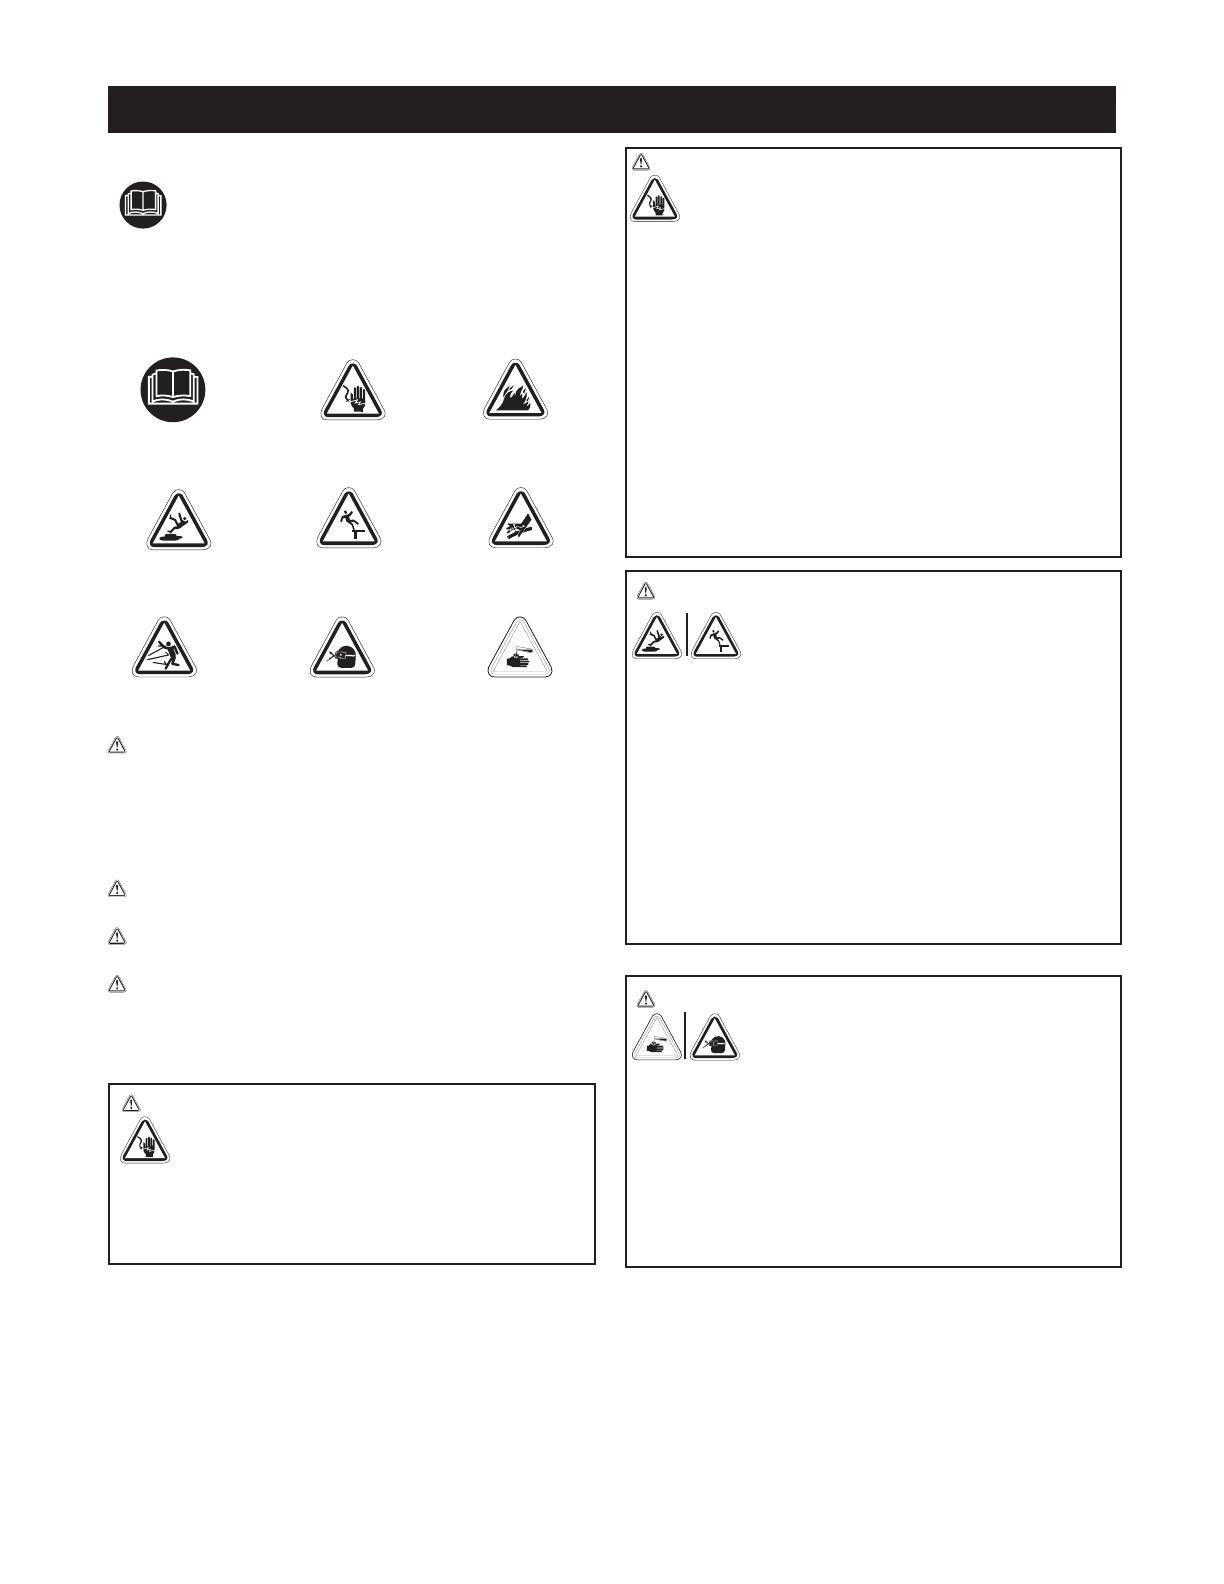
Safety Symbols and Meanings
The safety alert symbol indicates a potential personal injury
hazard. A signal word (DANGER, WARNING, or CAUTION) is used
with the alert symbol to designate a degree or level of hazard
seriousness. A safety symbol may be used to represent the type
of hazard. The signal word NOTICE is used to address practices
not related to personal injury.
DANGER indicates a hazard which, if not avoided, will result
in death or serious injury.
WARNING indicates a hazard which, if not avoided, could
result in death or serious injury.
CAUTION indicates a hazard which, if not avoided, could
result in minor or moderate injury.
NOTICE addresses practices not related to personal injury.
WARNING Risk of electrocution. Use of an extension cord
could cause electric shock or burn resulting in death or
serious injury.
• DO NOT use an extension cord with this electric pressure
washer. Your home’s electrical circuit receptacle or exten-
sion cord may not provide lifesaving ground-fault circuit-
interruption protection.
Read Manual
Slippery Surface
Projectile
Electrical Shock
Fall
Flying Objects
Fire
Fluid Injection
Chemical Burn
SAFETY RULES
WARNING Risk of electrocution. Contacting both power
wires in the power cord at the same time when plugged
in could cause electric shock or burn resulting in serious
injury or death.
• Inspect cord before each use, DO NOT use if cord is dam-
aged.
• The product is equipped with a ground fault circuit inter-
rupter (GFCI) built into the power cord plug. If replacement
of the plug or cord is required, use only identical replace-
ment parts.
• Keep all connections dry and off the ground.
• DO NOT touch plug with wet hands.
• DO NOT run cord through doorways, windows, holes in ceil-
ings, walls, or floors.
• DO NOT walk on cord.
• DO NOT drive over, drag or place objects over cord.• DO
NOT spray near power source.
WARNING Use of electric pressure washer could create
puddles and slipperysurfaces. Risk of kickback.
Spray gun could kick back causing you to fall
resulting in death or serious injury.
• Operate the electric pressure washer from a stablesurface.
• Do not overreach or stand on unstable support. Keep good
footing and balance at all times.
• The cleaning area should have adequate slopes and
drainage to reduce the possibility of a fall due to slippery
surfaces.
• Be extremely careful if you must use the electric pressure
washer from a ladder, scaffolding, or any other similar loca-
tion.
• Firmly grasp spray gun with both hands when using power
spray modes to avoid injury when spray gun kicks back.
WARNING Chemical Burn Hazard.
Chemicals could cause burns resulting in
death or serious injury.
• Always wear indirect vented (chemical splash) safety
goggles marked to comply with ANSI Z87.1 when using
chemicals.
• DO NOT substitute safety glasses or dry-condition goggles
for indirect vented safetygoggles.
• DO NOT use caustic liquid with electric pressure washer.
• Use ONLY pressure washer safe detergents/soaps. Follow all
manufacturers instructions.
3

NOTICE High pressure spray could damage fragile items includ-
ing glass.
• DO NOT point spray gun at glass when using turbo spray tip.
• NEVER aim spray gun at plants.
NOTICE Improper treatment of electric pressure washer could
damage it and shorten its life.
• If you have questions about intended use, call the customer
helpline at 1-866-902-9690
• DO NOT operate units with broken or missing parts, or with-
out protective housing or covers.
• DO NOT by-pass any safety device on the electric pressure
washer.
• DO NOT modify the electric pressure washer in any way.
• Before starting the electric pressure washer in cold weather,
check all parts of the equipment to be sure ice has not
formed there.
• DO NOT move the electric pressure washer by pulling on
hoses. Move unit using the transport handle supplied.
• This equipment is designed to be used only with Craftsman
original and replacement parts. If other parts are used the
user assumes all risks and liabilities.
WARNING Risk of eye or bodily injury. Spray could splash
back, propel objects or cause internal harm
resulting in serious injury.
• Always wear indirect vented (chemical splash) safety
goggles marked to comply with ANSI Z87.1 when using
or in vicinity of this equipment. NEVER substitute safety
glasses or dry-condition goggles for indirect vented
safety goggles.
• Know how to stop the pressure washer and bleed pres-
sure quickly. Be thoroughly familiar with the controls.
• DO NOT allow CHILDREN to operate the electric pressure
washer.
• Keep operating area clear of all persons.
• Inspect high pressure hose before each use. NEVER
repair high pressure hose; replace it.
• DO NOT repair leaking connections with sealant of any
kind; replace o-rings and gaskets.
• Keep hose connected to electric pressure washer and
spray gun while system is pressurized.
• ALWAYS point spray gun in safe direction while system
is pressurized and squeeze spray gun trigger to release
high pressure, every time you turn off the unit.
• DO NOT aim spray gun at people or animals.
• DO NOT drink from hose connected accessories.
• DO NOT secure spray gun in open position.
• DO NOT leave spray gun unattended while the electric
pressure washer is in ON (I) position.
• DO NOT use a spray gun which does not have a trigger
lock or trigger guard in place and in working order.
• Always be certain spray gun and accessories are cor-
rectly attached.
• Stay alert – watch what you are doing.
• DO NOT operate the product when fatigued or under the
influence of alcohol or drugs.
• Close supervision is necessary when this product is used
near children.
• Risk of Injection or Injury to Persons - Do not direct
discharge stream at persons.
• DO NOT spray electrical apparatus and wiring.
WARNING The high pressure stream of water that this
equipment produces could cut through skin and
its underlying tissues, resulting in serious injury and
possible amputation. Spray gun traps high water pressure,
even when motor is stopped and water is disconnected, which
could result in serious injury.
• NEVER aim spray gun at people, animals, or plants.
• ALWAYS point spray gun in safe direction, squeeze spray
gun trigger to release high pressure, every time you turn
off pressure washer.
WARNING Risk of fire. Spraying flammable liquids could
result in death or serious injury.
• DO NOT spray flammable liquids.
WARNING Risk of fire. Overheated cord could result in death
or serious injury.
• Uncoil cord completely prior to use.• DO NOT cover cord with
any material.
WARNING This product contains lead and lead compounds,
known to the State of California to cause birth defects or other
reproductive harm. Wash your hands after handling this product.
4
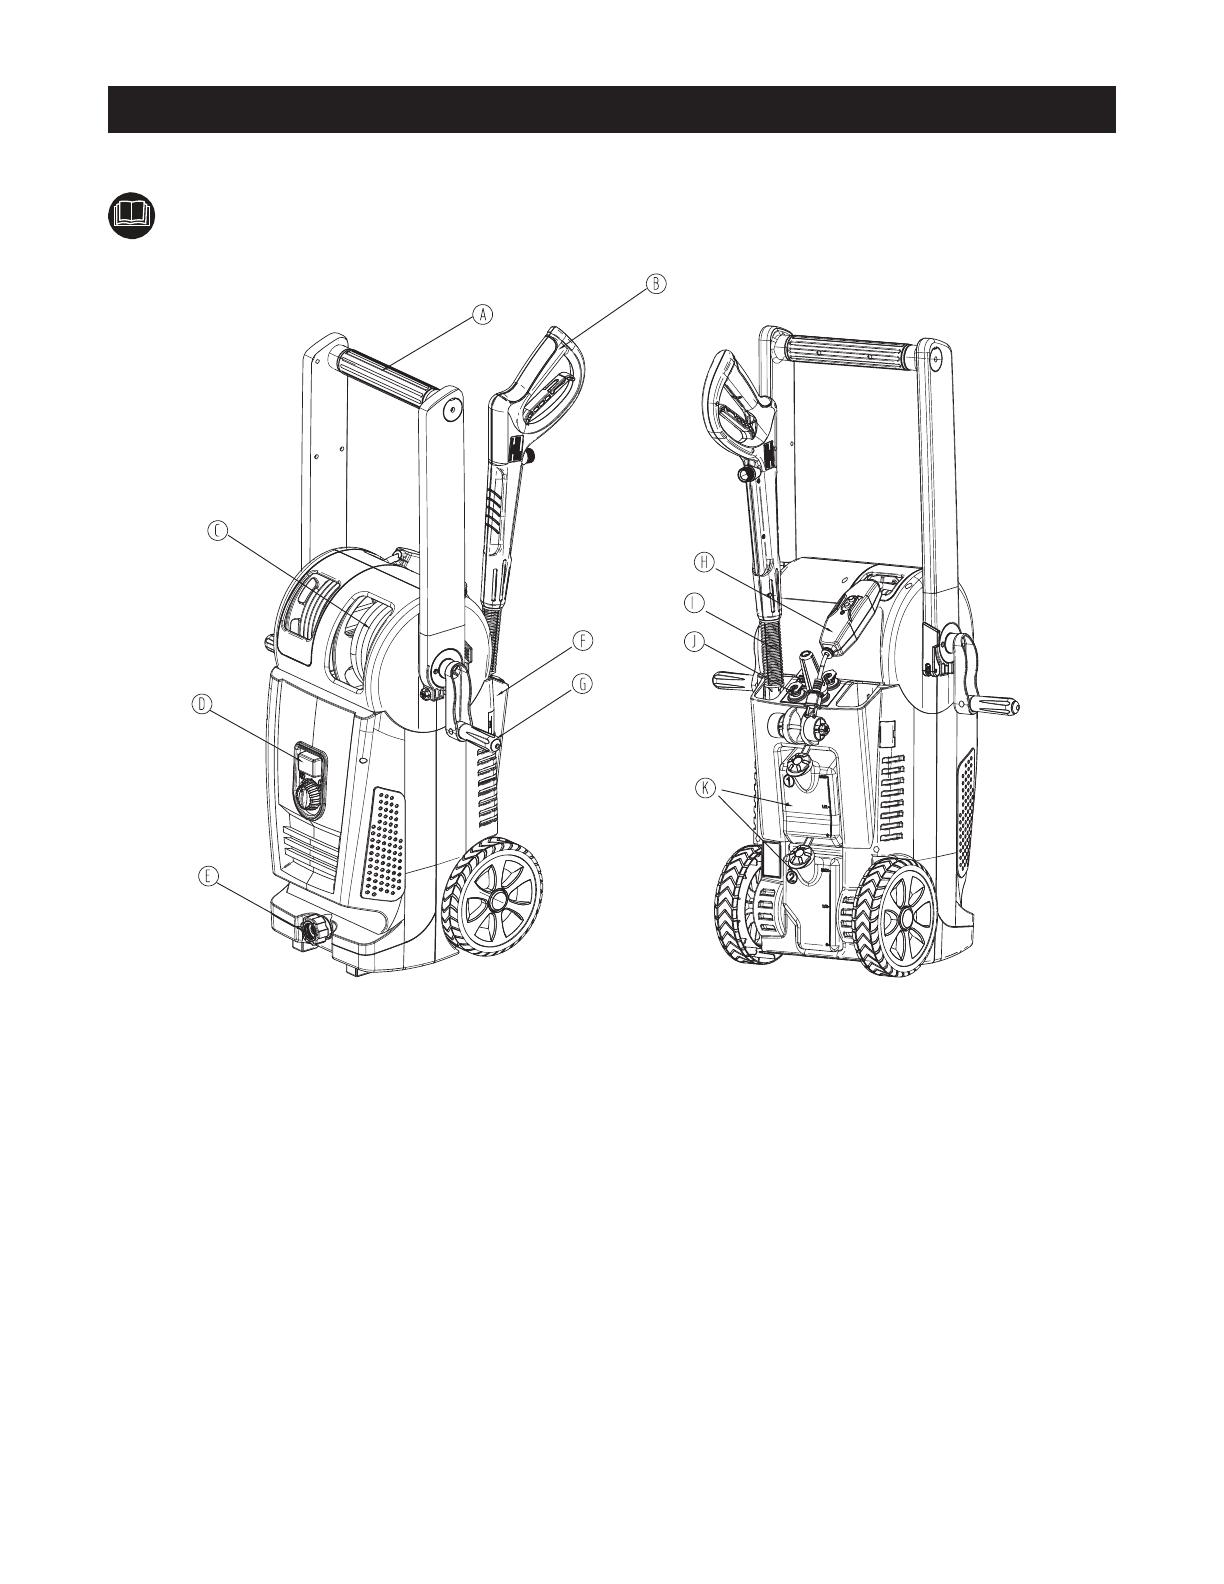
FEATURES AND CONTROLS
KNOW YOUR PRESSURE WASHER
Read the Operator’s Manual and safety rules before operating your pressure washer.
Compare the illustrations with your pressure washer to familiarize yourself with the locations of various controls and adjustments.
Save this manual for future reference
A - Folding handle — Grasp handle to lift or roll unit forward or
back
B - Spray Gun — Controls the application of water onto cleaning
surface with trigger device. Includes trigger lock to release trigger
for operation.
C - High Pressure Hose — Connect to spray gun.
D - Master ON/OFF Toggle Switch — Push left side (RED) (I)
in to turn pressure washer OFF. Push right side in (GREEN) (O) to
turn pressure washer ON.
E - Water Supply Inlet — Connect to water supply using a 50 ft.
(15.24 m) maximum garden hose
F - Gun holder- can hold the gun and wand
G - Handle crank — Fold out end, turn to wind up power cord or
high pressure hose.
H - Electric Cord with GFCI — The electric pressure washer and
operator are protected by a ground fault circuit interrupter (GFCI).
I - Spray Wand — Allows you to switch between three different
spray tips
J - Spray Tips — 15°, 25°, soap and Turbo tips included
k - Detergent Tanks — Each holds up to one quart (1.2 l) of
pressure washer safe detergent
5

ASSEMBLY
Your electric pressure washer requires some assembly but is
quickly ready for use.
If you have any problems with the assembly of your pressure
washer, please call the pressure washer helpline at 1-866-902-
9690.
UNPACK THE PRESSURE WASHER
1. Remove everything from carton.
2. Ensure you have all included items prior to assembly.
CARTON CONTENTS
Check all contents. If any parts are missing or damaged, call the
pressure washer helpline at 1-866-902-9690.
• Main unit
• Spray gun
• High pressure hose
• Plastic wand
• Quick connect tips (3)
• Parts bag (which includes the following):
• O-ring Kit
• Operator’s manual
Become familiar with each piece before assembling the pressure
washer. Identify all contents with the illustration on page 5. If any
parts are missing or damaged, call the pressure washer helpline
at 1-866-902-9690.
ASSEMBLING PRESSURE WASHER
Your Craftsman pressure washer will need assembly before
operation:
1. Lubricate o-rings.
2. Connect pressure hose to spray gun and pump.
3. Connect water supply to pump.
4. Attach plastic wand to spray gun.
5. Attach quick connect spray tip to plastic wand.
Lubricate O-Rings
Lubrication of o-rings is extremely important for installation and
operation. The use of a lubricant (petroleum or synthetic grease)
during assembly helps seat o-rings properly and provides an
improved seal. It also helps protect the o-ring from damage by
abrasion, pinching or cutting and extends the life of the o-ring.
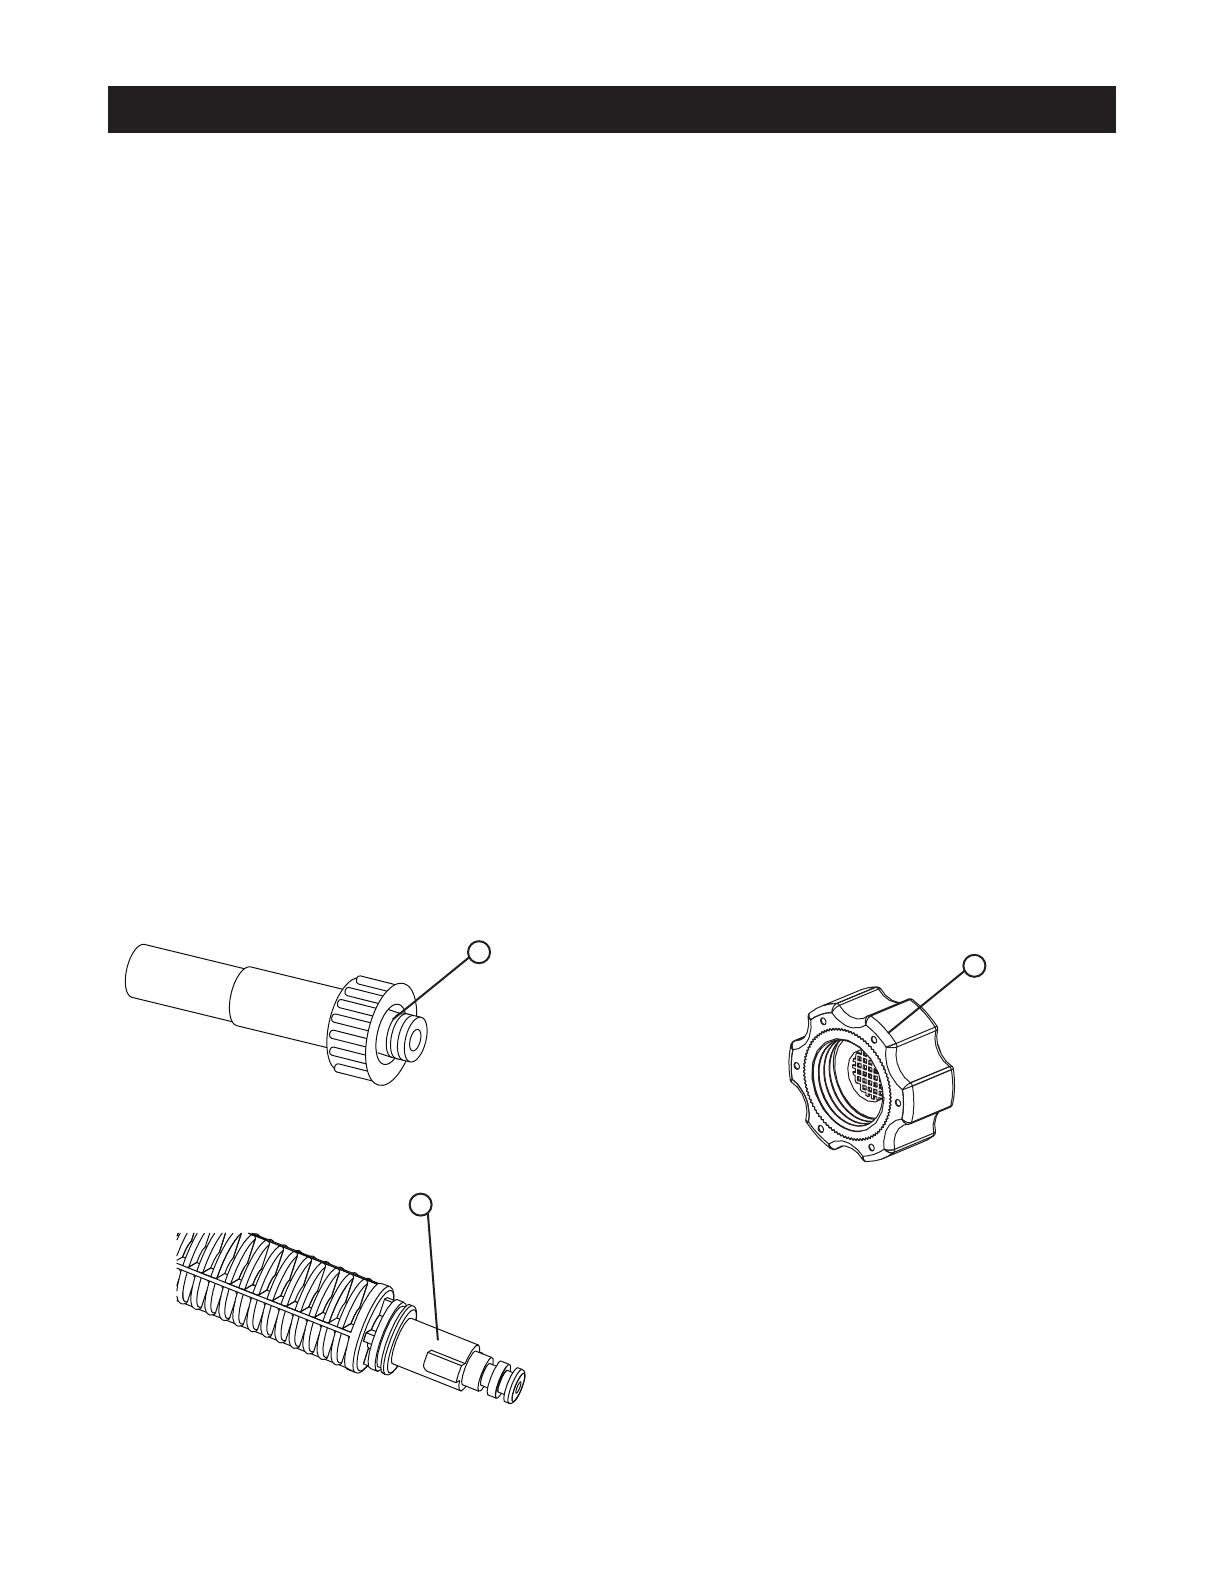
NOTICE ALWAYS apply a small amount of lubricant on o-rings
prior to assembling the high pressure hose (pump end) and high
pressure hose (gun end) (A), plastic wand (gun end) (B), and
garden hose to the pump (C)
Lubricate all connections shown below, following these
instructions:
1. Inspect and clean connecting surfaces prior to lubrication
and assembly.
2. Use lubricants sparingly during assembly; a light film is all
that is required.
3. Use a small brush or cotton swab to apply grease directly
to o-rings where they are not accessible (QC fitting, M22
fitting).
6
A
B
C
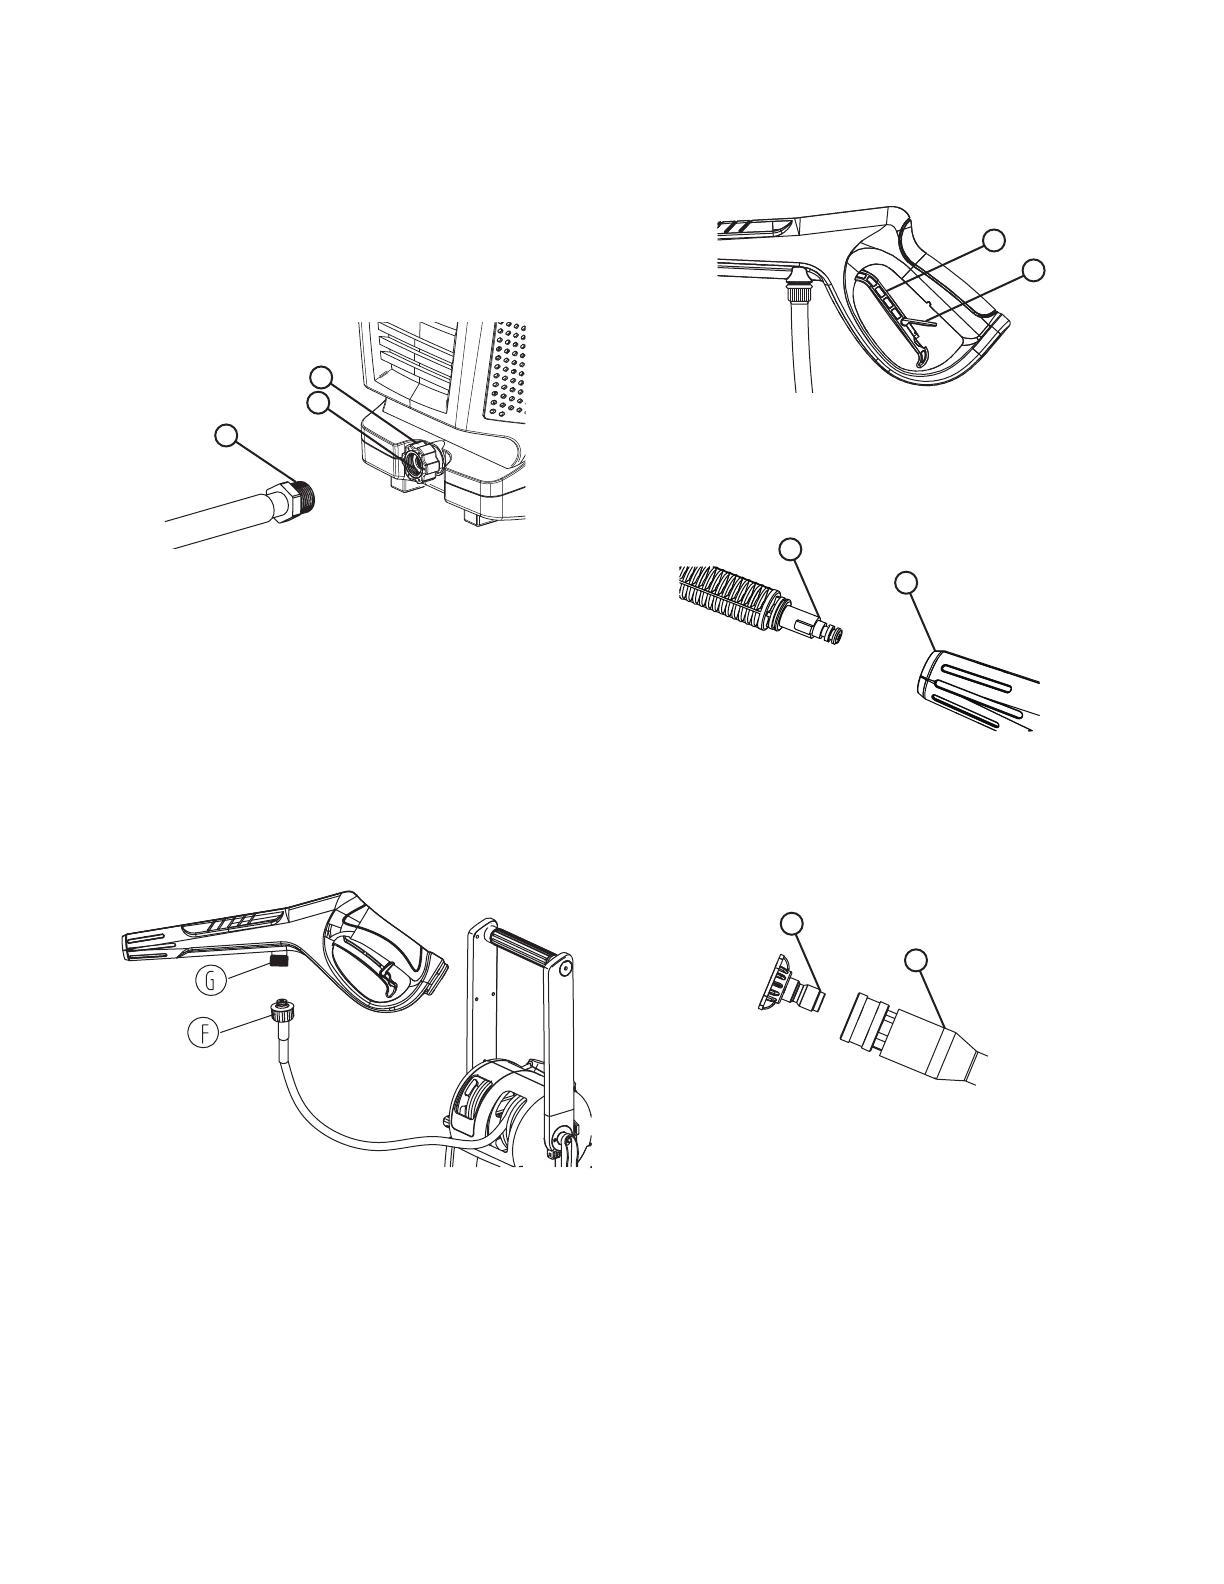
Connect Hoses and Water Supply
NOTICE Use ONLY cold water (less than 100°F).
1. Attach garden hose (50 ft. / 15.24 m maximum) to water
supply.
2. Run water through garden hose for 30 seconds to flush the
hose of debris. Turn off water.
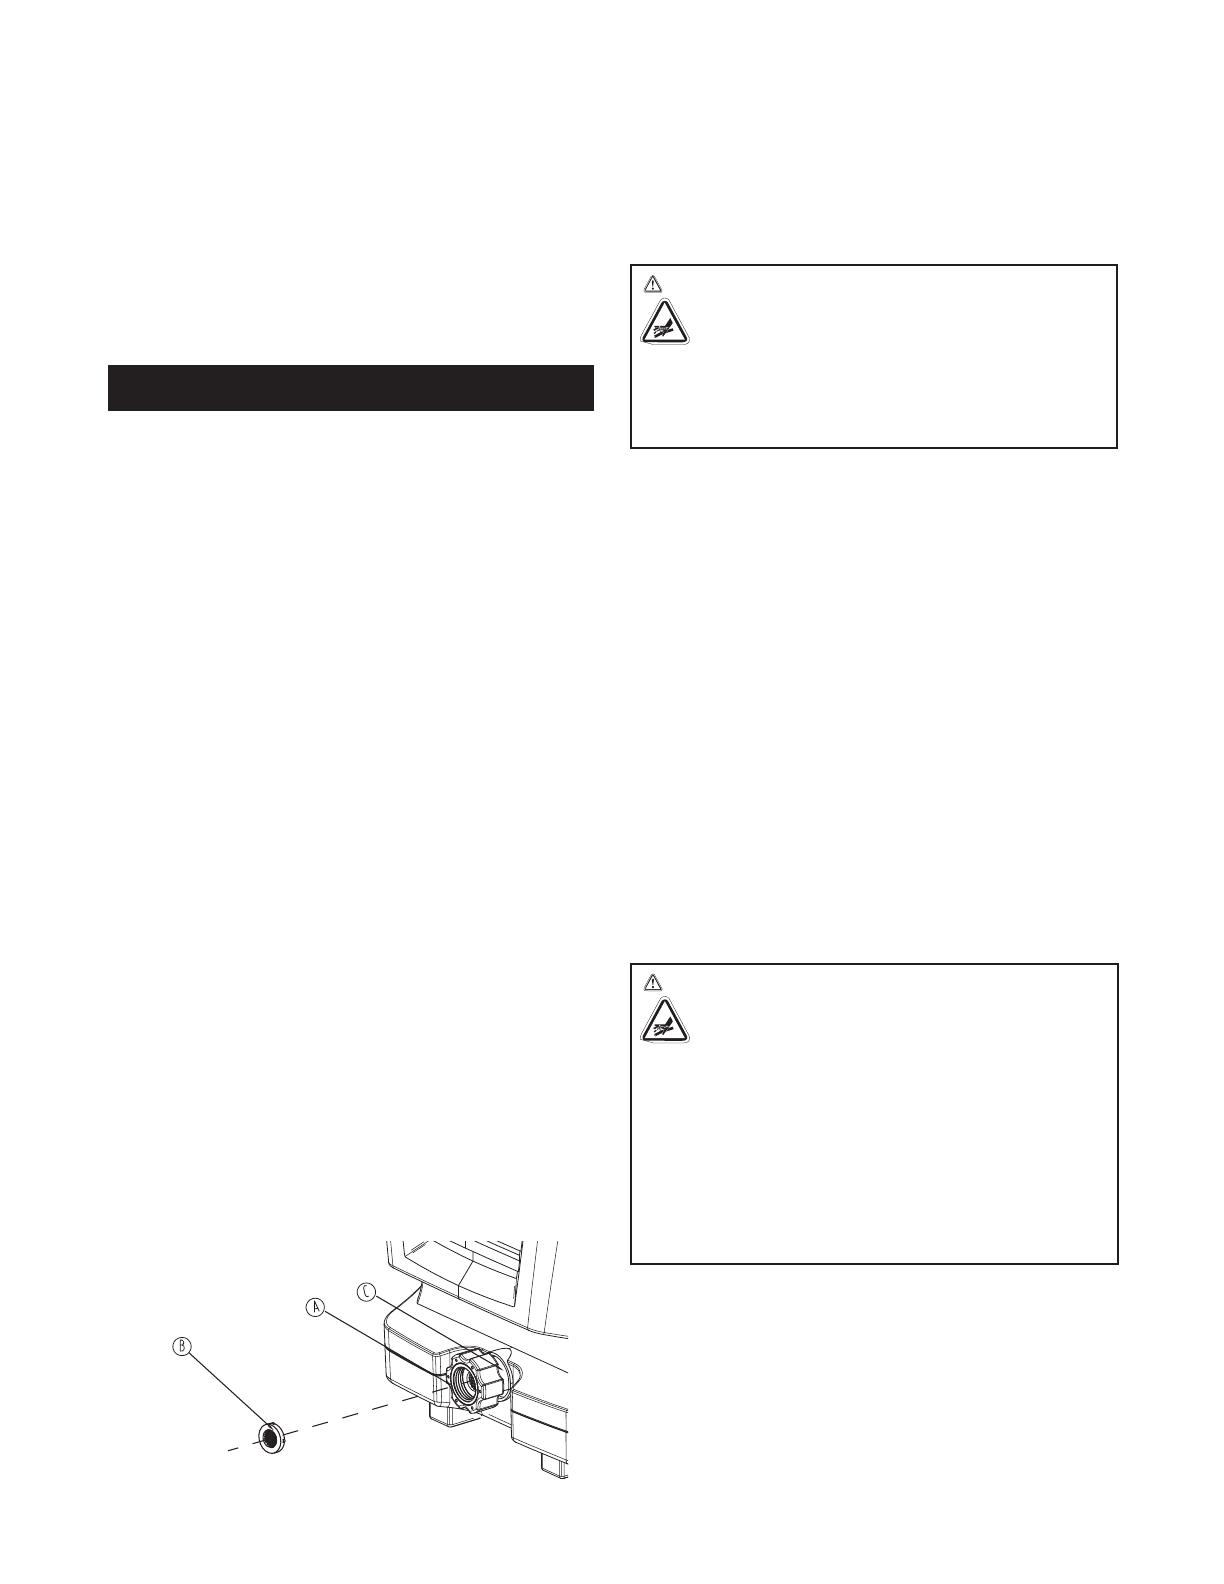
3. Confirm that water inlet screen (A) is installed in water inlet
located at left side from front of unit; Do Not remove except
for cleaning.
NOTICE If inlet screen is damaged or missing, DO NOT use elec-
tric pressure washer. Call 1-866-902-9690 for assistance.
NOTICE DO NOT run the pump without the water supply connect-
ed and turned on. Damage to equipment resulting from failure to
follow this instruction will void warranty.
• Attach opposite end of garden hose (B) to the water inlet
coupling (C). Tighten by hand
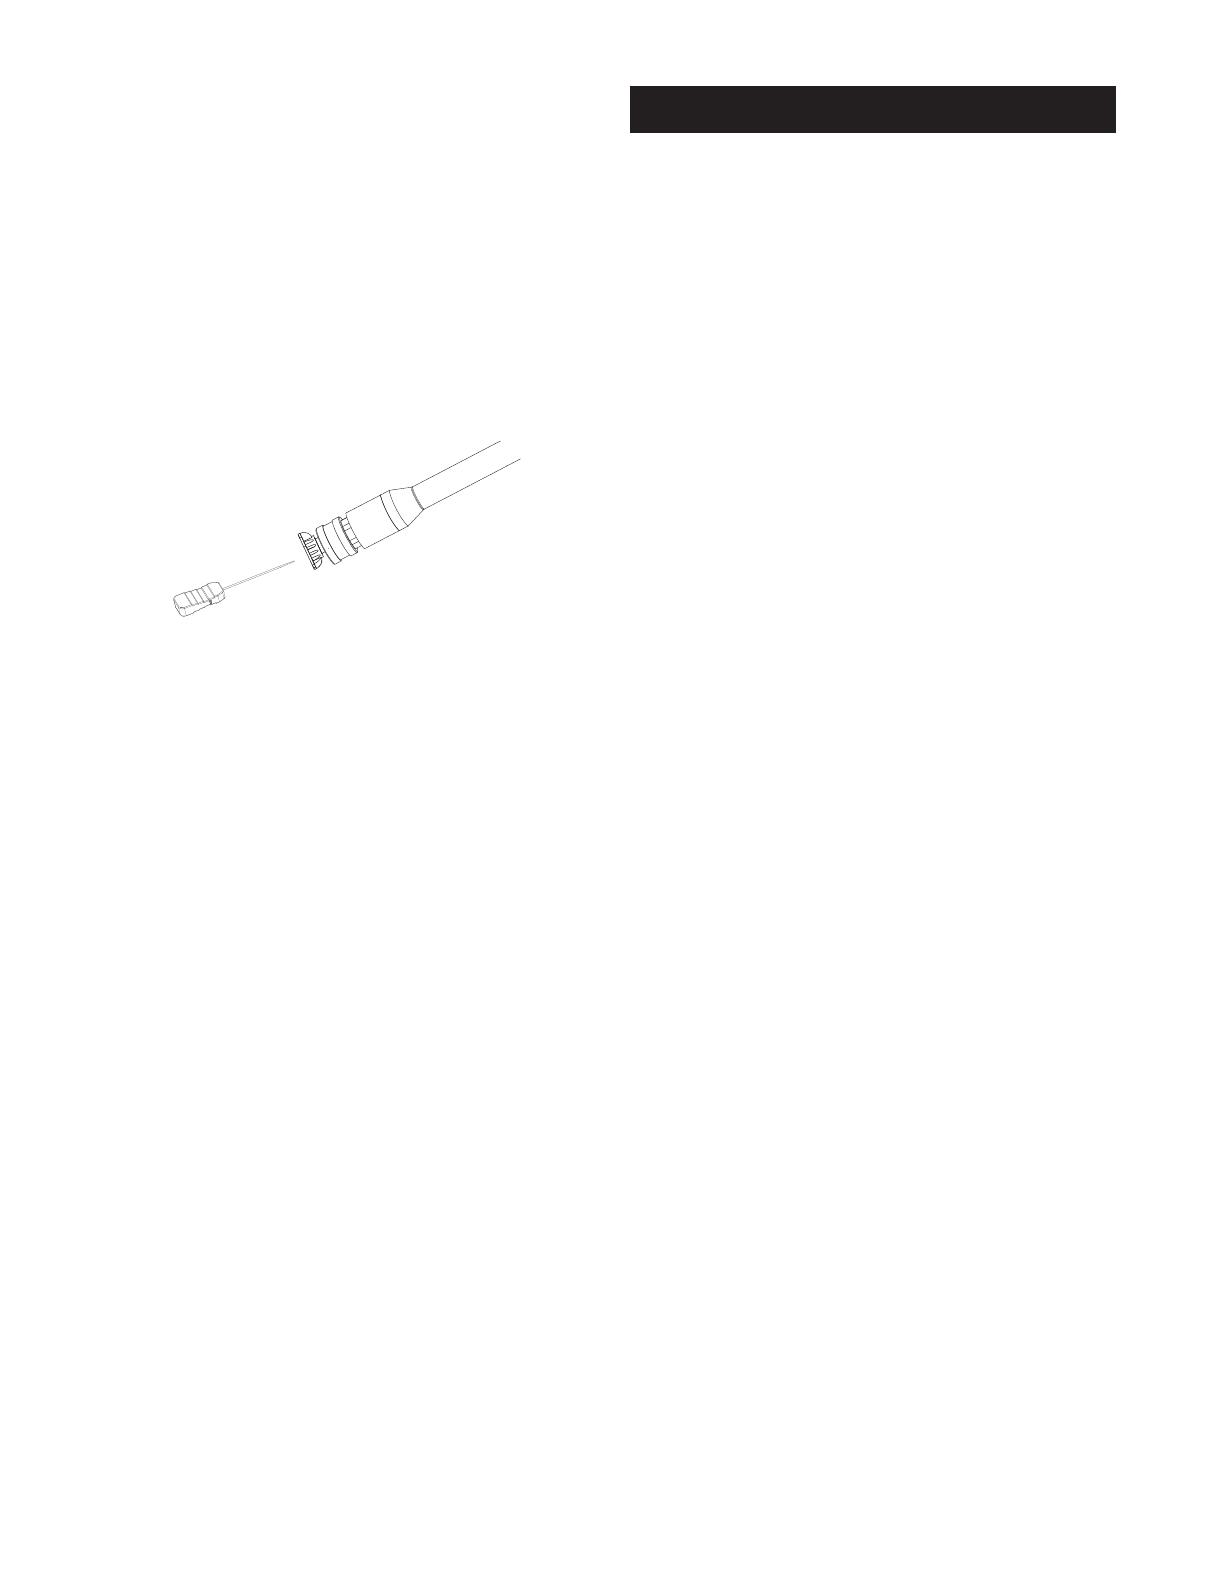
• Pull out a length of the high pressure hose from the hose
reel. Attach the hose end to the spray gun. Twist the nut (F)
of the hose onto the gun (G) by hand.
Connect Wand and Spray Tip
1. Turn ON water, point gun in a safe direction, press trigger
lock button (H) to release trigger, then squeeze trigger (J) to
purge pump system and spray gun of air and impurities.
• Insert and twist plastic wand (K) into spray gun (M). Once
• wand slides into gun, apply further inward pressure to wand
and twist 1/4 turn clockwise until securely in place.
• Turn OFF water and release trigger. Point gun in a safe direc-
tion and make sure trigger is locked and can’t be squeezed.
• Insert the spray tip (N) into plastic wand (P). Once spray tip
slides into gun, apply further inward pressure until it SNAPS
into place.
3.
4.
2.
1.
4.
5.
7
J
H
K
C
A
B
N
P
M

Checklist Before Starting Pump Motor
Review the unit’s assembly to ensure you have performed all of
the following.
1. Be sure to read Operator Safety and Operation before using
the electric pressure washer.
2. Check for properly tightened hose connections.
3. Check to make sure there are no kinks, cuts, or damage to
hoses.
4. Provide a proper water supply at an adequate flow (not to
exceed 100°F).
5. Pull out required length of electrical power cord and plug
into an electrical circuit rated for 120 Volts AC at 15 Amps
that is properly installed in accordance with all local codes
and ordinances.
Servicing Of A Double-Insulated Appliance
In a double-insulated product, two systems of insulation are
provided instead of grounding. No grounding means is
provided on a double-insulated product, nor should a means for
grounding be added to the product. Servicing a double- insulated
product requires extreme care and knowledge of the system, and
should be done only by qualified service personnel. Replacement
parts for a double-insulated product must be identical to the
parts they replace. A double- insulated product is marked with
the words “DOUBLE INSULATION” or “DOUBLE INSULATED.”
The symbol means DOUBLE-INSULATED APPLIANCE.
Ground Fault Circuit Interrupter Protection
This pressure washer is provided with a ground-fault circuit- in-
terrupter (GFCI) built into the plug of the power supply cord. This
device provides additional protection from the risk of electric
shock. Should replacement of the plug or cord become neces-
sary, use only identical replacement parts that include GFCI
protection. Do not operate pressure washer if GFCI is not working.
HOW TO USE YOUR PRESSURE WASHER
If you have any problems operating your pressure washer, please
call the pressure washer helpline at 1-866-902-9690.
How to Start Your Electric Pressure Washer
1. Place the electric pressure washer near an outside water
source capable of supplying water at a flow rate greater
than 3 gallons per minute (11.4 liters) and no less than 20
psi (1.38 bar) at the electric pressure washer end of garden
hose. DO NOT siphon supply water.
2. Connect garden hose to water inlet.
3. Check that high pressure hose is tightly connected to spray
gun. See Connect Hoses and Water Supply for illustra tions.
NOTICE DO NOT run the pump without the water supply con-
nected and turned on. Damage to equipment resulting from
failure to follow this instruction will void warranty.
4. Pull out a sufficient length of hose from the hose reel to al-
low you to operate the spray gun to your satisfaction.
5. Turn ON water, point gun in a safe direction, press trigger
lock button and squeeze trigger to purge pump system of air.
6. Remove any dirt or foreign matter from spray tips. Install
desired wand onto spray gun. See Connect Hoses and Water
Supply and How to Use Spray Tips for details.
7. Press the master ON/OFF switch to the OFF (0) position.
WARNING Risk of eye injury. Spray could splash back
or propel objects resulting in serious injury. Always
wear indirect vented (chemical splash) safety goggles
marked to comply with ANSI Z87.1 when using or in vicinity
of this equipment. NEVER substitute safety glasses or dry-
condition goggles for indirect vented safety goggles.
OPERATION
8

WARNING Risk of electrocution. Use of an extension cord
could cause electric shock or burn resulting in death or
serious injury.
• DO NOT use an extension cord with this electric pressure
washer. Your home’s electrical circuit receptacle or extension
cord may not provide lifesaving ground-fault
circuit-interruption protection.
• Plug electrical power cord into an electrical circuit rated for
120 Volts AC at 15 Amps that is properly installed in ac-
cordance with all local codes and ordinances. The indicator
light on the GFCI should be ON.
NOTICE The indicator light must be ON for the electric pressure
washer to operate.
WARNING Risk of electrocution. Non-operating ground fault
circuit interrupter (GFCI) could result in death or bodily
injury. If indicator light does not stay ON after test and
reset, do not use the pressure washer.
• Press TEST button (B). The indicator light (C) must be OFF.
• Press TEST button (B). The indicator light (C) must turn ON.
NOTICE DO NOT use the electric pressure washer if above test
fails.
• Press the master ON/OFF switch to the ON (I) position.
• Point gun in a safe direction, press trigger lock button
and squeeze trigger. The electric pressure washer motor
will start and stop as spray gun trigger is depressed and
released.
The electric pressure washer is now ready for use. Instructions
for use of the supplied accessories are given later in this section.
How to Stop Your Electric Pressure Washer
The electric pressure washer motor runs only when the trigger
is engaged. To stop the electric pressure washer and turn off the
motor:
1. Release spray gun trigger.
2. Press the master ON/OFF switch to the OFF (0) position.
NOTICE Releasing the trigger will shut off the motor but
does not shut off electrical power to the unit.
3. Turn off water supply.
4. ALWAYS point spray gun in a safe direction and squeeze
spray gun trigger to relieve built-up pressure in the unit.
WARNING The high pressure stream of water that this
equipment produces could cut through skin and its
underlying tissues, resulting in serious injury and
possible amputation.
Spray gun traps high water pressure, even when motor is
stopped and water is disconnected, which could result in serious
injury.
• Keep high pressure hose connected to pump and spray gun
while system is pressurized.
• ALWAYS point spray gun in safe direction, squeeze spray gun
trigger to release high pressure, every time you turn off pressure
washer.
1. Disconnect GFCI plug from outlet and wind power cord us-
ing handle crank.
2. Use the crank handles to wind the cord and hose back into
the unit. Store spray gun and accessories on the back of the
unit.
5.
6.
7.
8.
10.
11.
9.
9
How to Use Spray Tips
You should now be familiar with how to START and STOP your
electric pressure washer. If not, please refer to the previous
section to familiarize yourself with STARTING and STOPPING the
system before continuing.
There are three spray tips supplied with the pressure washer. The
turbo spray tip whirls a powerful pin-point jet of water for intense
cleaning. The white tipped spray tip is for general soap applica-
tions and the orange tipped spray tip is for various high pressure
applications.
Usage Tips
• For most effective cleaning, keep spray tip from 8 to 24 inches
away from cleaning surface.
• If you get spray tip too close, especially using a high pressure
setting, you may damage surface being cleaned.
• Do Not get closer than 6 inches when cleaning tires.
Applying Detergent
WARNING Chemical Burn Hazard.
Chemicals could cause burns resulting in death
or serious injury.
• Always wear indirect vented (chemical splash) safety goggles
marked to comply with ANSI Z87.1 when using chemicals.
• DO NOT substitute safety glasses or dry-condition goggles for
indirect vented safety goggles.
• DO NOT use caustic liquid with electric pressure washer
• Use ONLY pressure washer safe detergents/soaps. Follow all
manufacturers instructions.
To apply detergent, follow these steps:
1. Review use of spray tips in How to Use Spray Tips.
2. Tip unit back and remove detergent tank cap.
3. Fill tank with a detergent mixture designed for power
washers. The solution should be the consistency of water to
prevent clogging in the detergent system.
4. Reinstall detergent tank cap and tip unit back upright.
5. Install black tipped spray tip.
NOTICE Do not fill above bottom of filler tank neck or detergent
will leak out of cap when tipped back upright.
6. Make sure garden hose is connected to water inlet. Check
that high pressure hose is connected to spray gun and
pump. Turn on water.
NOTICE You must attach all hoses before you start the pres-
sure washer.
7. Start the pressure washer as instructed in How to Start Your
Electric Pressure Washer.
8. Apply detergent to a dry surface, starting at lower portion
of area to be washed and work upward using long, even,
overlapping strokes.
9. Allow detergent to “soak in” for 3-5 minutes before washing
and rinsing. Reapply as needed to prevent surface from
drying. To prevent streaking, do not allow detergent to dry on
surface.
10. Gently pull the detergent containers out of storage posi-
tion, and fill with detergent. Push the containers back into
storage position. Turn the knob to position to use the
upper detergent bottle, turn to position to use the lower
detergent bottle.
NOTE! Turn the knob to the + position when you use
detergent function. At the O position, detergent funtion is not
availble.
11. Do not use the detergent bottle in horizontal position
Electric Pressure Washer Rinsing
1. Remove black tipped spray tip from wand.
2. Install white or yellow tipped spray tip.
3. Keep spray gun a safe distance from area you plan to spray.
WARNING Risk of kick back.
Spray gun could kick back causing you to fall resulting in
death or serious injury.
• Operate the electric pressure washer from a stable surface.
• Be extremely careful if you must use the electric pressure
washer from a ladder, scaffolding, or any other similar location.
• Firmly grasp spray gun with both hands when using power
spray modes to avoid injury when spray gun kicks back.
NOTICE Detergent can only be applied with black spray tip.
4. Apply a high pressure spray to a small area and then check
10
foam
OWNER’S RESPONSIBILITIES
General Recommendations
Regular maintenance will improve the performance and extend
the life of the pressure washer.
The pressure washer warranty does not cover items that have
been subjected to operator abuse or negligence. To receive full
value from the warranty, the operator must maintain pressure
washer as instructed in this manual including proper storage as
detailed in Storage.
Before Each Use
1. Clean debris.
2. Check water inlet screen for debris or damage.
3. Check high pressure hose for leaks.
4. Check spray gun operation.
PRESSURE WASHER MAINTENANCE
Clean Debris
Daily or before use, clean accumulated debris from electric pres-
sure washer. Inspect cooling air slots and openings on the front,
rear and bottom of the electric pressure washer. These openings
must be kept clean and unobstructed.
The electric pressure washer parts should be kept clean to re-
duce the risk of overheating and ignition of accumulated debris.
• Use a damp cloth to wipe exterior surfaces clean.
NOTICE Improper treatment of the electric pressure washer
can damage it and/or shorten its life.
• DO NOT insert any objects through cooling slots.
Check and Clean Water Inlet Screen
Remove water inlet coupling (A). Then remove water inlet screen
(B) from the unit’s water inlet (C) using a needle nose pliers.
Water inlet is located at bottom front of unit. Examine water inlet
screen. If the screen is dirty, clean with a small brush and water.
If the screen is damaged, replace it.
MAINTENANCE
Check High Pressure Hose
The high pressure hose can develop leaks from wear, kinking,
or abuse. Inspect the hose each time before using it. Check for
cuts, leaks, abrasions or bulging of cover, damage or movement
of couplings. If any of these conditions exist, replace the hose
immediately.
WARNING The high pressure stream of water that this
equipment produces could cut through skin and its un
derlying tissues, resulting in serious injury and possible
amputation.
• NEVER repair high pressure hose. Replace it.
• Replacement hose rating MUST equal or exceed maximum
pressure rating of unit.
Check Spray Gun
Examine the hose connection to the spray gun and make sure it
is secure.
Nozzle Maintenance
Excessive pump pressure can cause a pulsing sensation felt
while squeezing the spray gun trigger. The principal cause of
excessive pump pressure is a nozzle clogged or restricted with
foreign materials such as dirt, etc. A clogged nozzle could lead to
pump cycling ON/OFF or not turning on even when there is some
flow.
To correct the problem, immediately clean the nozzle by follow-
ing these instructions:
1. Press the master ON/OFF switch to the OFF (0) position.
Remove power cord plug from electrical outlet.
2. Disconnect water supply at the electric pressure washer.
3. ALWAYS point spray gun in a safe direction and press trig-
ger lock button and squeeze spray gun trigger to release
retained high pressured water.
WARNING The high pressure stream of water that this
equipment produces could cut through skin and its
underlying tissues, resulting in serious injury and
possible amputation.
Spray gun traps high water pressure, even when motor is
stopped and water is disconnected, which could result in serious
injury.
• Keep high pressure hose connected to pump and spray gun
while system is pressurized.
• ALWAYS point spray gun in safe direction, squeeze spray gun
trigger to release high pressure, every time you turn off pressure
washer.
• Remove spray tip from end of plastic wand.
• Use a small paper clip to free any foreign material clogging
or restricting any of the spray tips.
4.
5.
11
surface for damage. If no damage is found, you can assume
it is okay to continue rinsing.
5. Start at top of area to be rinsed, working down with same
overlapping strokes as you used for cleaning.
Other Cleaning Tips
• NEVER leave the electric pressure washer unattended while
it is plugged into an electrical outlet and while water is sup-
plied to the equipment.
• If you have the nozzle too far away from the surface being
washed, the cleaning may not be as effective.
1. Reinstall spray tip into plastic wand.
2. Reconnect plastic wand to spray gun.
3. Make sure garden hose is connected to water inlet. Check
that high pressure hose is connected to spray gun. Turn on
water.
4. Plug power cord into electrical outlet and press the master
ON/OFF switch to the pressure washer ON (I) position.
5. Test the electric pressure washer by operating with each
spray tip.
Pump and Motor Maintenance
The electric pressure washer does not require any maintenance
to the pump or motor. Both assemblies are pre-lubricated and
sealed, requiring no additional lubrication ever.
AFTER EACH USE
Water should not remain in the unit for long periods of time. Sedi-
ments or minerals can deposit on pump parts and “freeze” pump
action. Follow these procedures after every use:
1. Press the master ON/OFF switch to the OFF (O) position.
Remove power cord plug from electrical outlet.
2. Turn off water supply, point gun in a safe direction, press
trigger lock button and squeeze trigger to relieve trapped
pressure.
3. Disconnect garden hose from the water supply and the
electric pressure washer.
4. Disconnect hose from spray gun and high pressure outlet on
pump. Drain water from hose, gun, and wand. Use a rag to
wipe off the hose.
5. Drain water from pump by tipping unit on its front side
(water inlet facing down).
6. Wind up power cord using handle crank.
7. Store unit in a clean, dry area.
8. If storing for more than 30 days see Winter or Long Term
Storage on next page.
6.
7.
8.
9.
10.
WINTER OR LONG TERM STORAGE
• Water should not remain in the unit for long periods of time.
Sediments or minerals can deposit on pump parts and
“freeze” pump action.
Initial Storage Procedures
1. Drain detergent tank (if used) by tipping unit on its front side
and pouring out all remaining solution.
2. Run the electric pressure washer with white tipped spray tip.
Flush for one or two minutes.
3. Press the master ON/OFF switch to the OFF (O) position.
Remove power cord plug from electrical outlet.
4. Turn off water supply. Point gun in a safe direction, press
trigger lock button and squeeze trigger to relieve trapped
pressure. After a few moments, release trigger on spray gun.
5. Disconnect garden hose from the water supply and the
electric pressure washer. Disconnect pressure hose from the
pump and the spray gun.
6. Drain water from hoses and spray gun, then use a cloth or
equivalent to wipe off all exterior surfaces.
7. Ensure that inlet (garden) and outlet (high pressure) hoses
are disconnected from the pump. Then drain water from
pump by tipping unit on its front side (water inlet facing
down).
NOTICE Water left in the pump could freeze and damage the
pump
Protecting the Pump
• To protect the pump from damage caused by mineral depos-
its or freezing, purchase a pump saver solution, available at
hardware stores or on the internet.
• When using the pump saver solution, make sure that the
pressure washer is turned off and that the inlet and outlet
hoses are disconnected.
• Read and follow all instructions and warnings supplied with
the pump saver solution that you use.
NOTICE You must protect your unit from freezing temperatures.
Failure to do so will permanently damage your pump and render
the unit inoperable. Freeze damage is not covered by the war-
ranty.
To use PumpSaver, make sure the electric pressure washer is
turned off and inlet and outlet hoses are disconnected.
Read and follow all instructions and warnings given on the Pump-
Saver container.
Final Storage Procedures
1. Coil power cord and store on back of unit.
2. Store spray gun and accessories on accessory tray.
3. Store unit in a clean, dry area that is protected from freezing
temperatures.
4. Cover unit with a suitable protective cover that does not
retain moisture.
STORAGE
12

TROUBLESHOOTING
Cause
1. Water inlet is blocked.
2. Inadequate water supply.
3. Garden hose is kinked or leaking.
4. Clogged water inlet screen.
5. Water supply is over 100°F (38°C).
6. High pressure hose is blocked or leaks.
7. Nozzle is obstructed.
8. Pump is faulty.
1. Water supply is not turned on.
2. Unit is not turned on.
1. High pressure spray tip installed.
Correction
1. Clear inlet.
2. Provide adequate water flow.
3. Straighten garden hose or replace if
leaking.
4. Check and clean water inlet screen.
5. Provide cooler water supply.
6. Clear blocks in high pressure hose
or replace hose.
7. Clean nozzle.
8. Take unit to qualified service dealer
for possible repair.
1. Turn on water supply.
2. Press the power cord GFCI button.
Indicator light must illuminate and
remain on to operate unit. Once light
is on turn the master ON/OFF switch
to the ON (I) position by pressing the
left side of switch.
3. Use only 50 ft. (15.24 m) maximum
garden hose.
1. Replace with white tipped spray tip.
Problem
Pump has following problems: failure
to produce pressure, erratic pressure,
chattering, loss of pressure, low water
volume.
Unit fails to start when spray gun trig-
ger is squeezed.
Detergent fails to mix with spray.
13

PARTS
Item Part # Description
1 LOWER DETERGENT BOTTLE
2 UPPER DETERGENT BOTTLE
3 PRESSURE WASHER
4 HANDLE CRANK
5 HOSE
6 GUN
7 WAND
8 TURBO NOZZLE
9 NOZZLE
10 NOZZLE
11 NOZZLE
12 NEEDLE
CRAFTSMAN 1800 PSI Electric Pressure Washer 99016
Replacement Parts
To purchase replacement parts, call 888-331-4569
14

TABLA DE CONTENIDOS
GARANTÍA
GARANTÍA ............................................................................................15
ESPECIFICACIONES..............................................................................15
REGLAS DE SEGURIDAD......................................................................16
CARACTERÍSTICAS Y CONTROLES ........................................................18
ENSAMBLAJE.......................................................................................19
FUNCIONAMIENTO...............................................................................21
MANTENIMIENTO................................................................................24
ALMACENAMIENTO..............................................................................25
SOLUCIÓN DE PROBLEMAS ..................................................................26
PIEZAS DE REPUESTO...........................................................................27
GARANTÍA LIMITADA DE CRAFTSMAN
El producto está garantizado POR DOS AÑOS a partir de la fecha de venta del producto contra defectos de material o mano de obra.
Se reemplazará sin cargo un producto defectuoso CON RECIBO DE COMPRA.
Para obtener detalles del reemplazo gratuito bajo cobertura de la garantía, visite la página web: www.craftsman.com/warranty.
Esta garantía no cubre las pistolas de rociado, mangueras, extensiones de boquillas, puntas de rociadores o filtros, que son piezas
reemplazables que se pueden desgastar por el uso normal dentro del período de garantía.
Esta garantía quedará anulada si se usa el producto para brindar servicios comerciales o si se renta a otra persona.
Esta garantía le otorga derechos legales específicos y es posible que también tenga otros derechos que pueden variar de un estado a
otro.
Sears Brands Management Corporation, Hoffman Estates, IL 60179
ESPECIFICACIONES DEL PRODUCTO
Especificaciones de la hidrolavadora
Presión máxima de salida .................................................................................1800PSI*
Tasa de flujo máximo .................................................................................... .1.2 GPM*
Mezcla de detergente .....................................Consultar las instrucciones del fabricante
Temperatura del agua ........................................... No debe exceder los 100 °F (40 °C)
Motor ................................................................................. Tipo universal (de escobilla)
Tensión nominal ................................................................................. 120 voltios de CA
Corriente .................................................................................................. . 13 amperios
* Esta hidrolavadora está clasificada en función de la norma PW101 - 2010
de la Pressure Washer Manufacturers Association (PWMA)
(Prueba y clasificación del rendimiento de hidrolavadoras).
ESPECIFICACIONES
15

GUARDE ESTAS INSTRUCCIONES
Lea este manual con detenimiento y familiarícese
con la hidrolavadora. Conozca los usos posibles,
limitaciones y riesgos que implica.
Información importante de seguridad
Símbolos de seguridad y sus significados
El símbolo de alerta de seguridad indica un posible riesgo
de lesiones. Se usa una palabra (PELIGRO, ADVERTENCIA o
PRECAUCIÓN) con el símbolo de alerta para designar un nivel
de gravedad del riesgo. Se podría usar un símbolo de seguridad
para representar el tipo de riesgo. La palabra AVISO se usa para
abordar prácticas no relacionadas a lesiones.
PELIGRO indica una situación riesgosa la cual, si no se evita,
provocará la muerte o lesiones graves.
ADVERTENCIA indica una situación riesgosa la cual, si no se
evita, podría provocar la muerte o lesiones graves
PRECAUCIÓN indica una situación riesgosa la cual, si no se
evita, podría provocar lesiones menores o moderadas.
AVISO aborda prácticas no relacionadas a lesiones
ADVERTENCIA Riesgo de descarga eléctrica. El uso de un
cable de extensión podría causar descargas eléctricas o
quemaduras y provocar la muerte o lesiones graves.
• NO use un cable de extensión con esta hidrolavadora eléc-
trica. Los receptáculos del circuito eléctrico de su hogar y
los cables de extensión podrían no proporcionar la protec-
ción de un interruptor diferencial que salva vidas.
Lea el manual
Superficie resbaladiza
Proyectil
Descarga eléctrica
Caída
Objetos voladores
Fuego
Inyección de fluido
Quemadura química
REGLAS DE SEGURIDAD
ADVERTENCIA Riesgo de descarga eléctrica. Hacer
contacto con ambos cables de alimentación al mismo
tiempo cuando están conectados podría causar
descargas eléctricas o quemaduras y provocar lesiones
graves o la muerte.
• Inspeccione el cable antes de cada uso. NO usar si el cable
está dañado.
• El producto posee un interruptor diferencial (GFCI) en el
enchufe del cable de alimentación. Si es necesario el reem-
plazo del enchufe o del cable, utilice solamente piezas de
repuesto idénticas.
• Mantenga todas las conexiones secas y elevadas del suelo.
• NO toque el enchufe con las manos húmedas.
• NO pase los cables por orificios de puertas, ventanas, en
techos, paredes o pisos.
• NO pise el cable.
• NO pase ni arrastre objetos por encima del cable.
• NO rocíe agua cerca de la fuente de alimentación.
ADVERTENCIA El uso de la hidrolavadora eléctrica podría
crear charcos y superficies resbaladizas. Riesgo
de contragolpe. La pistola rociadora podría
producir un contragolpe que podría hacer que
caiga y provocar la muerte o lesiones graves.
• Use la hidrolavadora eléctrica desde una superficie estable.
• No se estire demasiado ni se pare sobre una superficie
inestable. Mantenga una postura y equilibrio adecuados en
todo momento.
• El área de limpieza debe tener pendientes y drenaje ade-
cuados para reducir la posibilidad de caídas por superficies
resbaladizas.
• Tenga mucho cuidado si debe usar la hidrolavadora eléctrica
desde una escalera, andamio u otra ubicación similar.
• Tome la pistola rociadora firmemente con ambas manos
cuando use los modos potentes de forma tal que logre evitar
lesiones por el contragolpe.
ADVERTENCIA Riesgo de quemadura química. Las
sustancias químicas pueden infligir quemaduras
y provocar la muerte o lesiones graves.
• Siempre use gafas de seguridad con ventilación indirecta
(salpicadura química) que cumplan con ANSI Z87.1 cuando
use sustancias químicas.
• NO use gafas de seguridad comunes o para ambientes
secos en lugar de las de ventilación indirecta.
• NO use líquidos cáusticos con la hidrolavadora eléctrica.
• SOLO use detergentes/jabones aptos para hidrolavadoras.
Siga todas las instrucciones del fabricante.
16
AVISO El rociado de alta presión puede dañar artículos frágiles,
incluido el vidrio.
• NO apunte la pistola hacia vidrios cuando use la punta de
rociado turbo.
• NUNCA apunte la pistola hacia plantas.
AVISO El uso inadecuado de la hidrolavadora eléctrica podría
dañarla y reducir su vida útil.
• Si tiene preguntas sobre el uso indicado, llame al número de
atención al cliente al 1-866-902-9690.
• NO use unidades con piezas rotas o faltantes, o sin la car-
casa y las cubiertas protectoras.
• NO desactive los dispositivos de seguridad de la hidrolava-
dora eléctrica.
• NO modifique la hidrolavadora eléctrica de ninguna manera.
• Antes de encender la hidrolavadora eléctrica en clima frío,
verifique todas las piezas del equipo para asegurarse de que
no se haya formado hielo.
• NO mueva la hidrolavadora eléctrica halando de las
mangueras. Mueva la unidad mediante el asa de transporte
suministrada.
• Este equipo está diseñado para usarse solo con piezas origi-
nales y de repuesto de Craftsman. Si se usan otras piezas, el
usuario asume todos los riesgos y responsabilidades.
ADVERTENCIA Riesgo de lesiones a los ojos y el cuerpo.
El rociado podría salpicar, proyectar objetos o
causar daños internos que provoquen lesiones
graves.
• Siempre use gafas de seguridad con ventilación indirecta
(salpicadura química) que cumplan con ANSI Z87.1 cuan-
do use o esté cerca de este equipo. NUNCA use gafas de
seguridad comunes o para ambientes secos en lugar de
las de ventilación indirecta.
• Sepa cómo detener la hidrolavadora y agotar la presión
rápido. Familiarícese bien con los controles.
• NO permita que los NIÑOS usen la hidrolavadora eléc-
trica.
• No permita que haya personas en el área de funciona-
miento.
• Inspeccione la manguera de alta presión antes de cada
uso. NUNCA repare la manguera de alta presión; reem-
plácela.
• NO repare las conexiones con fugas mediante el uso de
selladores; cambie las juntas tóricas y mecánicas.
• Mantenga la manguera conectada a la hidrolavadora
eléctrica y la pistola rociadora mientras el sistema está
presurizado.
• SIEMPRE apunte la pistola en una dirección segura mien-
tras el sistema esté presurizado y accione el gatillo para
liberar la presión cada vez que apague la unidad.
• NO apunte la pistola hacia personas o animales.
• NO beba de los accesorios conectados a la manguera.
• NO fije la pistola en la posición abierta.
• NO deje la pistola sin supervisión mientras la hidrolava-
dora eléctrica esté en la posición de ENCENDIDO (I).
• NO use una pistola que no tenga un bloqueo o resguardo
del gatillo colocado y en buen funcionamiento.
• Siempre asegúrese de que la pistola y los accesorios
estén bien conectados.
• Manténgase alerta: Mire lo que esté haciendo.
• NO use el producto si está cansado o bajo la influencia
de alcohol o drogas.
• Se requiere una atenta supervisión cuando se usa el
producto cerca de niños.
• Riesgo de inyección o lesión a personas - No dirigir cor-
riente de descarga a personas.
• *NO rocíe aparatos eléctricos y cableado.
ADVERTENCIA El flujo de alta presión de agua que este
equipo produce podría cortar la piel y los tejidos
subcutáneos y provocar lesiones graves e incluso
una amputación. La pistola rociadora retiene la alta presión,
incluso cuando apaga el motor y desconecta el agua, lo que
podría provocar lesiones graves.
• NUNCA apunte la pistola hacia personas, animales o
plantas.
• SIEMPRE apunte la pistola en una dirección segura;
accione el gatillo para liberar la presión cada vez que
apague la hidrolavadora.
ADVERTENCIA Riesgo de incendio. Rociar líquidos
inflamables podría provocar la muerte o lesiones
graves.
• NO rocíe líquidos inflamables.
ADVERTENCIA Riesgo de incendio. Si el cable se sobreca-
lienta podría provocar la muerte o lesiones graves.
• Desenrolle el cable por completo antes de usar.
• NO cubra el cable con ningún material.
ADVERTENCIA Este producto contiene plomo y sus com-
puestos, conocidos por el Estado de California como causantes
de fectos congénitos y otros daños reproductivos. Lávese las
manos después de manipular este producto.
17

A - Asa — Tome el asa para levantar o rodar la unidad hacia
adelante y atrás
B - Pistola rociadora — Controla la aplicación de agua sobre la
superficie a limpiar con el gatillo. Incluye un bloqueo del gatillo
para poder soltarlo mientras está en uso.
C - Manguera de alta presión — Conectar a la pistola.
D - Interruptor maestro de ENCENDIDO/APAGADO — Pulse el
lado izquierdo (ROJO) (I) para APAGAR la hidrolavadora. Pulse el
lado derecho (VERDE) (O) para ENCENDER la hidrolavadora.
E - Entrada del suministro de agua — Conectar al suministro
de agua con una manguera de jardín de una longitud máxima de
50 pies (15.24 m).
F - Soporte de la pistola — Sostiene a la pistola y la lanza.
G - Manivela del asa — Despliegue el extremo y gire para en-
rollar el cable de alimentación o la manguera de alta presión.
H - Cable eléctrico con GFCI — La hidrolavadora eléctrica y el
operador quedan protegidos por un interruptor diferencial (GFCI).
I - Lanza de rociado — Le permite usar tres puntas de rociado
diferentes.
J - Puntas de rociado — Puntas de 15°, 25°, jabón y turbo
incluidas.
K - Depósitos de detergente — Cada uno admite hasta un
cuarto de galón (1.2 l) de detergente apto para hidrolavadoras.
18
CARACTERÍSTICAS Y CONTROLES
CONOZCA LA HIDROLAVADORA
Lea el manual del usuario y las reglas de seguridad antes de usar la hidrolavadora.
Compare las ilustraciones con la hidrolavadora para familiarizarse con la ubicación de los diversos controles y ajustes.
Guarde este manual para consultarlo en el futuro.
ENSAMBLAJE
La hidrolavadora eléctrica requiere de cierto ensamblaje pero se
alista para el uso con rapidez.
Si tiene problemas con el ensamblaje de la hidrolavadora, llame a
la línea de atención al cliente de la hidrolavadora al 1-866-902-
9690.
DESEMPACAR LA HIDROLAVADORA
1. Sacar todo de la caja.
2. Asegúrese de que tiene todas las piezas incluidas antes de
comenzar a ensamblar.
CONTENIDO DE LA CAJA
Verifique todo el contenido. Si alguna pieza falta o está dañada,
llame a la línea de atención al cliente de la hidrolavadora al
1-866-902-9690.
• Unidad principal
• Pistola rociadora
• Manguera de alta presión
• Lanza plástica
• Consejos de conexión rápida (3)
• Bolsa de piezas (que incluye lo siguiente):
• Juego de juntas tóricas
• Manual del usuario
Familiarícese con cada pieza antes de ensamblar la hidrolava-
dora. Identifique todo el contenido con las ilustraciones en la
página 18. Si alguna pieza falta o está dañada, llame a la línea de
atención al cliente de la hidrolavadora al 1-866-902-9690.
ENSAMBLAR LA HIDROLAVADORA
Deberá ensamblar la hidrolavadora Craftsman antes de usarla:
1. Lubrique las juntas tóricas.
2. Conecte la manguera de presión a la pistola y a la bomba.
3. Conecte el suministro de agua a la bomba.
4. Fije la lanza a la pistola.
5. Fije la punta de rociado de conexión rápida a la lanza.
Lubrique las juntas tóricas
La lubricación de las juntas tóricas es muy importante para
la instalación y el uso. Aplicar lubricante (grasa sintética o de
petróleo) durante el ensamblaje ayuda a que las juntas tóricas se
asienten correctamente y sellen con más eficacia. También ayuda
a proteger las juntas tóricas del daño por abrasión, aprietes o
cortes y extiende la vida útil de estas.
AVISO SIEMPRE aplique una pequeña cantidad de lubricante
en las juntas tóricas antes de ensamblar la manguera de alta
presión (extremos de la bomba y la pistola) (A), lanza (extremo de
la pistola) (B) y manguera de jardín a la bomba (C).
Lubrique todas las conexiones que se muestran a continua-
ción, siguiendo estas instrucciones:
1. Inspeccione y limpie las superficies de conexión antes de
lubricar y ensamblar.
1. Use los lubricantes con moderación durante el ensamblaje;
apenas se necesita una capa ligera.
1. Use un cepillo pequeño o hisopo de algodón para aplicar la
grasa directamente a las juntas tóricas cuando no estén al
alcance (accesorios QC y M22).
C
A
B
19
2.
3.

Conecte las mangueras al suministro de agua
AVISO Utilizar SOLO agua fría (menos de 100 °F)
1. Conecte la manguera de jardín (longitud máxima 50 pies /
15.24 m) al suministro de agua.
2. Haga pasar agua por la manguera de jardín por 30 segundos
para quitar la suciedad de esta. Cierre el agua.
3. Confirme que la pantalla de entrada de agua (A) está insta-
lada en la entrada de agua ubicada en el lado izquierdo de la
unidad; No la quite excepto que la vaya limpiar.
AVISO Si la pantalla de entrada está dañada o falta, NO use la
hidrolavadora eléctrica. Llame al 1-866-902-9690 para obtener
asistencia.
AVISO NO encienda la bomba sin conectar y abrir el suministro de
agua. El daño que sufra el equipo por no seguir estas instruccio-
nes anulará la garantía.
• Fije el extremo opuesto de la manguera de jardín (B) al
acople de la entrada de agua (C). Ajustar a mano.
• Fije el extremo opuesto de la manguera de alta presión a la
pistola. Gire la tuerca (F) de la manguera de alta presión que
conecta a la pistola (G) a mano.
4.
5.
20
C
A
B
Conecte la lanza y la punta de rociado
1. ABRA el agua, apunte la pistola en una dirección segura,
pulse el botón de bloqueo del gatillo (H) para liberarlo, luego
accione el gatillo (J) para purgar el aire y las impurezas del
sistema de la bomba y la pistola.
• Inserte y gire la lanza plástica (K) en la pistola (M). Una vez
que la lanza se deslice en la pistola, aplique mayor presión
hacia adentro a la lanza y gírela 1/4 de vuelta en sentido
horario hasta que quede firmemente en su lugar.
• CIERRE el agua y libere el gatillo. Apunte la pistola en una di-
rección segura y asegúrese de que el gatillo esté bloqueado
y no se pueda accionar.
• Inserte la punta de rociado (N) en la lanza plástica (P). Una
vez que la punta de rociado se deslice en la pistola, aplique
más presión hacia adentro hasta que ENCAJE en su lugar.
3.
4.
2.
1.
J
H
K
N
P
M
/