Leap Frog 615303 User manual
- Category
- Toys & accessories
- Type
- User manual
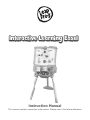
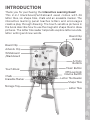
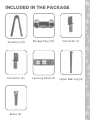
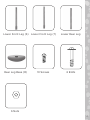
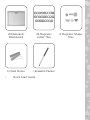
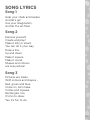
Leap Frog 615303 is a 2-in-1 easel with a whiteboard and blackboard, perfect for creative and educational play. It comes with 26 magnetic letter tiles and a reader that teaches letter names, sounds, and words. The touch book features interactive pages that encourage drawing and spelling. Four activity buttons offer music, art, and rhythm activities. The light-up music button plays four learning songs, and the storage tray keeps all the pieces organized.
Leap Frog 615303 is a 2-in-1 easel with a whiteboard and blackboard, perfect for creative and educational play. It comes with 26 magnetic letter tiles and a reader that teaches letter names, sounds, and words. The touch book features interactive pages that encourage drawing and spelling. Four activity buttons offer music, art, and rhythm activities. The light-up music button plays four learning songs, and the storage tray keeps all the pieces organized.


-
 1
1
-
 2
2
-
 3
3
-
 4
4
-
 5
5
-
 6
6
-
 7
7
-
 8
8
-
 9
9
-
 10
10
-
 11
11
-
 12
12
-
 13
13
-
 14
14
-
 15
15
-
 16
16
-
 17
17
-
 18
18
-
 19
19
-
 20
20
-
 21
21
-
 22
22
-
 23
23


Leap Frog 615303 User manual
- Category
- Toys & accessories
- Type
- User manual
Leap Frog 615303 is a 2-in-1 easel with a whiteboard and blackboard, perfect for creative and educational play. It comes with 26 magnetic letter tiles and a reader that teaches letter names, sounds, and words. The touch book features interactive pages that encourage drawing and spelling. Four activity buttons offer music, art, and rhythm activities. The light-up music button plays four learning songs, and the storage tray keeps all the pieces organized.
Ask a question and I''ll find the answer in the document
Finding information in a document is now easier with AI
Related papers
Other documents
-
LeapFrog 611203 User guide
-
Activa D407093 User manual
-
Crayola 74-1620 Datasheet
-
VTech DigiArt User manual
-
Dukane LEADERBOARD LB77H User manual
-
-
Hasbro All in One Fun Learning Center Operating instructions
-
Reflecta 23057 Datasheet
-
LeapFrog Tad's Fridge Phonics Parent Guide
-