Page is loading ...
User’s Manual
© 2016 VTech
All rights reserved
Printed in China
91-003216-006
US
Dear Parent,
At VTech®, we know how important the first day school is for your
child. To help prepare preschoolers for this important event, VTech
® has
developed the Preschool Learning
™ series interactive ts.
Preschool Learning
™ features fun characters and inviting school themes
that use technology to capture a child’s aention and teach important
preschool skills like spelling, counting and the alphabet. ese vital skills
are taught in a way that's bh fun and highly engaging to maintain a
child's interest. Children will also be introduced to fun school suects
such as art cla, music cla and even rece! With Preschool Learning
™,
learning is fun om day one!
At VTech
®, we know that a child has the ability to do great things.
at’s why all our electronic learning products are uniquely designed
to develop a child’s mind and allow them to learn to the best their
ability. We thank you for trusting VTech
® with the important job
helping your child learn and grow!
Sincerely,
Your iends at VTech®
To learn more about VTech® ts, visit www.vtechkids.com
3
INTRODUCTION
Thank you for purchasing the VTech
®
DigiArt Creative Easel
TM
.
The DigiArt Creative Easel
TM
transforms into a dry-erase board,
chalkboard or drawing table. Using the magic pen, children can follow
the blinking lights to draw more than 150 letters, numbers, objects and
shapes. They can also explore their creativity and draw anything they
want.
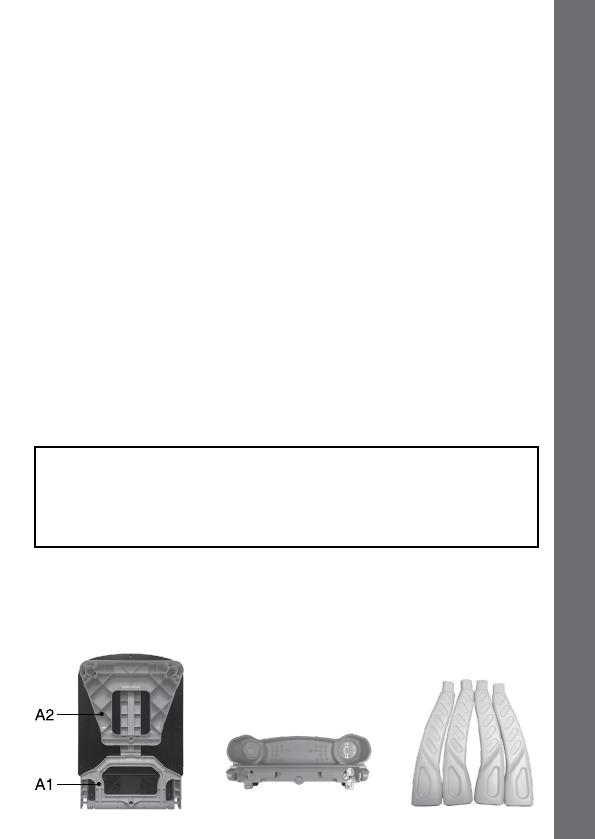
INCLUDED IN THIS PACKAGE
• One DigiArt Creative Easel
TM
(assembly required)
• Threepiecesofchalk
• Onedry-erasemarker
• User’smanual
WARNING:
All packing materials such as tape, plastic sheets, packaging locks and
tags are not part of this toy and should be discarded for your child’s
safety.
NOTE: Please keep this user’s manual as it contains important
information.
ACTIVATING NORMAL PLAY
1. Press the ON/OFF button to turn the unit on.
2. Press the FREE DRAW BUTTON.
3. Place and hold the MAGIC PEN on an LED dot for 2 seconds.
PARTS Of
THE DIGIART CREATIvE EASEL
Tm
INTRODUCTION
SUPPLIES TRAY (B)
CHALKBOARD/DRY-ERASEBOARD(A)
LEGS

4
20 21
22
16
18
17
9
10
12
14
2
3
7
8
6
5
4
1
13
19
15
PARTS Of THE DIGIART CREATIvE EASEL
Tm
5
MAGIC PEN
2
DRY-ERASEBOARD
6
SUPPLIES TRAY
3
LED SCREEN AREA
7
CHALKBOARD
4
MAGICPENHOLDER
8
BATTERYCOMPARTMENT
9
ON/OFFBUTTON
10
LETTERBUTTONS
11
NUMBERBUTTON
12
VOLUMEDOWNBUTTON
13
VOLUMEUPBUTTON
14
MUSICON/OFFBUTTON
15
BRIGHTNESSBUTTON
16
DRAWOBJECTSBUTTON
17
DRAWSHAPESBUTTON
18
GUESSTHEPICTUREBUTTON
19
FREEDRAWBUTTON
20
LEFTARROWBUTTON
21
OKBUTTON
22
RIGHTARROWBUTTON
1
PAPER CLIP
11
5
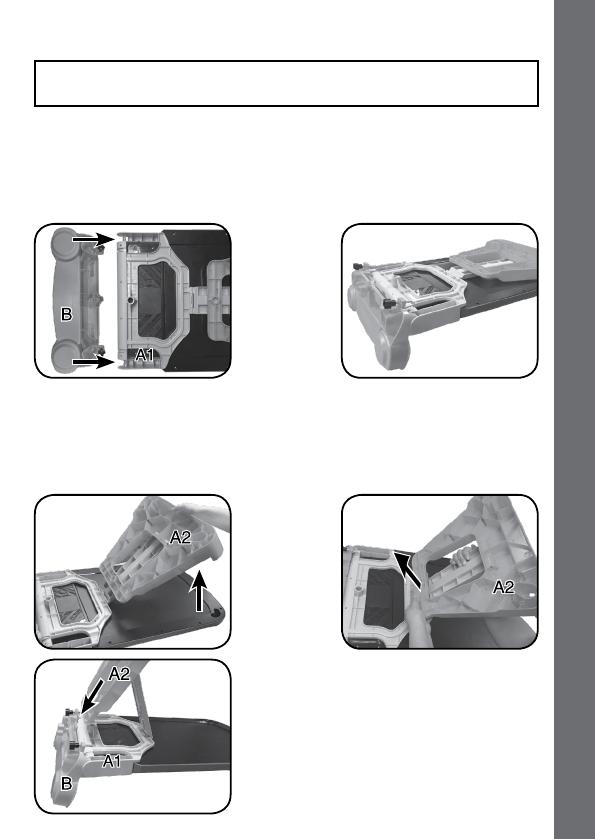
ASSEmBLY INSTRUCTIONS
ASSEmBLY INSTRUCTIONS
Adult assembly required. For your child’s safety, do not let your
child play with the toy until it is fully assembled.
DRY-ERASE EASEL fORm
Step 1:
To attach the SUPPLIES TRAY (B) to the CHALKBOARD/DRY-ERASE
BOARD (A), use the hooks on the SUPPLIES TRAY (B) to connect it to
part A1 of the CHALKBOARD/DRY-ERASE BOARD (A).
Step 2:
Lift the wide area of part A2 of the CHALKBOARD/DRY-ERASE
BOARD (A). Then unsnap the narrow area of part A2 and move it
towards the SUPPLIES TRAY (B). Insert the narrow part of A2 into the
slot on the back of the SUPPLIES TRAY (B), lining up the hole of A2
with the center screw of the SUPPLIES TRAY (B).

6
Step 3:
Tightenthecenterscrewbypushingitinandturningitclockwisetox
it in position.
Step 4:
Insert two LEGS into part A2 of the CHALKBOARD/DRY-ERASE
BOARD (A) and two LEGS into the bottom of the SUPPLIES TRAY (B).
The LEGS will lock into place.
ASSEmBLY INSTRUCTIONS
7
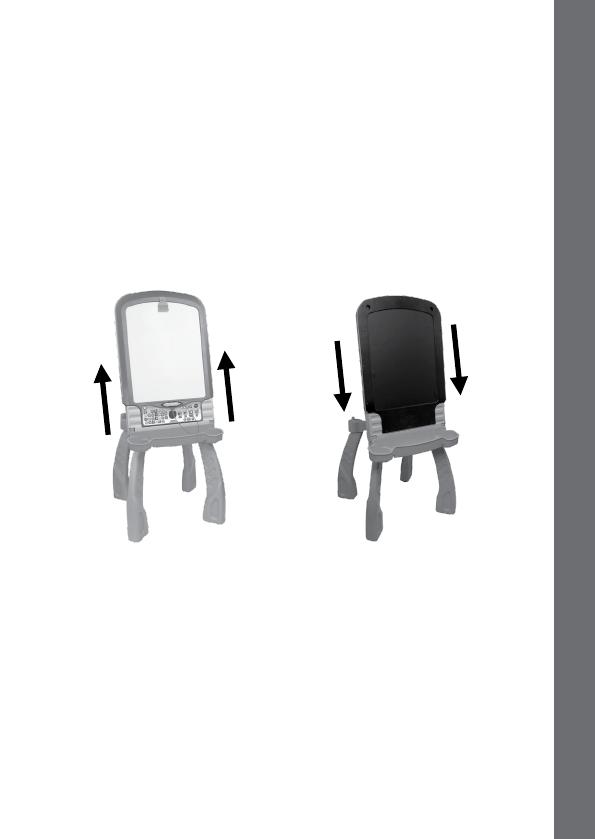
TRANSfORm fROm DRY-ERASE BOARD TO
CHALKBOARD
Step 1:
Make sure the MAGIC PEN is placed in the MAGIC PEN HOLDER.
Step 2:
Detach the CHALKBOARD/DRY-ERASE BOARD (A) from the stand
by pulling up, turning it over to the chalkboard side and putting it into
the stand again.
To change the chalkboard back into a dry-erase board, reverse the
order of the steps above.
TRANSfORmATION INSTRUCTIONS

8
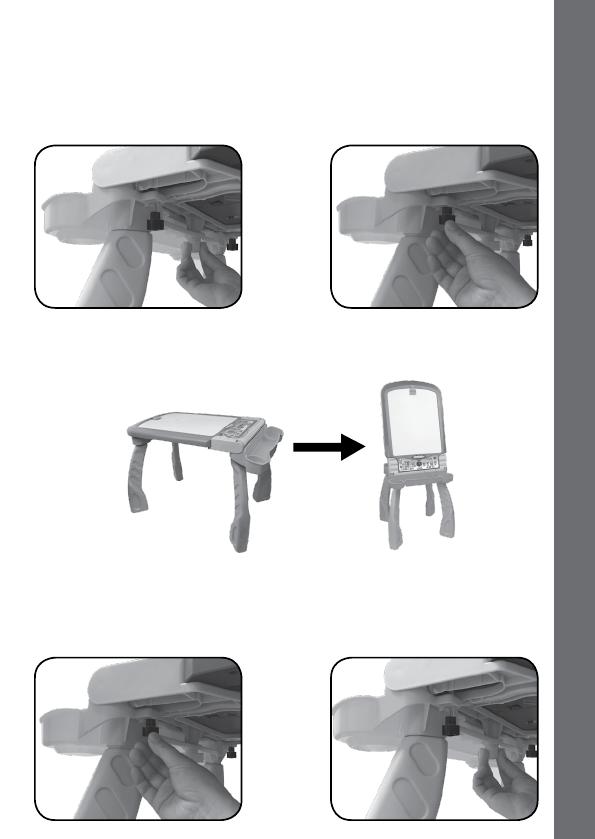
TRANSFORM FROM EASEL TO DRAWING TABLE
Step 1:
Make sure the unit is turned OFF and in DRY-ERASE BOARD mode
before transforming. Loosen the center screw by pushing in and turning
it counterclockwise.
Step 2:
Hold the CHALKBOARD/DRY-ERASE BOARD (A) with one hand and
with the other hand, move the back legs slowly backwards until the
CHALKBOARD/DRY-ERASE BOARD (A) lies horizontally on the four
LEGS.
TRANSfORmATION INSTRUCTIONS
9
Step 3:
Snap A2 into place and tighten the center screw by pushing it in and
turning it clockwise to x it in position. Then tighten the left and right
screws on the SUPPLIES TRAY (B) by turning them clockwise. The
DRAWING TABLE is now ready to use and the LED SCREEN AREA
will rotate automatically.
TRANSfORm fROm DRAWING TABLE
TO EASEL
Step 1:
Make sure the unit is turned OFF before transforming. Loosen the
left and right screws on the SUPPLIES TRAY (B) by turning them
counterclockwise. Then, loosen the center screw by pushing in and
turning it counterclockwise.
TRANSfORmATION INSTRUCTIONS

10
GETTING STARTED
Step 2:
Unsnap A2, lift the CHALKBOARD/DRY-ERASE BOARD (A) with one
hand and move the back legs forward with the other hand. Insert A2 into
the slot on the back of the SUPPLIES TRAY (B), lining up the hole of A2
with the center screw of the SUPPLIES TRAY (B).
Step 3:
Tightenthecenterscrewbypushingitinandturningitclockwisetox
it in position.
GETTING STARTED
BATTERY INSTALLATION
1. Make sure the unit is turned OFF.
2. Locate the battery compartment on the
bottomofthechalkboard.Openthebattery
cover by sliding the tab.
3. Remove the exhausted batteries and install
4 new “AA” batteries as illustrated.
4. Replace the battery cover and push down
until it clicks into position.

11
BATTERY NOTICE
• Usenewalkalinebatteriesformaximumperformance.
• Useonlybatteriesofthesameorequivalenttypeasrecommended.
• Do not mix different types of batteries: alkaline, standard (carbon-
zinc) or rechargeable (Ni-Cd, Ni-MH), or new and used batteries.
• Donotusedamagedbatteries.
• Insertbatterieswiththecorrectpolarity.
• Donotshort-circuitthebatteryterminals.
• Removeexhaustedbatteriesfromthetoy.
• Removebatteriesduringlongperiodsofnon-use.
• Donotdisposeofbatteriesinre.
• Donotchargenon-rechargeablebatteries.
• Remove rechargeable batteries from the toy before charging (if
removable).
• Rechargeablebatteriesareonlytobechargedunderadultsupervision.
LOW BATTERY
Whenthebatteriesareexhausted,theLED SCREEN AREA will show
the empty battery icon and then automatically shut off.
Please replace the batteries with a full set of new batteries before further
use.
AUTOMATIC SHUT-OFF
To preserve battery life, the DigiArt Creative Easel
TM
will automatically
turn off after 3 minutes without operation. In Free Draw Mode, the auto-
off time is 5 minutes.
DRY-ERASE BOARD
• Usetheincludeddry-erasemarkertodrawonthedry-eraseboard.
• Wipewithaslightlydampclothtoerasethedrawing.
Note:
• Notalldry-erasemarkerscanbecleanedthoroughly.Everytimeyou
use a new marker, draw a small line in the corner of the board before
allowing your child to play with the marker to see if it can be erased.
BATTERY NOTICE

12
mAGIC PEN AND LED SCREEN AREA
• Donotusesharporpointedobjectsonthewritingsurface.Scratching
the board will cause permanent damage.
• Use non-toxic dry-erase markers only. Do not use washable or
permanent marker, crayons, pens, pencils or other drawing tools to
draw on the board surface.
CHALKBOARD
• Usethechalktodrawonthechalkboard.
• Wipewithaslightlydampclothtoerasethedrawing.
Note:
• Donotusesharporpointedobjectsonthewritingsurface.Scratching
the board will cause permanent damage.
• Use the included chalk or school chalk only. Do not use outdoor
chalk, any type of marker, crayons, pens, pencils or other drawing
tools to draw on the board surface.
MAGIC PEN AND LED SCREEN AREA
The LED SCREEN AREA is located in the center of the DRY-ERASE
BOARD. The screen will rotate automatically when transformed between
the DRY-ERASE BOARD and DRAWING TABLE.
Be careful not to pull hard on the MAGIC PENwire.WhentheMAGIC
PEN is not in use, securely place it back in the MAGIC PEN HOLDER.
NOTE:
• TheMAGIC PEN only works when the unit is on.
• WhentheLEDscreeniscovered,donotusetheMAGIC PEN to draw
on the board. The sensitivity of the MAGIC PEN will be affected and
may not work properly.
• DirectsunlightmayaffectthesensitivityoftheMAGIC PEN, it is not
recommended for use outdoors.
13
ACTIvITIES
WRITE LETTERS
Press any LETTER BUTTON tolearnhowtowritethatletter.Follow
the voice instructions and use the MAGIC PEN to trace the blinking
lights to learn how to write the letter.
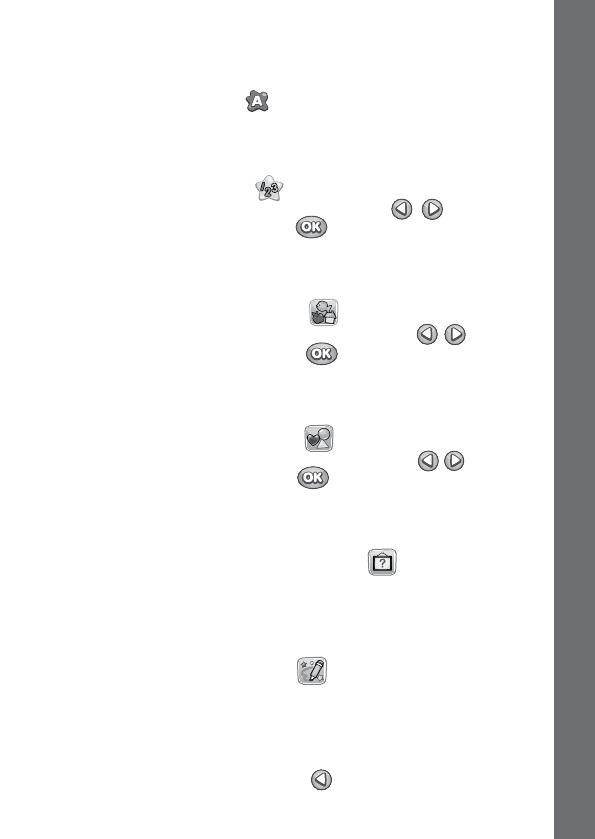
WRITE NUMBERS
Press the NUMBER BUTTON to see the number-selection menu.
Press the LEFT or RIGHT ARROW BUTTONS to choose a
number and press the OK BUTTON .Followthevoiceinstructions
and use the MAGIC PEN to trace the blinking lights to learn how to write
the number.
DRAW OBJECTS
Press the DRAW OBJECTS BUTTON to show the object-selection
menu. Press the LEFT or RIGHT ARROW BUTTONS to choose
an object and press the OK BUTTON toconrm.Followthevoice
instructions and use the MAGIC PEN to trace the blinking lights to learn
how to draw the object.
DRAW SHAPES
Press the DRAW SHAPES BUTTON to show the shape-selection
menu. Press the LEFT or RIGHT ARROW BUTTONS to choose
a shape and press the OK BUTTON .Followthevoiceinstructions
and use the MAGIC PEN to trace the blinking lights to learn how to draw
the shape.
GUESS THE PICTURE
Press the GUESS THE PICTURE BUTTON to start the game.
Follow the voice instructions and use the MAGIC PEN to trace the
blinking lights. Try to guess what the object is before you complete the
drawing.
FREE DRAW
Press the FREE DRAW BUTTON to create your own light-up
picture using the MAGIC PEN. Listen to ten different songs.
• Use the MAGIC PEN to light up the lights on the LED SCREEN
AREA.
• HoldtheMAGIC PEN on a light to clear it.
• PresstheLEFT ARROW BUTTON
to undo one step (maximum
30 steps).
ACTIvITIES
14
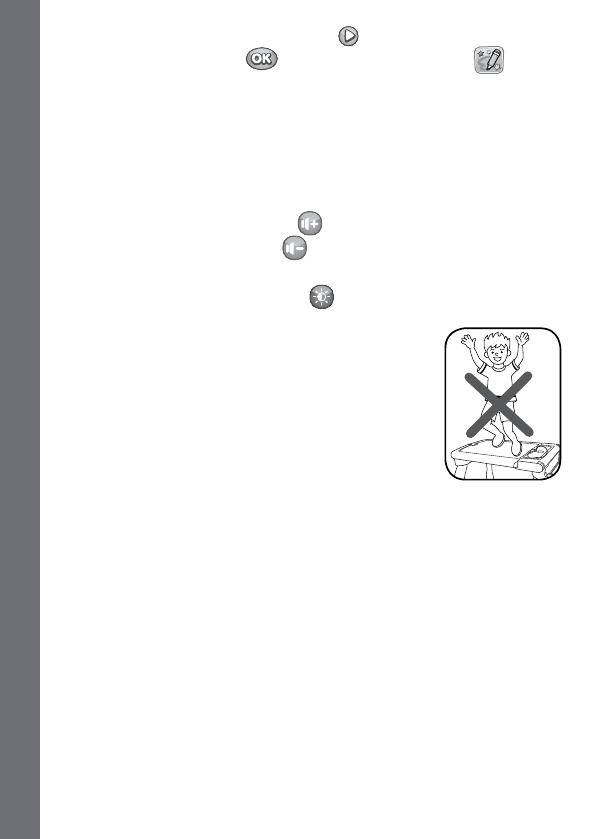
• PresstheRIGHT ARROW BUTTON to play the next song.
• PresstheOK BUTTON
or FREE DRAW BUTTON to clear
the screen.
PAPER CLIP
Insert a piece of paper into the PAPER CLIP and start drawing.
If you would like to listen to the music while drawing, turn on the unit and
press the FREE DRAW BUTTON.
VOLUME
Press the VOLUME UP BUTTON to make the volume louder, press
the VOLUME DOWN BUTTON to make the volume quieter.
SCREEN BRIGHTNESS
Press the BRIGHTNESS BUTTON to adjust the brightness.
CAUTION:
• Donotlaydown,standorjumponthetable.
• This item should only be used on level ground.
DO NOT use on an uneven surface.
• Thisitemwasmadetobeusedindoors.
• DO NOT use sprays or cleaners on the boards
because they could cause damage.
CARE & mAINTENANCE
1. Please store and use in dry areas.
2. Keep the unit clean by wiping with a slightly damp cloth.
3. Keep the unit out of direct sunlight and away from any direct heat
sources.
4. Remove the batteries when the unit is not in use for an extended
period of time.
5. Do not drop the unit on a hard surface and do not expose the unit to
excess moisture or water.
CARE & mAINTENANCE/TROUBLESHOOTING

15
TROUBLESHOOTING
Problem Possible solution(s)
The unit does
notturnON.
1. Reload the batteries to reset the unit. Please
refer to Battery Replacement section for the
instructions.
2. Batteries may be exhausted, please replace
with a new set of batteries.
The unit gives
an incorrect
response.
1. Batteries may be exhausted, please replace
with a new set of batteries.
2. Humidity may cause interference with the unit.
Please be sure the unit is in a dry area.
The magic pen
cannot draw on
some dots.
1. Make sure the LED screen is not covered by
paper, dry-erase marker drawings or other dirt.
Otherwise,the sensitivity of the MAGIC PEN
will be affected and may not work properly.
If the problem persists, please call our Consumer Services Department
at 1-800-521-2010 in the U.S. or 1-877-352-8697 in Canada, or by going
toourwebsiteatwww.vtechkids.comandllingoutourContactUsform
located under the Customer Support link. A service representative will
be happy to help you.
IMPORTANT NOTE:
Creating and developing VTech
®
products is accompanied by a
responsibility that we at VTech
®
take very seriously. We make
every effort to ensure the accuracy of the information, which forms
the value of our products. However, errors sometimes can occur.
It is important for you to know that we stand behind our products
and encourage you to call our Consumer Services Department
at 1-800-521-2010 in the U.S. or 1-877-352-8697 in Canada, or
bygoingtoourwebsiteatwww.vtechkids.comandllingoutour
Contact Us form located under the Customer Support link with
anyproblemsand/orsuggestions thatyoumight have.Aservice
representative will be happy to help you.
ImPORTANT NOTE

16
ImPORTANT NOTE
NOTE:
This equipment has been tested and found to comply with the limits for
aClassBdigitaldevice,pursuanttoPart15oftheFCCRules.These
limits are designed to provide reasonable protection against harmful
interference in a residential installation. This equipment generates, uses
and can radiate radio frequency energy and, if not installed and used
in accordance with the instructions, may cause harmful interference to
radio communications. However, there is no guarantee that interference
will not occur in a particular installation.
If this equipment does cause harmful interference to radio or television
reception, which can be determined by turning the equipment off and on,
the user is encouraged to try to correct the interference by one or more
of the following measures:
• Reorientorrelocatethereceivingantenna.
• Increasetheseparationbetweentheequipmentandreceiver.
• Connecttheequipmentintoanoutletonacircuitdifferentfromthatto
which the receiver is connected.
• Consultthedealeroranexperiencedradio/TVtechnicianforhelp.
THIS DEVICE COMPLIES WITH PART 15 OF THE FCC
RULES.OPERATIONISSUBJECTTOTHEFOLLOWINGTWO
CONDITIONS:(1)THISDEVICEMAYNOTCAUSEHARMFUL
INTERFERENCE,AND(2)THISDEVICEMUSTACCEPTANY
INTERFERENCE RECEIVED, INCLUDING INTERFERENCE
THATMAYCAUSEUNDESIREDOPERATION.
CAN ICES-3 (B)/NMB-3(B)
Caution:changesormodicationsnotexpresslyapprovedbytheparty
responsibleforcompliancecouldvoidtheuser’sauthoritytooperatethe
equipment.
Conforms to ASTM D-4236.

Register your product online at vtechkids.com/warranty.
PRODUCT WARRANTY
This Warranty is applicable only to the original purchaser,
is non-transferable and applies only to “VTech” products or
parts. This product is covered by a 3-month Warranty from
the original purchase date, under normal use and service,
against defective workmanship and materials. This Warranty does not apply
to (a) consumable parts, such as batteries; (b) cosmetic damage, including
but not limited to scratches and dents; (c) damage caused by use with non-
VTech products; (d) damage caused by accident, misuse, unreasonable use,
immersion in water, neglect, abuse, battery leakage, or improper installation,
improper service, or other external causes; (e) damage caused by operating
the product outside the permitted or intended uses described by VTech in the
owner’s manual; (f) a product or part that has been modified (g) defects caused
by normal wear and tear or otherwise due to the normal aging of the product; or
(h) if any VTech serial number has been removed or defaced.
Prior to returning a product for any reason, please notify the VTech Consumer
Services Department by going to our web site at www.vtechkids.com, filling
out our Contact Us form located under the Customer Support link or calling
1-800-521-2010.
If the service representative is unable to resolve the issue, you will be provided
instructions on how to return the product and have it replaced under Warranty.
Return of the product under Warranty must adhere to the following rules: If
VTech believes that there may be a defect in the materials or workmanship of the
product and can confirm the purchase date and location of the product, we will
at our discretion replace the product with a new unit or product of comparable
value. A replacement product or parts assumes the remaining Warranty of the
original product or 30 days from the date of replacement, whichever provides
longer coverage.
THIS WARRANTY AND THE REMEDIES SET FORTH ABOVE ARE EXCLUSIVE AND
IN LIEU OF ALL OTHER WARRANTIES, REMEDIES AND CONDITIONS, WHETHER
ORAL, WRITTEN, STATUTORY, EXPRESS OR IMPLIED. IF VTECH CANNOT
LAWFULLY DISCLAIM STATUTORY OR IMPLIED WARRANTIES THEN TO THE
EXTENT PERMITTED BY LAW, ALL SUCH WARRANTIES SHALL BE LIMITED TO
THE DURATION OF THE EXPRESS WARRANTY AND TO THE REPLACEMENT
SERVICE AS DETERMINED BY VTECH IN ITS SOLE DISCRETION.
To the extent permitted by law, VTech will not be responsible for direct, special,
incidental or consequential damages resulting from any breach of Warranty.
This Warranty is not intended to persons or entities outside the United States
of America. Any disputes resulting from this Warranty shall be subject to the
final and conclusive determination of VTech.
/