Page is loading ...

REV060818 TR3614A&TR4814A&TR6014A
SP31129
SP31130
SP31131
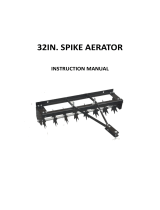
TOW BEHIND DRUM
SPIKE AERATOR
Instruction & Assembly
SAVE THESE INSTRUCTIONS FOR FUTURE REFERENCE

- 2 -
Table of Contents
General Warnings and Rules.3
Hazard Signal Word Definitions.4
Controls and Features Identification.5
Assembly Instructions.6
Operation Instructions.7
Maintenance and Storage...8
Specification..8
Parts Drawing & Parts List..9

- 3 -
GENERAL WARNINGS
READ and UNDERSTAND this manual completely before using the Spike Aerator.
Operator must read and understand all safety and warning information, operating instructions,
maintenance and storage instructions before operating this equipment. Failure to properly operate and
maintain the aerator could result in serious injury to the operator or bystanders.
Operation Warnings
Do not at any time carry passengers, sit or stand on the aerator.
Do not allow children to play on, stand upon or climb on the aerator.
Always inspect the aerator before using to assure it is in good working condition.
Replace or repair damaged or worn parts immediately.
Always check and tighten hardware and assembled parts before operation.
Do not exceed rated capacity – 36”/280lb, 48”/375lb & 60”/ 460lb.
Avoid large holes and ditches when operating the equipment.
Be careful when operating the aerator on steep grades (hill).
ALWAYS operate at reduce speed in rough terrain, along creeks, ditches and on hillsides.
Do not operate close to creeks, ditches and public highways.
To avoid personal injury and/or equipment damage DO NOT EXCEED 5MPH.
Only tow with recommended vehicles (Lawn/Garden Tractors and ATVs).
Always refer to the vehicle owner’s manual for proper towing.
Aerator is not designed to be used with zero-turn mowers.
Always secure and lock aerator to the vehicle hitch before operating.
Crush and Cut Hazards
Always keep hands and feet clear from moving parts while operating the equipment.
Always clear and keep work area clean when operating.
Always
wear safety gear, eye protection, gloves and work boots when operating the aerator.
WARNING
The warnings, cautions, and instructions outlined in this instruction manual cannot cover all
possible conditions or situations that may occur. It must be understood by the operator that
common sense and caution are factors which cannot be built into this product and must be
supplied by the operator.
PROP 65
WARNING
This product can expose you to chemicals including lead and lead compounds which are known
to the State of California to cause cancer and birth defects or other reproductive harm. For more
information, go to www.P65Warnings.ca.gov.
Assembly Is Required
This product requires assembly before use. See “Assembly” section for instructions. Because of the
weight and/or size of the aerator, it is recommended that another adult be present to assist with the
assembly. INSPECT ALL COMPONENTS closely upon receipt to make sure no components are
missing or damaged.

- 4 -
Hazard Signal Word Definitions
ABOUT YOUR SPIKE AERATOR
This spike aerator has a roughed steel construction and is designed to penetrate the soil up to 2.5 ” in
depth, allowing for compact soil to be loosen. Aerators promote a health lawn by opening up the
ground to allow water, air and nutrients to reach your lawns root system. It is ideal for heavy-traffic
areas (playgrounds and sports fields) and burned out, drought-damaged lawns. The steel roller will
accommodate either water or sand depending on the operators needs. When using water always
drain and remove the fill/drain plug to avoid freezing. The roller must be drained at temperatures
below 32°F (0°C) to prevent damage.
SP31129 - 36” Spike Aerator Max Capacity 280lb (127kg)
SP31130 - 48” Spike Aerator Max Capacity 375lb (170kg)
SP31131 - 60” Spike Aerator Max Capacity 460lb (209kg)
Technical specifications on the spike aerator are provided in the “Specifications” section of this
manual.
This is the safety alert symbol. It is used to alert
you to potential personal injury hazards. Obey all
safety messages that follow this symbol to avoid
possible injury or death.
DANGER indicates an imminently hazardous
situation which, if not avoided, will result in death
or serious injury.
DANGER
WARNING indicates a potentially hazardous
situation which, if not avoided, could result in
death or serious injury.
WARNING
CAUTION indicates a potentially hazardous
situation which, if not avoided, may result in minor
or moderate injury.
CAUTION
CAUTION used without the safety alert symbol
indicates a potentially hazardous situation which,
if not avoided, may result in property damage.
CAUTION

- 5 -
Read this owner’s manual before operating the equipment. Familiarize yourself with the location and
function of the controls and features. Save this manual for future reference.
1) Steel Drum Body – Use water or sand do not exceed listed rated capacity.
2) Hitch Bracket – Attaches to Steel Drum Body.
3) Hitch – Pin-type design use only with approve vehicles.
4) Joint Bushing / Grease Fitting – Grease before using.
Controls
and Features
Identification
1
2
3
4

- 6 -
CAUTION
Read and follow all instructions for assembly and operation. Failure to properly assemble this
equipment could result in serious injury to the user or bystanders, or cause equipment damage
.
SPIKE AERATOR COMPONENT PARTS AND ASSEMBLY
Take all parts out of the shipping crate and inspect components to ensure there are no missing
pieces before starting to assemble the spike aerator.
TOOLS REQUIRED
• 10mm Wrench
• 17mm Wrench
• Large Adjustable Wrench (Fill/Drain Plug)
CAUTION
When assembling or using the aerator exercise caution at all times, the spikes are sharp and may
result in serious injury to the user or bystanders.
Spike Aerator Assembly
1. Locate and layout all hardware and component parts.
2. Attach the U- Roller bracket (#1) to the joint bushing (#11& #17) using flat washer Ø10 (#3),
nylon lock nut M10 (#4) and hex bolt M10x55 (#9).
3. Attach the joint bushing (#11& #17) to the axle of steel roller (#16), put a flat washer Ø24
(#10), then insert a cotter pin (#13).
4. Attach the hitch bracket (#8) to the U-Roller bracket (#1) using hex bolt M10x85 (#2),
flat
washer Ø10 (#3), nylon lock nut M10 (#4).
5. Insert hitch pin with 2 bushing (#6) and R pin (#7).
6. Tighten the grease fitting (#12) to the joint bushing (#11 & #17). Attach lock washer Ø6 (#18)
in the middle of joint bushing and grease fitting.
7. Securely tighten all hardware before using.
8. Fill roller with water or sand do not exceed rated capacity.
9. Place Washer (15) over hole and secure with Fill/Drain Plug (14) and tighten.
10. Grease or oil bushings before using.
Assembly Instruction
s

- 7 -
WARNING
Before operating or using the spike aerator, review the instructions below and safety information
.
Failure to follow these instructions may result in property damage or injury to the operator or
bystanders.
IMPORTANT:
Aerating is putting small holes in the soil up to 2.5 inches in depth to create small reservoirs that will
bring oxygen, fertilizer and water down to the roots. For best aerating results follow the soil/lawn
preparation and operating aerator procedures.
SOIL AND LAWN PREPARATION
1. Remove large and small debris from work area.
2. If the ground is hard and dry, it is recommended the ground be sprinkled or watered for one or
two hours prior to aerating.
3. If the ground is wet or muddy DO NOT attempt to aerate.
4. Mow lawn and remove loose clippings before aerating.
USING YOUR PLUG AERATOR
1. DO NOT at any time carry passengers, sit or stand on the spike aerator.
2. Never attach a garden hose to the fill/drain hole when filling the roller. Dangerous pressure
build up can occur.
3. Only tow with recommended vehicles (Lawn/Garden Tractors and ATVs).
4. Refer to the vehicle owner’s manual for proper safety and towing instructions.
5. Always secure and lock the aerator to the vehicle hitch before operating.
6. Always make sure that the tow vehicle and the combined weight of the operator MUST BE
greater than the load of the lawn roller for proper control.
7. Start vehicle engine with the controls in neutral position, put throttle at the slowest engine
speed. Put transmission in low gear first, allowing spikes to enter the ground. Increase the
speed as work conditions permit.
8. Vehicle braking and stability may be affected with the attachment of this equipment.
9. Never exceed 5mph when towing the aerator.
10. Aerate in the straightest line as possible making overlapping passes to increase the spike point
pattern.
11. DO NOT make sharp turns that may cause the vehicles tires to rub against the aerator.
12. Avoid extremely sharp turns when using the aerator to prevent damage to lawn.
13. DO NOT cross over walks or drives with the spike aerator.
14. On sloped lawns, always aerate in an up and down direction. DO NOT attempt to aerate
across the slope always go in an up and down direction.
15. Always use caution when backing the aerator to avoid “jack-knifing”. Always back up in a
straight line.
16. Do not exceed rated capacity.
WARNING
The spike aerator must be drained at temperatures below 32°F (0°C) to prevent damage.
When the roller is not being used always drain the water out and leave the fill/drain plug out.
Operation Instructions

- 8 -
WARNING
Improper maintenance and storage of the spike aerator may void your warranty.
MAINTENANCE
• ALWAYS disconnect equipment from towing vehicle when cleaning or servicing the unit.
• After each use drain water and leave plug out.
• Rinse/dry the lawn roller after each use.
• Before using, grease axle and all moving parts as needed.
• Periodically check all fasteners for tightness.
• Annually clean and lightly lubricate parts.
• Use a glossy enamel spray paint to touch up scratched or worn painted metal surfaces.
• Never exceed the rated capacity of the lawn roller, it will do damage.
IMPORTANT:
If a part needs replacement, only use parts that meet the manufacturer’s specifications. Replacement
parts that do not meet specifications may result in a safety hazard or poor operations.
STORAGE
• Never leave water in the roller for extended periods of time.
• Remove fill/drain plug when storing.
• Always drain water from the roller to keep it from freezing.
• Before storing make sure the lawn roller is clean and dry for years of trouble free service.
• Store indoors or protected area during severe weather and winter months.
36’’ Spike Aerator Load Capacity ...................................................... 280lb (127kg)
48’’ Spike Aerator Load Capacity ...................................................... 375lb (170kg)
60’’ Spike Aerator Load Capacity ...................................................... 460lb (209kg)
36’’ Spike Aerator Drum Dimension (L x W) ............................................. 36’’x14’’
48’’ Spike Aerator Drum Dimension (L x W) ............................................. 48’’x14’’
60’’ Spike Aerator Drum Dimension (L x W) ............................................. 60’’x14’’
Construction ................................................................................................... Steel
Max. Aeration Depth ......................................................................................... 2.5”
Hitch Type ................................................................................ Universal Pin Style
Maintenance
and
Storage
Specifications

- 9 -
Ref#
Drawing No. Description Qty
1 TR3614/TR4814/TR6014-00001 U- Roller Bracket 2
2 9101-10085-DX Hex Bolt M10x85 2
3 9301-10000-DX Flat Washer Ø10 6
4 9206-10000-DX Nylon Lock Nut M10 6
5 N870-00011 Hitch Pin 1
6 N280-00026 Bushing 2
7 N021-00004-DX R Pin 1
8 TR3614-01000 Hitch Bracket 1
9 9101-10055-DX Hex Bolt M10x55 4
10 T328-20004 Back Plate Ø43×Ø26×3 2
11 TR3614-03000 Joint Bushing (Right) 1
12 9701-06000 Grease Fitting 2
13 9404-05050-DX Cotter Pin Ø5x50 2
14 N450-00001-DX Fill/Drain Plug 1
15 N450-00002 Washer Ø40×Ø33×5 1
16 TR3614A/TR4814A/TR6014A-01000 Steel Roller 1
17 TR3614-02000 Joint Bushing (Left) 1
18 9303-06000-DX Lock Washer Ø6 2
Parts Drawing & Parts List
/