Page is loading ...

1
7
B
3
9
D
4
10
E
2
8
C
5
11
F
6
A
G
Vanguard
™
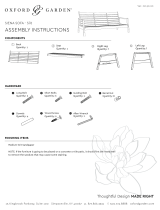
Drawing Room Table
Tools required: Phillips screwdriver, slotted screwdriver.
Assembly Instructions
For VAN42
VAN48
Important notes:
1. Power tools for assembly are not recommended. Great care must be taken to avoid
over-tightening screws so that holes are not stripped accidentally.
2. Wood products can be easily scratched if not handled carefully. Please use care
when unpacking and assembling to prevent damage.
Barrel Nuts
14 pcs
Allen Wrench
1 pc
Wood Dowels
14 pcs
Bolts, 2¼"
22 pcs
Wood Plugs
10 pcs
Bolts, 1/2"
4 pcs
Washers
8 pcs
Tabletop Assembly
1 pc
Leg - Back Left
1 pc
Leg - Front Left
1 pc
Leg - Back Right
1 pc
Leg - Front Right
1 pc
Side Rail - Left
1 pc
Side Rail - Right
1 pc
Back Rail
1 pc
Footrest
1 pc
Pencil Ledge
1 pc
Drawer Dividers
2 pcs
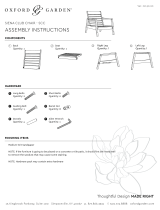
How To Install Bolts and Barrel Nuts
Insert barrel nut (
B
) in predrilled hole of side
rails (
5 &6
).
Use screwdriver to ensure long slot is aligned
with bolt (
A &G
).
Insert bolt and tighten.
Long slot in barrel nut must align with bolt.
1
2
3
4

2
Step 2
Side rails (
5 &6
) have angled ends and off-center middle
holes. They are not interchangeable.
The face of each side rail with seven holes should face in.
The middle three holes should be closest to the back of the
table (furthest from drawer knob).
Double-check that angled ends align properly with legs
before bolting.
Connect side rails between legs using 2¼" bolts and barrel
nuts (
B
) as shown in Figure 2. Keep all bolts slightly loose
to allow for assembly steps to follow.
1
2
3
4
5
Step 1
Remove parts from carton and check that all are
present. For ease of handling and assembly, do not cut
plastic wrap around tabletop assembly (
9
) until the
end of the assembly process.
Use care in handling all parts to prevent scratches
and other damage. Two people will be necessary to lift
tabletop assembly from carton.
Place tabletop assembly on a carpeted or otherwise
protected floor with the drawer unit facing up, as
shown in Figure 1.
Each leg is numbered (
1- 4
) and must be attached to
the corner with corresponding number.
Insert two dowels (
D
) in each leg (no glue necessary)
and attach legs to tabletop assembly using 2¼" bolts
(
A
) and washers (
E
). Keep all leg bolts slightly loose
to allow for assembly steps to follow.
1
2
3
4
5
©2012 ALVIN & COMPANY, INC.
Figure 2
Figure 3
7
8
D
B
A
5
6
A
B
Figure 1
3
4
9
E
A
2
1
D
Step 3
1
2
3
4
5
Back rail (
7
) has angled ends. Double-check
alignment with legs before bolting in place.
Insert 2 dowels into each end of back rail
(no glue necessary).
Connect back rail between legs using 2¼" bolts
and barrel nuts as shown in Figure 3. Keep bolts
slightly loose.
Insert 1 dowel into each end of footrest (
8
)
(no glue necessary).
Connect footrest between legs using 2¼" bolts and
barrel nuts. Rounded edge should face tabletop. Keep
bolts slightly loose.

3
©2012 ALVIN & COMPANY, INC.
Step 4
1
2
3
4
Bolt Tightening Sequence
Tighten all (22) 2¼" bolts using the following sequence. We
recommend a gradual tightening process in which you go
through the sequence a few times and tighten the bolts more
each time. This will ensure good joint alignment. Pay special
attention that the legs align well with the tabletop assembly.
Footrest to side rails first.
Side rails to legs second.
Back rail to legs third.
Legs to tabletop assembly fourth.
Step 5
Without cutting plastic wrap yet, lift from under the
tabletop (not the legs) and carefully flip table into the
upright position. This will require two people. Use care to
prevent scratches or other damage.
Cut plastic wrap.
Pencil ledge (
10
) has two functions, depending on which
edge faces up. The raised position prevents materials from
sliding off the tilted surface. The flush position provides a
comfortable, rounded edge for your forearms.
Choose which position you desire and attach pencil ledge
to front edge of tabletop using 1/2" bolts (
G
) into threaded
inserts, as shown in Figure 5. Tighten firmly using care not
to strip.
1
2
3
4
G
10
11
Step 6
Lift back of tabletop into an elevated tilt position to
gain access to back of drawer. (See directions for
adjusting tilt on the last page of these instructions.)
Insert drawer dividers (
11
) into desired slots as
shown in Figure 6.
1
2
Figure 4
Figure 5
Figure 6
1st
1st
2nd
2nd
2nd
2nd
4th
4th
4th
4th
3rd
3rd

©2012 ALVIN & COMPANY, INC. • P.O. Box 188, Windsor, CT 06095-0722
Phone: 860-243-8991 • Toll-Free: 800-444-2584 • Fax: 860-242-8037 • Toll-Free Fax: 800-777-2896
www.alvinco.com
LIT-A11241 3/12
Step 7
Now that your table assembly is nearly complete,
we recommend that you go back and tighten all the
leg bolts and screws one more time. This will ensure
that your table remains strong, sturdy, and stable for
years of use.
Optional Insert the wood plugs (
F
) into each of
the bolt holes as shown in Figure 7. Gently tap into
place. Please don’t install with permanent adhesive.
Since wood products have a tendency to expand and
contract from season to season, we recommend that
you remove the wood plugs and retighten the bolts
every 6 months.
1
2
Please recycle as much of the packaging materials as possible. Thank you.
Thank you for purchasing this Alvin
®
table
Need assistance with assembly? Call customer service at 1-800-444-2584. Visit us online at www.alvinco.com.
USAGE INSTRUCTIONS
Adjust Tilt
The ratcheted tilt mechanisms allow you to set the tabletop to a variety of comfortable working angles. Simply lift the tabletop from the
back edge until it clicks into the desired position. To return the top to the flat position, raise the back edge as high as it will go. This will
release the ratchet mechanism allowing the top to be lowered.
Pencil Ledge
Pencil ledge has two functions, depending on which edge faces up. The raised position prevents materials from sliding off the tilted
surface. The flush position provides a comfortable, rounded edge to rest your forearms against.
Repositionable Drawer Dividers
The drawer has numerous slots for the dividers, depending on the things you plan to store. It is easiest to reposition the dividers from
the back of the table. Close the drawer fully and lift the tabletop to its highest tilt position for easiest access.
Care Instructions
Clean like any other piece of fine wood furniture. Use a soft cloth and avoid harsh or abrasive cleansers.
Seasonal Adjustments
Since wood products have a tendency to expand and contract from season to season, remove wood plugs and retighten all the bolts
every 6 months. This will ensure that your table remains strong, sturdy, and stable for years of use.
F
Figure 7
/