Metra. The World’s Best Kits.
®
MetraOnline.com © COPYRIGHT 2020 METRA ELECTRONICS CORPORATION REV. 11/10/20 INST107-CH5
INSTALLATION INSTRUCTIONS
107-CH5
Patent Pending
Attention! Let the vehicle sit with the key
out of the ignition for a few minutes before
removing the factory radio. When testing the
aftermarket equipment, ensure that all factory
equipment is connected before cycling the
key to ignition.
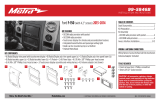
KIT FEATURES
• ISO DDIN radio provision*
• Textured to match the factory finish
* This kit is designed for an ISO DDIN radio which have an “L” shaped chassis
design, with the radio chassis at the top of the screen,
or Pioneer modular 6.8” radios.
† Refer to the radio manufacturer for current models
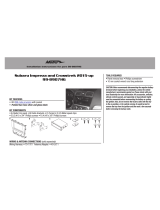
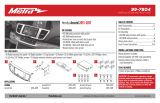
KIT COMPONENTS
• A) Radio trim panel • B) Radio brackets • C) Extension bracket • D) Vent adapter • E) #8 x 1/2” screw for drivers side (1)
TOOLS REQUIRED
• 3/8” socket set • Cutting tool/Dremel
• Panel removal tool • Phillips screwdriver
TABLE OF CONTENTS
Dash Disassembly ..................................................2
Kit Preparation .......................................................3
Kit Assembly
–ISO DDIN radio provision .....................................4
–Pioneer Modular radio provision .......................5
WIRING & ANTENNA CONNECTIONS
(sold separately)
Wiring Harness: 70-1817
Antenna Adapter: Not required
A CB D E
Jeep Grand Cherokee 1996-1998
Visit MetraOnline.com for more detailed information about the product and up-to-date vehicle
specific applications