IBM Ricoh ScanPro User manual
- Category
- Scanner Transparancy Adapters
- Type
- User manual
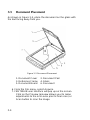
IBM Ricoh ScanPro is a color flatbed scanner that offers high-quality scanning results with an optical resolution of 300 x 600 dpi. The scanner is designed to be compact and lightweight, making it easy to store and transport. It also comes with a variety of features that make it easy to use, including TWAIN support and a built-in TouchScan feature.
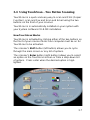
With TWAIN support, the IBM Ricoh ScanPro can be used with a variety of scanning software applications. This makes it easy to scan documents, photos, and other images into your computer for editing, printing, or sharing. The TouchScan feature allows you to scan documents with just a single touch of a button, making it quick and easy to get started.
IBM Ricoh ScanPro is a color flatbed scanner that offers high-quality scanning results with an optical resolution of 300 x 600 dpi. The scanner is designed to be compact and lightweight, making it easy to store and transport. It also comes with a variety of features that make it easy to use, including TWAIN support and a built-in TouchScan feature.
With TWAIN support, the IBM Ricoh ScanPro can be used with a variety of scanning software applications. This makes it easy to scan documents, photos, and other images into your computer for editing, printing, or sharing. The TouchScan feature allows you to scan documents with just a single touch of a button, making it quick and easy to get started.


-
 1
1
-
 2
2
-
 3
3
-
 4
4
-
 5
5
-
 6
6
-
 7
7
-
 8
8
-
 9
9
-
 10
10
-
 11
11
-
 12
12
-
 13
13
-
 14
14
-
 15
15
-
 16
16
-
 17
17
-
 18
18
-
 19
19
-
 20
20
-
 21
21
-
 22
22
-
 23
23
-
 24
24
-
 25
25
-
 26
26
-
 27
27
-
 28
28
-
 29
29
-
 30
30
-
 31
31
-
 32
32
-
 33
33
-
 34
34
-
 35
35
-
 36
36
-
 37
37
-
 38
38
-
 39
39
-
 40
40


IBM Ricoh ScanPro User manual
- Category
- Scanner Transparancy Adapters
- Type
- User manual
IBM Ricoh ScanPro is a color flatbed scanner that offers high-quality scanning results with an optical resolution of 300 x 600 dpi. The scanner is designed to be compact and lightweight, making it easy to store and transport. It also comes with a variety of features that make it easy to use, including TWAIN support and a built-in TouchScan feature.
With TWAIN support, the IBM Ricoh ScanPro can be used with a variety of scanning software applications. This makes it easy to scan documents, photos, and other images into your computer for editing, printing, or sharing. The TouchScan feature allows you to scan documents with just a single touch of a button, making it quick and easy to get started.
Ask a question and I''ll find the answer in the document
Finding information in a document is now easier with AI
Related papers


Other documents
-
Compaq P/N DOC-FB4B User manual
-
Cirkuit Planet CKP MO6020 Datasheet
-
Global Sources TM254G User manual
-
Genius VividPro II User manual
-
Epson 1640SU User manual
-
 Document Camputer Tech DocketPORT 687 User manual
-
Epson ActionScanner User manual
-
-
Xerox 90-8018-800 Datasheet
-
Visioneer OneTouch 7400 USB Photo Scanner User manual
