Page is loading ...


iTo^th.lesi
Thank
you
for
ordering the
Sensor Toilet Seat from iTouchless.
Through daily use,
you
will discover its many
benefits. Please
provide
feedback to
us through our website.
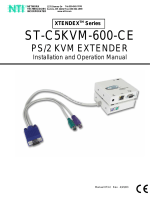
Included
Parts
(Fig.l):
2 x
Metal Screws
2 x
Rectangular Washers
2 x Adjustment
Brackets
2 x,
Large Fastener
(Try
to use these first)
2
x Small Fastener
(not
shown
-Use
these only
if the Large
Fastener
doesn't fit)
2 x
Large Plastic Bolt
Cap
(Use
these with the
Large Fastener)
2 x
Small Plastic Bolt Cap
(not
shown: Use these
with the Small Fastener)
2 x
Hexagonal Metal Bolt
I x
Rechargeable Battery
1 x A/C Adapter Charger
1 x User Manual
1 x Sensor
Toilet
Sdat with attached
mounting
bracket
(Need
1 x Phillips
head screwdriver)
Fig. I
fl---Metat
screw
AdiustmentBracft€ts
I
"
\S-r"i:]fl$'"'
S
i
;i
i
i
S
Fastener-
Q
U
Plastic
Bolt
Gap
ftl
Hexaqonal-l'
MetaiBott
lD

WTo^tfi.lesi
STANDARD
TOILET
BOWL
l
fT
l-------.'"'"*._-l
|
.
-*1""!.11surar
I
|
/
washers'
,:{_:;:.""-'"}
brackets--
1!)---prastic
oort
{)
hexagonal
\ir
bolts
*"*_
f
nstallation
parts
illustration
(Fig
2):
WAftJVJ'V6
DO
NOT
SIT ON LIfr
COVER!

quick
installation
guide
iTo^thlesi
L) Remove
your
old
toilet seat
from
your
toilet
bowl
2) Push
and
hold
gray
button on the side of
the Sensor
Toilet Seat.
Release and
slide
off Mounting
Bracket
from the Sensor
Toilet Seat
(Fig.3)
3) Check
if the
Large
Fasteners can
fit into
the screw
holes
of
your
existing
toilet
bowl
(Fig.4)
4) lf it cannot
fit the
holes
(too
big), use the
Small
Fasteners
5)
Place and align
the
Mounting
Bracket on
your
toilet
bowl
(Fig.5)
(continued
on next
page)
Fig.3
Fig.5

quick
installation
guide
;To^ti.lesi
6) Place the Adjustment Brackets
onto the
Mounting Bracket
(Fig.6)
7) Put
the Rectangular Metal Washers
onto the
Adjustment Brackets
(Fig.6)
8) Put the Hexagonal Metal Bolts into
the
Plastic Bolt
Caps
(Fig.7)
9)
Put Plastic Bolt Caps into
the Fasteners
(Fig.8)
(continued
on next
page)
'Blr*ffi:#riF?e1.:11T1i]m
Fig.8

quick
installation
guide
'
Fig.lO
Hold
both
the
Fastener and
the
Plastic Bolt Cap
like this
and
connect
the Screws
from the
top of the
toilet
bowl
(continued
on next
Page)
iTo^thless
10)
Insert
Screw
through
the
Rectangular
Metal
Washer
and
Adjustment
Brackets
and
through
the
toilet bowl
hole'
(Fig.9).
LL)
Insert
and
turn
screw
into
Fastener
and
Plastic
Bolt
Cap
as
you
hold them
from
below
(Fig.10).
The
Fastener
bottom
will
open
up
as
your
tighten
the
screw
(Fig.11).
Do
not
over tighten
the
Screw
until
Step
13.
4
Fig.ll

quick
installation
guide
iTo^ti.lesi
L2) Repeat the steps L0
and
11 for
the other
side
13) Align the Mounting Bracket
on toilet bowl.
Tighten the Screws.
l-4) Push and hold
gray
button while
sliding
the Sensor
Toilet
Seat
into
the Mountinq
Bracket
(Fig.
12)
15) Insert Battery to the
battery compartment.
After installation,
the
Sensor Toilet Seat shoulc
be aligned on the toilet
bowl
(Fig.13)
"w.q,li
:!
Fig.12
Fig. t3

removing
the
toilet
seat
To Remove
the
Sensor
Toilet
Seat:
1)
Push and hold
the
gray
release
button.
2)
Slide out the
SensorToilet
Seat
(Fig.
14)
iTo^ti.less=
Fig. 14

specifications
Sensor
Ranges:
.
Front Sensor
(when
the
Cover
is
closed): 4 to 6 inches
o
Top
Sensor
(when
the
Cover
is
opened): 2 to 4 inches
.
Occupant
Sensor
(in
the center of the
Cover):
adjustable
18
-
39
inches
o
Occupant
Motion
Sensor
(in
the center
of the Cover):
fixed L20 degree
detection angle
a.
)+^a
r\l l
\S'})LHf,
]NY
q\
Front
Sensor
e-I
Sensor
Positions:
.
Front Sensor: 45 degree
angle upward
o
Top Sensor: Points straight
up
.
Occupant
Sensor: Points
horizontally
.
Motion Sensor: L20 degree horizontally
2rc4
i nches
iTo^rfi.less
l-8 to 39
i nches
Occupant
Sensors
.'r'l
I
note: second occupant
motion sensor
-
120
degree
horizontally
and
vertically
Note: The sensors are the
latest
"beam"
type infrared
sensor. Simply break the
beam as
you
approach
(it
will activate
quickly).
DO NOT wave at the sensors
as they
will not activate
in order to
prevent
unintentional opening.
Top
Sensor
Cover
Occupant
Touchless
Toilet
Seat
Occupant Sensor
Range
Sensor
Sensorl,
Rechargeable
Battery
ffi:
seat
-
"'.t'Flt"
",4u*rru**e#,+;4t
A/c
Jack
Occupant
Motion
Battery Release

occupant
sensor
range
adjustment
iTr^thksi
Use the Dial on the side
of the
sensor toilet
seat to increase
or
reduce
the sensor range
(Fig.15).
Lower the range
enough
so the
infrared
beam does not mistake
bathroom
fixtures for
an occupant
and fails to
close,
and high enough
so the infrared
sensor
detects the occupant during
use
and does
not
close unintentionally.
Fig. t5
L) Turn
the Dial all the way
to the left
to turn
off the sensor
toilet seat
2)Turn
the Dial to the right
to hear
and feel
a click
sound to turn on
the sensor
toilet
seat. lmmediately after
the dial has
passed
the
click, it is set to the
shortest
sensor
range
(L8
inches).
3) To increase
the sensor range,
gradually
turn the Dial
to the
right.
lf
the Cover
or Seat remains open
for several
minutes,
even
without an occupant
or movement
in
the sensor range, the
sensor range
is set
too high for
your
room
size:
you
should
reduce the sensor range
by
turning the
Dial to
the left.

quick
starter
guide
Fig.17
iTo^thless
L) Approach within
the range of the
Front
Sensor,
the
Cover
will
open automatically
(Fis.16)
qiu
2) When the Cover
is opened,
put
hand
within the
range of the Top Sensor
to lift
up the Seat
automatically
(Fig.L7)
(continued
on the
next
page)
Fig. t6

quick
starter
guide
Fig..l8
iTo^ti,lesi
3)
When
the Seat is opened,
put
hand within
the range of the Top
Sensor to
put
the
Seat
down
(Fig.18)
4) Both
Seat and Cover
will
close
automatically
after the Occupant and Motion
Sensor no
longer
detect an
occupant
and movement
(blue
LED light will stop
blinking) for
30
seconos.
5)
lf only the
Cover
is opened,
it will
automatically close after
both sensors
no
longer
detect an occupant
and movement
for L5 seconds
6) To open
or close
the
Seat
put
hand
within
the range of the Top
Sensor at least 2
seconds after
previous
activation.
The
Seat
will
open or close depending
on
its
current
state.
t
#\
K
\l
JA
NW
\S
S:T-
'Sensor
Range:
L8
to 39
.r
inches
)))
note:
second
occupant
motion
sensor
-
1"20 degree
horizontally
and vertically

charging
the battery
iTo"tfi,less
When the
sensor toilet seat is working abnormally
or the opening
speed
of the
Cover and Seat
is
slower
than
normal, the Battery
may need to be charged.The
rechargeable
Battery
is located in the battery
compartment
that is on top of the back of the toilet
seat.
To Charge:
lf
you
have an electric
outlet
near the Sensor
Toilet Seat,
you
can
charge the Battery
while it
is in the
battery compartment
without turning
off
the
power.
Simply
plug
the charger
into
the
A/C
plug-in
hole
located next to the
sensor
Dial
(Fig
19).
The
LED light on
the A/C adaptor
will turn
from RED to GREEN
when the battery
is fully
charged.
Flg.19
lfyou do not
have
an electric outlet
near the
SensorToilet
Seat,
please
follow
the steps
below
to charge
the battery.
1
)
Turn off the
sensor
toilet seat by turning
the
Dial all the
way to
the left until a click
sound is
heard and
felt.
2) Push the
gray
release button to eject
the
Battery from
the compartment.
(Fig
20)
(continued
on
the
next
page)
Fig.20

charging the
battery
iTo^ti.less
3)
Plug in
the
A/C
power
adaptor to the hole
on the Battery and charge it in
any electric
outlet.
(Fig.21)
4) The LED light
on
the A/C
adaptor will turn
from RED to
CREEN
when the
battery
is fully
charged.
5) Once fully charged,
re-insert
the Battery
and make sure
it is
secured in the batterv
compartment.
Fig.2l
F O
R BES T P E
RF O RI}IA
I\ICE;
.
Gfiarge
Battery for
24 Hours BeforE
Inftial
Use
.
Cfrarge Battery for I Hours for Normal Recfiarge

RETURN POLIGY
iTo^ti.less
Due to the hygienic nature
of this
product,
we
cannot
accept any returns for any
unit that has
been
installed
or used due
to
government
regulations. This
is a universal
policy
for
all
dealers of
hygienic
products.
For the
safety of our customers, iTouchless
cannot accept
product
returns if the
Installation Hardware Kit has been
opened or if other signs
of use are detected.
Once
the bag of the
Installation
Hardware Kit has
been opened, the
product
will be
deemed
non-returnable. We
also cannot accept returns of
products
without all
originally-shipped
components
(installation
package,
instructions,
etc.)
lf the
product
has not been
installed or used,
and
if the bag of the Installation
Hardware Kit has not
been
opened,
then we will
accept returns within
30 days of the
purchase
date.
Simply send us the
package
FREIGHT PREPAID
by an insured
carrier such as UPS or
FedEx. Returned
products
are to be returned in
the original
condition with
all originally
packaged
components. Customer
is responsible for return shipping
costs
and refund
amount is subject to a 15o/o
restocking
fee.
Before
returning,
please
contact us at
www.iTouchless.com to request
a RMA# and
shipping
instructions. We will
NOT ACCEPT
packages
without
RMA#'s.
lf item(s) are
received
in a non-resellable
condition, the item may be refused
for credit,
depending on
the
conditien of
the
item
(e.9.,
product
is
damaged, shows signs of use, has been
written
on,
has missing
packaging, parts,
.warning
labels or instructions).
Any Problems? DO
NOT RETURN TO
STORE. Gall
{-8OO-660-7g7a first.

lTonchfusr'
i nnovation for everyone'"
/