Page is loading ...

MODEL N° 0113
OWNER’S MANUAL
Keep this Product ID Number and use when contacting Customer Service:
Copy

2
Most injuries are caused by misuse and/or not following instructions. Use caution when using this product.
To ensure safety, do not attempt to assemble this product without following the instructions carefully. Check entire box and inside all
packing material for parts and/or additional instruction material. Before beginning assembly, read the instructions and identify parts
using the hardware identifi er and parts list in this document. Proper and complete assembly, use and supervision are essential to
reduce the risk of accident or injury.
FAILURE TO FOLLOW THESE WARNINGS MAY RESULT IN SERIOUS INJURY OR PROPERTY
DAMAGE AND WILL VOID WARRANTY.
t%POPUVTFPSTUPSFIPUPCKFDUTTVDIBTHSJMMTCMPXUPSDIFTXFMEJOHFRVJQNFOUFUDOFBSUIFQSPEVDU
t*GVTJOHBMBEEFSEVSJOHBTTFNCMZVTFFYUSFNFDBVUJPO
t5XPDBQBCMFBEVMUTBSFSFRVJSFEGPSBTTFNCMZ*UJTBMTPSFDPNNFOEFEUIBUBUIJSEBEVMUGVODUJPOBTBOJOTUSVDUJPOSFBEFS
SAFETY INSTRUCTIONS
REGISTER YOUR PRODUCT ONLINE AT WWW.LIFETIME.COM
LIFETIME’S PROMISE TO YOU:
We invite you to read our privacy policy at www.lifetime.com
REGISTER today!
At Lifetime, we are committed to providing innovative and quality products. While registering, you will have the opportunity to give us your feedback. Your input
is valuable to us.
t:PVDBOBMTPPQUJOUPSFDFJWFOFXQSPEVDUOPUJmDBUJPOTPSQSPNPUJPOT
t*OUIFVOMJLFMZFWFOUPGBQSPEVDUSFDBMMPSTBGFUZNPEJmDBUJPOZPVSSFHJTUSBUJPOQSPWJEFTUIFJOGPSNBUJPOXFOFFEUPOPUJGZZPV
directly.
t3FHJTUSBUJPOJTGBTUFBTZBOEDPNQMFUFMZWPMVOUBSZ
Maintaining your privacy is our long-standing policy at Lifetime. And you can rest assured that Lifetime will not sell or provide your
personal data to other third parties, or allow them to use your personal data for their own purposes.
**For customers outside the U.S. or Canada, please contact the store for assistance.**
**U.S. and Canada customers ONLY**
*'"44*45"/$&*4/&&%&%
DO NOT CONTACT THE STORE!
CALL OUR CUSTOMER SERVICE DEPARTMENT at 1 (800) 225-3865
)0634BNUPQN.POEBZUISPVHI'SJEBZ.PVOUBJO4UBOEBSE5JNF
**Call, or visit our Web site for Saturday hours**
2/10/2012
INSTRUCTION #1050480 C
Copy

3
GPSFBDIQFSTPO
TOOLS REQUIRED FOR ASSEMBLY
BEFORE BEGINNING ASSEMBLY
,FFQUIFIBSEXBSFCBHTBOEUIFJSDPOUFOUTTFQBSBUF*GBOZQBSUTBSFNJTTJOHDBMMPVS
$VTUPNFS4FSWJDF%FQBSUNFOU
*EFOUJGZ BOE JOWFOUPSZ BMM QBSUT BOE IBSEXBSF VTJOH UIF QBSUT BOE IBSEXBSF MJTUT BOE
identifi ers in this document.
*Electric Drill
*Measuring Tape
Carpenter’s LevelSafety GlassesPhillips Screwdriver
*For use if attaching Pegboard to sheetrock and studs.

4
This area is located at the top, left-hand
corner of the page and indicates which tools
and hardware are needed to complete the
assembly steps on a page.
This area is located at the top, right-hand
corner of the page and shows an image of the
product with shaded parts indicating which
section is being assembled.
SEC
#
Note:
!
Refer to the following areas throughout the instructions
to assist in the assembly process:
This area is usually located in the bottom,
left-hand corner of a step and indicates that
special attention is needed to perform a
particular part of a step.
These areas are usually located in the bottom,
right-hand corner of a step and indicate that
damage to the product or serious injury may
occur if the caution or warning is not heeded.
Throughout the Parts & Hardware List, Part
& Hardware Identifi ers, and instructions
are three-letter IDs. These IDs are below
the images of the parts and hardware to
help you locate and identify the parts and
hardware during assembly. These IDs are not
necessarily on the parts themselves.
WARNING
ASSEMBLY GUIDE
TOOLS AND HARDWARE REQUIRED FOR THIS PAGE
CAUTION
ADZY
wYw1BO)FBE4DSFX

5
ID Description Quantity
Main Parts
"'6 1FHCPBSE4USJQ
BHC Pegboard Strip Hardware
"%8 Yw1BO)FBE4DSFX
BHD Tool Clip Assortment Hardware
"*) +)PPL
"** -)PPL
"*+ 5PPMIPMEFS
"*' w%PVCMF"SN)PPL
"*( w%PVCMF"SN)PPL
PEGBOARD STRIP HARDWARE [BHC]
Part shown at actual size
1BSUTIPXOBUBDUVBMTJ[F
TOOL CLIP ASSORTMENT HARDWARE [BHD]
Parts shown at actual size
ADWY
Yw1BO)FBE4DSFX
AIIY
-)PPL
AIFY
w%PVCMF"SN)PPL
AFUY
Pegboard Strip
AIGY
w%PVCMF"SN)PPL
AIHY
+)PPL
AIJY
Toolholder
HARDWARE & PARTS LIST
HARDWARE IDENTIFIER
PARTS IDENTIFIER
Note: Throughout the Parts & Hardware List, Part & Hardware Identifiers, and instructions are three-
letter IDs. These IDs are below the images of the parts and hardware to help you locate and identify
the parts and hardware during assembly. These IDs are not necessarily on the parts themselves.
!

6
TOOLS AND HARDWARE REQUIRED FOR THIS PAGE
SEC
ADW
ADWY
AFU
SEC
SEC
Using a level, position the Pegboard Strip (AFU) in any desired location along a Wall Panel wall. Screw the
1FHCPBSE4USJQUPUIF8BMMVTJOHmWF#10 x 3/4” Phillips Pan-Head Screws (ADW). See Note. Repeat this step for
second Pegboard Strip.
*OTFSUHooks (AIF, AIG, AIH, AII, and AIJ).
PEGBOARD STRIP INSTALLATION
Note: The Pegboard Strip is screwed directly into the plastic. Line up the Strip anywhere on Wall so
holes are over plastic (and not over a groove in the Wall).
!
Note: Ensure the Pegboard Strip is level before inserting Screws.
!
1
1.1
1.2

7
TOOLS AND HARDWARE REQUIRED FOR THIS PAGE
SEC
Studs
Grabber Screws
ADWY
SEC
SEC
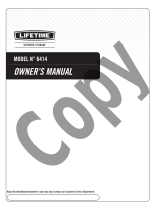
*GZPVQMBOPOIBOHJOHUIF1FHCPBSE4USJQGSPN4IFFUSPDLPS8PPE1BOFMJOHXFTVHHFTUVTJOHBMFWFMUP
QPTJUJPOBwYwYw#PBSEBDSPTTUXPTUVETBTTIPXOBOETDSFXJOHUIF#PBSEUPUIF4UVETVTJOHGPVS
w(SBCCFS4DSFXTUXPGPSFBDITUVE1VSDIBTFUIFw(SBCCFS4DSFXTBUZPVSMPDBMIBSEXBSFTUPSF
Screw the Pegboard Strip (AFU)UPUIFwYwYw#PBSEVTJOHmWF#10 x 3/4” Phillips Pan-Head Screws (ADW).
'PMMPXJOTUSVDUJPOTJO4FDUJPO*OTFSUUIFJ-Hook (AIH), L-Hook (AII), Toolholder (AIJ), 2” Double-Arm-Hook (AIF), and
4” Double-Arm-Hook (AIG) into the holes in the Pegboard Strip. Repeat these steps for the second Pegboard Strip.
ATTACHING PEGBOARD STRIP TO SHEET ROCK OR WOOD PANELING
Note: If you wish to hang the two Pegboard Strips next to one another, use a 1”x4”x37” Board
and screw the Board across three Studs using six (6) 2” Grabber Screws (two for each stud).
!
ADW
2.1
2.2
2

8
ENHANCE YOUR LIFETIME
®
PURCHASE BY ADDING ACCESSORIES OR OTHER GREAT PRODUCTS
Or call: 1-800-424-3865
To purchase accessories or other Lifetime
®
products, visit us at:
www.lifetime.com
MEJORE SU COMPRA LIFETIME
®
Y AÑADA ACCESORIOS U OTROS PRODUCTOS EXCELENTES
O llame al: 1.800.424.3865
Para comprar accesorios u otros productos Lifetime
®
EUA, visítenos en:
www.lifetime.com
AMÉLIOREZ VOTRE ACHAT LIFETIME
®
EN AJOUTANT DES ACCESSOIRES OU AUTRES PRODUITS
Ou appelez-nous au 1.800.424.3865
Pour acheter des accessoires ou autres produits Lifetime
®
, rendez-vous une visite à :
www.lifetime.com
/