ThisPTAC/PTHPisintendedtobeinstalledthroughan
exteriorwallofthebuildingwherethewallis6in.(15.2cm)to
13in.(33cm)thick.Forlocationswherethewallisadifferent
thickness,see"RequiredParts,Accessories,andOptions."
• This PTAC/PTHP is intended to be installed using a wall
sleeve in a wall opening.
• This PTAC/PTHP may be installed flush with the floor or at
different heights above the floor. See "Required Parts,
Accessories, and Options."
The location shall accommodate the drainage of condensate.
Condensate drainage options include drainage to the exterior
of the building, to the interior of the building or to the wall
interior.
The location shall accommodate the correct electrical
provisions based on the connection method (cord connected
up to 230 volt, direct wired for 265 volt). See "Required Parts,
Accessories, and Options."
IMPORTANT: The instructions indicate the order of installation of
each part or accessory at the point where the component should
be installed. If that accessory or part is not required or is already
installed, then proceed to the next step.
Accessory Kits
Wall installation
• Drain kit attaches to the bottom of the wall sleeve for internal
draining of condensate or to the rear wall sleeve flange for
external draining. Recommended on all PTAC/PTHPs to
remove excess condensate. Packaged in quantities of 10.
Wall sleeve extension retrofit kit is a 2.4 in. (6.1 cm) sleeve
extension attached to the room side of the sleeve to allow for
the installation of a 133/4in. (35 cm) PTAC/PTHP into an
111/2in. (29.2 cm) wall sleeve.
• Front cover side mount kit modifies the method of attaching
the front cover.
• Subbase kit Includes leveling legs, side filler panels and
mounting brackets for electrical accessories. Accepts power
disconnect switch and conduit kit.
IMPORTANT: Subbase kit provides PTAC/PTHP support for
walls less than 6 in. (15.2 cm) thick or for any wall structurally
unable to support the chassis weight.
Standard grille (louver) is stamped aluminum, anodized to
resist chalking and oxidation. It consists of heavy-gauge
aluminum alloy in the following finishes: clear, extruded
aluminum and dark bronze acrylic enamel.
Architectural louver is a replacement for the standard louver.
It consists of heavy-gauge aluminum alloy in the following
finishes: clear, extruded aluminum and dark bronze acrylic
enamel.
Lateral duct adapter kit attaches to the PTAC/PTHP and
provides a transition to direct up to 35% of the total airflow to
a secondary room, either left or right of the PTAC/PTHR Kit
includes duct plenum with discharge grille and internal baffle,
adapter and end cap.
Lateral duct extension is a 3 ft (91.4 cm) insulated plenum
that attaches to the left or right side of the duct adapter. The
extension can be cut to length by the installer. Maximum
allowable straight extension is 15 ft (4.6 m).
The PTAC/PTHP is intended for mounting through an exterior
wall. If the wall is thicker than 13 in. (33 cm), an extension to
the wall sleeve must be used. The PTAC/PTHP should be
installed level or pitched slightly to the outside. The exterior
of the sleeve must be caulked at the building interface.
Electrical
The PTAC/PTHP will have field wiring configurations based upon
the specific installation. Additional wiring options include:
• Disconnect switch kit installed in the subbase provides a
means for disconnecting power to the PTAC/PTHR
NOTE: See "Subbase Kit" previous.
• Desk control kit allows the PTAC/PTHP to be turned on or off
from a remote central station via a 24 volt interface.
• Conduit kit with junction box makes the field wiring
connections for direct wired 265 volt models and includes a
means of quick disconnect for easy removal of the chassis. It
can be used with or without the subbase.
NOTE: See "Subbase Kit" previous.
• Digital remote thermostat is a wall mounted remote
thermostat.
• A time delay fuse is provided with 265 volt PTAC/PTHPs.
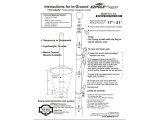
Electrical Shock Hazard
Plug into a grounded 3 prong outlet.
Do not remove ground prong.
Do not use an adapter.
Do not use an extension cord.
Failure to follow these instructions can result in death,
fire, or electrical shock.
IMPORTANT: Connect PTAC/PTHP to a single-outlet circuit only.
230/208 Volt PTAC/PTHP
All 230/208 volt PTAC/PTHPs are equipped with power cords.
230/208 volt 250 volt Receptacles
PTAC/PTNP and Overcurrent Protection
AMPS 15 20 30
RECEPTACLE (_ @ (_
NEMA Type 6-15R 6-20R 6-30R
The field-supplied cutlet must match plug on service cord and
be within reach of service cord.