Anderic 63T-AC8.3T User manual

Type
User manual

Anderic 63T-AC8.3T is a versatile ceiling fan remote control kit designed to enhance your comfort and convenience. With four distinct fan speed settings (High, Medium, Low, and Off), you can effortlessly adjust the airflow to your desired level. Additionally, the integrated light dimmer allows you to seamlessly control the brightness of your connected lighting fixture, creating the perfect ambiance for any occasion.

Anderic 63T-AC8.3T is a versatile ceiling fan remote control kit designed to enhance your comfort and convenience. With four distinct fan speed settings (High, Medium, Low, and Off), you can effortlessly adjust the airflow to your desired level. Additionally, the integrated light dimmer allows you to seamlessly control the brightness of your connected lighting fixture, creating the perfect ambiance for any occasion.

63T-AC8.3T 3-Speed Universal Ceiling Fan Remote Control Kit.
GENERAL INFORMATION
This remote controller is designed to control your ceiling fan speed and light brightness separately. Four buttons
(HIGH, MEDIUM, LOW, and OFF) control the fan’s speed and off.
The light dimmer button will control the light brightness dimmer and off.
The blue indicator on the remote will light when one of the six buttons is pressed.
SETTING THE CODES
This unit has 16 different code combinations. To set the codes, perform the following steps:
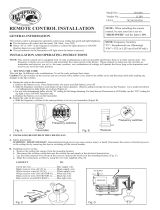
1. Setting the codes on the remote:
a. Remove the battery cover. Press firmly on the arrow and slide the battery cover off.
b. Slide the code switches to your choice of up or down position. The factory setting is all up; we
suggest not using this position. Use a small screwdriver or ballpoint pen to slide firmly up or down
(Figure 1).
2. Setting the codes on the receiver:
a. Slide codes witches on the receiver to the same position as your remote (Figure 2). Replace the
battery cover on the remote.
INSTALLING RECEIVER IN CEILING FAN
WARNING: HIGH VOLTAGE! Disconnect power by removing the fuse or switching off the circuit breaker. Do not use
solid-state fans. The electrical wire must meet all local and national electrical code requirements. Supply for fan must
be 110/120 volt, 60Hzmaximum fan motor amps: 1.0, Maximum light watts: 140W incandescent or 60W
LED/CFL/E-Ballast. Otherwise, power can cause severe injury or death.
1. Remove power from the circuit.
2. Remove the ceiling fan canopy from the mounting bracket.
3. Disconnect the existing wiring between the ceiling fan and the electrical junction box.
4. Make connections using the wire nuts supplied: If other fans or supply wires are a different color, have this
unit installed by a qualified licensed electrician.
Green fan wire .... Bare supply wire
Black receiver wire (AC IN L) .... Black wire from the ceiling
White receiver wire (AC IN N) .... White wire from the ceiling
White receiver wire (TO MOTOR N) .... White fan wire
Black receiver wire (TO MOTOR L) .... Black fan wire
Blue receiver wire (FOR LIGHT) .... Blue fan wire
5. Push all connected wires up into the junction box.
6. Lay the brown antenna wire on top of the receiver and put the receiver into the mounting bracket.
7. Reinstall the canopy on the mounting bracket.
8. Restore power.
ANDERIC®
Installation Instructions
OPERATING THE REMOTE:
1. Install two AAA batteries (not included). (To prevent damage to the remote, remove
the battery if not used for a long time).
2. Store the remote away from excessive heat or humidity.
3. This remote control is equipped with 16 code combinations.
4. Operating the buttons on the panel of the remote.
a. Key Press to adjust the fan speed to HIGH.
b. Key Press to adjust the fan speed to MEDIUM.
c. Key Press to adjust the fan speed to LOW.
d. Key Press to adjust the fan speed to OFF.
e. Key Press to toggle between 2,4,8 Hour fan delay, indicated by the LED
at the top of the remote. Note: The fan must be on first.
f. Key Quickly press and release to toggle the light on and off. Press and
hold to cycle through the brightness levels of the light; release when desired
brightness is reached. The receiver will remember the status of the light
brightness.
INSTALLING THE REMOTE’S WALL MOUNT HOLDER
Place it in an accessible area of your home and screw the remote-control holder into the wall using the two screws
provided; slide the remote into the holder for easy storage.
TROUBLESHOOTING GUIDE
The remote fails to operate:
1. Is there power to the receiver?
2. Is the receiver wired correctly?
3. Are the drawstrings (if applicable) set to High speed and the light in the on position?
4. Is the wall switch turned on?
5. Are the batteries installed correctly and have reasonable charge?
6. Are the code switches set at the same positions in both the remote and receiver?
The light or fan is turning off or on randomly.
The issue may be due to possible interference from or to other remote controls such as garage door openers, car
alarms, or security systems. You can change the code combination in your remote and receiver.
The remote will not operate at a distance.
Try placing the brown antenna wire on the receiver higher through the ceiling/outside the junction box.
NOTICE
Your ceiling fan and light kit assembly must meet the following requirements:
1. Do not use solid-state fans.
2. Electrical rating: 110/120v 60Hz 3.5A
3. MAX. Motor amps: 1.0
4. MAX. Light watts: 140W incandescent or 60W LED/CFL/E-Ballast
WARNING
TO REDUCE SHOCK RISK, THIS FAN MUST BE INSTALLED WITH A WALL CONTROL/SWITCH. NOTE: THE
MANUFACTURER IS NOT RESPONSIBLE FOR ANY RADIO OR TV INTERFERENCE CAUSED BY
UNAUTHORIZED MODIFICATIONS TO THIS EQUIPMENT. SUCH MODIFICATIONS COULD VOID THE USER’S
AUTHORITY TO OPERATE THE EQUIPMENT.
SUPPORT
For support, please go to our website at Anderic.com.
LEGAL
Anderic is a registered trademark of Dan’s Electronics Etc., Inc. All rights reserved.
  • Page 1 1
  • Page 2 2
  • Page 3 3

Anderic 63T-AC8.3T User manual

Type
User manual

Anderic 63T-AC8.3T is a versatile ceiling fan remote control kit designed to enhance your comfort and convenience. With four distinct fan speed settings (High, Medium, Low, and Off), you can effortlessly adjust the airflow to your desired level. Additionally, the integrated light dimmer allows you to seamlessly control the brightness of your connected lighting fixture, creating the perfect ambiance for any occasion.

Ask a question and I''ll find the answer in the document

Finding information in a document is now easier with AI