Phocos Any-Grid Series User manual

Type
User manual

Phocos Any-Grid Series is a hybrid inverter charger designed for use with Lithium battery models, enabling seamless integration of renewable energy sources like solar PV systems. It offers flexible system configuration options, allowing for parallel operation of multiple units to meet higher power requirements or expand battery capacity. With advanced communication capabilities, the Any-Grid Series ensures optimal system performance and efficient energy management.

Phocos Any-Grid Series is a hybrid inverter charger designed for use with Lithium battery models, enabling seamless integration of renewable energy sources like solar PV systems. It offers flexible system configuration options, allowing for parallel operation of multiple units to meet higher power requirements or expand battery capacity. With advanced communication capabilities, the Any-Grid Series ensures optimal system performance and efficient energy management.

Phocos Any-Grid™ series
Any-Grid™ use with Lithium battery models:
Shoto SDA10-48100
Applicable for Any-Grid™
PSW-H-8kW-230/48V, PSW-H-5kW-230/48V,
PSW-H-5kW-120/48V and PSW-H-6.5kW-120/48V
Recommended battery settings guide
www.phocos.com 1 | P a g e
1.0 Introduction
This guide outlines the recommended settings and establishing communication for operation of one or more Any-
Grid™ PSW-H-8kW-230/48V, PSW-H-5kW-230/48V, PSW-H-5kW-120/48V or PSW-H-6.5kW-120/48V hybrid inverter
chargers with Shoto SDA10-48100 battery modules in the low-voltage (48 Vdc nominal) configuration, referred to in
this guide as “battery modules”.
Note that the charge/discharge settings are automatically negotiated with the battery if this guide is used and
cannot be changed. If you wish to manually set these settings, then a communication cable between the PSW-H and
batteries is not needed and the battery type in settings menu 05 of the PSW-H must be set to “User defined” (USE). In
this case it is your responsibility to choose settings within the specifications of the battery to preserve the battery
warranty.
The Any-Grid must be installed according to the Any-Grid User and Installation Manual” included with every Any-
Grid unit and available online at www.phocos.com. The battery terminals of the Any-Grid must be connected to the
batteries according to the Shoto installation manual at the appropriate step mentioned in the chapter 5.0 Battery
Settings and Communication Cable Installation of this manual.
WARNING: Be sure to read and respect the warnings in the installation manuals of the Any-Grid, the battery modules
and any other connected equipment. The installation must be conducted by a trained professional.
2.0 Requirements
The following is required to proceed with this guide:
Any-Grid PSW-H-5KW-230/48V, PSW-H-5KW-120/48V or PSW-H-6.5KW-120/48V
Note: the minimum display unit firmware version U2 must be 06.19 or later, with the corresponding U1
firmware for your Any-Grid PSW-H.
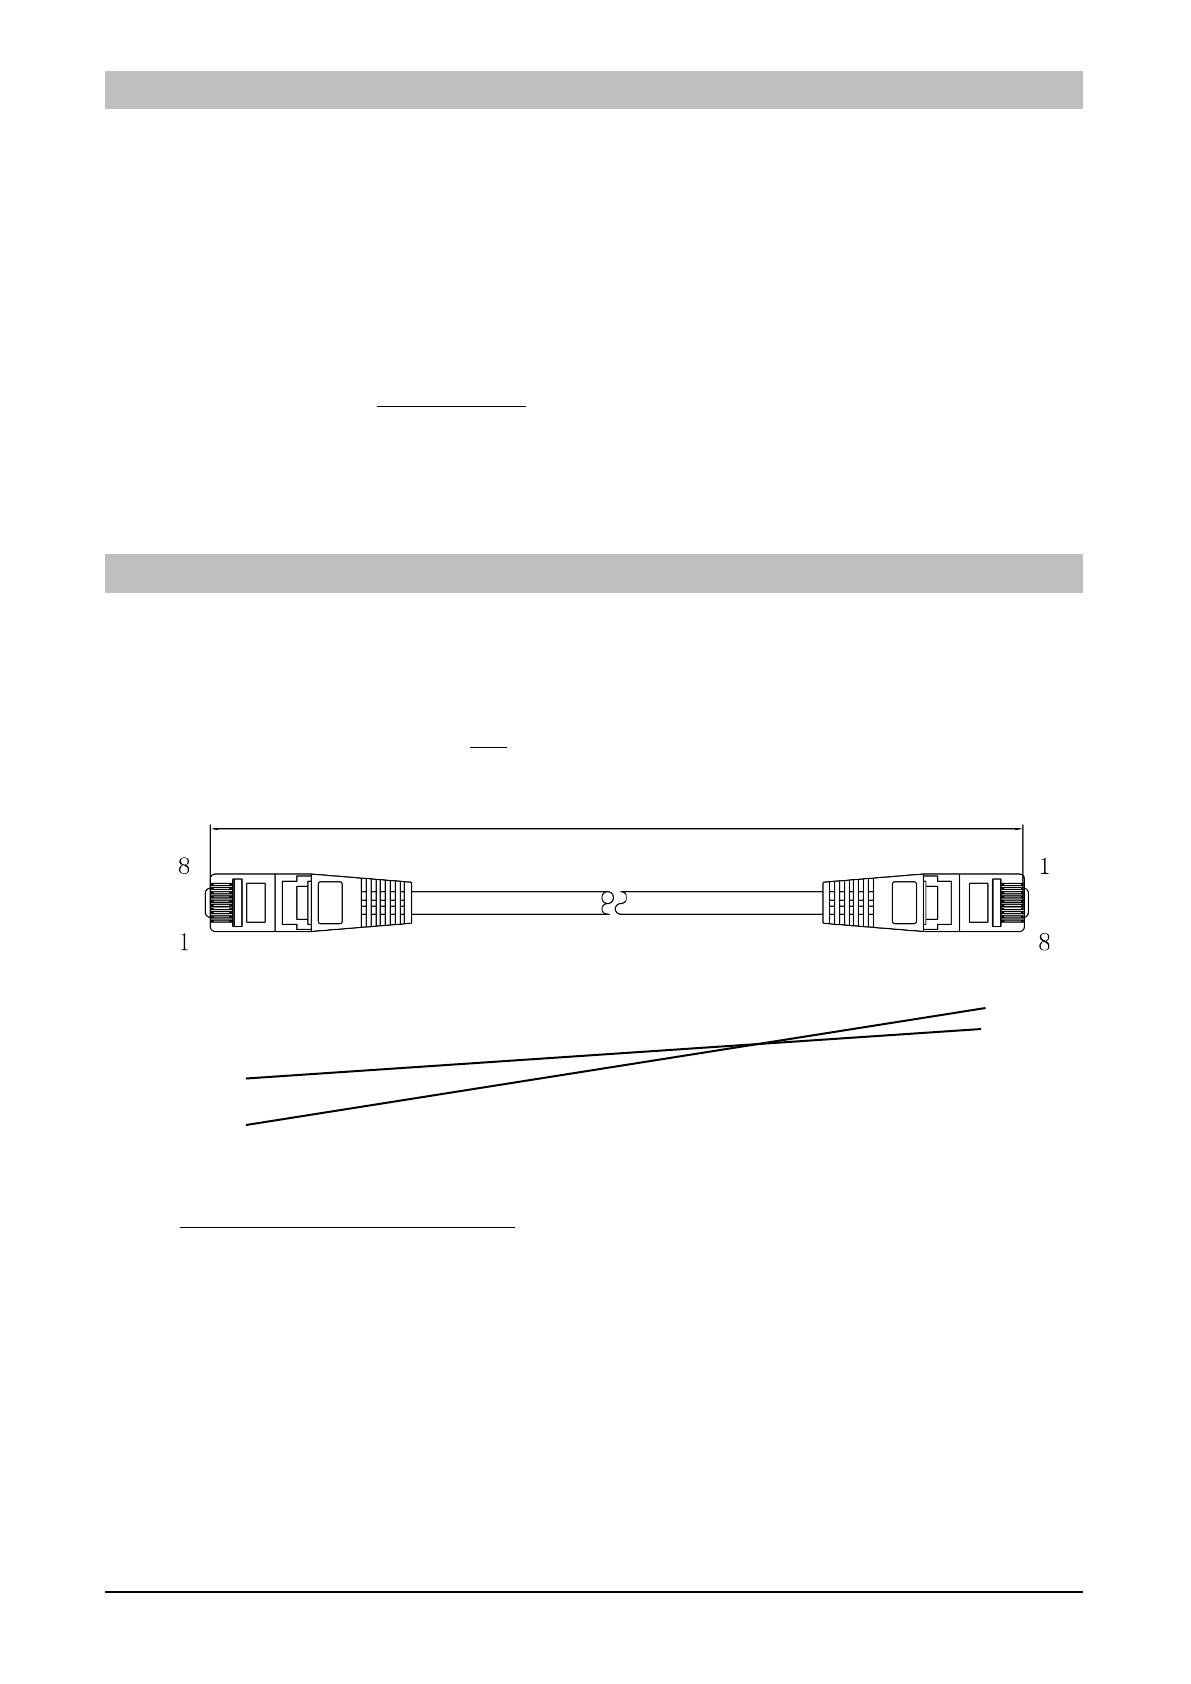
Battery communication cable with only the following pins connected:
Any-Grid PSW-H side Shoto battery side
Make sure the cable is correctly oriented between the battery and PSW-H unit when installing below.
WARNING: Do not use the inverter cable included with your Shoto batteries. Wiring your own cable
according to the pinout above must be done at your own risk. Any damage to the PSW-H or battery due to
incorrect wiring, cable orientation or use of an incorrect cable is not covered by any warranty.
Shoto SDA10-48100 battery module(s)
Pin 8 1
Pin 7 2
Pin 6 3
Pin 5 4
Pin 4 5
Pin 3 6
Pin 2 7
Pin 1 8
www.phocos.com 2 | P a g e
3.0 System Overview
4.0 Battery Sizing
To maintain the full battery warranty, each battery module should be sized not to exceed 50 Adc continuous current
(verify Shoto manual for details). It is thus recommended to use at least 2 battery modules in parallel to deliver both
sufficient continuous current and peak current for a single PSW-H-5KW at full power. When using multiple Any-Grid
units, be sure to increase the number of batteries accordingly to sustain the required currents. Using too few
batteries per inverter may void your Shoto battery warranty.
The batteries must be wired in parallel to form a single large battery bank when using multiple Any-Grids, with a
nominal voltage of 48 Vdc. All Any-Grids must be connected to a single battery array.
5.0 Battery Settings and Communication Cable Installation
CAUTION: Before connecting the battery modules to the Any-Grid(s), please follow the installation instructions in this
chapter step by step. The battery, AC input source, AC output loads and PV input must remain disconnected until
instructed otherwise.
Any battery-related settings made will be over-written if the communication cable is used. If you wish to manually
use settings at your own risk, then do not use the communication cable.
1. Make the battery communication cable as described in chapter 2. This cable is designed specifically for
connecting the Any-Grid PSW-H to Shoto batteries.
2. Ensure the battery modules are all turned off.
3. Ensure the battery modules are still turned off. Connect the Any-Grid(s) to the battery power (positive and
negative) terminals with the correct polarity.
CAUTION: If the correct polarity of the battery is not observed, the Any-Grid and the battery may be
damaged, this is not covered by warranty.
Connect the battery communication cable mentioned in chapter 2 to the battery RS-485 (A or B?) port and
the other end to the Any-Grid’s BMS port. Take care to connect the correct cable ends to the battery and
Any-Grid:
Shoto batteries
www.phocos.com 3 | P a g e
Any-Grid Battery
4. Ensure the battery modules are wired as outlined in the Shoto battery manual. Turn on the batteries:
5. Ensure the “ON/OFF” load power button of the Any-Grid(s) is in the ON position (depressed), but no loads are
connected:
The Any-Grid(s) should now be running, the display(s) on.
6. Apply the following setting on the Any-Grid to which the Shoto battery bank is connected with the
communication cable. This setting refers to the Any-Grid manual, chapter Operation Device Operation
Settings Settings menus.
Battery type
Menu 05: RS-485 (MODBUS RTU) battery
7. Once the setting has been applied, exit the settings menu by pressing to return to the main view.
8. Activate the circuit breakers or insert the fuses to energize the various inputs and outputs on the Any-Grid in
the following order (skip any that are not connected):
a) AC input
b) PV input
c) AC output
9. If you are using more than one Any-Grid, this procedure ensures that the unit to which the Shoto battery is
connected, will communicate with the Shoto battery BMS. Automatically, the battery type of all other
connected Any-Grid units will be set to “User-defined”, this is normal.
The commissioning and programming of the battery-related settings of the Any-Grid is now complete.
www.phocos.com 4 | P a g e
The content of this document is subject to change without notice.
Copyright © 2022 Phocos AG, all rights reserved.
Version: 20220211
Phocos AG
Magirus-Deutz-Str. 12
89077 Ulm, Germany
Phone +49 731 9380688-0
Fax +49 731 9380688-50
www.phocos.com
  • Page 1 1
  • Page 2 2
  • Page 3 3
  • Page 4 4
  • Page 5 5

Phocos Any-Grid Series User manual

Type
User manual

Phocos Any-Grid Series is a hybrid inverter charger designed for use with Lithium battery models, enabling seamless integration of renewable energy sources like solar PV systems. It offers flexible system configuration options, allowing for parallel operation of multiple units to meet higher power requirements or expand battery capacity. With advanced communication capabilities, the Any-Grid Series ensures optimal system performance and efficient energy management.

Ask a question and I''ll find the answer in the document

Finding information in a document is now easier with AI