NEC NP-PX1005QL-B Owner's manual
- Category
- Data projectors
- Type
- Owner's manual
This manual is also suitable for


Ver. 2 11/18
• Apple, Mac, and MacBook are trademarks of Apple Inc. registered in the U.S. and other countries.
• Microsoft, Windows, Windows Vista, Internet Explorer, .NET Framework and PowerPoint are either a registered
trademark or trademark of Microsoft Corporation in the United States and/or other countries.
• Cinema Quality Picture logo, AccuBlend, NaViSet, and Virtual Remote are trademarks or registered trademarks of
NEC Dispolay Solutions, Ltd. in Japan, in the United State and other countries.
• The terms HDMI and HDMI High-Denition Multimedia Interface, and the HDMI Logo are trademarks or registered
trademarks of HDMI Licensing Administrator, Inc. in the United States and other countries.
• DisplayPort and DisplayPort Compliance Logo are trademarks owned by the Video Electronics Standards Associa-
tion in the United States and other countries.
• HDBaseT™ and the HDBaseT Alliance logo are trademarks of the HDBaseT Alliance.
• DLP
®
, DLP logo and BrilliantColor are trademarks or registered trademarks of Texas Instruments in the United States
and other countries.
• PJLink trademark and logo are trademarks applied for registration or are already registered in Japan, the United
States of America and other countries and areas.
• Blu-ray is a trademark of Blu-ray Disc Association
• CRESTRON and CRESTRON ROOMVIEW are trademarks or registered trademarks of Crestron Electronics, Inc.
in the United States and other countries.
• Ethernet is either a registered trademark or trademark of Fuji Xerox Co., Ltd.
• Extron and XTP are registered trademarks of RGB Systems, Inc. in the United States.
• Other product and company names mentioned in this user’s manual may be the trademarks or registered trademarks
of their respective holders.
• Virtual Remote Tool uses WinI2C/DDC library, © Nicomsoft Ltd.
NOTES
(1) The contents of this user’s manual may not be reprinted in part or whole without permission.
(2) The contents of this user’s manual are subject to change without notice.
(3) Great care has been taken in the preparation of this user’s manual; however, should you notice any questionable
points, errors or omissions, please contact us.
(4) Notwithstanding article (3), NEC will not be responsible for any claims on loss of prot or other matters deemed
to result from using the Projector.

i
Important Information
Please use the power cord supplied with this projector. If the supplied power cord does not satisfy
requirements of your country’s safety standard, and voltage and current for your region, make
sure to use the power cord that conforms to and satises them.
• The power cord you use must be approved by and comply with the safety standards of your
country. Please refer to the page 151 about the power cord specication.
Rated voltage by country is listed below for your reference. For selecting an appropriate power
cord, please check rated voltage for your region by yourself.
AC 230 V : European countries
AC 120 V : North America
Safety Cautions
Precautions
Please read this manual carefully before using your NEC projector and keep the manual handy for future reference.
CAUTION
To turn off main power, be sure to remove the plug from power outlet.
The power outlet socket should be installed as near to the equipment as possible, and should be easily
accessible.
CAUTION
TO PREVENT SHOCK, DO NOT OPEN THE CABINET.
THERE ARE HIGH-VOLTAGE COMPONENTS INSIDE.
REFER SERVICING TO QUALIFIED SERVICE PERSONNEL.
This symbol warns the user that uninsulated voltage within the unit may be sufficient to cause electrical
shock. Therefore, it is dangerous to make any kind of contact with any part inside of the unit.
This symbol alerts the user that important information concerning the operation and maintenance of this
unit has been provided.
The information should be read carefully to avoid problems.
WARNING: TO PREVENT FIRE OR SHOCK, DO NOT EXPOSE THIS UNIT TO RAIN OR MOISTURE.
DO NOT USE THIS UNIT’S PLUG WITH AN EXTENSION CORD OR IN AN OUTLET UNLESS ALL THE PRONGS
CAN BE FULLY INSERTED.
Machine Noise Information Regulation - 3. GPSGV,
The highest sound pressure level is less than 70 dB (A) in accordance with EN ISO 7779.

ii
Important Information
Disposing of your used product
In the European Union
EU-wide legislation as implemented in each Member State requires that used electrical and electronic prod-
ucts carrying the mark (left) must be disposed of separately from normal household waste. This includes
projectors and their electrical accessories. When you dispose of such products, please follow the guidance
of your local authority and/or ask the shop where you purchased the product.
After collecting the used products, they are reused and recycled in a proper way. This effort will help us reduce
the wastes as well as the negative impact to the human health and the environment at the minimum level.
The mark on the electrical and electronic products only applies to the current European Union Member States.
Outside the European Union
If you wish to dispose of used electrical and electronic products outside the European union, please contact
your local authority and ask for the correct method of disposal.
For EU: The crossed-out wheeled bin implies that used batteries should not be put to the general household
waste! There is a separate collection system for used batteries, to allow proper treatment and recycling in
accordance with legislation.
According the EU directive 2006/66/EC, the battery can’t be disposed improperly. The battery shall be sepa-
rated to collect by local service.
WARNING
This equipment is compliant with Class A of CISPR 32. In a residential environment this equipment may cause
radio interference.
RF Interference (for USA only)
WARNING
• The Federal Communications Commission does not allow any modications or changes to the unit EXCEPT
those specied by NEC Display Solutions of America, Inc. in this manual. Failure to comply with this government
regulation could void your right to operate this equipment.
• This equipment has been tested and found to comply with the limits for a Class A digital device, pursuant to Part
15 of the FCC Rules. These limits are designed to provide reasonable protection against harmful interference
when the equipment is operated in a commercial environment. This equipment generates, uses, and can radi-
ate radio frequency energy and, if not installed and used in accordance with the installation manual, may cause
harmful interference to radio communications. Operation of this equipment in a residential area is likely to cause
harmful interference in which case the user will be required to correct the interference at his own expense.
• This device complies with Part 15 of FCC Rules. Operation is subject to the following two conditions.
(1) This device may not cause harmful interference, and (2) this device must accept any interference received,
including interference that may cause undesired operation.
Important Safeguards
These safety instructions are to ensure the long life of your projector and to prevent re and shock. Please read them
carefully and heed all warnings.
WARNING
• When the projector is damaged, cooling uids may come out of internal part.
Should this happen, immediately turn off the AC supply to the projector and contact your dealer.
DO NOT touch and drink the cooling uid. When the cooling uids are swallowed or contacted with
your eyes, please consult medical attention immediately. If you touch the cooling uid with your hand,
rinse your hands well under running water.

iii
Important Information
Installation
• Do not place the projector in the following conditions:
- on an unstable cart, stand, or table.
- near water, baths, or damp rooms.
- in direct sunlight, near heaters, or heat radiating appliances.
- in a dusty, smoky or steamy environment.
- on a sheet of paper or cloth, rugs or carpets.
• Do not install and store the projector in the below circumstances. Failure to do so may cause of malfunction.
- In powerful magnetic elds
- In corrosive gas environment
- Outdoors
• If you wish to have the projector installed on the ceiling:
- Do not attempt to install the projector yourself.
- The projector must be installed by qualied technicians in order to ensure proper operation and reduce the risk
of bodily injury.
- In addition, the ceiling must be strong enough to support the projector and the installation must be in accordance
with any local building codes.
- Please consult your dealer for more information.
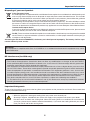
WARNING
• Do not cover the lens with the lens cap or equivalent while the projector is on. Doing so can lead to melting of
the cap due to the heat emitted from the light output.
• Do not place any objects, which are easily affected by heat, in front of the projector lens. Doing so could lead
to the object melting from the heat that is emitted from the light output.
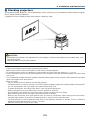
The below pictogram indicated on the cabinet means the precaution for avoiding to place objects in front of the
projector lens.
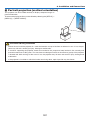
This projector can be installed any angle within vertical and horizontal 360° range, however, life of optical parts will
be shorten in the following installation state:
• When the projector is installed on which lens faces downward.
• When the intake vent on the projector side faces downward in the portrait installation. (→ page 137)
For portrait installation, install the projector with the intake vent at the bottom. Observe precautions for portrait installation.
* A customized stand is required to be attached to the projector. (→ page 138)
Fire and Shock Precautions
• Ensure that there is sufficient ventilation and that vents are unobstructed to prevent the build-up of heat inside your
projector. Allow enough space between your projector and a wall. (→ page xi)
• Do not try to touch the exhaust vent on the rear side (when seen from the front) as it can become heated while the
projector is turned on and immediately after the projector is turned off. Parts of the projector may become tempo-
rarily heated if the projector is turned off with the POWER button or if the AC power supply is disconnected during
normal projector operation.
Use caution when picking up the projector.

iv
Important Information
• Prevent foreign objects such as paper clips and bits of paper from falling into your projector. Do not attempt to retrieve
any objects that might fall into your projector. Do not insert any metal objects such as a wire or screwdriver into your
projector. If something should fall into your projector, disconnect it immediately and have the object removed by a
qualied service personnel.
• Do not place any objects on top of the projector.
• Do not touch the power plug during a thunderstorm. Doing so can cause electrical shock or re.
• The projector is designed to operate on a power supply of 110-240V AC 50/60 Hz. Ensure that your power supply
ts this requirement before attempting to use your projector.
• Make sure to mount the power cord stopper before attempting to use your projector. Please refer to page 15 about
the power cord stopper.
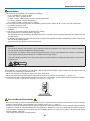
• Do not look into the light source using optical instruments (such as magnifying glasses and mirrors). Visual impair-
ment could result.
• When turning on the projector, ensure that nobody is facing towards the lens in the path of the light emitted from the
laser. Do not look into the lens while the projector is on. Serious damage to your eyes could result. The following
label, that is indicated at the lens-mounting-section on the projector cabinet, describes this projector is categorized
in the risk group 2 of IEC 62471-5: 2015. As with any bright light source, do not stare into the beam, RG2 IEC
62471-5: 2015.
• Perform the adjustment from behind or from the side of the projector. Adjusting from the front could expose your
eyes to strong light which could injure them.
• Keep any items (magnifying glass etc.) out of the light path of the projector. The light path being projected from the
lens is extensive, therefore any kind of abnormal objects that can redirect light coming out of the lens, can cause
an unpredictable outcome such as a re or injury to the eyes.
• Do not place any objects, which are easily affected by heat, in front of a projector exhaust vent.
Doing so could lead to the object melting or getting your hands burned from the heat that is emitted from the exhaust
vent.
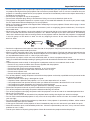
• Handle the power cord carefully. A damaged or frayed power cord can cause electric shock or re.
- Do not use any power cord other than the one supplied with the projector.
- Do not bend or tug the power cord excessively.
- Do not place the power cord under the projector, or any heavy object.
- Do not cover the power cord with other soft materials such as rugs.
- Do not heat the power cord.
- Do not handle the power plug with wet hands.
• Turn off the projector, unplug the power cord and have the projector serviced by a qualied service personnel under
the following conditions:
- When the power cord or plug is damaged or frayed.
- If liquid has been spilled into the projector, or if it has been exposed to rain or water.
- If the projector does not operate normally when you follow the instructions described in this user’s manual.
- If the projector has been dropped or the cabinet has been damaged.
- If the projector exhibits a distinct change in performance, indicating a need for service.
• Disconnect the power cord and any other cables before carrying the projector.
• Turn off the projector and unplug the power cord before cleaning the cabinet.
• Turn off the projector and unplug the power cord if the projector is not to be used for an extended period of time.
• When using a LAN cable:
For safety, do not connect to the terminal for peripheral device wiring that might have excessive voltage.
• Do not use the malfunctioned projector. It may cause of not only electric shock or re but also serious damage to
your eye sight.
• Do not let children to operate the projector by themselves. If the projector is operated by children, adults need to
attend and keep their eyes on children.
• If damage or malfunction of the projector is found, immediately stop to use it and consult your dealer for repair.
• Never disassemble, repair, and remodel by end users. If these are performed by end users, it may cause of serious
problem on users’ safety.
• Consult your dealer for disposing the projector. Never disassemble the projector before disposing it.

v
Important Information
CAUTION
• Keep hands away from the lens mounting portion while performing a lens shift. Failure to do so could result in
ngers being pinched by the moving lens.
• Do not use the tilt-foot for purposes other than originally intended. Misuses such as gripping the tilt-foot or hang-
ing on the wall can cause damage to the projector.
• Select [HIGH] in Fan mode if you continue to use the projector for consecutive days. (From the menu, select
[SETUP] → [INSTALLATION(1)] → [FAN MODE] → [HIGH].)
• Do not unplug the power cord from the wall outlet or projector when the projector is powered on. Doing so can
cause damage to the AC IN terminal of the projector and (or) the prong plug of the power cord.
To turn off the AC power supply when the projector is powered on, use the projector’s main power switch, a
power strip equipped with a switch, or a breaker.
• When moving the projector, make sure you have at least two people. Attempting to move the projector alone
could result in back pain or other injuries.
Caution on Handling the Optional Lens
When shipping the projector with the lens, remove the lens before shipping the projector. Always attach the dust cap
to the lens whenever it is not mounted on the projector. The lens and the lens shift mechanism may encounter dam-
age caused by improper handling during transportation.
Do not hold the lens part when carrying the projector.
Doing so could cause the focus ring to rotate, resulting in accidental dropping of the projector.
In the condition the projector is no lens mounted, do not put your hands in the lens mount opening for carrying the
projector.
For mounting, replacing, and cleaning the lens, make sure to power off the projector and disconnect the power cord.
Failure to do so can result in eye injury, electric shock, or burn injuries.
Keep hands away from the lens mounting portion while performing a lens shift. Failure to do so could result in ngers
being pinched by the moving lens.
Cable information
CAUTION
For HDMI, DisplayPort, BNC, LAN, and RS232C, please use a shielded cable.
Use of other cables may cause interference with radio and television reception.

vi
Important Information
Precautions when installing or replacing the lens unit sold separately (LENS
CALIBRATION)
After installing or replacing the lens unit, press either the CALIBRATION button on the main unit or the INFO/L-CALIB.
button while pressing the CTL button on the remote control to carry out [LENS CALIBRATION]. (→ page 17, 110)
By carrying out [LENS CALIBRATION], the adjustment range of the zoom, focus, and shift of the [LENS MEMORY]
is calibrated.
Contact your dealer to install and replace the lens unit.
Remote Control Precautions
• Handle the remote control carefully.
• If the remote control gets wet, wipe it dry immediately.
• Avoid excessive heat and humidity.
• Do not short, heat, or take apart batteries.
• Do not throw batteries into re.
• If you will not be using the remote control for a long time, remove the batteries.
• Ensure that you have the batteries’ polarity (+/−) aligned correctly.
• Do not use new and old batteries together, or use different types of batteries together.
• Dispose of used batteries according to your local regulations.
Light Module
1. A light module containing multiple laser diodes is equipped in the product as the light source.
2. These laser diodes are sealed in the light module. No maintenance or service is required for the performance of
the light module.
3. End user is not allowed to replace the light module.
4. Contact qualied distributor for light module replacement and further information.
Laser Safety Caution
• For USA
This product is classied as Class 3R of IEC 60825-1 Second edition 2007-03
Complies with FDA performance standards for laser products except for deviations pursuant to Laser Notice No.
50, dated June 24, 2007.
For other regions
This product is classied as Class 1 of IEC 60825-1 Third edition 2014-05 and EN 60825-1 Third edition 2014-08.
This product is classied as RG2 of IEC 62471-5 First edition 2015-06.
Obey the laws and regulations of your country in relation to the installation and management of the device.
• Outline of laser emitted from the built-in light module:
• Wave length: 450–460 nm
• Maximum power: 380 W
• Radiation pattern from the protective housing:
• Wave length: 450–460 nm
• Maximum laser radiation output: 0.253 mJ
• Pulse duration: 0.5 ms
• Repetition frequency: 240 Hz
• The laser module is equipped in this product. Use of controls or adjustments of procedures other than those speci-
ed herein may result in hazardous radiation exposure.
CAUTION
• Use of controls or adjustments or performance of procedures other than those specied herein may result in
hazardous radiation exposure.
CAUTION – CLASS 3R OF IEC 60825-1 SECOND EDITION LASER PRODUCT
LASER LIGHT – AVOID DIRECT EYE EXPOSURE

vii
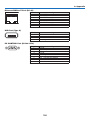
Important Information
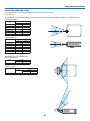
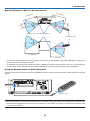
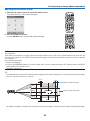
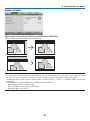
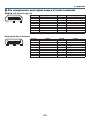
Laser light radiation range
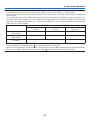
The gure below shows the maximum radiation range of the laser light.
(unit: degree)
Applicable lens unit: NP16FL-4K/NP17ZL-4K/NP18ZL-4K/NP19ZL-4K/NP20ZL-4K/NP21ZL-4K/NP31ZL-4K
Horizontal angle H
Lens Zoom
Tele Wide
NP16FL-4K — 32.6
NP17ZL-4K 15.5 21.6
NP18ZL-4K 12.3 16.0
NP19ZL-4K 7.7 12.6
NP20ZL-4K 5.3 7.9
NP21ZL-4K 3.4 5.4
NP31ZL-4K 27.6 33.2
Vertical angle V
Lens Zoom
Tele Wide
NP16FL-4K — 19.7
NP17ZL-4K 8.9 12.5
NP18ZL-4K 7.0 9.1
NP19ZL-4K 4.3 7.1
NP20ZL-4K 3.0 4.5
NP21ZL-4K 1.9 3.0
NP31ZL-4K 16.4 20.2
H
H
V
V
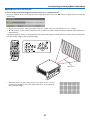
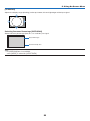
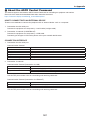
Applicable lens unit: NP39ML-4K
Horizontal angle H
Lens Zoom
Tele Wide
NP39ML-4K — 53.0
Vertical angle V
Lens Zoom
Tele Wide
V1 V2
NP39ML-4K — 9.5 18.8
H
H
V
1
V
2

viii
Important Information
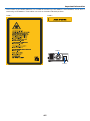
• These labels of the LASER PRODUCT in CLASS 3R conforming to IEC 60825-1 Second edition, and in Class 1
conforming to IEC 60825-1 Third edition are stuck on the below indicated positions.
Label 1 Label 2
Label 1
Label 2

ix
Important Information
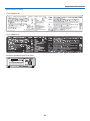
• Manufacturer's ID Label
(For PX1005QL-W)
(For PX1005QL-B)
Position of the Manufacturer's ID Label

x
Important Information
About Copyright of original projected pictures:
Please note that using this projector for the purpose of commercial gain or the attraction of public attention in a venue
such as a coffee shop or hotel and employing compression or expansion of the screen image with the following func-
tions may raise concern about the infringement of copyrights which are protected by copyright law:
[ASPECT RATIO], [KEYSTONE], Magnifying feature and other similar features.

xi
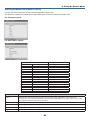
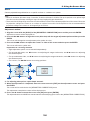
Important Information
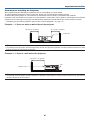
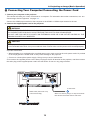
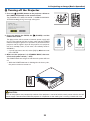
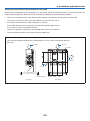
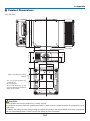
Clearance for Installing the Projector
Allow ample clearance between the projector and its surroundings as shown below.
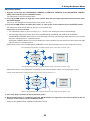
The high temperature exhaust coming out of the device may be sucked into the device again.
Avoid installing the projector in a place where air movement from the HVAC is directed at the projector.
Heated air from the HVAC can be taken in by the projector’s intake vent. If this happens, the temperature inside the
projector will rise too high causing the over-temperature protector to automatically turn off the projectors power.
• Concerning to the portrait projection, please refer “Portrait projection” on page 137.
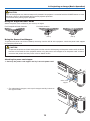
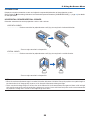
Example 1 – If there are walls on both sides of the projector.
30 cm/11.8" or greater 30 cm/11.8" or greater
Intake vent
NOTE:
• The drawing shows the proper clearance required for the left and right of the projector assuming sufficient clearance has been
kept for the front, back and top of the projector.
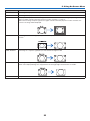
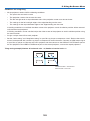
Example 2 – If there is a wall behind the projector.
50 cm/19.7" or greater
Lens
Exhaust vent
NOTE:
• The drawing shows the proper clearance required for the back of the projector assuming sufficient clearance has been kept for
the right, left and top of the projector.

xii
Table of Contents
Important Information ............................................................................................i
1. Introduction ...........................................................................................................1
❶ What’s in the Box? ..........................................................................................................1
❷ Introduction to the Projector ............................................................................................3
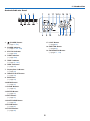
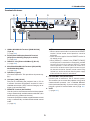
❸ Part Names of the Projector ...........................................................................................6
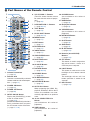
❹ Part Names of the Remote Control ...............................................................................10
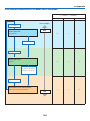
2. Projecting an Image (Basic Operation) ...............................................13
❶ Flow of Projecting an Image .........................................................................................13
❷ Connecting Your Computer/Connecting the Power Cord ..............................................14
❸ Turning on the Projector ................................................................................................ 16
❹ Selecting a Source .......................................................................................................19
❺ Adjusting the Picture Size and Position ........................................................................22
❻ Turning off the Projector ................................................................................................33
❼ After Use .......................................................................................................................34
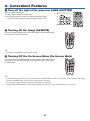
3. Convenient Features ......................................................................................35
❶ Turn off the light of the projector (LENS SHUTTER) .....................................................35
❷ Turning off the Image (AV-MUTE) .................................................................................35
❸ Turning Off the On-Screen Menu (On-Screen Mute) ....................................................35
❹ Shift the On-Screen Menu displaying position ..............................................................36
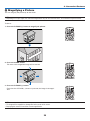
❺ Freezing a Picture .........................................................................................................37
❻ Magnifying a Picture .....................................................................................................38
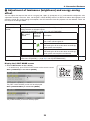
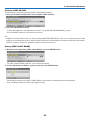
❼ Adjustment of luminance (brightness) and energy-saving effect ..................................39
❽ Correcting Horizontal and Vertical Keystone Distortion [CORNERSTONE] ..................43
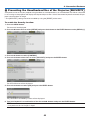
❾ Preventing the Unauthorized Use of the Projector [SECURITY] ...................................46
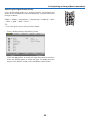
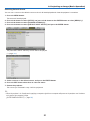
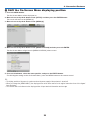
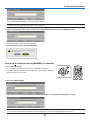
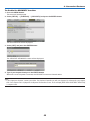
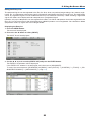
❿ Controlling the Projector by Using an HTTP Browser ...................................................49
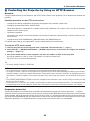
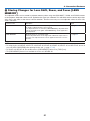
⓫ Storing Changes for Lens Shift, Zoom, and Focus [LENS MEMORY]..........................51
4. Multi-Screen Projection ...............................................................................57
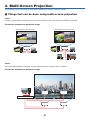
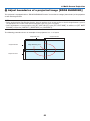
❶ Things that can be done using multi-screen projection ................................................57
❷ Using a single projector to project two or four types of videos at the same time
[PICTURE BY PICTURE] ........................................................................................ 58
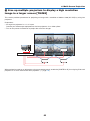
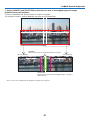
❸ Line up multiple projectors to display a high resolution image in a larger screen
[TILING] ..................................................................................................................60
❹ Adjust boundaries of a projected image [EDGE BLENDING] ....................................... 64

xiii
Table of Contents
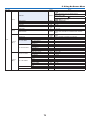
5. Using On-Screen Menu .................................................................................71
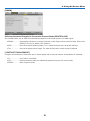
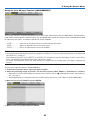
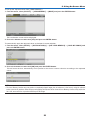
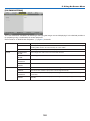
❶ Using the Menus ...........................................................................................................71
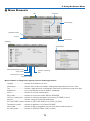
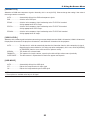
❷ Menu Elements .............................................................................................................72
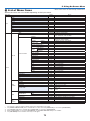
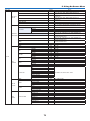
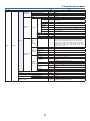
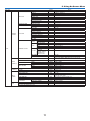
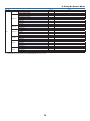
❸ List of Menu Items ........................................................................................................73
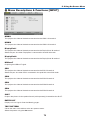
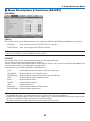
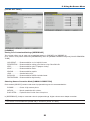
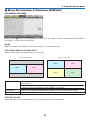
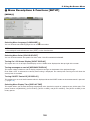
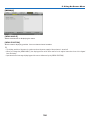
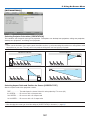
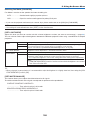
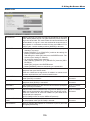
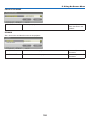
❹ Menu Descriptions & Functions [INPUT] ......................................................................79
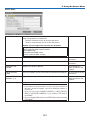
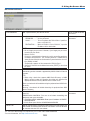
❺ Menu Descriptions & Functions [ADJUST] ...................................................................83
❻ Menu Descriptions & Functions [DISPLAY] ..................................................................95
❼ Menu Descriptions & Functions [SETUP] ................................................................... 105
❽ Menu Descriptions & Functions [INFO.] .....................................................................129
6. Installation and Connections ..................................................................133
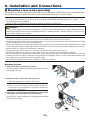
❶ Mounting a lens (sold separately) ...............................................................................133
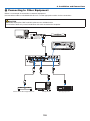
❷ Connecting to Other Equipment .................................................................................135
❸ Portrait projection (vertical orientation) ....................................................................... 137
❹ Stacking projectors .....................................................................................................139
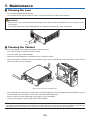
7. Maintenance .....................................................................................................142
❶ Cleaning the Lens.......................................................................................................142
❷ Cleaning the Cabinet
..................................................................................................142
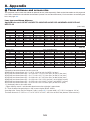
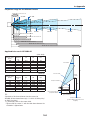
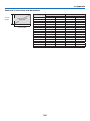
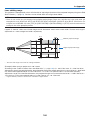
8. Appendix ..............................................................................................................143
❶ Throw distance and screen size .................................................................................143
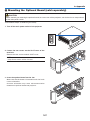
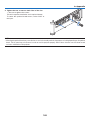
❷ Mounting the Optional Board (sold separately) ..........................................................147
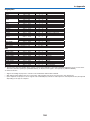
❸ Compatible Input Signal List .......................................................................................149
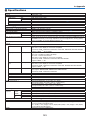
❹ Specications .............................................................................................................151
❺ Cabinet Dimensions ...................................................................................................154
❻ Pin assignments and signal names of main terminals................................................155
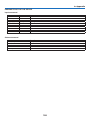
❼ About the ASCII Control Command ............................................................................157
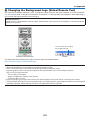
❽ Changing the Background Logo (Virtual Remote Tool) ...............................................159
❾ Troubleshooting ..........................................................................................................160
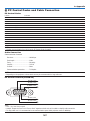
❿ PC Control Codes and Cable Connection ..................................................................167
⓫ Troubleshooting Check List .........................................................................................168

1
1. Introduction
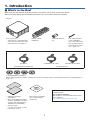
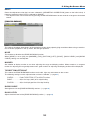
❶ What’s in the Box?
Make sure your box contains everything listed. If any pieces are missing, contact your dealer.
Please save the original box and packing materials if you ever need to ship your projector.
Projector
Dust cap for lens
* The projector is shipped without
a lens. For the types of lens and
throw distances, see page 143.
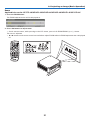
Remote control
(7N901041)
AA alkaline batteries
(x2)
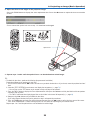
Lens theft prevention
screw (79TM1071)
This screw makes it dif-
cult to remove the lens
mounted on the projec-
tor. ( → page 134)
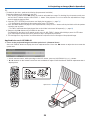
Power cord × 3
(79TM1021) (79TQ1001 for AC 120 V) (79TQ1011 for AC 200 V)
For Europe/Asia/South America For North America
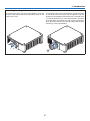
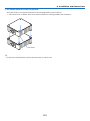
4 Stacking holders (79TM1101)
When stacking projectors (double stacking), the tilt foot of the upper projector will be placed onto these stacking holders. (→
page 139)
For North America only
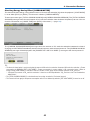
Limited warranty
For customers in Europe:
You will nd our current valid Guarantee Policy
on our Web Site:
https://www.nec-display-solutions.com
• Important Infomation
(7N8N9041)
• Quick Setup Guide (For North
America: 7N8N9051) (For Other
countries than North America:
7N8N9051 and 7N8N9061)
• Security Sticker
(Use this sticker when security
password is set on.)
NEC Projector CD-ROM
User’s manual (PDF)
(7N952732)

2
1. Introduction
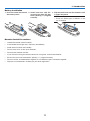
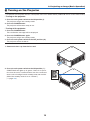
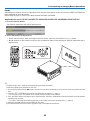
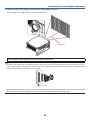
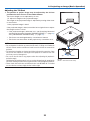
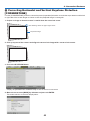
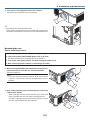
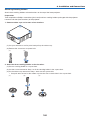
Removing/Attaching the Dust Cap
To remove the dust cap from the projector, push the
tongue at the top left outward and pull the knob at the
center of the cap.
To attach the dust cap to the projector, locate the catch
on the lower end of the dust cap and place it into the
opening of the projector with the point of a triangle mark
(▽) facing downward (① in the gure below), and then
push the upper end of the dust cap against the projec-
tor to place the catches into the slot while clutching the
handle (② in the gure below).

3
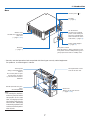
1. Introduction
❷ Introduction to the Projector
This section introduces you to your new projector and describes the features and controls.
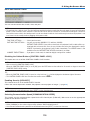
General
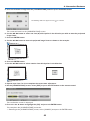
• Single-chip DLP projector with high resolution and high brightness
Realized to project the image in the resolution 3840 × 2160 pixels (4K UHD), the aspect ratio in 16:9, and the
brightness in 10000 lumens.
• Superior dust-proof structure
Adapted the cycle cooling system for cooling down the optical parts. By this system, air in the light source is cooled
down and circulated. As the result, the optical parts are not exposed to the open air and enable to keep brightness
without contamination by dust.
* Can not prevent contamination by dust completely.
Light source · Brightness
• A long-life laser diode is equipped in the light module
The product can be operated at low cost because the laser light source can be used for a long time without requir-
ing replacement or maintenance.
• Brightness can be adjusted within a wide range
Unlike with ordinary light sources, the brightness can be adjusted from 20 to 100% in 1% increments.
• [CONSTANT BRIGHTNESS] mode
Brightness normally decreases with use, but by selecting [CONSTANT BRIGHTNESS] mode, sensors inside the
projector detect and automatically adjust the output, thereby maintaining constant brightness throughout the life
of the light module.
However, if brightness output is set at the maximum, brightness will decrease with use.
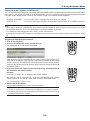
Installation
• Wide range of optional lenses selectable according to the place of installation
This projector supports 8 types of optional lenses, providing a selection of lenses adapted to a variety of places
of installation and projection methods.
In addition, the lenses can be mounted and removed in one touch.
Note that no lens is mounted upon shipment from the factory. Please purchase optional lenses separately.
• This projector can be installed any angle within vertical and horizontal 360° range, however, life of optical
parts will be shorten in the following installation state:
• When the projector is installed on which lens faces downward.
• When the intake vent on the projector side faces downward in the portrait installation.
• Double stackable for high light output projection
By stacking 2 projectors, increased brightness on a large screen is possible.
• Power lens control for quick and easy adjustment
By using buttons on the projector or the remote control, zoom, focus, and position (lens shift) can be adjusted.

4
1. Introduction
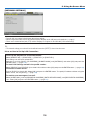
Videos
• High quality pictures using Cinema Quality Picture technology
The device displays high-resolution pictures with its rich gradation expression capability and by improving the
contrast in the picture boundary area using the development technology for digital cinema projectors and the
unique NEC video processor for image processing.
• A variety of input terminals such as HDMI, DisplayPort, HDBaseT, SDI, etc.
The projector is equipped with HDMI (1/2), DisplayPort (1/2), HDBaseT, SDI (1/2/3/4) input terminals. Moreover,
You can install optional boards (sold separately) to SLOT.
The projector’s HDMI input terminals and DisplayPort input terminals support HDCP.
HDBaseT, promoted and advanced by the HDBaseT Alliance, is a consumer electronic (CE) and commercial
connectivity technology.
• Displaying two or four images at the same time (PICTURE BY PICTURE)
With this single projector you can project two or four images at the same time.
When projecting two images, you can adjust its position on the screen. The projector also supports the portrait
projection.
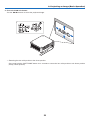
• Multi-screen projection using multiple projectors
You can line up multiple projectors to display a high resolution image in a larger screen.
Furthermore, the boundaries of the screens are smoothed using an edge blending function.
• Slot for optional board
This projector has a slot for optional boards (sold separately).
Network
• Supports wired LAN
Equips the LAN and HDBaseT (RJ-45) ports. Utilizing a wired LAN connected with these ports, it enables to control
the projector by a computer.
• Convenient utility software (User Supportware)
This projector supports our utility software (NaViSet Administrator 2, Virtual Remote Tool, etc.).
NaViSet Administrator 2 helps you control the projector by a computer via wired LAN connection.
Virtual Remote Tool helps you perform operations by a virtual remote control such as projector's power on or off
and signal selection via wired LAN connection. Moreover, it has function to send an image to the projector and
register it as the logo data.
Please visit our web site for downloading each software.
URL: https://www.nec-display.com/dl/en/index.html
• CRESTRON ROOMVIEW and Extron XTP compatibility
The projector supports CRESTRON ROOMVIEW and Extron XTP, allowing multiple devices connected in the
network to be managed and controlled from a computer. Moreover, it enables to output and control image via an
Extron XTP transmitter connected with the projector.

5
1. Introduction
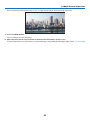
About this user’s manual
The fastest way to get started is to take your time and do everything right the rst time. Take a few minutes now to
review the user’s manual. This may save you time later on. At the beginning of each section of the manual you’ll nd
an overview. If the section doesn’t apply, you can skip it.
Page is loading ...
Page is loading ...
Page is loading ...
Page is loading ...
Page is loading ...
Page is loading ...
Page is loading ...
Page is loading ...
Page is loading ...
Page is loading ...
Page is loading ...
Page is loading ...
Page is loading ...
Page is loading ...
Page is loading ...
Page is loading ...
Page is loading ...
Page is loading ...
Page is loading ...
Page is loading ...
Page is loading ...
Page is loading ...
Page is loading ...
Page is loading ...
Page is loading ...
Page is loading ...
Page is loading ...
Page is loading ...
Page is loading ...
Page is loading ...
Page is loading ...
Page is loading ...
Page is loading ...
Page is loading ...
Page is loading ...
Page is loading ...
Page is loading ...
Page is loading ...
Page is loading ...
Page is loading ...
Page is loading ...
Page is loading ...
Page is loading ...
Page is loading ...
Page is loading ...
Page is loading ...
Page is loading ...
Page is loading ...
Page is loading ...
Page is loading ...
Page is loading ...
Page is loading ...
Page is loading ...
Page is loading ...
Page is loading ...
Page is loading ...
Page is loading ...
Page is loading ...
Page is loading ...
Page is loading ...
Page is loading ...
Page is loading ...
Page is loading ...
Page is loading ...
Page is loading ...
Page is loading ...
Page is loading ...
Page is loading ...
Page is loading ...
Page is loading ...
Page is loading ...
Page is loading ...
Page is loading ...
Page is loading ...
Page is loading ...
Page is loading ...
Page is loading ...
Page is loading ...
Page is loading ...
Page is loading ...
Page is loading ...
Page is loading ...
Page is loading ...
Page is loading ...
Page is loading ...
Page is loading ...
Page is loading ...
Page is loading ...
Page is loading ...
Page is loading ...
Page is loading ...
Page is loading ...
Page is loading ...
Page is loading ...
Page is loading ...
Page is loading ...
Page is loading ...
Page is loading ...
Page is loading ...
Page is loading ...
Page is loading ...
Page is loading ...
Page is loading ...
Page is loading ...
Page is loading ...
Page is loading ...
Page is loading ...
Page is loading ...
Page is loading ...
Page is loading ...
Page is loading ...
Page is loading ...
Page is loading ...
Page is loading ...
Page is loading ...
Page is loading ...
Page is loading ...
Page is loading ...
Page is loading ...
Page is loading ...
Page is loading ...
Page is loading ...
Page is loading ...
Page is loading ...
Page is loading ...
Page is loading ...
Page is loading ...
Page is loading ...
Page is loading ...
Page is loading ...
Page is loading ...
Page is loading ...
Page is loading ...
Page is loading ...
Page is loading ...
Page is loading ...
Page is loading ...
Page is loading ...
Page is loading ...
Page is loading ...
Page is loading ...
Page is loading ...
Page is loading ...
Page is loading ...
Page is loading ...
Page is loading ...
Page is loading ...
Page is loading ...
Page is loading ...
Page is loading ...
Page is loading ...
Page is loading ...
Page is loading ...
Page is loading ...
Page is loading ...
Page is loading ...
Page is loading ...
Page is loading ...
Page is loading ...
Page is loading ...
Page is loading ...
Page is loading ...
Page is loading ...
Page is loading ...
Page is loading ...
-
 1
1
-
 2
2
-
 3
3
-
 4
4
-
 5
5
-
 6
6
-
 7
7
-
 8
8
-
 9
9
-
 10
10
-
 11
11
-
 12
12
-
 13
13
-
 14
14
-
 15
15
-
 16
16
-
 17
17
-
 18
18
-
 19
19
-
 20
20
-
 21
21
-
 22
22
-
 23
23
-
 24
24
-
 25
25
-
 26
26
-
 27
27
-
 28
28
-
 29
29
-
 30
30
-
 31
31
-
 32
32
-
 33
33
-
 34
34
-
 35
35
-
 36
36
-
 37
37
-
 38
38
-
 39
39
-
 40
40
-
 41
41
-
 42
42
-
 43
43
-
 44
44
-
 45
45
-
 46
46
-
 47
47
-
 48
48
-
 49
49
-
 50
50
-
 51
51
-
 52
52
-
 53
53
-
 54
54
-
 55
55
-
 56
56
-
 57
57
-
 58
58
-
 59
59
-
 60
60
-
 61
61
-
 62
62
-
 63
63
-
 64
64
-
 65
65
-
 66
66
-
 67
67
-
 68
68
-
 69
69
-
 70
70
-
 71
71
-
 72
72
-
 73
73
-
 74
74
-
 75
75
-
 76
76
-
 77
77
-
 78
78
-
 79
79
-
 80
80
-
 81
81
-
 82
82
-
 83
83
-
 84
84
-
 85
85
-
 86
86
-
 87
87
-
 88
88
-
 89
89
-
 90
90
-
 91
91
-
 92
92
-
 93
93
-
 94
94
-
 95
95
-
 96
96
-
 97
97
-
 98
98
-
 99
99
-
 100
100
-
 101
101
-
 102
102
-
 103
103
-
 104
104
-
 105
105
-
 106
106
-
 107
107
-
 108
108
-
 109
109
-
 110
110
-
 111
111
-
 112
112
-
 113
113
-
 114
114
-
 115
115
-
 116
116
-
 117
117
-
 118
118
-
 119
119
-
 120
120
-
 121
121
-
 122
122
-
 123
123
-
 124
124
-
 125
125
-
 126
126
-
 127
127
-
 128
128
-
 129
129
-
 130
130
-
 131
131
-
 132
132
-
 133
133
-
 134
134
-
 135
135
-
 136
136
-
 137
137
-
 138
138
-
 139
139
-
 140
140
-
 141
141
-
 142
142
-
 143
143
-
 144
144
-
 145
145
-
 146
146
-
 147
147
-
 148
148
-
 149
149
-
 150
150
-
 151
151
-
 152
152
-
 153
153
-
 154
154
-
 155
155
-
 156
156
-
 157
157
-
 158
158
-
 159
159
-
 160
160
-
 161
161
-
 162
162
-
 163
163
-
 164
164
-
 165
165
-
 166
166
-
 167
167
-
 168
168
-
 169
169
-
 170
170
-
 171
171
-
 172
172
-
 173
173
-
 174
174
-
 175
175
-
 176
176
-
 177
177
-
 178
178
-
 179
179
-
 180
180
-
 181
181
-
 182
182
-
 183
183
-
 184
184
-
 185
185


NEC NP-PX1005QL-B Owner's manual
- Category
- Data projectors
- Type
- Owner's manual
- This manual is also suitable for
Ask a question and I''ll find the answer in the document
Finding information in a document is now easier with AI
Related papers
Other documents
-
Maxell MPWU8101B User manual
-
LG BU70QGA User manual
-
Hitachi CPHD9950B User manual
-
Epson Home Theater System EH-TW3200 User manual
-
Hitachi CP-WU9410 User manual
-
Optoma ZK1050 User manual
-
-
-
Sanyo PLV-HD100 - 5500 Lumens Owner's manual
-
Sony VPL-FHZ700L Operating instructions