Page is loading ...

The Crestron® CHV-TSTAT-FCU-PIR-10-W-T is a fan-coil thermostat
with variable heating, cooling, and fan speed control. Built with versatility
and energy efficiency in mind, this thermostat has the additional benefit
of a built-in passive-infrared (PIR) sensor to ensure that energy spent on
climate control is never wasted on a vacant room.
In the Box
1 CHV-TSTAT-FCU-PIR-10, 0-10 V Heating/Cooling Fan-Coil
Thermostat
Additional Items
2 Screw, 6-32 x 1 in., Pan Head, Phillips (2007251)
2 Screw, M3 x 16 mm, Flat Head, Phillips (2013788)
Install the Device
NOTE: Installers should have a strong working knowledge of HVAC
systems.
Install the thermostat away from direct sunlight, drafts, doorways,
skylights, and windows. Also, make sure that the thermostat is
conveniently located for control access and setup.
Thermostats should be mounted 60 in. (~1.6 m) above the finished floor;
this is an HVAC industry standard. Do not mount on an exterior wall.
The following tools and hardware are required for installation:
l 1-gang U.S. electrical box or 1-gang U.K. electrical box (notsupplied)
l Phillips screwdriver (notsupplied)
CHV-TSTAT-FCU-PIR-10-W-T
Quick Start
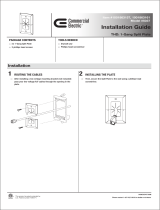
1

Install the thermostat in the electrical box.
1. Turn the HVAC system power off.
2. Separate the thermostat front plate from the rear plate. It may be
necessary to exert force when removing the front plate.
3. Feed the HVAC wiring from the electrical box through the hole in the
center of the rear plate.
4. Make HVAC connections. Refer to the Connect the Device section for
details.
CAUTION: To avoid a possible short circuit, ensure excess wire is
inside the electrical box and not pinched between the box and the
device.
NOTE: To ensure accurate temperature readings, plug the wire hole
with insulation to prevent drafts in the back of the unit.
5. Attach the thermostat rear plate to the electrical box using the
included screws.
NOTE: For U.S.-style installations, use the 6-32 x 1 in. screws. For
U.K.-style installations, use the M3 x 16 mm screws.
6. Attach the front plate.
CAUTION: Do not press on the LCD display during mounting, as
this may cause the screen to crack.
7. Carefully remove the warning label from the LCD display on the front
plate.
8. Turn the HVAC system power on.
Installation in U.S. Electrical Box (top) and U.K. Square Electrical Box
(bottom)
CHV-TSTAT-FCU-PIR-10-W-T
Quick Start
2

Connect the Device
Make the necessary connections as called out in the illustrations that
follow. A miniature flathead screwdriver (not supplied) is required to
attach the control wires from the HVAC system. Apply power after all
connections have been made.
If the system being connected does not match the system described
below, contact Crestron Technical Support for assistance.
Cresnet® Wire Connections
Jumper Connections
CHV-TSTAT-FCU-PIR-10-W-T
Quick Start
3

HVAC Connections
CHV-TSTAT-FCU-PIR-10-W-T
Quick Start
4

Configure the Device
To enter Setup mode, press and hold the Down button. While holding the
Down button, simultaneously press and hold the Mode and Fan buttons
until the SETUP: SYSTEM screen is displayed.
For detailed setup information, refer to the CHV-TSTAT-FCU-PIR-10
Supplemental Guide (Doc. 7964) at www.crestron.com/manuals.
Visit the Product Page
Scan the QR code to visit the product page.
www.crestron.com/model/6508012
Additional Information
Original Instructions
The U.S. English version of this document is the original instructions.
All other languages are a translation of the original instructions.
Crestron product development software is licensed to Crestron dealers and Crestron
Service Providers (CSPs) under a limited nonexclusive, nontransferable Software
Development Tools License Agreement. Crestron product operating system software is
licensed to Crestron dealers, CSPs, and end-users under a separate End-User License
Agreement. Both of these Agreements can be found on the Crestron website at
www.crestron.com/legal/software_license_agreement.
The product warranty can be found at www.crestron.com/warranty.
The specific patents that cover Crestron products are listed at
www.crestron.com/legal/patents.
Certain Crestron products contain open source software. For specific information, visit
www.crestron.com/opensource.
Crestron, the Crestron logo, and Cresnet are either trademarks or registered
trademarks of Crestron Electronics, Inc. in the United States and/or other countries.
Other trademarks, registered trademarks, and trade names may be used in this
document to refer to either the entities claiming the marks and names or their
products. Crestron disclaims any proprietary interest in the marks and names of
others. Crestron is not responsible for errors in typography or photography.
©2020 Crestron Electronics, Inc.
Doc ID 7915C
(2054039)
01/24/20
CHV-TSTAT-FCU-PIR-10-W-T
Quick Start
5
/