Page is loading ...

ASSEMBLY INSTRUCTION
ASSEMBLY COMPLETED
NOTE : AFTER A FEW DAYS OF ASSEMBLY. IT WILL HAVE ACCLIMATIZED TO THE ENVIRONMENT. PLEASE TIGHTEN ALL HARDWARE.CHECK TIGHTNESS OF
ALL SCREWS EVERY 6 - 8 WEEKS.
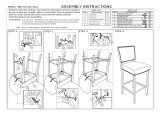
STEP 1
Put bench top (1) down on flat floor, pls pay attention to protect top;
Fix side frame (2) and bench top by using Jcbc screw (A),screw (C)
and allen key (D).
STEP 3
ITEM : Oak-Bench
NO. PARTLIST QTY
NO. HARDWARE QTY
11PC
22PCS
4PCS
4PCS
4PCS
4PCS
1PC
A
B
C
D
E
E
A
B
C
D
1
2
2
ADJUST FOOT
ALLEN KEY
M4
SCREW
M7 X 50
JCBC SCREW
M6 X 50
NUT
M10 X 12
BENCH TOP
SIDE FRAME
STEP 2
Rotate adjust foot (E) on side frame bottom.
/


![HomeSullivan405302C-36(3A)[5PC]-24](http://vs1.manuzoid.com/store/data/000635708_2-6da331492e1541846a6c99271607eafe-160x210.png)


