Page is loading ...

LSI™ 3ware® 9750
SATA+SAS RAID
Controller Card
Supports the 9750 Family
Models 9750-4i, 9750-8i, 9750-4i4e,
9750-8e, 9750-16i4e, and
9750-24i4e
PN: 45412-01, Rev. C
May 2010
Installation Guide
45412- 01C

ii LSI 3ware 9750 SATA+SAS RAID Controller Card Installation Guide
Document Description
Document 45412-01, Rev. C, May 2010.
This document will remain the official reference source for all revisions
and releases of this product until rescinded by an update.
Disclaimer
It is the policy of LSI Corporation to improve products as new technology,
components, software, and firmware become available. LSI reserves the
right to make changes to any products herein at any time without notice.
All features, functions, and operations described herein may not be
marketed by LSI in all parts of the world. In some instances, photographs
and figures are of equipment prototypes. Therefore, before using this
document, consult your LSI representative for information that is
applicable and current. LSI DOES NOT ASSUME ANY
RESPONSIBILITY OR LIABILITY FOR THE USE OF ANY
PRODUCTS DESCRIBED HEREIN EXCEPT AS EXPRESSLY
AGREED TO IN WRITING BY LSI.
LSI products are not intended for use in life-support appliances, devices,
or systems. Use of any LSI product in such applications without written
consent of the appropriate LSI officer is prohibited.
Proprietary Rights Notice
This document contains proprietary information of LSI Corporation. The
information contained herein is not to be used by or disclosed to third
parties without the express written permission of an officer of LSI.
License Restriction
The purchase or use of an LSI Corporation product does not convey a
license under any patent, copyright, trademark, or other intellectual
property right of LSI or third parties.
Copyright Notice
© 2010 LSI Corporation. All rights reserved.
Trademark Acknowledgments
LSI, LSI logo, 3ware
®
, 3DM
®
, 3DM2™, StorSwitch
®
, StorSave™, and
StreamFusion™+ are all trademarks or registered trademarks of LSI
Corporation. All other brand and product names may be trademarks of
their respective companies.

www.lsi.com/channel/products iii
About this Guide . . . . . . . . . . . . . . . . . . . . . . . . . . . . . . . . . . . . .iv
Chapter 1. Getting Started . . . . . . . . . . . . . . . . . . . . . . . . . . . . . 1
Contents of this Package. . . . . . . . . . . . . . . . . . . . . . . . . . . . . . . . . . . . . . 2
9750 Controller Card Models. . . . . . . . . . . . . . . . . . . . . . . . . . . . . . . . . . . 4
Cables . . . . . . . . . . . . . . . . . . . . . . . . . . . . . . . . . . . . . . . . . . . . . . . . . . . . 7
Internal SFF-8087 Cable with Sideband Support . . . . . . . . . . . . . . . . . 7
External SFF-8088 Cable . . . . . . . . . . . . . . . . . . . . . . . . . . . . . . . . . . . 7
System Requirements . . . . . . . . . . . . . . . . . . . . . . . . . . . . . . . . . . . . . . . . 8
Motherboard and Slot Requirements . . . . . . . . . . . . . . . . . . . . . . . . . . 8
Enclosure Requirements . . . . . . . . . . . . . . . . . . . . . . . . . . . . . . . . . . . . 8
Drive Requirements . . . . . . . . . . . . . . . . . . . . . . . . . . . . . . . . . . . . . . . . 8
Operating System Requirements . . . . . . . . . . . . . . . . . . . . . . . . . . . . . 9
Safety Information . . . . . . . . . . . . . . . . . . . . . . . . . . . . . . . . . . . . . . . . . . 10
Site Selection . . . . . . . . . . . . . . . . . . . . . . . . . . . . . . . . . . . . . . . . . . . 10
Personal Safety When Installing the 9750 Card in Your Computer . . . 11
Protecting Equipment and Data . . . . . . . . . . . . . . . . . . . . . . . . . . . . . 11
Installation Considerations . . . . . . . . . . . . . . . . . . . . . . . . . . . . . . . . . 12
Chapter 2. Installing the 9750 SATA+SAS Controller Card . . 14
Tools You Need . . . . . . . . . . . . . . . . . . . . . . . . . . . . . . . . . . . . . . . . . . . . 14
Before You Start. . . . . . . . . . . . . . . . . . . . . . . . . . . . . . . . . . . . . . . . . . . . 14
Installing Your BBU . . . . . . . . . . . . . . . . . . . . . . . . . . . . . . . . . . . . . . . 15
Installation for Mac Users . . . . . . . . . . . . . . . . . . . . . . . . . . . . . . . . . . . . 17
Install the Controller in the Computer . . . . . . . . . . . . . . . . . . . . . . . . . . . 17
Attach the Cables to Your Controller . . . . . . . . . . . . . . . . . . . . . . . . . . . . 19
Connect the Cables to Backplanes . . . . . . . . . . . . . . . . . . . . . . . . . . . . . 21
Finishing Up the SATA+SAS Controller Card Installation . . . . . . . . . . . . 22
Check Installation and Close the Case . . . . . . . . . . . . . . . . . . . . . . . . 22
Configure Your SATA+SAS Arrays . . . . . . . . . . . . . . . . . . . . . . . . . . . . . 22
Chapter 3. Specifications . . . . . . . . . . . . . . . . . . . . . . . . . . . . . 23
Electrical Characteristics . . . . . . . . . . . . . . . . . . . . . . . . . . . . . . . . . . . . . 23
Power Supply Requirements for the 9750-4i, 9750-8i, 9750-4i4e, and
9750-8e Controller Cards . . . . . . . . . . . . . . . . . . . . . . . . . . . . . . . . . . 23
Power Supply Requirements for the 9750-24i4e and 9750-16i4e
Controller Cards . . . . . . . . . . . . . . . . . . . . . . . . . . . . . . . . . . . . . . . . . 24
Environmental Specification. . . . . . . . . . . . . . . . . . . . . . . . . . . . . . . . . . . 25
Physical Dimensions . . . . . . . . . . . . . . . . . . . . . . . . . . . . . . . . . . . . . . . . 26
Fault Tolerance . . . . . . . . . . . . . . . . . . . . . . . . . . . . . . . . . . . . . . . . . . . . 26
Jumper and Connector Description for the 9750 Controller Card Family 27
LEDs on 9750 Controller Card Family. . . . . . . . . . . . . . . . . . . . . . . . . . . 42
Technical Certifications . . . . . . . . . . . . . . . . . . . . . . . . . . . . . . . . . . . . . . 43
Appendix: Technical Support . . . . . . . . . . . . . . . . . . . . . . . . . 44
Table of Contents

iv LSI 3ware 9750 SATA+SAS RAID Controller Card Installation Guide
About this Guide
Congratulations on your purchase of the 3ware
®
9750 SATA+SAS
Raid Controller Card. This guide tells you how to install it.
The following additional documentation is available for your 3ware
SATA+SAS RAID controller card on the CD that came with your
controller. The documentation is also available through the LSI
Download Center at
http://www.lsi.com/channel/
ChannelDownloads.
3ware SATA+SAS RAID Controller Card Software User Guide,
Version 10.0 or newer
3ware SATA+SAS RAID Controller Card Software User Guide
Addendum, Version 10.1 (web-only release)
3ware SATA+SAS RAID Controller Card CLI Guide, Version
10.0 or newer.
The 3ware HTML Bookshelf is an HTML version of the Software
User Guide and the CLI Guide, combined as one resource. It is only
available on your 3ware CD, in the
/doc/3wareHTMLBookshelf
folder.
Online help is also available when you are using 3DM2™ (3ware
Disk Manager 2).
Chapter/Appendix Description
1 Getting Started Overview of the 3ware SATA+SAS
controller card and important safety
factors to keep in mind during installation.
2 Installing the 9750
SATA+SAS Controller Card
How to install the 3ware 9750
SATA+SAS controller card.
3 Specifications Specifications for the 9750 controller
card.
Appendix: Technical Support Websites with the latest information
related to 3ware RAID controllers.

www.lsi.com/channel/products 1
Chapter 1. Getting
Started
The LSI 3ware 9750 SATA+SAS RAID controller card provides
these features:
Support for up to 127 SAS and/or SATA devices per controller,
single port only.
Release 10.2 adds external support.
OS support includes FreeBSD
®
, Linux
®
, Mac OS
®
X,
OpenSolaris™, VMware
®
, and Windows
®
.
RAID 6 with simultaneous parity generation to maximize
performance.
LSI 2108 RAID-on-Chip (ROC) hardware platform.
StreamFusion™+ optimization of RAID 5 and RAID 6 disk
accesses to maximize application performance under heavy
loads.
StorSave™ Battery Backup Unit (BBU) with write journaling
to optimize data protection and performance (BBU must be
purchased separately, see Step 2 on page 14).
Hot-swap and hot-spare for data availability.
RAID levels 0, 1, 5, 6, 10, 50, and Single Disk
Up to 6 Gbps per port data transfer rates
Support for 3 Gbps and 6 Gbps, SATA and SAS, Hard Disk
Drive (HDD) and Solid State Disk (SSD) technologies.
Onboard ECC DDRII SDRAM

Chapter 1. Getting Started
2 LSI 3ware 9750 SATA+SAS RAID Controller Card Installation Guide
Contents of this Package
If you purchased a full retail kit with cables, the following items are
included:
One of the 3ware 9750 RAID controller card models in Table 1.
This document, LSI 3ware 9750 SATA+SAS RAID Controller
Card Installation Guide.
3ware CD-ROM with driver, software, and additional
documentation.
Appropriate cables for your 9750 RAID controller card see
Table 2, also see “Cables” on page 7.
Table 1: 9750 Controller Card Family
Model Ports Description
9750-4i 4 One internal 4x wide port.
9750-8i 8 Two internal 4x wide ports.
9750-4i4e 8 One internal 4x wide port, one external 4x wide
port.
9750-8e 8 Two external 4x wide ports.
9750-16i4e 20 Four internal 4x wide ports, one external 4x wide
port.
9750-24i4e 28 Six internal 4x wide ports, one external 4x wide
port.
Table 2: Cable and Connectors for the 9750 Family
Model
Internal
Connectors
External
Connectors
Cable
9750-4i 1 x SFF8087 – One internal 4 lane
SATA+SAS cable with
sideband support.

Contents of this Package
www.lsi.com/channel/products 3
9750-8i 2 x SFF8087 – Two internal 4 lane
SATA+SAS cables with
sideband support.
9750-4i4e 1 x SFF8087 1 x SFF8088 One internal 4 lane
SATA+SAS cable with
sideband support. One
external 4 lane
SATA+SAS cable.
9750-8e – 2 x SFF8088 Two external 4x lane
SATA+SAS cables.
9750-16i4e 4 x SFF8087 1 x SFF8088 Four internal 4x lane
SATA+SAS cables with
sideband support. One
external 4x lane
SATA+SAS cable.
9750-24i4e 6 x SFF8087 1 x SFF8088 Six internal 4x lane
SATA+SAS cable with
sideband support, one
external 4x lane
SATA+SAS cable.
Table 2: Cable and Connectors for the 9750 Family (continued)
Model
Internal
Connectors
External
Connectors
Cable

Chapter 1. Getting Started
4 LSI 3ware 9750 SATA+SAS RAID Controller Card Installation Guide
9750 Controller Card Models
Figure 1. Layout of the 4-Port 3ware 9750-4i SATA+SAS RAID
Controller Card
Figure 2. Layout of the 8-Port 3ware 9750-8i SATA+SAS RAID
Controller Card
85049-09
JT3B1
JT6B3
JT6B2
JT6B1
JT5B2
JT5B3
Heat Sink for
RAID-On-Chip (ROC)
Red
System Error
LED
CRT6A1
Jumpers
Green Drive Activity LED
CRT4B1
Connector for
Battery Backup Unit
JT5B1
Port 0
Ports
0-3
See Table 6 for jumper descriptions
and Table 11 for LED descriptions
J4L1 on back
See Table 7 for jumper descriptions
and Table 12 for LED descriptions
85049-08
JT5A1
JT5B1
JT3B1
JT6B3
JT6B2
JT6B1
JT5B2
JT5B3
Heat Sink for
RAID-On-Chip (ROC)
Red System Error LED
CRT6A1
Port 4
Port 0
Jumpers
Green Drive Activity LED
CRT4B1
Connector for
Battery Backup Unit
See Table 6 for jumper descriptions
and Table 11 for LED descriptions
Ports
4- 7
Ports
0-3
J4L1 on back
See Table 7 for jumper descriptions
and Table 12 for LED descriptions

9750 Controller Card Models
www.lsi.com/channel/products 5
Figure 3. Layout of the 8-Port 3ware 9750-4i4e SATA+SAS RAID
Controller Card
Figure 4. Layout of the 8-Port 3ware 9750-8e SATA+SAS RAID
Controller Card
Port
0-3
J1A1
J6B1
J6A1
J6B2
J1A2
J1A3
J1A5
Port
4-7
J1B1
J2B2
J6A2
J6A3
J1A4
85062-01
CR3B2 System Error (Red LED)
CR3B1 Drive Activity (Green LED)
J2B1
See Table 7 for jumper descriptions
and Table 11 for LED descriptions
See Table 8 for jumper descriptions
and Table 12 for LED descriptions
J6B2
J6A1
J1A2
J1A1
J1A4
J1B1
J6B1
J1A3
Port
0-3
Port
4-7
J6A2
J6A3
85040-18
CR3B2 System Error (Red LED)
CR3B1 Drive Activity (Green LED)
J2B1
See Table 8 for jumper descriptions
and Table 11 for LED descriptions
See Table 9 for jumper descriptions
and Table 12 for LED descriptions

Chapter 1. Getting Started
6 LSI 3ware 9750 SATA+SAS RAID Controller Card Installation Guide
Figure 5. Layout of the 20-Port 3ware 9750-16i4e SATA+SAS RAID
Controller Card
Figure 6. Layout of the 28-Port 3ware 9750-24i4e SATA+SAS RAID
Controller Card
85066-05
J4B2
Ports
0-3
J3B1
Ports
4-7
J2B2
Ports
8-11
J2B1
Ports
12-15
J1A2
J1B1
J1B3
J1B2
Ports 16-19
J1C1
J2D1
J1L1
on
back
J4A2
J5A2
J4A3
J5B3
J4A1
J4B1
CRT5A2 System Error
(Red LED)
CRT5A1 Drive Activity
(Green LED)
See Table 9 for jumper descriptions
and Table 11 for LED descriptions
See Table 10 for jumper descriptions
and Table 12 for LED descriptions
85067-05
J1A2
J1B1
J1B3
J1B2
Ports 24-27
J1C1
J2D1
J1L1
on
back
J4A2
J5A2
J4A3
J5B3
J4A1
J4B1
J5B1
J5A1
Ports
4-7
J5B2
Ports
0-3
CRT5A2 System Error
(Red LED)
CRT5A1 Drive Activity
(Green LED)
See Table 10 for jumper descriptions
and Table 11 for LED descriptions
J4B2
Ports
8-11
J3B1
Ports
12-15
J2B2
Ports
16-19
J2B1
Ports
20-23
See Table 11 for jumper descriptions
and Table 12 for LED descriptions

Cables
www.lsi.com/channel/products 7
Cables
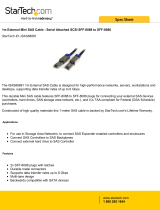
Internal SFF-8087 Cable with Sideband Support
Use with the internal connectors of the 9750 family of 3ware RAID
controllers.
Figure 7. Typical Internal SFF-8087 Cable
External SFF-8088 Cable
Use with the external connectors of the 9750 family of 3ware RAID
controllers.
Figure 8. Typical External SFF-8088 Cable
Important: You should only use LSI 3ware certified cables
with your LSI 3ware RAID controller. Using an incorrect cable
can result in drives that are not detected. The appropriate
cables are included with your controller. If you must replace a
cable, see the list of available cables and associated part
numbers at http://www.lsi.com/channel/products/
raid_controllers/accessories/cables.

Chapter 1. Getting Started
8 LSI 3ware 9750 SATA+SAS RAID Controller Card Installation Guide
System Requirements
Motherboard and Slot Requirements
A workstation-class or server-class motherboard with an x8 or x16
lane PCI-Express Gen 2.0 or 1.0 slot. For a list of supported
motherboards, access the LSI website at:
http://www.lsi.com/channel/support/marketing_resources. Click the
Data & Interoperability tab, and then click 3ware 6Gb/s SAS
Interoperability List.
Enclosure Requirements
In order to attach more than four drives per connector, enclosures
with expanders are required.
In order to use enclosure support services, such as locating a drive
by blinking an LED or notification of a rebuild, the enclosure needs
to support SES (SCSI Enclosure Services). For a list of supported
chassis and enclosures, access the LSI website at:
http://www.lsi.com/channel/support/marketing_resources. Click the
Data & Interoperability tab, and then click 3ware 6Gb/s SAS
Interoperability List.
Drive Requirements
The 3ware RAID controller is designed for use with drive
capacities beyond 2 TB.
SAS and/or SATA drives can be used with the 3ware 9750 RAID
controller.
SATA drives must meet SATA-2 (3.0 Gbps) or SATA-3 (6.0 Gbps)
standards and also be included on the list of supported drives on the
interoperability list.
SAS drives must meet SAS (3.0 Gbps or 6.0 Gbps) standards and
also be included on the list of supported drives on the
interoperability list.

System Requirements
www.lsi.com/channel/products 9
For a list of supported drives, access the LSI website at
http://www.lsi.com/channel/support/marketing_resources. Click the
Data & Interoperability tab.
Operating System Requirements
3ware 9750 RAID controller may be used with the following
operating systems for Intel and AMD 32-bit and 64-bit x86 based
motherboards:
Microsoft Windows Server 2003 (SP2 or newer) and 2008
Microsoft Windows Vista and Windows 7
Red Hat Enterprise Linux
openSUSE Linux
SUSE Linux Enterprise Server
Fedora Core Linux
Other Linux distributions based on open source Linux 2.6
kernel.
FreeBSD
VMware
OpenSolaris
Mac OS X (Intel platform only)
For the latest supported operating systems, see the current Release
Notes at
http://www.lsi.com/channel/ChannelDownloads, and the
file versions.txt, available on the 3ware release CD.
Other Requirements
Adequate air flow and cooling
Adequate power supply for drives
3DM2 (3ware Disk Manager 2), a browser-based application
used to configure and maintain RAID units, is compatibile with
(but not required) one of the following browsers:
Internet Explorer (current version)

Chapter 1. Getting Started
10 LSI 3ware 9750 SATA+SAS RAID Controller Card Installation Guide
Mozilla Firefox (current version)
Safari
In addition:
JavaScript must be enabled
Cookies must be enabled
For best viewing, screen resolution should be 1024 x 768 or greater,
with 16-bit color or greater.
Safety Information
To reduce the risk of bodily injury, electrical shock, fire, and
equipment damage, read this information and observe all warnings
and precautions in this guide before installing or maintaining your
computer.
The 3ware 9750 RAID controller card should be installed by
technically qualified persons. If you are uncomfortable opening a
computer system and conforming to standard ESD (electrostatic
discharge) practices, you should have a computer technician
perform the installation.
Site Selection
The product is designed to operate as a component to a computer
system. The environment that is provided for the system must be:
Clean, dry, and free of airborne particles (other than normal
room dust).
Well-ventilated and away from sources of heat including direct
sunlight and radiators.
Away from sources of vibration or physical shock.
Isolated from strong electromagnetic fields produced by
electrical devices.
Provided with a properly grounded wall outlet.

Safety Information
www.lsi.com/channel/products 11
Provided with a product main power disconnect or sufficient
space to access the power supply cord(s), because they serve as
the product's main power disconnect.
Personal Safety When Installing the 9750 Card in
Your Computer
Protecting Equipment and Data
ESD (Electrostatic Discharge) Precautions
To avoid damaging computer components and accessories when
installing or removing the 3ware RAID controller card, follow
standard electrostatic discharge (ESD) precautions:
When your computer case is open and its internal parts are
exposed, do not touch any internal part unnecessarily.
Warning. We recommend you plug your system into a surge
suppressor or UPS (uninterruptible power supply) and during
an electrical storm, we recommend disconnecting all phone,
network, and power cables.
Warning! High voltages may be found inside computer
equipment.
Before installing any of the hardware in this package or
removing the protective covers of any computer equipment,
turn off power switches and disconnect power cords. Do not
reconnect the power cords until the hardware is installed and
the system cover is closed.
Heat Sink Warning. Do not replace the factory-installed
heat sink shipped with the 3ware 9750 SATA+SAS controller
cards. Replacing the heat sink alters the thermal
characteristics and cooling requirements and may cause the
controller to fail. Replacing the factory-installed heat sink
voids the warranty.
Back up your data! Creating or deleting disk arrays
destroys existing files on the member drives. If your drives
contain valuable data, back them up and save the data
elsewhere before attaching the drives to the controller.

Chapter 1. Getting Started
12 LSI 3ware 9750 SATA+SAS RAID Controller Card Installation Guide
Always wear a grounded strap or work on an ESD-protective
mat.
Do not remove the 3ware SATA+SAS controller card from its
protective bag until you are properly grounded.
Handle the 3ware RAID controller card by its edges or by the
metal bracket.
Do not touch any pin, contact, lead or component on the 3ware
RAID controller card.
Installation Considerations
Air Flow, Cable Length, and Routing Space
Adequate airflow and ventilation are particularly important for
3ware 9750 RAID controller card. The on-board heat sink collects
heat, and must have adequate airflow in order to disburse it. It is
important that the cables do not obstruct the air flow or prevent
proper ventilation of the system.
If you are installing a 9750 with a BBU (battery backup unit), it is
important to install the BBU away from components that generate
the most heat in the system, such as the graphics card. In addition,
to allow for better cooling, it is best not to install a 3ware RAID
controller card with a BBU directly between two other PCIe add-in
cards. If you are installing two 3ware RAID controller cards with
BBUs in the same system, it is recommended to not install them
next to each other.
Selecting the Slot in Which to Install the Controller Card
Consider these factors when deciding on the slot in which to insert
the controller:
3ware 9750 RAID controller card must be installed in
PCI Express x8 or x16 slots.
Warning. Do not operate the 9750 controller card with
system cover removed, as this may disrupt proper airflow.

Safety Information
www.lsi.com/channel/products 13
Warning! PC users do NOT insert the 9750 controller card into
a PCI-X slot. Doing so could potentially damage the board or
the system, and void the warranty.
Note: PC users some low-cost motherboards have a single PCI
Express slot which is reserved for a video card. These slots
cannot accommodate a 3ware 9750 SATA+SAS controller card
or other PCI-E device.
If there is an extra open PCI Express x8 or x16 slot in your
computer, install the controller card next to it to provide
additional ventilation for the controller.
Cable routing may be easier if you install the 3ware RAID
controller card next to an open slot.
Things to Watch Out For During Installation of the RAID
Controller
Be careful when installing the 3ware SATA+SAS controller card
into your system. Excessive force can damage the board or your
system.
Be sure to follow the installation instructions in “Chapter 2.
Installing the 9750 SATA+SAS Controller Card” on page 14.

Chapter 2. Installing the 9750 SATA+SAS Controller Card
14 LSI 3ware 9750 SATA+SAS RAID Controller Card Installation Guide
Chapter 2. Installing the
9750 SATA+SAS
Controller Card
Tools You Need
You need the following tools during installation:
An ESD grounding strap or mat
A Phillips screwdriver
Before You Start
3ware 9750 SATA+SAS controller cards can be installed in a
standard enclosure or in an enclosure with a backplane.
1 Be sure to read “Safety Information” on page 10 in Chapter 1.
2 If you have a battery backup unit (BBU), install it before
proceeding. See
“Installing Your BBU” for installation
instructions.
3 If your enclosure is low-profile, unscrew the full height bracket
from the 3ware 9750 SATA+SAS controller card and replace it
with the included low-profile bracket, using the same screws.
Not valid for high-port count controller cards, 9750-16i4e and
9750-24i4e.
4 If appropriate, set the PM2 (power management) jumper on the
disk drives, to enable staggered spinup. Check the
documentation that came with your disk drives to see whether
this is required.
5 SATA-2 hard drives are sometimes shipped from the
manufacturer with the transfer rate set to 1.5
Gbps. If this is the
case for your drives, you may need to remove a jumper or run a
software utility to change the transfer rate to 3.0 Gbps. Please
check with your hard drive manufacturers documentation or
website on how to set the transfer rate to 3.0 Gbps.

Before You Start
www.lsi.com/channel/products 15
Installing Your BBU
To connect your BBU directly or remotely to your 3ware 9750
RAID controller card see:
“Installing the iBBU07 Directly on the Your 3ware 9750
Controller Card”
“Connecting the iBBU07 Remotely to the 3ware 9750
Controller Card”
Installing the iBBU07 Directly on the Your 3ware 9750
Controller Card
Follow these steps to install the iBBU07 on the SAS 9750 RAID
controller. The battery backup unit is installed on the front side of
the controller.
1 Ground yourself, and remove the iBBU07 daughtercard from
the package.
2 Insert the battery pack harness connector at the end of the
colored wires into the 5-pin J4 connector on the backside of the
iBBU07.
3 Place the iBBU07 front-side-up on a flat, clean, static-free
surface.
4 With the front side up, place the RAID controller on a flat,
clean, static-free surface.
5 Hold the iBBU07 daughtercard so that the battery side is up and
the J5 connector lines up with the:
JT3B1 connector on the SAS 9750-4i and 9750-8i cards.
J6B2 connector on the SAS 9750-4i4e and 9750-8e cards.
6 Carefully press the iBBU07 onto the RAID controller so that
the two connectors are firmly joined.
7 Secure the iBBU07 to the RAID controller with the screws and
the standoffs in the three screwholes. The standoffs are
threaded at both ends, and a screw goes into each end.

Chapter 2. Installing the 9750 SATA+SAS Controller Card
16 LSI 3ware 9750 SATA+SAS RAID Controller Card Installation Guide
8 Use the Phillips-head screws that are provided to secure the
iBBU07 to the RAID controller.
9 Install the RAID controller in a PCI Express slot in the
computer.
Connecting the iBBU07 Remotely to the 3ware 9750 Controller
Card
Use the supplied 20-pin cable to connect the iBBU07 to your RAID
controller.
Because server chassis design and workstation chassis design vary
from vendor to vendor, there is no standard mounting option that is
compatible with the various system configurations.
Therefore, the iBBU07 battery kit contains only the battery and the
cable, allowing value-added reseller’s (VAR) and chassis
manufacturers to customize the location of the remote battery to
provide the most flexibility within various environments.
Follow these steps to install the iBBU07 remotely to the RAID
controller.
1 Ground yourself, and remove the iBBU07 from the package.
2 Use the three Phillips-head screws that are provided to secure
the iBBU07 to the motherboard or the server chassis.
3 Insert the battery pack harness connector at the end of the
colored wires into the J4 connector on the rear side of the
iBBU07.
4 Connect one end of the 20-pin, 10-inch cable to the J2
connector on the iBBU07 and the other end to:
J4L1 connector on your 9750-4i and 9750-8i cards.
J6B1 connector on your 9750-4i4e and 9750-8e cards.
J1L1 connector on your 9750-16i4e and 9750-24i4e cards.
There are black triangles on the connectors to help you install
them properly. Insert the cable connectors so that the black
triangles are aligned.
/