Page is loading ...

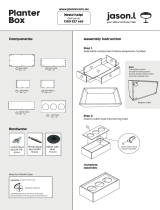
ELIZABETH DRESSER with CUSHION STOOL UNIT
ASSEMBLY INSTRUCTIONS
Thank you for purchasing the ELIZABETH DRESSER with CUSHION STOOL. Please read the
instructions carefully to ensure safe operation of the product.
Size:
(W)1000 x (D)495 x (H)1295mm
Page 1 of 19
Batch No : PO# xxxx
1295
Colour : Oak / White
1000
495

Page 2 of 19
• This product is intended for a maximum weight of 40kgs. Do not exceed this weight.
• We recommend the use of the wall strap provided for safety reasons. N.B. Wall fixings are not included -please
source suitable fixings for your wall type. If in doubt please consult a qualified tradeperson. Warning: Always
ensure the area to be drilled is free from hidden electrical wires, water and gas pipes.
• It is essential that this unit is fixed to a wall with the fixings provided.

Page 3 of 19
Side Panel (L)A 1
B
Side Panel (R)
1
C
Top Panel (R)
1
D
Back Panel
1
E
Drawer Support (L)
1
M
Drawer Front (R)
1
N
Drawer Front (C)
1
O
Drawer Side Small (L)
2
P
Drawer Side Small (R)
2
A
F
Drawer Support (R)
1
G
Mirror Panel
1
H
Panel Support
2
I
Stool Side Panel (L)
2
J
Stool Top Panel
1
K
Stool Support Panel
1
L
Drawer Front (L)
1
U
Cushion Stool
1
V
Mirror Support
2
Z
Drawer Bottom Small
2
Z1
Drawer Bottom Big
1
Q
Drawer Side Big (L)
1
R
Drawer Side Big (R)
1
S
Drawer Back Small
2
T
Drawer Back Big
1
B
C
D
E
F
V
V
G
H
H
L
M
N
O
O
P
P
Q
R
S
S
T
Z
Z
Z1
I
I
K
J
U
Cushion

2x
a
Unitar Screw
M6.3 x 40mm
5 x 8 x 13.5mm
12x
b
CSK Screw
M4.7 x 38mm
24x
c
Wood Dowel
D8 x 30mm
25x
d
Minifix Bolt
M5 x 29mm
4x
g
Nail Leg
(15/12) M6 x 9mm
25x
h
Minifix Cam
3x
j
Drawer Slide
350mm
3x
k
Drawer Slide
350mm
Page 4 of 19
3
8x
e
CSK Screw
M4 x 25mm
12x
i
Euro Screw
1x
m
Allen Key
M4
1x
l
Safety Strap
L-200mm
13x
f
CSK Screw
M3.5 x 15mm
DRESSER FIXINGS

Page 5 of 19
STEP 1
24 x
c
Parts Required
Qty
Panel (A)
1
Panel (B)
1
Panel (D)
1
Parts Required
Qty
Panel (H)
2
Panel (O)
2
Panel (P)
2
Panel (Q)
1
Panel (R)
1
Panel (E)
1
Panel (F)
1
A
B
D
H
x2
E
F
O
P
Q
R
x2
x2
c
c
c
c

STEP 2
25 x
d
Parts Required
Qty
Panel (A)
1
Panel (B)
1
Panel (C)
1
Parts Required
Qty
Panel (F)
1
Panel (L)
1
Panel (M)
1
Panel (N)
1
Panel (E)
1
Page 6 of 19
STEP 3
Parts Required
Qty
Parts Required
Qty
Panel (A)
1
Panel (B)
1
Panel (E)
1
Panel (F)
1
3sets x
j
12 x
i
A
B
C
E
F
M
N
L
d
d
d
d
d
d
i
i
j
j
A
B
E
E
F
F
i
i
i
j
j
j

STEP 4
Parts Required
Qty
Panel (D)
1
Panel (E)
1
Panel (F)
1
STEP 5
Page 7 of 19
Parts Required
Qty
Panel (H)
2
1 x
m
2 x
a
D
E
F
m
a
2 x
h
H
H
E
F
D
h

STEP 6
STEP 7
Page 8 of 19
Parts Required
Qty
Panel (B)
1
Parts Required
Qty
Panel (A)
1
3 x
h
3 x
h
A
H
D
E
F
h
B
A
D
H
F
E
h

STEP 9
STEP 8
Parts Required
Qty
Panel (C)
1
Page 9 of 19
11 x
h
4 x
g
g
g
A
B
F
H
D
A
B
C
D
F

STEP 11
STEP 10
Parts Required
Qty
Panel (V)
2
Parts Required
Qty
Panel (G)
1
Page 10 of 19
4 x
e
V
V
C
D
A
e
e
4 x
e
G
V
V
D
A
C

STEP 13
STEP 12
Parts Required
Qty
Panel (O)
2
Panel (P)
2
Parts Required
Qty
Panel (Z)
2
Panel (Z1)
1
Panel (Q)
1
Parts Required
Qty
Panel (R)
1
Panel (S)
2
Panel (T)
1
Page 11 of 19
12 x
b
b
b
O
P
S
Q
R
T
x2
O
P
S
Q
R
T
Z
Z1
x2

STEP 15
STEP 14
Parts Required
Qty
Panel (L)
1
Panel (M)
1
Panel (N)
1
Page 12 of 19
3 sets
k
6 x
h
12 x
f
O
P
S
Z
L
O
P
S
Z
M
Q
R
Z1
T
N
h
h
h
f
f
k
k
P
f
f
f
k
k
k
P
P
R
Z1
Z
Z
L
M
N

STEP 16
Page 13 of 19
A
C
L
N
M
G

6x
a
Wood Dowel
D8 x 30mm
6x
b
Minifix Bolt
M5 x 29mm
4x
c
CSK Screw
M4 x 25mm
4x
d
Nail Leg
5 x 8 x 13.5mm
Page 14 of 19
3
6x
e
Minifix Cam
(15/12)
STOOL FIXINGS

STEP 17
6 x
a
Parts Required
Qty
Panel (I)
2
Panel (K)
1
Page 15 of 19
STEP 18
Parts Required
Qty
Panel (I)
2
Panel (J)
1
6 x
b
I
K
x2
I
x2
a
a
J
b
b

STEP 19
Parts Required
Qty
Panel (J)
1
Panel (U)(Cushion)
1
STEP 20
Page 16 of 19
Parts Required
Qty
Panel (H)
2
4 x
c
1 x
e
J
U
Cushion
c
I
K
e

STEP 21
STEP 22
Page 17 of 19
Parts Required
Qty
Panel (J)
1
Parts Required
Qty
Panel (I)
1
4 x
e
1 x
e
I
I
K
e
4 x
d
d
I
I
K
J
e

STEP 23
Page 18 of 19
Put the screw in
the top panel hole
of your furniture
Make a hole in
the wall and put
the wall plug in
Put the screw in
the wall plug hole
f
l
l
l
f
Safety strap (L-200mm)
1 x
Csk Screw (M3.5x15mm)
1 x
NOTE : Wall fixing are not supplied with this product
as different devices (such as Rawl plugs on brick
work).You must use fixing devices suitable for the
type of wall you intend to mount this product to.
Please ensure that the head of any screw used has
a diameter greater that the diameter of the mounting
hole on the product and than the fixing is safe and
secure before use.
The straps and screws to fix the strap on to
the furniture are provided only.
f

Your ELIZABETH DRESSER with CUSHION STOOL UNIT is now completely assembled
Page 19 of 19
/