Page is loading ...

Instruction Manual
Mod. 452-A

Contents
1 Important aspects .......................................................................................................................... 1
2 Features ........................................................................................................................................ 2
3 Fuel ............................................................................................................................................... 3
4 Installing ducts and fume extraction systems ................................................................................. 4
4.1 Installing without a chimney ................................................................................................ 4
4.2 Installing with a chimney ..................................................................................................... 6
5 Package content ............................................................................................................................ 7
6 Safety ............................................................................................................................................ 8
7 Installing the pellet burning free standing fire ................................................................................ 9
8 Filling the pellet reservoir .............................................................................................................. 9
9 Remote control and display panel ................................................................................................. 10
10 Humidifier .................................................................................................................................... 11
11 Activation ..................................................................................................................................... 11
12 Disabling ....................................................................................................................................... 12
13 Recommendations on using this unit ............................................................................................. 12
14 Removing the side covers (only when needed) .............................................................................. 13
15 Cleaning and maintenance ............................................................................................................ 14
15.1 Heat exchanger .................................................................................................................. 14
15.2 Burning basket and ash pan grate ....................................................................................... 15
15.3 Ash basket. ......................................................................................................................... 16
15.4 Hatch ................................................................................................................................. 16
15.5 Cleaning the glass ............................................................................................................... 16
15.6 Additional cleaning ............................................................................................................. 17
15.7 Performing an inspection after a long period of inactivity ................................................... 18
16 Menu ............................................................................................................................................ 19
17 Date/Time .................................................................................................................................... 20
18 Timer ............................................................................................................................................ 21
19 Settings menu ............................................................................................................................... 23
19.1 Language ............................................................................................................................ 24
19.2 Eco mode ........................................................................................................................... 24
19.3 Lighting .............................................................................................................................. 24
19.4 Tones ................................................................................................................................. 24
19.5 Temperature unit (°C / °F) ................................................................................................... 24

19.6 Pellet recipe ....................................................................................................................... 24
19.6.1 Temporary activations ................................................................................................... 25
19.6.2 Power activations .......................................................................................................... 25
19.7 Thermostat ......................................................................................................................... 25
19.8 Loading the pellets ............................................................................................................. 25
19.9 Cleaning ............................................................................................................................. 25
20 User Info ....................................................................................................................................... 26
21 Sleep ............................................................................................................................................ 27
22 - Troubleshooting ......................................................................................................................... 27
23 List of alarms/failures/recommendations...................................................................................... 28
24 Installing and operating using a programmable thermostat - optional ................................................................................ 29
25 Instructions to install the remote control ...................................................................................... 30
26 Optional safety installation – UPS connection kit........................................................................... 32
27 For your safety we remind you that you should: ............................................................................ 33
28 Life cycle of a Free Standing Fire unit ............................................................................................ 34
29 Sustainability ................................................................................................................................ 35
30 Warranty ...................................................................................................................................... 35
31 Exclusions: .................................................................................................................................... 35
32 Glossary ........................................................................................................................................ 36
33 Annexes ........................................................................................................................................ 38


1
1 Important aspects
• Thank you for purchasing a Fogo Montanha Free Stand Fire unit.
• The manufacturer of Fogo Montanha Free Standing Fire units hereby represents that they are the sole
responsible for the compliance of all manufactured models with the general safety requirements. Any
changes made to the product without the previous written consent from the manufacturer will void the
above statement.
• Please read these instructions carefully before installing, using and servicing the unit and keep them at
hand for future reference.
• This instruction manual is provided with the product. Please keep it near the unit.
•
• All products comply with the EU's Construction Products Directive (EU Reg. No. 305/2011) and are
approved for the EC compliance marking. This product has been manufactured according to the
14785:2008 EN standards.
• This product may only be installed by authorized people, who must provide the buyer a statement of
compliance regarding the installation, taking full responsibility for the final installation and, consequently,
for the proper operation of the unit. Fogo Montanha manufacturer disclaims all liability for any damages
occurring to the equipment if installed by non-qualified people.
• All local regulations, including any applicable national and European standards, must be observed when
installing, operating and servicing the unit.
• To get technical assistance, please contact the unit supplier or installation staff. You should have the unit
serial number ready. This number can be found on the identification plate located on the top lid or on the
label attached to the plastic cover of this manual.
• Any technical assistance procedures must be performed by the unit provider or installer, except in special
situations and after assessment by the installer or assistance engineer who may then decide to contact
Fogo Montanha, if necessary.
• This unit must be used according to its intended purpose pursuant to the manufacturer's specification. All
contractual and non-contractual responsibilities of the manufacturer are hereby excluded for damages
caused to people, animals or property resulting from the misuse or faulty installation or servicing of the
unit.
• All the components that make part of the unit’s assembly and that together guarantee its operation and
energetic efficiency must only be replaced with original parts provided by an authorised technical
assistance centre.
• The unit must be serviced at least once a year or every 600-800 kg of pellets consumed, by the installation
engineer.

2
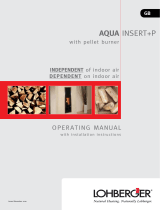
2 Features
Dimensions
•
Height (H) = 1100 mm
•
Width (W) =490 mm
•
Depth (D) = 450 mm
Weight
•
Weight = 118 kg
Fume exhaust
•
Diameter (F) = 80 mm
•
Height (AF) = 195 mm
•
Width (LF) =170 mm
Combustion airflow intake
•
Diameter (C) = 50 mm
•
Height (AC) = 200 mm
•
Width (LC) = 75 mm
Technical characteristics
•
Thermal power (min – max.) = 5.2 - 9.6 KW
•
Thermal performance (min – max.) = 88 – 90 %
•
CO emissions 13% O2 (min – max.) = 0.02 – 0.03 %
•
Gas temperature (min – max.) = 120 – 190
%
•
Gas flow (min – max.) = 5 – 7 g/s
•
Draught at the chimney = 12 Pa
•
Maximum heating capacity (depends on the household
insulation) = 50 – 220 m³
•
Pellet consumption certified according to the EN14961-2
grade A1 (min – max.) = 1.2 – 2.3 kg/h
•
Pellet reservoir = 20 kg
•
Rated voltage = 230 Kv
•
Rated frequency = 50 Hz
•
Electric power at start up = 378 W
•
Rated electric power = 122

3
3 Fuel
• To operate this unit do not use pellets other than those certified in compliance with the EN14961-2
standard, grade A1.
• We recommend that you use only pellets that are certified in compliance with the EN 14961-2 standard,
grade A1.
Parameters
EN plus – A1
Units
Diameter
Between 5 and 7
mm
Length
3.15 ≤ W ≤ 30
mm
Density
≥ 600
kg/dm3
Heating capacity
≥ 5.32
KWh/kg
Mechanical strength
≥ 97.5
% (mass)
Ash
≤ 0.5
% (mass)
Humidity
≤ 10
% (mass)
Sulphur percentage
< 0.05
% (mass)
Chlorine percentage
< 0.02
% (mass)
Nitrogen percentage
< 0.3
% (mass)
Copper
≤ 10
mg/kg
Chromium
≤ 10
mg/kg
Arsenic
≤ 1
mg/kg
Lead
≤ 10
mg/kg
Cadmium
≤ 0.5
mg/kg
Mercury
≤ 0.1
mg/kg
Nickel
≤ 10
mg/kg
Zinc
≤ 100
mg/kg
• The physical and chemical properties of the pellets (namely, calibre, friction, density and chemical
composition) may vary within specific tolerance ranges and across manufacturers. Please note that this
may cause changes to the feeding process and, consequently, the need for different doses (more or less
pellet quantity).
• The unit allows for a ± 25% adjustment to the pellet dosage at start-up and at power levels.
• The CE certification tests that were run used wood pellets l with a heating capacity of 5.4 kWh/kg.

4
4 Installing ducts and fume extraction systems
• The exhaust pipe must have been designed for and dedicated to this purpose, in compliance with local
requirements and any applicable regulations.
• Important! An inspection-T with an airtight lid must be attached to the exit of the unit’s exhaust pipe to
allow for the regular inspection of the system or discharge of heavy dust and condensates.
• As shown, the exhaust duct should be assembled in a way that allows for the cleaning and servicing using
the insert of the inspection points.
• Under normal operating conditions, the combustion gas exhaustion must create a draught of 12 Pa, one
meter above the fume exit.
• The unit must not share the chimney with other equipment.
• The pipes installed outside the household must have double stainless steel insulation and an internal
diameter of 80 mm.
• The fume exhaust pipe may generate condensation, so we recommend that the appropriate systems for
collecting condensates are installed.
4.1 Installing without a chimney
• The installation of this unit without a chimney must be made by bringing the fume exhaust pipe directly
out and over the top of the roof at approximately 0.5 m higher.
• Double-walled stainless steel insulated pipes must be used and properly attached to avoid condensation.
• A T-connection must be installed at the base of the pipe to allow for periodic inspections and annual
maintenance, as illustrated in the following figure.

5
• The following figure shows some examples which illustrate the basic requirements for installing the unit’s
chimney
FAILURE TO COMPLY WITH THESE REQUIREMENTS MAY PREVENT THE CORRECT
OPERATION OF THE UNIT (PLEASE OBSERVE ALL OF THE INSTRUCTIONS PRESENTED
ON THE DIAGRAMS).
• The free standing fire TRAMA operates with the combustion chamber in draught. Therefore, it is
absolutely necessary to have installed a fume exhaustion duct that can adequately extract the
combustion gases.
• Fume duct material: The tubing to be used for this installation must consist of 0.5 mm thick rigid
stainless steel, with fitting bindings attaching the different sections and accessories.
• Insulation: The fume ducts must be double-walled and insulated to make sure that fumes do not cool
down going outwards, which would cause an inadequate circulation and condensation that might damage
the unit.
• Output T connection: Always attach a "T-tube" with damper to the output of the unit.
• Swing type check valve: Always install this system to avoid fumes backflow.
• Draught in the chimney: The figure below shows three standard diagrams, specifying the adequate
lengths and diameters. Any other type of installation must guarantee a draught of 12 Pa (0.12 mbars)
measured when hot and at the maximum power.
• Ventilation: For the optimal operation of the unit, the assembly site must have a air inlet installed with a
minimum cross section of 100cm2, preferably at the back of the unit. The unit is equipped with a circular
pipe (Ø 50 mm) that can connect to the exterior of the house.

6
• If you use a tube to allow for the combustion airflow intake from the outside, this should not have more
than 60cm long horizontally, and an internal diameter equal or greater than the unit's tube diameter. The
connection path must be straight (without bends).
• If the house is equipped with a air exhaust system (e.g. kitchen extractor fan), a top ventilation section
must be installed, suitable to accommodate the different air exhaust systems existing in the household.
• Installing the unit in locations near kitchen exhaust fans or fume extractors may prevent the correct
operation of the unit and, in certain situations, may cause the inversion of the chimney draught flow
which will expel the fumes into the room where the unit is installed.
4.2 Installing with a chimney
• As shown in the following figure, the installation of the unit brings the exhaustion tube directly onto the
chimney. If the chimney is too large, an 80 mm-wide pipe should be installed at the fume outlet.
• A T connection must be attached to the base of the tubing, to allow for periodic inspections and annual
maintenance.
• We recommend that you do not use the unit in adverse weather conditions that may seriously impact the
draught (particularly with very strong winds).
• Before lightening the fore, you must make sure that the chimney tubing is free from obstructions.
Otherwise, the fume can be blown into the room where the unit is installed.

7
5 Package content
The unit is shipped with the following contents:
o Instruction Manual
o Power cable
o Infrared remote control
o Performance statement
• Before unpacking the unit, check if the package is in perfect conditions, and report to the installer or
reseller if the package evidences signs of damage or defect.
• After unpacking the unit, please check if the contents are complete and undamaged. If not, please contact
the reseller where the unit was purchased.
• During the unpacking process, please remove the parts that secure the unit to the pallet. Use a
screwdriver to release the unit (please see the following pictures).

8
6 Safety
• In order to avoid the occurrence of problems when using the unit, it is important that you respect the
minimum safety distances specified. Please see the next image.
A> 20 cm.
B> 150 cm.
• The unit should be assembled at a distance of 20cm from the rear wall to facilitate the maintenance
procedures and to allow for a proper ventilation.
• Please maintain a distance of 150 cm between the ceiling and the top of the unit, especially if the ceiling
is made of flammable materials.
• The unit’s supporting base must be made of glass, ceramic or steel laminate. If the room's floor is made of
flammable materials (wood, carpet, etc) this may present a fire hazard.
• During the unit's operation, make sure you keep any combustible materials at a safe distance.

9
7 Installing the pellet burning free standing fire
• The unit is equipped with four adjustable height feet, allowing for simple adjustments of the unit when
placed on uneven floors.
• Remove the instruction manual from the package and hand it over to the client.
• Connect an 80mm diameter pipe between the unit’s combustion gases output and the fume extraction
duct directed to the exterior of the building (e.g. through the chimney) – please check diagrams in section
4.
• Connect the 230V AC power cable to a grounded power socket.
• The side of the unit where the hot air outlet is located must be placed facing the area to be heated.
8 Filling the pellet reservoir
• Open the pellet reservoir's lid located in the top of the unit, as shown in the following figures.
• Empty the pellet bag into the reservoir
• Close the reservoir lid

10
9 Remote control and display panel
• The unit is equipped with a modern microprocessor that manages several functions which allow you to
configure and programme the unit. You can access these functions using the unit's touch screen.
• The infrared remote control allows you to access some of the unit's functions remotely.
Device
Function
You can view and set the unit's parameters and functions.
You can use the infrared remote control to turn the unit on and off.
You can also increase or decrease the ventilator's airflow and the unit's
power level.
• Sections 16, 17, 18, 19, 20 and 21 of this manual provide a description of each function and its location.
• The following table describes the touch screen display and the operation of each menu item.
Button
Function
Turning the unit on and off.
Resetting errors.
Accessing the menus.
Function confirmation (OK).
Switching between manual/automatic
modes.
Exiting the menus (ESC).
Scrolling the menus and functions up and
down.
Increase and decrease the ventilator's
airflow.
Increase or decrease the set- point
temperature.
Increase or decrease the unit's power.

11
10 Humidifier
• This usage of this type of heating equipment may cause the air in the room to be very dry. To avoid this,
this unit is equipped with a stainless steel container to be filled with water that will evaporate to help
humidify the air in the room, as shown in the following pictures.
• The humidifier is located inside the unit, as other components, and it should be removed and positioned
correctly in the appropriate place at the top of the unit.
11 Activation
• Before operating the unit, please make sure that the pellet feeder channel is filled with pellets. To do this,
with the unit turned off enable the pellet feeder function (section 19.6). The unit will be ready for
operation when the first pellets start to fall into the burner. Disable the function.
• To start operating the unit you need to press the start/stop key for 3 seconds. The display will show the
message “activação” (activation) during the lighting phase until completion.
• The pellets travel through the pellet feeder channel onto the burning basket (combustion chamber),
where they will be ignited by means of a heat resistor. This process may take between 5 to 10 minutes,
depending on whether the worm screw has been previously loaded with pellets or not. Upon completion
of the ignition phase, “On” should appear on the display.
• The heating power can be adjusted at any time by pressing the power selection button for approximately
1 second.
• You can choose between five pre-set power levels. The selected power is indicated on the display. The
initial power setting at each start-up will correspond to the power level set during the last cycle
operation.
• The unit will be hot during operation, so you should be careful when touching the glass, the door lock and
the heat exchanger damper.

12
12 Disabling
• The turn off sequence is performed by pressing the start/stop key for 3 seconds.
• Until completion of this phase the display will show the message “desactivação” (deactivation). The
extractor will remain active until a fume temperature of 40°C is reached, to ensure that all the fuel is
completely burned.
13 Recommendations on using this unit
• Ensure that the unit is properly connected to the power mains using the 230V AC power cable.
• Check if the pellet reservoir is supplied with pellets. Inside the pellet reservoir is a safety grid to prevent
users from reaching the worm screw.
• Always check if the burner is not obstructed before igniting the unit.
THE UNIT'S COMBUSTION CHAMBER IS MADE OF IRON PLATE COATED WITH
HIGH TEMPERATURE RESISTANT PAINT, WHICH RELEASES FUMES DURING THE
FIRST BURNING SESSIONS DUE TO THE CURING OF THE PAINT.
• Please make sure the room where the unit is installed has adequate air circulation; otherwise, the unit
will not work properly. For this reason, you should consider if there are other air-consuming heating
appliances in the room (e.g. gas units, braziers, extractors, etc.) as these should not be used
simultaneously with this unit.
• You should not turn the stove off and on intermittently, as this could damage the unit's electronic and
electric components.
• Even though the unit is grounded, do not touch the unit with wet hands; the improper handling of the
unit may cause an electric discharge. If you notice any electrical problems, please contact your person
who performed the installation.
• The unit should only be disconnected after its full stop. Make sure that the display shows “Off” before
disconnecting the unit. If necessary, unplug the power cable from the power socket.
• Never open the door when the unit is still connected to the power socket or during its operation. If you
need to open the door, disconnect the unit and allow it to cool down completely.

13
• The free standing units have a probe to measure the room temperature. This probe is attached to the
grid at the rear panel (as shown in the figure below). For a good reading of the room temperature, avoid
the contact between the end of the probe and the unit chassis. If you want, you may secure the probe to
the wall near the unit.
• Before starting up the unit, check to determine if the deflector plate is correctly positioned.
14 Removing the side covers (only when needed)
• Detach the screw located at the bottom of the unit’s side cover. To do so, use a number 5 hexagonal
wrench.

14
• Lift the cover and pull it backwards, detaching it from the upper and lower fixtures. Assemble the covers
in the reverse order.
15 Cleaning and maintenance
• In order to achieve an optimal operating performance, it's essential to carry out a set of cleaning and
maintenance procedures. To do so in a convenient way, use y a household vacuum cleaner.
• The cleaning operation should be carried out after each burn of approximately 30 kg. To prevent any
accidents, the cleaning and maintenance operations must be performed with the disconnected from the
power socket and after complete cool down.
• The deterioration of parts due to the lack of cleaning will void the warranty provided by Fogo Montanha.
• For cleaning and maintenance purposes, we recommend that you use
o a household vacuum cleaner.
o a 20-25 mm wide and 80 cm long twisted-wire
o steel brush.
15.1 Heat exchanger
• This operation should be performed after the unit has completely cooled down to prevent accidents.
/