Page is loading ...

Quartz
User Manual
Thank you for purchasing a BATRIBIKE Electric Bicycle
from Fallowgate Limited.
With care and correct usage your bicycle
will give many years of service.
Please read the manual fully before use.

MODEL:-
QUARTZ
SERIAL NUMBER:-
PURCHASE DATE:-
DAY MONTH YEAR
/
/
IMPORTANT PLEASE READ THIS MANUAL FULLY
PRIOR TO ASSEMBLY AND USE
For your safety and to ensure a long and trouble free life of your bicycle,
check the operation of brakes, lights, tyre pressures, horn and gears.
Also check all fasteners, including quick release mechanisms, before
every ride.
Service & Spares
Cables may stretch a little during the first few uses. Brakes and gears may need
to be adjusted after the first few rides to ensure correct operation. If you return
the bicycle to us, (please contact us first), we will be pleased to check and adjust
accordingly within the first 6 weeks of purchase, free of charge. If it is more con-
venient for you a local cycle shop could carry out this operation at your expense.
Your BATRIBIKE bicycle uses standard cycle parts wherever possible. Items
such as tyres, tubes, lights, brake pads/blocks and cables may be obtained
direct from us or your local cycle shop or retailer.
Specialist parts such as the motor, battery, & electrical parts or frame compo-
nents are only available from Fallowgate Limited
PACKAGE CONTENTS
1 PART ASSEMBLED BICYCLE
1 SADDLE & POST ASSEMBLY
1 BATTERY
1 BATTERY CHARGER
1 PAIR PEDALS
1 MANUAL

3
CAUTION
Your new BATRIBIKE Quartz needs assembling by a competent person. If you
are in any doubt about assembly you should contact a local cycle shop for
assistance.
Assembly Instructions
1 Open box and lift out loose packaging. Lift out seat and put to one side.
2 With help from a second person lift out bicycle from box.
3 The pedals and charger are strapped to the
rear carrier. Remove these & put to one side.
4 Cut cable tie and remove packaging from
both parts of the handlebar stem. Insert
smaller diameter stem into larger handlebar
stem, this will only fit one way due to locating
slot, push in fully. Take care not to trap
cables and wires, ensure you get all wires
and cables to the correct side.
5 Raise handlebars into upright position and lock into place using the
locking mechanism* screw. Lock the handlebar stem at the desired height
with quick release mechanism*.
6 Cut & remove cable tie holding forks to rear of bicycle. Lift bike & unfold.
7 Fasten locking mechanism*, put side stand down and rest bicycle on floor.
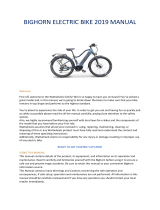
8 Remove packaging from pedals and insert into
pedal crank. Tighten with 15mm spanner. You must
ensure you put the correct pedal on the correct side.
The pedals are marked for left and right insertion.
(See photo). The left hand pedal, (marked L), has a
left hand thread and screws in anti-clockwise. The
right hand pedal, (marked R), screws in clockwise
on the chain side.
9 Insert seat assembly and tighten
using the quick release mechanism*.
You can adjust the height as required
by using this mechanism.
for instructions on operation of
quick release and locking mecha-
nisms refer to relevant section in
user manual on page 5
R
L

4
10 Remove all packaging from bicycle.
11 Remove keys from handlebars. These are used to lock and unlock the
battery into the frame.
12 Remove battery and charge using the charger supplied. See battery
charging section on how to do this correctly.
13 Inflate tyres to correct pressure as indicated on the side of the tyre.
40 - 65 PSI is the general range. You will find by keeping the tyres
correctly inflated it will give a better range on a charge. (Higher pressure
gives less rolling resistance and therefore a better range).
14 The rear light requires two AA batteries. Remove rear lens by undoing the
screw using a Phillips screwdriver. Pull lens out slightly from bottom and
lift upwards. Place batteries in correct position as shown on battery
holder. Replace lens and screw back into position. The switch to operate
the light is located on the bottom.
15 Your bike is now fully assembled. Please read Usage Instructions prior to
riding and make yourself familiar with your bicycle controls.
Usage Instructions
Battery Charging.
The battery can be charged either on or off the bicycle, but must be charged
inside in dry conditions to avoid the risk of electrical shock. Only use the charger
supplied with the bicycle.
1) Lift handle on battery.
2) Ensure the power is turned off at the battery.
3) Insert charger lead into socket on battery casing, taking note of the
position of locating lug.
4) Insert 3 pin mains plug into mains socket and switch on at wall.
5) There is an indicator light on the charger
CHARGE—Glows red when charging and green when charge is
complete.
6) When battery is charged, firstly turn off the mains supply, unplug
and then remove the charging plug from the battery.
To ensure maximum battery life charge your battery after each ride & DO NOT
leave fully discharged.
If your BATRIBIKE Quartz is not in use for an extended period,
charge the battery once a month to prevent deterioration.

5
Quick release fittings for seat & handle bar height adjustment.
With the locking lever in the loose position, tighten the nut until finger tight, The
final tightening is done by moving the lever to the locked position. To undo move
lever to loose position to enable height adjustment.
Loose Locked
Folding
1 Fold pedals by
squeezing in as per
photo, and turning
through 90 degrees.
2 Turn the pedals to the position shown in photo-
graph so they are not trapped when folding the
frame.
3 Release centre frame lock as follows:-
4 Fold frame front to back.
5 Unscrew handlebar folding lock fully and fold down handlebars.
Reverse procedure to return bicycle to riding position.
Flip catch Turn to side Lift up lever to
release pin from
frame

6
Riding
To turn on the power, lift the handle on the battery and press the red switch to
the on position. The battery indicator will light up on the handlebars.
Pressing the 6km/h button will immediately power
the motor to approximately 6km/h (4 mph), and is
useful to assist in setting off from standstill.
The amount of assistance from the motor can be
selected using the and buttons.
reduces assistance and increases assistance.
The picture above shows no assistance selected and a 3/4 full battery.
Press once and LED “LOW” lights up giving low
level assistance.
(Less assistance will give greater range).
Press once more and LED “MED” lights
up giving medium level assistance.
Press once more and LED “HIGH” lights
up giving high level assistance.

7
Press once more and all three LEDs light up. In this
mode the throttle will work and you can travel without
pedalling. Speed is regulated by twisting the throttle.
Twisted fully towards you gives full power. Releasing
fully gives no power.
Pressing will drop back to high power setting, pressing again will reduce to
medium level etc.
Horn
To operate the horn press the green button on the left handlebar.
Front Light
To turn the light on press the red button on the handlebar.
Press again to turn off.
Braking
To stop release the throttle and pull the brake levers.
Side Stand
To put the bicycle on its stand:-
1) While holding the bicycle upright, push the stand
to its full extent.
2) Lean bicycle over onto stand.
Make sure bicycle is on solid ground.
Important
PLEASE CHARGE THE BATTERY
BEFORE FIRST USING THE BICYCLE.
Even though the battery indicator will show charge this cannot be
relied upon until the battery has had the initial full charge.

BATRIBIKE Electric Bicycles are exclusive to:-
Fallowgate Limited
Kellaway House
Marton Road
Sturton-by-Stow
Lincoln
LN1 2AH
Phone: 01427-787774
E-mail: supp[email protected]
Warranty
Please retain your receipt as this is your proof of purchase and entitlement to
Warranty.
The Frame of your new BATRIBIKE Quartz is guaranteed for
2 years from date of purchase.
Other main cycle parts have a warranty of 1 year.
The battery is covered for 6 months as battery life is determined
by User care.
In the event of warranty repairs becoming necessary you should return your
bicycle to BATRIBIKE at the address below. Delivery & collection charges are
not redeemable under warranty.
Brake blocks/pads, tyres, lights and cables etc. are considered as consum-
ables and replacements are available from BATRIBIKE or may be obtained
from your local cycle shop.
————————— USER MANUAL—BATRIBIKE Quartz — ISSUE 1 — ©2009 Fallowgate Limited —————————
/