Page is loading ...

Original instruction manual
City bike, Trekking/ATB bike
Mountain bike, Racing bike
Youth bike
ISO 4210:2014
Pedelec / E-bike
EN 15194
Translation of the Original instruction manual

Frame
Top tube
Down tube
Seat tube
Head tube
Chain stays
Seat stays
Seat
Seat post
Seat post clamp with quick release
Rack
Rear light with integrated
reector
V-brakes
Mudguard
Spoke protector
Reector
Mudguard stay
Derailleur cassette
Dropout
Rear derailleur
Side stand
Front derailleur
Chain
Chain ring
Crank arm
Sprocket guard
Pedal
Handlebars with grip
Twist shifter
Bell
Brake lever
Brake cable
Adjustable stem
Headset
Front light with reector
Shifter cable
Suspension fork
Safety xture
Front mudguard
Disc brake caliper
Brake disc
Wheel:
Hub dynamo
Spoke
Tyre
Reective ring
Rim
Valve
Bicycle parts/city and touring bikes
6
5
4
4
3
3
2
2
1
1
5
6
C2
The City bike, Trekkingbike/ATB, Dutch-style bike, Single-speed bike/Fixie, Children‘s bike, Pedelec/e-bike you purchased may
look different. This operating manual only applies to the bicycle with which it was supplied.
8
Fastening front wheel (bolted axle / thru axle / quick release)
7
Fastening rear wheel (bolted axle / thru axle / quick release)
7
8
/

Frame
Top tube
Down tube
Seat tube
Head tube
Chain stays
Seat stays
Seat
Seat post
Seat post clamp with quick release
Rear shock absorber
V-brake
Dropout
Derailleur cassette
Rear derailleur
Front derailleur
Chain
Chain ring
Crank arm
Pedal
The Mountain bike, All Mountain, Enduro, Freeride/Downhill, Dirt/Street/Freestyle bike, Cross bike/ATB, Fatbike, Single-speed bike/Fixie,
BMX, Pedelec/e-bike you purchased may look different. This operating manual only applies to the bicycle with which it was supplied.
Stem
Twist shifter
Handlebars with grip
Brake lever
Headset
Shifter cable
Brake cable
Suspension fork
Disc brake caliper
Brake disc
Wheel:
Hub
Spoke
Tyre
Rim
Valve
Bicycle parts/mountain bike
6
5
4
4
3
3
2
2
1
1
5
6
C3
7
8
8
Fastening front wheel (bolted axle / thru axle / quick release)
7
Fastening rear wheel (bolted axle / thru axle / quick release)
/

The Road Racing bike, Triathlon/Time trial bike, Cyclocross bike, Single-speed bike/Fixie, Pedelec/e-bike you purchased may look
different. This operating manual only applies to the bicycle with which it was supplied.
Frame
Top tube
Down tube
Seat tube
Head tube
Chain stays
Seat stays
Seat
Seat post
Seat post clamp
Brake
Derailleur cassette
Dropout
Rear derailleur
Front derailleur
Chain
Chain ring
Crank arm
Pedal
Headset
Stem
Handlebars with bar tape
Brake/shifter lever
Brake cable
Shifter cable
Fork
Disc brake caliper
Brake disc
Wheel:
Hub
Spoke
Tyre
Rim
Valve
C4
3in1 E EN 3.0
Bicycle parts/road bike
6
4
3
2
1
5
5
6
4
3
2
1
7
8
8
Fastening front wheel (bolted axle / thru axle / quick release)
7
Fastening rear wheel (bolted axle / thru axle / quick release)
/

1
/
Contents
Contents 1
Foreword 2
Safety information 3
Before the rst ride 4
Before each ride 5
If you have fallen 5
Legal regulations 6
Intended use 6
Adjusting the bicycle to the rider 10
Using quick releases and through axles 10
Through axles 11
Installing pedals 12
Setting up the seating position 13
Setting up the angle of the seat 13
Setting up the position of the
handlebars/stem 14
Setting up the brake levers 15
Back pedal brakes 16
Children 16
Children's bicycle / training wheels 16
Transporting children/child bike trailers 17
Frame 18
Suspension 19
Hand-over documentation C5
Bicycle identication C6
Notes C7
Maintenance/upkeep 20
Chain 20
Belt drive 21
Wheels 22
Rims/tyres 22
Tyres and tyre pressure 23
Tubeless tyres 24
Tubular tyres 24
Dealing with a at tyre 24
Brakes 26
Gear system 29
Inspection plan 31
Lubrication 33
Bolted connections 34
Loose accessories 35
Loose luggage rack 35
Bar ends 35
Attached accessories 36
Accessories/ maintenance/ spare parts 36
Light system 36
Mudguard 37
Rack 37
Triathlon/TT bike 39
Disc wheels, special wheels 39
Electrical/electronic gear shifting system 39
When you have purchased a BMX bicycle 40
How to use carbon components 41
Transporting the bicycle 42
Liability for material defects (warranty) 43
Environmental protection tips 43
What aspects are particularly important
to consider when riding a pedelec? 44
Introduction 44
General safety information 44
Different versions of motors and batteries 45
Legal regulations 46
Before the rst ride 47
Notes on electrical and electronic
components 47
Charging process 48
Storage of the battery 50
Initial operation 51
Functionality 51
Range 52
Recuperation 52
Riding without motor support 52
Maintenance and care 53
Different guidelines for S-Pedelecs /
E-Bikes 54
Bike tuning is not permitted 56
Trailer operation 57
Transporting a Pedelec 57
Liability for material defects and
service life 57
Imprint 58
Inspections 58
Bicycle parts/city and touring bikes C2
Bicycle parts/mountain bike C3
Bicycle parts/road bike C4

2
/
Dear Customer,
to start with, we’d like to provide you with some
important information about your new bicycle.
This will help you make the most of its benets
and avoid any possible risks. Please read this
instruction manual carefully and keep it for your
future reference.
Your bicycle has been handed over to you fully
assembled and adjusted. If this is not the case,
please contact your specialist retailer to ensure
that this important work is completed or make
sure you carefully read the enclosed assembly
instructions and follow all the directions given.
It is assumed that users of this product have
a basic and sufcient knowledge of how to use
bicycles.
Everyone that uses
• repairs or services
• cleans
• or disposes of
this bicycle has to understand and take note of the
content and purpose of this operating manual. If
you have any further questions or have not quite
understood certain points, you should contact a
specialist bicycle retailer for your own safety.
All information contained in this operating man-
ual relates to the design, technology as well as
care and maintenance of your bicycle. Please take
note of this information, as much of it is relevant
to safety. Failure to consider this information can
cause accidents, falls and damage to property.
As modern bicycle technology is highly com-
plex, we have chosen to only describe the most
important points.
As modern bicycle technology is highly com-
plex, we have chosen to only describe the most
important points.
For more specic technical details, please re-
fer to the enclosed notes and instructions from
the respective manufacturers of the individual
components used. If you are unsure about a
particular point, please contact your specialist
retailer.
Before riding your bicycle on public roads,
you should inform yourself about the applicable
national regulations in your spe-
cic country.
Firstly, here are a few important
pointers as to the rider’s person
which are also very important:
• Always wear a suit-
able bicycle hel-
met adjusted to t your head and wear
it for every ride!
• Read the instructions supplied by your hel-
met manufacturer relating to tting the helmet
properly.
• Always wear bright clothing or sportswear with
reective elements when you ride. This is vital
so that other people can SEE YOU.
• Always wear tight clothing on your lower body,
and trouser clips if required. Your shoes should
be grippy and have stiff soles.
• Never ride with your hands off the handlebars
Even if you are an experienced bicycle user,
please take the time to rst read the chapter “Be-
fore the rst ride” and then carry out all the impor-
tant checks from the chapter “Before each ride”!
Please note that as a bike rider, you are par-
ticularly at risk on public roads.
Ensure that you protect yourself and others
with responsible and safe riding!
Note for parents and legal guardians:
As your child‘s legal guardian, you are respon-
sible for your child‘s actions and safety. This in-
cludes responsibility for the technical condition
of your child‘s bicycle and adjusting it to t your
child‘s body size.
Please read the “Children‘s bicycles” section for
aspects which you and your child should always
consider.
In addition, you should also ensure that your
child has learnt how to use the bicycle safely. The
child should know how to ride the bicycle prop-
erly and responsibly in the environment in which
it will be used.
• Note that children un-
der eight years of age
have to ride on the
pavement. Children
between eight and ten
years of age may use
the pavement.
• Children must dismount from their bicycle
when they have to cross a cycle lane.
Foreword

3
/
Safety information
Check that all quick releases are safe and secure
every time you ride after your bicycle was un-
used, even for a short period of time! Regularly
check that all bolts and components are secure.
Note that components made of composite
materials, i.e. carbon bre, often require a low-
er tightening torque. See page 34. Common
parts made of carbon bre include the handle-
bars, stems, seat posts and saddle rails, frames,
forks, and cranks. Ask your specialist retailer to
instruct you on how to properly use and maintain
these materials.
These operating instructions are based on the
assumption that you can ride a bicycle. These
are not instructions to learn how to ride a bicycle.
They are also not intended to provide information
on how to assemble or repair the bicycle.
Please be aware that riding a bicycle involves
some basic risks. You, the bicycle rider, are ex-
posed to particular risk. Always remain aware
that you are not as protected as you are, for ex-
ample, in a motorcar. You have no airbag and
there is no car body. You are nevertheless mov-
ing faster and in other parts of the road than a
pedestrian. You should therefore pay special at-
tention to other road users.
Never use headphones or a mobile phone while
riding a bicycle. Never ride when you are not able
to keep full control. This applies, in particular, after
taking medication or consuming alcohol or drugs.
• Please adapt your riding style
to the conditions when the
road is wet or slippery. Ride
more slowly and brake earlier,
as the braking distance will be
signicantly increased.
• Adapt your speed to the terrain and your rid-
ing skills.
• Never ride with your hands off the handlebars.
Please carefully read all warnings and notes in
this operating manual before using the bicycle.
We recommend keeping the manual close to
your bicycle, so that it is always at hand.
Please ensure you read the chapters “Be-
fore the rst ride” and “Before each ride” be-
fore using the bicycle for the rst time!
If you lend your bicycle to a third party, please
give them this operating manual with the bicycle.
This operating manual contains different types
of pointers – one providing important information
about your new bicycle and how to use it, a second
referring to possible damage to property and the
environment, and a third type warning against po-
tential falls and serious damage, including physical
injury. The fourth type of pointer asks you to com-
ply with the correct torque in order to prevent com-
ponents from coming loose or breaking. If you see
this symbol, there is always a risk that the danger
described can occur! The text which the warning
covers always has a grey background.
Information: This symbol pro-
vides information about how to
use the product or highlights spe-
cic parts of the operating manual
that are particularly important.
Warning: This symbol is aimed
at warning you against improper
use that could result in damage to
property or the environment.
Danger: This symbol indicates
possible dangers to your health
and life that could arise if specic
actions are not taken or corre-
sponding regulations adhered to.
Important bolted connection!
Please adhere to the exact rec-
ommended torque when tighten-
ing this connection. The correct
mounting torque is either displayed on the com-
ponent or listed in the table of torques on page
34. A torque wrench has to be used to achieve
the precise prescribed torque. If you don’t own
a torque wrench then you should always leave
this work up to a specialist retailer! Parts which
do not have the correct torque could fall off or
break! This can result in serious accidents!
The warnings break down as follows:
Modern bicycle technology is high
tech! Working on bicycle parts there-
fore requires special knowledge, ex-
perience and specialist tools! Please do not
attempt to work on the bicycle yourself! Give
your bicycle to a specialist retailer for repair,
servicing and maintenance!

4
/
Modern braking systems might be
more powerful or have a different
functionality than those that you are
used to. Please get to know the brakes on a
safe piece of land before setting off on your
rst ride with the bicycle!
If you use a bicycle with carbon bre rims,
please note that this material provides a sig-
nicantly weaker braking effect in combina-
tion with rim brakes than aluminium rims do!
Also remember that the effectiveness of
brakes can be different, often worse, than you
are used to in wet conditions or on slippery
surfaces. Please take the possibility of longer
braking distances and slippery surfaces into
account when riding!
If you are riding a single speed or a “xie”,
please familiarise yourself with its behaviour
under braking before your rst ride! Single
speed wheels with just one brake are not per-
mitted on public roads. Fixie bicycles cannot
freewheel, which means that the pedals AL-
WAYS turn with bicycle‘s wheels.
Get familiar with the grip of your bicy-
cle pedals when they have a rubber
or plastic cage. Rubber and plastic
pedals become very slippery under wet con-
ditions!
Drive train
Gear system
Suspension
fork
Your specialist bicycle retailer will be happy to
answer any further questions you have after
reading this manual.
Please ensure that your bicycle is ready for
use and is adjusted to t your body.
These include:
• Setting the position and xture of the seat and
handlebars
• Checking the assembly and settings of the
brakes
• Securing the wheels into the frame and fork
To ensure that you enjoy a safe and comfortable
riding position, please allow your specialist deal-
er to set up your handlebars and stem.
Adjust the seat to a safe and comfortable posi-
tion for you (see page 13).
Allow your specialist retailer to set up the
brakes so that the brake levers are always within
easy reach. Ensure that you know which lever
operates which brake (right/left)!
The right brake lever operates the rear wheel
brake. The left brake lever operates the front
wheel brake. Despite this, however, you should
still check if the same rule applies to your bike’s
levers before riding it for the rst time, as this can
sometimes vary.
Before the rst ride
Please also consult the additional operating
manuals of the individual component manufac-
turers, which were supplied with your bicycle or
available online.
Ensure that the wheels are securely fastened in
the frame and fork. Check that all quick release
skewers, through axles and all important nuts
and bolts are secure (see page 10 and 34).
Lift your bicycle up slightly and drop it onto the
ground from about 10 cm in the air. If it rattles or
makes another unusual noise, ask a specialist re-
tailer to identify and x the problem before you ride.
Push the wheels forwards with the brakes
applied. The back brake should completely pre-
vent the back wheel from moving, while the front
brake should lift the back wheel off the ground
with its braking effect. Please take an initial test
ride in a safe place where you can familiarise
yourself with the new brakes! Modern brakes can
behave completely differently under braking than
those that you are perhaps used to. The bicycle‘s
steering should not rattle under braking or exhibit
any play.
Check the air pressure in the tyres. You will
nd instructions as to the correct tyre pressures
on the sides of the tyres. Please adhere to the
required minimum and maximum pressure! If
you cannot nd any recommended pressures,
2.5 bar/36 psi is a suitable pressure for most
tyres. If the wheels are thinner than 30 mm or
11/8", the tyre pressure should be lled to 4
bar/58 psi.
As a general rule of thumb when you are out
on a ride, you can check the tyre pressure by
doing the following: If you place your thumb on
a pumped up tyre, you should not be able to sig-
nicantly change its shape by applying pressure.
Check the tyres and rims. Scan them for any
damage, cracks or deformations, as well as em-
bedded particles, e.g. shards of glass or sharp
stones.

5
/
If you should nd any cuts, rips or holes,
please refrain from riding! First have your bicycle
checked over by a specialist.
Before each ride
Before every ride, please check that:
• The lights and bell are working and safely se-
cured
• The brakes are working safely and are prop-
erly secured
• The cables and ttings are not leaking if you
have a model with hydraulic brakes
• The tyres are free of foreign objects and dam-
age, and the rims are not damaged and run
true,
particularly after riding off road
• The tyres have a sufcient tread depth
• The suspension components are working
properly and are safely secured
• The screws, nuts, through axles and quick
releases are rmely placed (see page 10 and
34).
• There are no deformations or cracks on the
frame and fork.
• The handlebars, stem, seat post and seat are
both correctly and securely fastened as well as
set up in the right position
• The seat post and seat are secure. Try turning
the seat or tipping it upwards or downwards. It
should not move.
• If you are using clipless/magnet pedals, please
check that they are working properly. The ped-
als should release easily and smoothly.
• For BMX bicycles: Safe operation of the rotor,
safe attachment of the handlebars to the stem
and of the axle pegs.
If you are unsure of whether your bi-
cycle is in a sound technical condi-
tion, take it to a specialist retailer to
be checked instead of riding it!
It is particularly important if you use your bi-
cycle a lot, either through sports riding or daily
use, that you regularly have all the important
parts checked by a specialist retailer.
Frame and fork, suspension components
and other parts relevant to your safety such
as brakes and wheels are subject to heavy
wear, which can impact the operating safety
of these parts.
If you use parts for longer than their intended
lifetime, these can fail without warning, which
can in turn lead to falls and serious injury!
Please make these checks before
continuing after a fall or if your bicy-
cle falls over!
Aluminium parts cannot be safely bent back
into shape, while carbon components can
sustain damage which is not recognisable to
the eye.
Allow the bike to be checked by a specialist
retailer.
Check the entire
bicycle for dam-
age. It could have
dents and cracks
in the frame and
the fork as well as
bent components.
When parts of the
handlebars or the
seat were shifted
or twisted, the respective parts must be checked
for functionality and safe attachment.
• Look carefully at the frame and the fork. Defor-
mation can usually be seen quite clearly when
you look at the surface from different angles.
• Look whether the seat, seat post, stem or
handlebars are still in their correct position.
Do NOT twist or bend the component from
its changed position without opening the re-
spective screw connection. It is essential that
you adhere to the fastening torque prescribed
when fastening the components. The appro-
priate information can be found on page 34
and in the Chapter “Quick release”, page 10.
• Check whether both wheels are correctly and
securely attached to the frame and the fork.
• Lift the front wheel and turn it and then lift
the rear wheel and turn it. The rim must run
straight and centrally through the brakes. The
tyre may not touch the brakes. The distance
between the frame or the fork and the tyre in-
dicates whether a wheel runs in a central posi-
tion in bicycles with disk brakes.
• Test whether both brakes have full functionality.
If you have fallen

6
Legal regulations
/
• Do not start riding before checking whether the
chain is safely resting on the chain wheel and
the sprocket. It must run fully over the gear
wheels. Falls and serious injuries may result
if you start off and the chain falls off a gear
wheel.
Do NOT ride on when you notice that something
on your bicycle has changed. Check loose parts
for functionality and always use a torque spanner
to fasten them. Bring your bicycle to a special-
ist dealer, describe the fall and have the bicycle
inspected!
Aluminum components may break
suddenly if they have become de-
formed. Do not use deformed or
bent components, e.g. after a fall. Always ex-
change such components.
Components made of carbon can be se-
verely damaged without showing any dam-
age. Have all components made of carbon
checked by a specialist dealer after a fall.
Before riding your bicycle on public roads, you
should inform yourself about the applicable na-
tional regulations in your specic country.
This section provides information on how the
bicycle has to be equipped to be permitted to
participate in public road trafc.
Here you can nd out which light systems
have to be installed or carried with you and which
brakes the bicycle has to be equipped with.
There is also an explanation of which age re-
strictions apply and what age riders
have to be to ride where. The par-
ticipation of children in public road
trafc is also addressed here. If
there is an obligation to wear a hel-
met, it is stated here.
Info
Permitted overall weight: Rider‘s
weight + Bicycle weight + Baggage
weight
Bicycles are intended for transporting
one person at a time. Transporting an
additional person on the bike is only
permitted in the framework of national legis-
lation. A tandem is exempt from this. If you
would like to transport baggage, this requires
that your bicycle is tted with suitable equip-
ment. Children can only be transported in chil-
dren‘s seats or trailers intended for this pur-
pose. We recommend not taking any chances
when it comes to quality in this area!
Ensure that you do not exceed the maxi-
mum permissible weight.
Intended use
(see page C5)
The information in these operating instructions
only applies to bicycle types that are listed on the
cover.
Information concerning individual bicycle types
is marked appropriately.
Appropriate use includes adherence to the op-
erating, maintenance and repair conditions that
are described in these operating instructions.

7
/
If your bicycle is equipped in line with national
law, the following is permitted:
Type 1
Trekking bikes
and appropriately
equipped pedelecs,
youth bicycles, child
bicycles and single
speed/xie bicycles can be used on public roads
and light off-road conditions, such as eld paths.
Type 2
City and tour bikes
and appropriately
equipped pedelecs,
youth bicycles, child bi-
cycles and single speed/
xie bicycles can be
used on public roads
and paved routes.
Manufacturers and dealers are not liable for
damage resulting from use outside of intended
use. This applies particularly to damage resulting
from non-adherence to the safety instructions, e.g.,
in terms of:
• Using the bicycle on terrain
• Carrying excess weight or
• Making improper repairs to defects
These bikes are not designed for extreme impact.
This includes riding over steps, bike jumping, ex-
treme use in authorised biking competitions, do-
ing tricks and performing stunts. Participating in
a competition is only permissible if the manufac-
turer has designed the bike to do so.
Type 3
Racing bikes
and appropriately
equipped Pedelecs/
youth bikes/ single
speed bikes/ xed-gear
bikes should be used
on public roads, smooth surfaces and paved
streets. Participating in a competition is only per-
missible if the manufacturer has designed the
bike to do so.
Manufacturers and dealers are not liable for
damage resulting from use outside of intended
use. This applies particularly to damage resulting
from non-adherence to the safety instructions,
e.g., in terms of:
• Use on terrain
• Excess load
• Improperly repairing defects
These bikes are not designed for extreme im-
pact. This includes riding over steps, bike jump-
ing, extreme use in authorised biking competi-
tions, doing tricks and performing stunts.
Type 4
Triathlon /Time trial bikes
are used on public
roads, smooth surfaces
and paved streets. Par-
ticipating in a competi-
tion is only permissible if
the manufacturer has designed the bike to do so.
Manufacturers and dealers are not liable for
damage resulting from use outside of intended
use. This applies particularly to damage resulting
from non-adherence to the safety instructions,
e.g., in terms of:
• Use on terrain
• Excess load
• Improperly repairing defects
These bikes are not designed for extreme im-
pact. This includes riding over steps, bike jump-
ing, extreme use in authorised biking competi-
tions, doing tricks and performing stunts.
Type 5
Cyclocross bikes
and appropriately
equipped youth bikes,
single speed/ xed-
gear bikes should be
used on public roads
and easy terrain, including unpaved pathways
and designated cyclocross courses. Participating
in a competition is only permissible if the manu-
facturer has designed the bike to do so.
Manufacturers and dealers are not liable for
damage resulting from use outside of intended
use. This applies particularly to damage resulting
from non-adherence to the safety instructions,
e.g., in terms of:
• Use on challenging terrain and riding over ob-
stacles.
• Excess load
• Improperly repairing defects
These bikes are not designed for extreme im-
pact. This includes riding over steps, bike jump-
ing, extreme use in authorised biking competi-
tions, doing tricks and performing stunts.

8
/
Type 6
MTB – spring travel up to approx. 120 mm
and appropriately
equipped pedelecs,
youth bicycles and sin-
gle speed/xie bicycles
can be used on public
roads and light off-road conditions such as eld
paths, trails and cross-country courses. They may
be used to ride over small obstacles such as roots,
rocks or steps. Appropriate protective equipment
(suitable helmet, gloves) should be worn.
Manufacturers and dealers are not liable for
damage resulting from use outside of intended
use. This applies particularly to damage resulting
from non-adherence to the safety instructions,
e.g., in terms of:
• Using the bicycle on terrain
• Carrying excess weight or
• Making improper repairs to defects
These bikes are not designed for extreme im-
pact. This includes riding over steps, bike jump-
ing, extreme use in authorised biking competi-
tions, doing tricks and performing stunts.
Type 7
All Mountain – spring travel approx. 120-150mm
and appropriately
equipped pedelecs can
be used on public roads
and off-road. They may
be used to ride over
obstacles such as roots, rocks or steps. Small
jumps are permitted. Appropriate protective
equipment (suitable helmet, gloves, protectors
as necessary) should be worn.
Manufacturers and dealers are not liable for
damage resulting from use outside of intended
use. This applies particularly to damage resulting
from non-adherence to the safety instructions,
e.g., in terms of:
• Using the bicycle in extreme off-road condi-
tions, for high jumps, steep descents or in bike
parks
• Carrying excess weight or
• Making improper repairs to defects
Bicycles are generally not designed to withstand
extreme stress, such as steep descents or high
jumps, nor heavy-duty use, such as authorised
competitive events, tricks or stunts.
• Using the bicycle on rough terrain, for high
jumps, steep descents or hard riding in bike
parks
• Carrying excess weight or
• Making improper repairs to defects
These bikes are not designed for extreme stress.
This includes steep descents or high jumps, ex-
treme use in authorised biking competitions, do-
ing tricks or performing stunts.
Type 8
Enduro – spring travel approx. 150-180mm
and appropriately equipped pedelecs can be
used on public roads and off-road. They may be
used to ride over obstacles such as roots, rocks
or steps. Jumps are permitted. Appropriate pro-
tective equipment (suitable helmet, full-nger
gloves, protectors as necessary) should be worn.
Manufacturers and dealers are not liable for
damage resulting from use outside of intended
use. This applies particularly to damage resulting
from non-adherence to the safety instructions,
e.g., in terms of:
Type 9
Freeride/Downhill – spring travel from 180mm
and appropriately equipped pedelecs can be
used on public roads and off-road. They may be
used to ride over obstacles such as roots, rocks
or steps. Jumps are permitted. Appropriate pro-
tective equipment (full-face helmet, full-nger
gloves, protectors) should be worn.
Manufacturers and dealers are not liable for
damage resulting from use outside of intended
use. This applies particularly to damage resulting
from non-adherence to the safety instructions,
e.g., in terms of:
• Using the bicycle on rough terrain, for very
high jumps, steep descents or hard riding in
bike parks
• Carrying excess weight or
• Making improper repairs to defects

9
/
These bikes are not designed for extreme stress.
This includes extreme use in authorised biking
competitions, doing crazy tricks or performing
stunts.
Type 10
BMX
and appropriately equipped youth bicycles and
single speed/xie bicycles can be used on public
roads and light off-road conditions such as eld
paths, BMX trails, ramps and skate parks. They
may be used to ride over small obstacles such
as roots, rocks or steps. Appropriate protective
equipment (suitable helmet, gloves, protectors)
should be worn.
Manufacturers and dealers are not liable for
damage resulting from use outside of intended
use. This applies particularly to damage resulting
from non-adherence to the safety instructions,
e.g., in terms of:
• Using the bicycle on rough terrain, for jumps,
steep descents, in bike parks
• Carrying excess weight or
• Making improper repairs to defects
These bikes are not designed for extreme stress.
This includes steep descents or high jumps, ex-
treme use in authorised biking competitions, do-
ing tricks or performing stunts.
Type 11
Dirt/Street/Freestyle Bikes
and appropriately equipped youth bicycles and
single speed/xie bicycles can be used on pub-
lic roads and off-road such as eld paths, BMX
trails, ramps and dirt lines. They may be used to
ride over obstacles such as roots, rocks or steps.
Appropriate protective equipment (suitable hel-
met, gloves) should be worn.
Manufacturers and dealers are not liable for
damage resulting from use outside of intended
use. This applies particularly to damage resulting
from non-adherence to the safety instructions,
e.g., in terms of:
• Using the bicycle on rough terrain, for very
high jumps, steep descents or hard riding in
bike parks
• Carrying excess weight or
• making improper repairs to defects
These bikes are not designed for extreme stress.
This includes extreme use in authorised biking
competitions, doing tricks or performing stunts.
Type 12
Cross bikes/ATBs
and appropriately
equipped pedelecs
youth bicycles and sin-
gle speed/xie bicycles
can be used on public
roads, and light off-road conditions such as eld
paths. They may be used to ride over small ob-
stacles such as roots or rocks.
Manufacturers and dealers are not liable for
damage resulting from use outside of intended
use. This applies particularly to damage resulting
from non-adherence to the safety instructions,
e.g., in terms of:
• Using the bicycle on terrain,
• Carrying excess weight or
• Making improper repairs to defects
These bikes are not designed for extreme im-
pact. This includes riding over steps, bike jump-
ing, extreme use in authorised biking competi-
tions, doing tricks and performing stunts.
Participating in a competition is only permissible if
the manufacturer has designed the bike to do so.
If you are not certain about which kind of bike
you have, ask your specialist retailer or the man-
ufacturer about its use and limitations. Inform
yourself about current legislation before riding
your bike on public roads and pathways. Only
ride on routes which are permitted for your type
of bicycle.

10
The quick release closes with the
correct holding force when counter-
pressure is visible at the centre of
the lever movement and the force of the ball
of your thumb is required to close the lever
completely.
/
Possible positions for adjusting bolted connections
Possible positions of quick releases / through axles
* see page 34
If your bicycle has one or several full
oating axles, please read the cor-
responding instructions provided by
the component manufacturer on how to oper-
ate and service these parts.
Using quick releases and through axles
Quick releases and through axles are systems
installed on the bicycle in place of bolted con-
nections. They consist of two parts: The clamp-
ing lever, which provides the necessary clamping
force, and the locking nut, which allows you to
regulate the clamping force. You can change the
setup of your quick release when the clamping
lever is open.
For detailed information, please
read the instructions supplied by the
manufacturer. The functionality and
secure t of the suspension parts are vital for
your safety!
Adjusting the bicycle to the rider
The seat post, seat, stem and handlebars can
only be tightened and secured with quick releas-
es or bolted connections.
Tightening adjustment nuts
Loosening adjusting nuts

11
• All quick releases must be rmly
closed before you ride off.
• Make sure that all quick releases
and through axles are properly in place
even if the bike was only left unattended for
a short period of time.
• The quick release lever must be close
to the frame, fork or seat post when it is
closed!
• The tip of the quick release lever must
always point towards the back when it is
closed. This ensures that it cannot open
due to contact during the ride.
Please lock down wheels and other
parts that are attached with quick re-
leases when you park your bicycle.
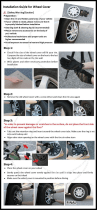
/
Through axles
Through axles that mostly function – and must be
handled – like quick releases, are also currently
used in chassis in lieu of bolts.
Mostly the through axle is screwed into the
dropout on the side opposite the drive and then
presses the two parts of the fork against the hub
located between them. The hub and the axle are
fastened with a quick-release lever.
Systems in which the axle is only inserted or
screwed in and then fastened with a screw also
exist. Refer to the attached component manufac-
turer instructions and allow your dealer to explain
the system to you in detail.
The following instructions refer particularly to
the quick-release axles of the Rockshox forks,
but are also generally applicable to other forks.
Mounting
Place your wheel into the dropout below the fork
leg. The hub must be rmly attached in the dropout.
Disc brakes: Ensure that the brake disk is prop-
erly inserted into the brake calliper. Ensure that
neither the brake disk nor the hub or the brake
disk fastening screws knock against the lower
parts of the fork. If you do not know how to adjust
disk brakes, please read the instructions provid-
ed by your disk manufacturer.
Inserting and fastening
1. Turn the quick-release lever to the open posi-
tion. Ensure that the lever grips the appropri-
ate slot in the axle.
2. Push the axle from the right side into the hub
until it connects to the thread of the left dropout.
Inappropriately installed wheels may
shift while you are driving or detach
from the vehicle. This may damage
the vehicle and expose the driver to severe
and life-threatening injuries. It is therefore im-
portant to take note of the following instruc-
tions:
• Ensure that the axle dropout and quick-
release mechanisms are clean and free of
dirt and impurities.
• Let your dealer explain in detail how your
front wheel is correctly fastened using the
quick-release system installed.
• Appropriately fasten the front wheel.
• Never use the bicycle unless you are sure
that the wheel has been properly secured
and cannot come loose.
3. Fasten the axle in the dropout by placing the
fast-release lever into the axle ange and fas-
tening the axle in a clockwise direction until it
is hand-tight. Close the quick-release lever by
folding it over.
During the closing movement, you should feel
tension when the quick-release lever is in the
horizontal position (90 degrees to the lower part
of the fork / axle extension).
The quick-release lever should leave a clear
imprint on your palm.
In case you do not feel resistance in the 90-de-
gree position and the lever does not leave a clear
imprint on your hand, the tension is not sufcient.
Increase the tension as follows: Open the fast-re-
lease lever and slowly tighten the quick-release
fastening screw until the correct tension has
been achieved. In order to increase the tension,
open the fast release leaver and insert a 2.5 mm
Allen key into the tension adjuster in the middle
of the lever tappet.
Quick-release axle in the fork dropouts, without hub, Rock Shox
®
fork

12
/
Again turn the Allen key in a clockwise direction
and again check the lever tension. Repeat the
process until the lever tension is sufcient.
Do not use any other tools to fasten the axle
to the lower part of the fork. The axle and/or the
lower part of the fork may be damaged when the
axle is excessively tightened.
Through axles of other manufacturers can be
tightened differently. One possible way is to loos-
en the locknut in the dropout and to x it after
having turned it clockwise.
The quick-release fastener may not
be readjusted or turned after closing.
Turning the quick-release fastener
may loosen the axle and have a detrimental
effect on driving safety. This may lead to se-
vere or lethal injuries.
Trough axle with allen key for adjustment
Removal
1. Open the quick-release lever and place it into
the slot in the axle ange.
2. Turn the quick-release lever in an anti-clock-
wise direction until the axle exits from the
thread of the dropout and then pull the axle
out of the hub.
The basic function is the same when your bicycle
is equipped with a Fox fork. The quick-release
axle is then inserted into the fork from the left
side.
Adjustment nut
Fork dropouts
Fox
®
fork
Through axles of other manufacturers
Correctly closed quick-
release lever for Fox
®
forks
Check that all quick-release fasten-
ers and quick-release axles are rm-
ly attached, even when your bicycle
only remained unsupervised for a short time.
You may only start driving when all quick-re-
lease fasteners are rmly closed.
Installing pedals
If your bicycle was supplied without the pedals
pre-installed, these have to be attached with the
correct wrench. Please note that the pedals have
to be screwed in in different directions and se-
cured with a high mounting torque (see page 34).
Apply assembly grease to both threads.
Forwards
* see page 34
Please read the enclosed instruc-
tions from the respective manufac-
turer if you use pedals feature hook
or strap systems. Practice taking your feet in
and out of the hooks and operating the strap
releases in a safe place. Tightened straps do
NOT release the feet!
Possible consequences are falling and in-
juries.

13
Ensure that you read the manu-
facturer‘s instructions before using
magnet or clipless pedals. Practice
clipping your shoes in and out of the pedals‘
locking system before your rst ride in a quiet,
safe place. Clipless pedals which do not prop-
erly release are a safety hazard.
Source: Shimano
®
techdocs
In the case of magnet pedals, you
are able to adjust how much force is
required to release the shoe from the
pedal. Please test this on your rst ride with
a setting that releases very easily! Regularly
clean your magnet pedals and keep them in
good condition with a suitable spray lubricant.
Determining the correct seat height
Set the seat to the height you estimate as cor-
rect. Sit on the bicycle. Allow somebody to aid
you in doing this or lean against a wall or railing.
Place one pedal to its lowest position and put
your heel onto it. Your leg should now be straight.
If you put your foot into the correct riding posi-
tion, your leg should be slightly bent.
Your foot is in the correct position for starting
off when its widest part is above the pedal axis.
Children and people who do not feel
secure when riding a bicycle should
be able to reach the oor with the tip
of their foot. They are otherwise at risk of fall-
ing and serious injuries.
When you ride with clipless pedals, the pedal
plates should be set to ensure this position.
This prevents damage to your musculoskeletal
system and ensures maximum transmission of
force.
Patented seat post with two-screw attachment
Setting up the angle of the seat
When you have set the height of the seat, you
have to check that the angle of the seat is suit-
able. In general, the upper surface of the seat
should be horizontal. You can adjust this by loos-
ening the clamping bolts in the seat post.
/
Setting up the seating position
Before you use your bicycle for the rst time, the
seating position has to be set up to suit your body
size. This is vital for riding safely and securely.
To do this, the seat‘s height, alignment and an-
gle have to be set up, as do the height and align-
ment of the handlebars with the stem.
Knee angle of the upper leg
min. 90°, arm angle 90°
The knee must be above the axle of the front pedal
Correct seat height
90˚
90˚

14
Patented seat post with one-screw attachment
* see page 34
Attachment with seat clamps
Suspension seat posts:
Integrated Seatpost
If your bicycle is equipped with a so-called in-
tegrated xture: or operation and adjustment
please read the enclosed instructions from the
respective manufacturer.
Before you start riding, please test to
see if your seat post and seat are se-
cure. To do this, grab the seat at the
front and back and attempt to turn it. It should
not move.
/
If your mountain bike is
equipped with a telescopic
seat post, please ensure
you read the instructions
provided by the manufac-
turer before use.
When adjusting the height of the
seat, never pull the seat post further
out than the maximum extension
length marked! If your tube does not have a
maximum marking, then you must leave a
minimum insertion length of 7.5 cm.
Please ensure that you read the part
manufacturer‘s operating manual
when setting up and operating sus-
pension seat posts telescopic seat posts.
Height adjustment is possible
Setting up the position of the handlebars/
stem
Various types of stem are used on bicycles:
Threadless stem
STOP
7,5 cm
For bikes with rear suspension, the seat post
should never come in contact with any part of the
rear suspension.
STOP

15
Setting up the brake levers
Set the brake lever so that you can safely grip it
and brake without getting tired. Familiarize your-
self with the allocation of the brake levers to the
rear and the front wheel brake!
Some brakes are equipped with brake force
limiters (“modulators”). These components are
intended to prevent over-braking and dangerous
blocking of the wheels.
/
Changing the position of the stem
also changes the position of the han-
dlebars. You should always be able
to safely reach and use grips and controls.
Please ensure that all cables and lines are
long enough to allow you to turn the handle-
bars in every possible way.
Adjustable stem
Quill stem
For detailed information, please
read the instructions supplied by the
manufacturer. The functionality and
secure t of the suspension parts are vital for
your safety!
Height changes are possible by:
• Exchanging the spacer installed below or
above the stem
• Turning the stem
• Exchanging the stem
This should only be performed by a
specialist dealer
Adjustment of the stem incline is possible
BMX bicycles are ridden in a stand-
ing position. Please ask your special-
ised dealer which riding position is
suitable for you.
The braking force can suddenly in-
crease when the brake lever is pulled
strongly or at the end of the lever
movement!
Familiarize yourself with this uneven braking
effect. Request the manufacturer’s operating
instructions and have them explained to you.
The brake levers should be set up
so that your hands can safely and
comfortably apply them as a straight
extension of your arms.
Check the position of the brake le-
vers before your rst ride.
In hub gear systems, the right
brake lever on the handlebars is generally the
front brake. However, in chain gear systems,
this brake lever is located on the left side of
the handlebars.
If you would like to swap the position of the
brake levers on the handlebars, please con-
tact a specialist retailer to do the work.
90˚
90˚

16
Children
Children's bicycle / training wheels
As a parent or legal guardian, you have a major
responsibility when your child rides a bicycle and
therefore wants to ride on public roads!
• Take the time to accompany the child on its
rst ride in a safe and quiet place (car park,
eld).
• Explain to the child that it should only ride with
a helmet and easily visible, bright clothing.
• Set up the seat and handlebars so that the
child is able to put its feet on the ground in
unsafe situations – it is important to have a re-
laxed seating position if your child is to control
the bicycle properly.
• Explain and practice using the front and rear
brakes. It is especially important to practice
using the backpedal brake and learning how
to carefully apply the handbrakes connected
to the front wheel.
Mechanical brakes can
usually be readjusted
by turning the adjust-
ment screw located on
the handle. Loosen the
adjustment screw from
the handle until the braking function becomes
more secure. Secure the adjustment by tighten-
ing the locknut on the handle.
Adjusting
screw
Lock nut
In some models it is
possible to bring the
brake levers closer to
the handlebars, using
special devices.
Adjusting
screw
/
In order to allow people with smaller hands to
safely apply the brakes, the levers can be set up
to be closer to the handlebars using an adjusting
screw (located in the lever).
Set up the cable tension in such a way that the
brake levers do not touch the handlebar grip,
even when they are applied to their fullest extent!
The safest way to brake using back
pedal brakes is when the line of the
pedals is horizontal. If one pedal is at
the top and one at the bottom, the poor force
output produced is not conducive to effective
braking!
Back pedal brakes
If your bicycle is equipped with back pedal brakes,
you brake by pushing the pedals backwards in-
stead of forwards. This means that your bicycle
will not freewheel and you are unable to rotate the
pedals backwards freely as you otherwise can!
The effectiveness of back pedal
brakes can deteriorate substantially
on long inclines! This type of braking
system can become very hot from continuous
braking. You should also use the front brake
to slow down on long inclines. Try to give back
pedal brakes the chance to cool down and do
not touch them.
/