Page is loading ...

hwhw
USER GUIDE
MODEL: EBIKE1 V1.0 (2019)
WARNING: FOR YOUR OWN SAFETY AND THAT OF YOUR EQUIPMENT, MAKE SURE TO READ THIS
MANUAL AND TAKE THE PRECAUTIONS DETAILED. FAILURE TO FOLLOW WARNING NOTICES AND
INSTRUCTION MAY RESULT IN DAMAGE, INJURY OR DEATH.
WIDO V1 PRO
ELECTRIC FOLDING ALL TERRAIN BIKE

2

WIDO V1 PRO - USER GUIDE
3
CONTENTS
CONTENTS | 3
SAFETY INFORMATION | 4
GETTING TO KNOW THE BIKE | 6
ASSEMBLY / UNFOLDING YOUR BIKE | 8
FOLDING YOUR BIKE | 10
BIKE SPECIFICATION | 11
BATTERY & CHARGING | 11
BIKE DISPLAY PANEL | 14
ADJUSTING THE BIKE TO FIT | 14
RIDE CHECKLIST | 16
MAINTENANCE | 16
PRODUCT REPLACEMENT | 17
GENERAL TIPS | 18
TROUBLESHOOTING | 20
CONTACT | 21
DECLARATION OF CONFORMITY | 22

4
SAFETY INFORMATION
If unfamiliar with any aspect of this user guide we recommend that you take your bike
and & manual to a local bike shop for inspection, assembly and further instructions.
Alternatively, our customer services team are always happy to help.
• It is extremely important that you follow the safety guidelines contained in this
manual in order to ensure maximum safety for you as well as maximum durability of
your bike.
• Before you ride this bike for the first time, please be absolutely sure that it has
been correctly assembled. You will find step by step instructions in this manual. But
if for any reason you are not completely certain, please bring it to your nearest
bicycle shop.
• Key steps that must be checked or completed with absolute certainty (to include
secure fastening) are pedals, saddle height, handlebar (both rotation and height)
and wheels.
• Please ensure all safety latches, including quick releases and rings, are locked in
place and snug without any movement.
• Please ensure all bolts (including the front/rear wheels and saddle bolt) are properly
tightened.
• If you are unfamiliar with cycling, we suggest that you take a cycling course that
includes riding safely.
• Test your brakes prior to using the bike every time. In wet or icy conditions, use
extra caution.
• Frequently check your tire pressures. They should be approximately between 4 and
6.5 bar (58 and 94 psi).
Low tire pressures will result in damage to the tires and rims. It can shorten the
lifespan of your bike as well as cut your ride short if you suer from a flat tire.
• We recommend you to always wear a helmet when riding any bicycle.
• Please observe all trac regulations and bicycle laws, including any applicable
lighting laws.
• Don’t drink and ride. Even a small amount of alcohol can impair your judgement,
lowering your ability to remain safe on the bike.
• Weather and night time operation can be tricky. Please use extra caution in
inclimate, icy or snowy weather and at night.
• Don’t lend your bicycle to anyone who is unfamiliar with it. If you choose to loan
your Wido bike to anyone, make sure they have also read and fully understand this
owner’s manual.
• E-bikes are not toys. All riders must be at least 16 years old.
• This bike is meant to be ridden by a single person. Total max. recommended weight
of rider, including all items such as backpack, is 120 kg (18st 12lbs).
• This bicycle can be ridden on most terrain but it is intended for riding primarily on
the street & cycle paths. Be extra careful if you decide to use it on other surfaces.
• It is advisable to be extremely cautious when riding in trac. Cars are not used to
the speed at which an e-bike can travel, as compared to a regular bike.

WIDO V1 PRO - USER GUIDE
5
• Since it is impossible to anticipate every situation or condition which can occur
while on the bike, this manual makes no representation about the safe use of
the bicycle under all conditions. There are risks associated with the use of any
bicycle.
• When you need to replace the battery, please either dispose of it properly or send
it back to us or your local bike shop to ensure that it is properly recycled.
• Warning: Do NOT take apart OR repair parts by yourself. Please go to your local
bike shop that has experience with e-bikes. If In doubt, please contact the
Wido support team.
If you have any further questions about the operation of this Wido e-bike, please consult
your local e-bike dealer or contact the Wido support team who will be happy to help.

6
GETTING TO KNOW THE BIKE
1
2
10
11
12
15
15
17
18
13
14
21
24
25
26
22
23
19
20
3
4
5
6
8
9
7

WIDO V1 PRO - USER GUIDE
7
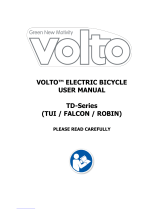
KEY COMPONENTS
1. Saddle
2. Seatpost
3. Seatpost quick release
4. Disc brake
5. Tire
6. Spoke
7. Motor
8. Cassette
9. Rear derailleur
10. Chain
11. Handlebar lock mechanism
12. Pedal
13. Crankset
14. Charging hole
15. Key for battery lock
16. Display/control panel
17. Handlebar
18. Brake lever
19. Handlebar stem
20. Disc brake caliper
21. Battery
(HIDDEN)
22. Gear shifters
23. Bell
24. Kickstand
25. Carry & folding handle
26. Bike folding/lock mechanism

8
If you have diculty assembling your bike, we recommend you take your bike and &
manual to a local bike shop for inspection, assembly and further instructions. Alternatively,
our customer services team are always happy to help.
If something appears to be wrongly assembled - even if you have followed these
instructions, please contact us or a trained/professional bike specialist before riding
your bike. We recommend taking your bike to your local bike shop to have it thoroughly
checked.
UNFOLDING THE HANDLEBAR
Straighten the handlebar stem (19) until it is perpendicular to the ground and lock the
handlebar locking mechanism (11) in place with a few twists. The Wido V1 Pro handlebar is a
fixed height handlebar.
IMPORTANT: Make sure the handlebar stem fits tightly into the handlebar locking
mechanism, and is securely fastened. Failure to do so could result in loss of control of
your bike and could cause serious injury.
ASSEMBLY/UNFOLDING YOUR BIKE
19
11

WIDO V1 PRO - USER GUIDE
9
UNFOLDING THE BIKE
If the bike is already folded, follow these steps to set it up for use.
Ensure that the battery pack is secure, locked and will not slide out of the battery
compartment (for more information see section ‘Battery & Charging’ within this user guide.
Holding the carry & folding handle (25) in one hand, fold the bike into a closed postion with
the other (or your knee if you find this easier!). Ensure that the bike folding/lock mechanism
(26) is open at this point. Once the bike has been unfolded and straightened out, push the
lock mechanism back in until it is closed tightly.
IMPORTANT: Ensure that the bike folding/lock mechanism is secure before using your
bike. Again, failure to do so could result in loss of control of your bike and could cause
serious injury.
25
25
26
26

10
A great feature of this product is that it can be conveniently folded for easy transportation,
fitting into cars and onto public transport for example. Folding your bike is relatively easy
but if in doubt, we recommend you take your bike and & manual to a local bike shop for
further instructions. Alternatively, our customer services team are always happy to help.
FOLDING THE HANDLEBAR
Unscrew the handlebar locking mechanism (11) until you feel the handlebar stem start to
drop. It should fold neatly over to the right side of the bike. Ensure that the cables do not
get caught and become ‘pinched’. This can cause damage which could lead to injury if the
bike malfunctions.
FOLDING THE BIKE
Ensure that the battery pack is secure, locked and will not slide out of the battery
compartment (for more information see section ‘Battery & Charging’ within this user guide.
Unlock the bike folding/lock mechanism (26) by lifting the top part of the lock and pulling
the lever away from the bike. Grab the carry & folding handle (25) in one hand, and push/
nudge with your knee the bike into a folded postion.
FOLDING YOUR BIKE
11
19
19

WIDO V1 PRO - USER GUIDE
11
Motor: Rear wheel 250W brushless motor
Battery: Samsung 36V 14Ah
Max speed: 15mph/24kmh
Battery range: Up to 60 miles
Bike weight with battery: 25kg
Bike dimensions: H107 x W62 x L161cm
Bike dimensions when folded: H70 x W45 x L90cm
Wheels: 20” x 4” 34 hole Kenda krusade all-terrain wheels
Gears: 6 speed Shimano SIS index
Max rider weight: 150kg
Rider size range: 142 – 195cm
BIKE SPECIFICATION
The battery (21) is your e-bike’s main energy source, so be sure to treat it with care at
all times. We recommend that you recharge it only with the charger which has been
provided with your battery.
Your bike will come with a set of keys which are used to lock your battery into position.
Your bike can/should not be used when the battery is unlocked. To secure your battery,
when the frame is open and the battery inserted, simply turn the key into a ‘locked’
postion.
BATTERY & CHARGING
21

12
INSERTING THE BATTERY
1. Open the frame (see ‘Unfolding the bike’).
2. Insert the battery with connections facing outwards (using the facing section as a
guide)
3. Lock the battery into place using the key for the battery lock (15).
4. Close the bike’s frame and secure.
REMOVING THE BATTERY
1. Open the frame.
2. Unlock the battery using the key.
3. Slide the battery out of the frame, using the small finger hook.
4. Close the bike frame again.
CHARGING THE BATTERY
IMPORTANT: Do not charge the battery with any chargers other than the one supplied
with your Wido bike. Failure to do so may result in battery damage. Follow all instructions
provided with the charger supplied with your bike. Failure to do so could result in
damage to your battery or could create a fire hazard that could cause you serious injury.
CHARGING DIRECTLY FROM THE BIKE:
1. Make sure that the battery is turned o when charging directly from the bike.
2. Plug the charger directly through the charging hole (14). Pull back the rubber cover
to expose the charging connection.
BATTERY & CHARGING CONT.
14

WIDO V1 PRO - USER GUIDE
13
REMOVING THE BATTERY FROM THE BIKE:
Simply remove the battery from the frame as explained earlier in this section and plug the
charger into the battery.
CHARGING TIMES:
With standard charger (2.0 A) : between 4 to 6 hours*
* Depends on current battery usage level, climate conditions, earlier charging cycles.
IMPORTANT: If your bike will be kept for a long period in extreme temperatures (below
0ºC/ 32ºF or above 35ºC / 95ºF), remove the battery and keep it in a place where the
temperature is between 4ºC / 40ºF and 32ºC / 90ºF.
Do not charge the battery when the air temperature is below 0ºC / 32ºF or above
40ºC / 104ºF. This is could result in serious damage to the battery.
BATTERY USAGE
Before assembling your bike, it is recommended that you should charge the battery. This
could take up to 6 hours.
To reach the furthest distance on one charge, it is recommended to pedal the bicycle as
often as possible, or use the lowest power assist setting - this will help save the battery.
When battery power is low while riding your e-bike, it is recommended to pedal as much
as possible to minimise battery usage so you can get home on the charge that is left on
the battery. Once home, charge it as soon as possible.
To further get the best distance out of your e-bike, refrain from unnecessary braking; coast
as much as possible. Turn o the power when parked up. If you decide to walk & push
your bike for any reason, keep the power turned o.
IMPORTANT: Type - Lithium battery. Voltage: 36V. Please check all notes/instructions
directly on the battery’s label.
WARNING: Do not take the battery apart. Do not burn, puncture, submerge in water
or damage the battery in any way. Do not use the battery if it appears to be damaged.
In case of any noise, irregular heat or leakage from the battery, stop use immediately.
Keep the battery stored in a ventilated place and out of direct sunlight. Keep the battery
stored above 0° C to avoid excess loss of battery power.

14
The bike display panel should appear as shown:
The power button is used to turn the motor on/o. To switch on, press once and to turn o,
hold down the power button.
MODE
Pressing ‘MODE’ will increase or reduce the motor power and how much your pedalling is
assisted. There are three settings ‘Low, Med, High’. Continue to press the ‘MODE’ button to
navigate through these options.
BATTERY
At the top of the control pad is the battery charge monitor. This indicates via an LED the
state of the current battery charge from Low - ‘L’, to High - ‘H’.
SADDLE HEIGHT
Loosen the seatpost quick release (3) and manually raise or lower the saddle to the
desired height before securing in place with the quick release.
IMPORTANT: Do not raise the seatpost above the minimum insert line which is printed
on the seatpost. Raising the seat above this line can cause this component to fair, loss of
control of the bike and serious injury/damage to you or your bike.
BIKE DISPLAY PANEL
ADJUSTING THE BIKE TO FIT

WIDO V1 PRO - USER GUIDE
15
SADDLE TILT POSITION
To tilt the saddle to the right position, move the saddle more forward/rearward or adjust
the nose of the saddle to point slightly upward/downward - loosen the nut/screw located
under the saddle, at the top of the seatpost (2). Once loose, move the saddle to your ideal
position. When the desired position is set, firmly tighten the nut again.
HANDLEBAR ROTATION
The handlebars can be rotated for comfort by loosening the in the centre of the underside
of the handlebars (17) using an allen key. Once loose, rotate the handlebar to desired
position, making especially certain that the brake levers (18) are a comfortable reach for
safe braking. Before retightening, double check that the handlebar is still centered. Then
securely tighten the bolt with the allen key.
IMPORTANT: Make sure the handlebar is securely in place and that the brake levers are
comfortably in reach. Failure to do so could result in loss of control of your bike and could
cause you serious injury.
BRAKES
As you ride, your brake pads will become thinner. When you notice that braking power
decreases, adjust the pads closer to the rotor. Always keep an eye on them so you can
replace them the moment they are worn out. If you are unsure of anything relating to your
brakes, please take your bike to your local dealer for their expert advice.
IMPORTANT: Note which brake lever controls which wheel; left brake lever controls front
wheel, right brake lever controls rear wheel. Be sure to avoid abrupt or strong braking as
it can cause you to fall o the bike. When braking, lean your body weight a bit rearward
to counter balance the braking inertia. Keep an eye on the brake pads for wear as they
wear out regularly. If they look as though they are worn out or close to it, please replace
them right away to maintain safe braking control. Before every ride, test the brakes to
be sure they are working well. Inspect and test the brakes before each ride. Worn, dirty,
damaged, or improperly-adjusted brakes can reduce your ability to control your bike and
could cause you serious injury.
GEARS
This bike comes equipped with 6 gears. To change gears, simply push the gear (+) button,
one click per gear change. To drop down gears, use the shifter. The higher the gear, the
higher the resistance. Change gears to match your pedaling comfort level. Be sure to
pedal when shifting gears to ensure a smooth gear change. This will also prolong the life
of your gear / drivetrain components.

16
Check that the seatpost is tightly fastened. Check that bolt of saddle is tight.
Check that the handlebar is tightly fastened.
Check that handlebar locking mechanism is tightly fastened.
Check that the bike folding/lock mechanism for the frame and its clips are tightly fastened.
Check that all other bolts and fasteners are tight, such as for kickstand and motor.
Check for proper functioning of brakes and gears. Check that battery is fully charged or
you know how much charge your battery holds.
Check that battery is correctly installed in bike and locked in place
Check that tire pressure is correct and check that tires are not damaged.
Make sure that reflectors are in place.
Some countries require bikes be equipped with a bell - if yours does, make sure it is
attached to your bike.
Like a car MOT & service, it is recommended to take your bicycle for a full tune-up and
maintenance check by a bicycle mechanic on a regular basis. Regular servicing can
prevent long term damage and expenses in the future.
Be sure to keep your chain and all moving parts lubricated so that they work eectively at
all times. Lubrication is necessary to use when the moving parts are dry. As for the chain,
lubricate the dried chain after every bike wash, as well as after every wet weather ride.
General maintenance includes but is not strictly limited to: Checking tyre inflation & profile,
checking brake wear, cleaning pedals, greasing and oiling the bike chain, attending to bike
wheel spoke damage.
You can clean your bicycle by removing dirt with a brush and then washing with hot water.
Regular cleaning of the bike improves its product lifespan. IMPORTANT: Do not use too
much water around the battery. Never use a high pressure washer to clean your bike. Dry
simply using a soft, clean cloth.
RIDE CHECKLIST
MAINTENANCE

WIDO V1 PRO - USER GUIDE
17
3 MONTH CHECKLIST:
Check the wheels and tyres, check that everything on the bike is tight and in good
condition. Check the wear on the brake pads, adjust the tension if necessary and check
the eectiveness of the brakes. Check the frame and fixings are in good condition.
Clean and lubricate the chain. Clean the pedals. Fully charge the battery.
REGULAR CHECKS:
Be sure to regularly check the following:
Is the battery charged?
Do the brakes work properly?
Are the cables damaged?
Are the braking surfaces clean and are the brake pads worn?
Is the bike adjusted to your fit correctly?
Are the wheels & tyres damaged, correctly inflated or worn? (pressure indicated on tyres)
Does the assisted pedalling work correctly?
It is always good to keep spare tires, inner tubes, lube, chain, brake pads on hand as these
items are worn out most quickly.
If a product or component of your bike is in need of replacement and you are not
completely certain how to do this, it is recommended to take it to your local bike dealer.
This includes cables/housing, bearing adjustments, brake adjustment and wheel
adjustments. Be sure to replace parts with original bike components to ensure optimal
level of performance.
Warning: As with all mechanical components, the bicycle is subjected to wear and high
stresses. Dierent materials and components may react to wear or stress fatigue in
dierent ways. If the design life of a component has been exceeded, it may suddenly fail
possibly causing injury to the rider. Any form of crack, scratches, or change of colouring
in highly stressed areas indicate that the life of the component has been reached and it
should be replaced.
Failure to repair or replace worn components could reduce your ability to control your
bike and could cause you serious injury.
PRODUCT REPLACEMENT

18
It is recommended to take your bicycle for a full tune-up and maintenance check by a
bicycle mechanic on a regular basis.
While your bike is rain and splash-proof, their electrical components should NEVER be
submerged in water.
To prevent corrosion, dry the bicycle and its components after every wet ride. Store the
bike and battery in a dry location.
IMPORTANT! NEVER attempt to open the casings of the battery, motor, or controller.
This will void any warranty & could damage the products, reducing your ability to control
your bike and potentially causing you serious injury. If you experience a problem with the
battery, motor, or controller, please contact our customer services team or your local bike
shop.
If the motor is used with frequent starts and stops, if ridden on rough terrain, or when
carrying a heavy weight, the indicator may show a low battery level. The indicator should
increase again after riding a certain distance under normal circumstances.
Turning on/o too frequently can damage the battery.
Park the electric bicycle by using the stand and lifting the rear wheel.
If there are problems with the brakes, DO NOT USE the bicycle. First adjust or repair the
brakes.
Read this instruction manual first before riding. If lending your bike to someone else then
ensure they are familiar with the product and they have read this user guide first.
Look after your brakes, in bad weather brake early and more regularly.
Ensure your bike has lights if ridden at night. Turn them on!
Control your speed over rough roads as vibration can damage the wheels/tyres.
Do not park the bike for extended periods of time in the sun. This will damage the battery
and electrical components.
To protect the bike paintwork, do not leave the bike in very damp or very hot places.
If you are commuting significant distances regularly, it is advisable to recharge the battery
before the return journey.
For occasional use, it is recommended to recharge the battery weekly, even if it is unused.
GENERAL TIPS

WIDO V1 PRO - USER GUIDE
19
Always charge the battery after any use.
Always charge the battery indoors.
Keep the battery away from water wherever possible.
Do not disassemble or modify the battery
Do not expose the battery to fire or extreme temperatures.
Do not short circuit the battery.
Do not allow the battery to be exposed to high impact, force or pressure.
As an additional safety feature, we recommend that users purachase front/rear lights that
are not powered by the bike battery.
Do not over inflate the tyres.
Change through the gears in an orderly manner (1 at a time) and only when the bike is
being pedalled. To mainatin gear performance, ensure these are lightly oiled at all times.
We recommend that you cycle with a helmet at all times for your own safety and to avoid
injury or even death. Ensure that it will eectively protect your head in any collision/fall.
BATTERY DISPOSAL
To protect the environment, do not dispose of electric equipment in together with
household waste material. In observance of European Directive 2012/19/EU on waste
electric and electronic equipment and its implementation in accordance with national law,
electric equipment that has reached the end of its life must be collected seperately and
returned to an environmentally friendly compatible recycling facility.

20
A. Top speed too slow:
1. Fully recharge battery
2. Check weight doesn’t exceed limit stated
3. Check terrain - is it too bumpy?
B. Power on but motor not working:
1. Reinstall battery & check it is inserted correctly.
2. Replace fuse
3. Please contact customer services
C. Riding shorter distance per recharge:
1. Check tire pressures
2. Recharge completely or have charger re-inspected
3. Replace battery
4. Please contact customer services
D. Power and indicator lights are all on, with throttle or pedal assist, but e-bike doesn’t
work:
1. Controller needs to be replaced, or
2. Motor needs to be replaced
3. Please contact customer services.
E. You connect the power to the charger, but indicator light does not come on:
1. Check whether there is electricity to the charger
2. If you have a voltage meter, you can check to see if the charger produces the
correct current.
F. You plug in the charger to both bike and outlet, and the green light comes on instead
of the red light - which means it isn’t charging:
1. Check to see if the batteries aren’t already fully charged
2. Check whether the charger is plugged in properly to both battery and outlet
3. Check the voltage of the charger and battery
4. If “zero” voltage on the charger, then it needs to be replaced
5. If “zero” voltage from the battery, then check the fuse.
G. Brakes not working eectively:
1. Check the distance between brake pads and the wheel rim
2. Check for wear on the brake pads.
3. Check the brake pads are parallel with the wheel rim.
4. Fine tune the brakes
5. Consult a bike mechanic for more in depth repairs.
TROUBLESHOOTING
/